還記得我們先前在 Day 10 - 專案建置與 docker-compose 的時候使用 Docker Compose 來建置 Database 嗎?
我們把這個 docker 先跑起來,再來在 .\src 確定上述的 docker-compose.yml 存在後執行
docker compose up -d
可以在 Docker Desktop 看到我們的 Account Database

然後我們用 Database Client 連線到 1433 port 的 SQL Server,執行下面的 Script:
-- 創建 db_account 資料庫
CREATE DATABASE db_account;

-- 切換到 db_account 資料庫
USE db_account;

-- 創建 tb_user 資料表
CREATE TABLE [dbo].[tb_user] (
    [id] UNIQUEIDENTIFIER NOT NULL PRIMARY KEY,
    [first_name] NVARCHAR(100) NOT NULL,
    [last_name] NVARCHAR(100) NOT NULL,
    [email] NVARCHAR(255) NOT NULL UNIQUE,
    [password_hash] NVARCHAR(255) NOT NULL,
    [created_date_time] DATETIME2 NOT NULL,
    [updated_date_time] DATETIME2 NOT NULL,
    CONSTRAINT UQ_User_Email UNIQUE (email)
);
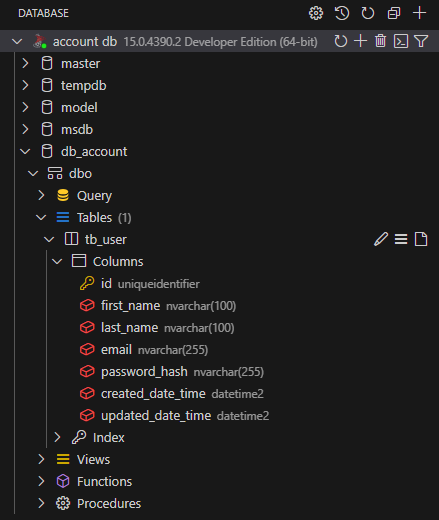
重新整理一下,就可以看到我們的資料表了。
對截圖工具有興趣,可以到 Day 09 - 開發工具 找我在這裡用的所有 Extensions。
有了資料庫,我們要來選擇 ORM(Object-Relational Mapping),為了控制篇幅,我們這邊選擇 Entity Framework。
首先在 Infrastructure Layer 安裝 Microsoft.EntityFrameworkCore 和 Microsoft.EntityFrameworkCore.SqlServer。
DbContext 是 EF Core 用來管理應用程式與資料庫之間資料存取的類別,負責查詢、儲存和管理資料的變更追蹤。
using Account.Domain.Aggregates;
using Microsoft.EntityFrameworkCore;

namespace Account.Infrastructure;

public class AccountContext : DbContext
{
    public DbSet<User> Users { get; set; }

    public AccountContext(DbContextOptions<AccountContext> options) : base(options)
    {
    }

    protected override void OnModelCreating(ModelBuilder modelBuilder)
    {
        base.OnModelCreating(modelBuilder);

        modelBuilder.ApplyConfiguration(new AccountConfiguration());
    }
}
有了 DbContext,接著就要來對應用程式與資料庫之間資料的差異進行一些詳細的配置。
using Account.Domain.Aggregates;
using Account.Domain.ValueObjects;
using Microsoft.EntityFrameworkCore;
using Microsoft.EntityFrameworkCore.Metadata.Builders;

namespace Account.Infrastructure;

public class AccountConfiguration : IEntityTypeConfiguration<User>
{
    public void Configure(EntityTypeBuilder<User> builder)
    {
        // 設定資料表名稱
        builder.ToTable("tb_user");

        // 設定主鍵
        builder.HasKey(u => u.Id);

        // 設定 Property Mapping
        // 轉換 UserId -> Guid
        // 需要建立新的 Overloading Method: UserId.Create(Value)
        builder.Property(u => u.Id)
               .HasColumnName("id")
               .ValueGeneratedNever()
               .HasConversion(
                   id => id.Value,
                   value => UserId.Create(value))
               .IsRequired();

        // 設定 Property Mapping
        builder.Property(u => u.FirstName)
               .HasColumnName("first_name")
               .HasMaxLength(100)
               .IsRequired();

        // 設定 Property Mapping
        builder.Property(u => u.LastName)
               .HasColumnName("last_name")
               .HasMaxLength(100)
               .IsRequired();

        // 設定 Property Mapping
        builder.Property(u => u.Email)
               .HasColumnName("email")
               .HasMaxLength(255)
               .IsRequired();
        // Email 有 UNIQUE CONSTRAINT
        builder.HasIndex(u => u.Email)
               .IsUnique();

        // 設定 Property Mapping
        // 這邊需要實作將 Password 加密成 PasswordHash
        builder.Property(u => u.PasswordHash)
               .HasColumnName("password_hash")
               .HasMaxLength(255)
               .IsRequired();

        // 設定 Property Mapping
        builder.Property(u => u.CreatedDateTime)
               .HasColumnName("created_date_time")
               .IsRequired();

        // 設定 Property Mapping
        builder.Property(u => u.UpdatedDateTime)
               .HasColumnName("updated_date_time")
               .IsRequired();
    }
}
我們為了要讓 EF 可以在從資料庫取回 ID 值時 Create 一個 UserId,我們得在 Account.Domain 內的 UserId.cs 加入這個 Overloading Method
    public static UserId Create(Guid value)
    {
        return new(value);
    }
我們要把 Password 在整個專案跟 Database 內都變成加密的 PasswordHash
修改一下在 Account.Domain 內的 User.cs,新增一個加密的方法 HashPassword,然後把 Password 改成 PasswordHash,整體如下:
using System.Security.Cryptography;
using System.Text;
using Account.Domain.ValueObjects;
using Common.Library.Seedwork;

namespace Account.Domain.Aggregates;

public class User : Entity<UserId>, IAggregateRoot
{
    public string FirstName { get; private set; }
    public string LastName { get; private set; }
    public string Email { get; private set; }
    public string PasswordHash { get; private set; }

    private User() { }

    public User(UserId id, string firstName, string lastName, string email, string password)
    {
        Id = id;
        FirstName = firstName;
        LastName = lastName;
        Email = email;
        PasswordHash = HashPassword(password); // Hash
        CreatedDateTime = DateTime.UtcNow;
        UpdatedDateTime = DateTime.UtcNow;
    }

    public static User Create(
        string firstName,
        string lastName,
        string email,
        string password)
        => new()
        {
            Id = UserId.Create(),
            FirstName = firstName,
            LastName = lastName,
            Email = email,
            PasswordHash = HashPassword(password), // Hash
            CreatedDateTime = DateTime.UtcNow,
            UpdatedDateTime = DateTime.UtcNow
        };

    public bool VerifyPassword(string password) => PasswordHash == HashPassword(password); // Hash

    private static string HashPassword(string password)
    {
        var hashedBytes = SHA256.HashData(Encoding.UTF8.GetBytes(password));
        return Convert.ToHexString(hashedBytes);
    }
}
接著來處理連線字串的配置問題,回顧一下 Day 10 的連線字串,並把 Database 從 master 改成剛剛創建的 db_account,記得 SSL 的認證也要關掉。
Server=localhost,1433;Database=db_account;User Id=sa;Password=Passw0rd!TrustServerCertificate=True;
在 AccountContext.cs override OnConfiguring 並 DI IConfiguration
using Account.Domain.Aggregates;
using Microsoft.EntityFrameworkCore;
using Microsoft.Extensions.Configuration;

namespace Account.Infrastructure;

public class AccountContext : DbContext
{
    private const string DEFAULT_CONNECTION_SECTION = "DefaultConnection";
    private readonly IConfiguration _configuration;

    public DbSet<User> Users { get; set; }

    public AccountContext(DbContextOptions<AccountContext> options, IConfiguration configuration) : base(options)
    {
        _configuration = configuration;
    }

    protected override void OnConfiguring(DbContextOptionsBuilder optionsBuilder)
    {
        if (!optionsBuilder.IsConfigured)
        {
            optionsBuilder.UseSqlServer(_configuration.GetConnectionString(DEFAULT_CONNECTION_SECTION));
        }
    }

    protected override void OnModelCreating(ModelBuilder modelBuilder)
    {
        base.OnModelCreating(modelBuilder);

        modelBuilder.ApplyConfiguration(new AccountConfiguration());
    }
}
最後我們將連線字串放進我們的 appsettings 裡面
{
  "Logging": {
    "LogLevel": {
      "Default": "Information",
      "Microsoft.AspNetCore": "Warning"
    }
  },
  "AllowedHosts": "*",
  "Kestrel": {
    "EndpointDefaults": {
      "Protocols": "Http2"
    }
  },
  "JwtSettings": {
    "Secret": "my-secret",
    "ExpiryInMinutes": 5,
    "Issuer": "todo-issuer",
    "Audience": "todo-audience"
  },
  "ConnectionStrings": {
    "DefaultConnection": "Server=localhost,1433;Database=db_account;User Id=sa;Password=Passw0rd!;TrustServerCertificate=True"
  }
}
我們修改一下 AccountInfrastructureRegister.cs
using Account.Application;
using Microsoft.EntityFrameworkCore;
using Microsoft.Extensions.DependencyInjection;

namespace Account.Infrastructure;

public static class AccountInfrastructureRegister
{
    public static IServiceCollection AddAccountInfrastructure(this IServiceCollection services)
    {
        services.AddScoped<IUserRepository, UserRepository>();
        services.AddSingleton<ITokenProvider, JwtProvider>();
        services.AddDbContext<AccountContext>();

        return services;
    }
}
上面把跟 SQL Server 的連線配置都做好了,現在要來修改 UserRepository 讓原本存在記憶體的 _users 改成存在 Database。
但在這之前,我們 Repository 因為 Aggregate Root 全成功與全失敗的特性,我們有讓它具備 IUnitOfWork 的屬性,而在 EF Core 的 DbContext 本身就是一個完整的管理功能,可以當成我們的 UnitOfWork 實體,故讓它繼承 IUnitOfWork,修改如下:
using Account.Domain.Aggregates;
using Common.Library.Seedwork;
using Microsoft.EntityFrameworkCore;
using Microsoft.Extensions.Configuration;

namespace Account.Infrastructure;

public class AccountContext : DbContext, IUnitOfWork
{
    private const string DEFAULT_CONNECTION_SECTION = "DefaultConnection";
    private readonly IConfiguration _configuration;

    public DbSet<User> Users { get; set; }

    public AccountContext(DbContextOptions<AccountContext> options, IConfiguration configuration) : base(options)
    {
        _configuration = configuration;
    }

    protected override void OnConfiguring(DbContextOptionsBuilder optionsBuilder)
    {
        if (!optionsBuilder.IsConfigured)
        {
            optionsBuilder.UseSqlServer(_configuration.GetConnectionString(DEFAULT_CONNECTION_SECTION));
        }
    }

    protected override void OnModelCreating(ModelBuilder modelBuilder)
    {
        base.OnModelCreating(modelBuilder);

        modelBuilder.ApplyConfiguration(new AccountConfiguration());
    }

    public async Task<bool> SaveEntitiesAsync(CancellationToken cancellationToken = default)
    {
        try
        {
            await base.SaveChangesAsync(cancellationToken);
            return true;
        }
        catch (Exception)
        {
            return false;
        }
    }
}
接著修改 UserRepository,並讓 AccountContext 當作 UnitOfWork 實體來使用。
using Account.Application;
using Common.Library.Seedwork;

namespace Account.Infrastructure;

public class UserRepository : IUserRepository
{
    private readonly AccountContext _accountContext;

    public UserRepository(AccountContext accountContext)
    {
        this._accountContext = accountContext ?? throw new ArgumentNullException(nameof(accountContext));
    }

    public IUnitOfWork UnitOfWork => _accountContext;

    public Domain.Aggregates.User? GetUserByEmail(string email)
    {
        return _accountContext.Users.SingleOrDefault(u => u.Email == email);
    }

    public void Add(Domain.Aggregates.User user)
    {
        _accountContext.Users.Add(user);
    }
}
最後在每個 reference 用 IUnitOfWork 確認 Transaction。在這裡就是 AccountService 的 Register
    public AuthenticationResult Register(string firstName, string lastName, string email, string password)
    {
        if (_userRepository.GetUserByEmail(email) is not null)
            throw new ArgumentException("Email address already exists");

        var user = User.Create(firstName, lastName, email, password);

        _userRepository.Add(user);

        _userRepository.UnitOfWork.SaveEntitiesAsync().Wait();

        return new AuthenticationResult(
            user.Id.Value,
            user.FirstName,
            user.LastName,
            user.Email,
            _tokenProvider.GenerateToken(user.Id.Value, user.FirstName, user.LastName)
        );
    }
最後來測試一下,記得先把 gRPC Clicker 的 Timeout 拉長
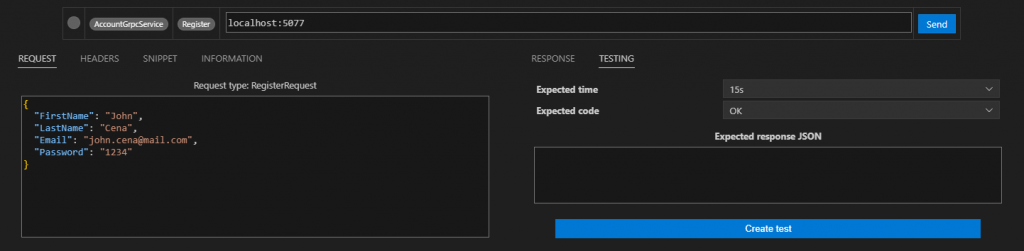
註冊帳號,並檢查 Database,這裡可以注意一下 Hash Password 有沒有成功

登入看看
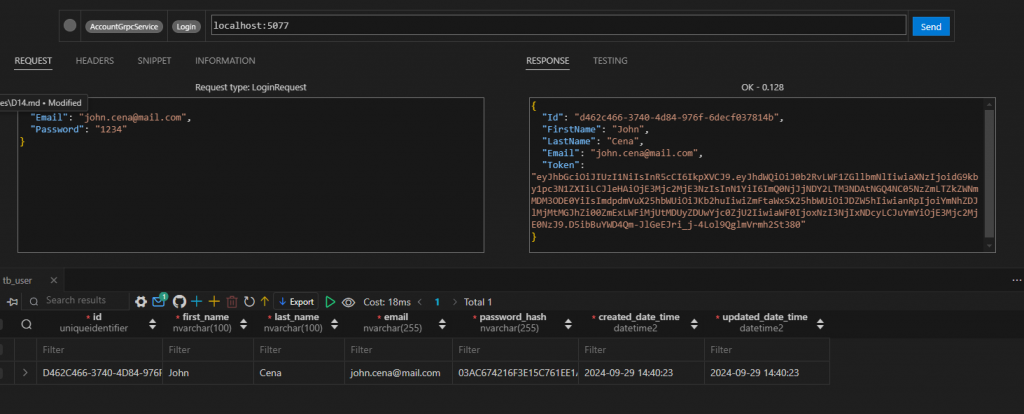
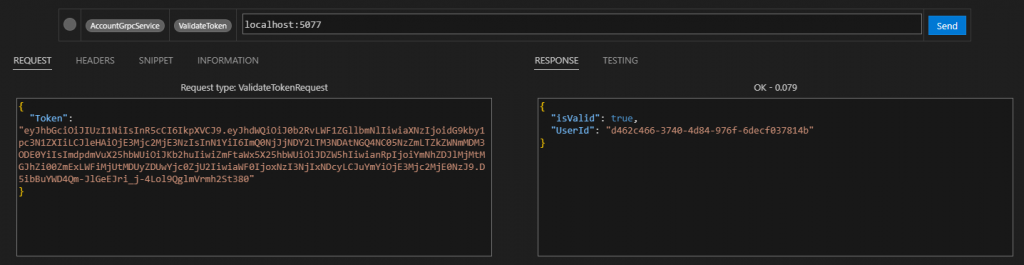
驗證看看 Token 是否正確
到目前為止,我們完成了大部份的 Account Service 的功能,接著先去實作完 Todo Service,再來完成 Event 的功能。
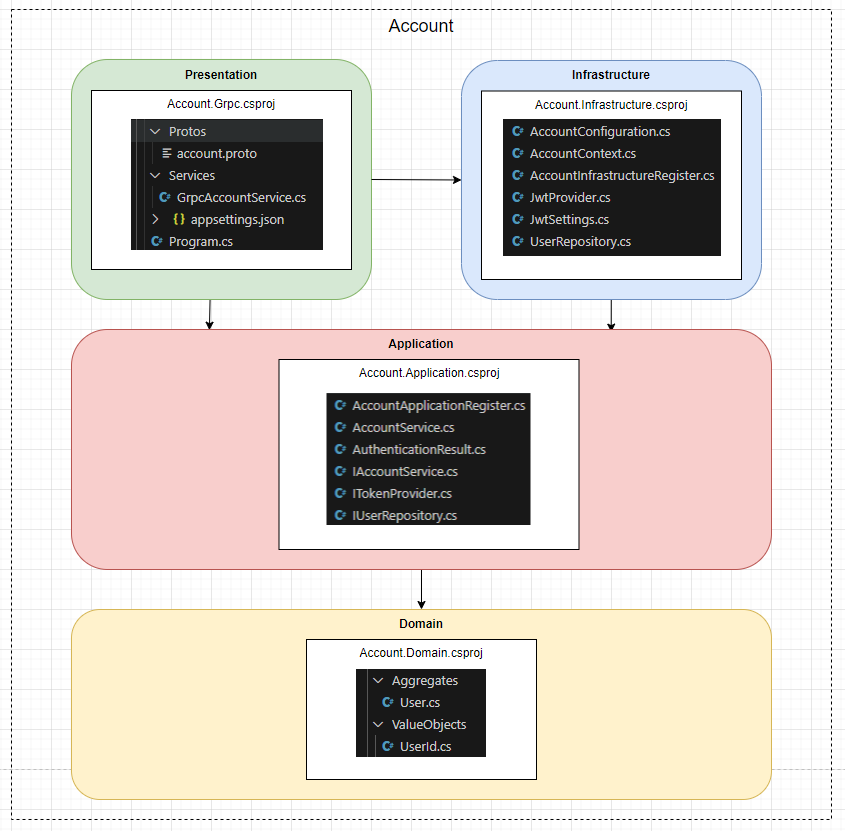
最後補上架構圖