
我們已經了解到Django REST framework(DRF)中權限的設計,但是在確認用戶是否有對應的權限之前,對於用戶的認證(Authentication)是我們今天要探討的重點,今天主要會探討幾種DRF在認證上的方式與應用,以及應該在哪些場景下做使用
程式碼:https://github.com/class83108/drf_demo/tree/drf_auth_base
今日重點:
DRF提供許多內建的認證類別,滿足不同的應用場景
HTTP Basic Auth進行認證request.user (代表Django User模型實例)與request.auth (為None,不會提供額外的認證訊息)至於HTTP Basic Auth的流程是什麼?
我們可以來看DRF中BaseAuthentication的原始碼
class BasicAuthentication(BaseAuthentication):
    """
    HTTP Basic authentication against username/password.
    """
    www_authenticate_realm = 'api'

    def authenticate(self, request):
        """
        Returns a `User` if a correct username and password have been supplied
        using HTTP Basic authentication.  Otherwise returns `None`.
        """
        auth = get_authorization_header(request).split()

        if not auth or auth[0].lower() != b'basic':
            return None

        if len(auth) == 1:
            msg = _('Invalid basic header. No credentials provided.')
            raise exceptions.AuthenticationFailed(msg)
        elif len(auth) > 2:
            msg = _('Invalid basic header. Credentials string should not contain spaces.')
            raise exceptions.AuthenticationFailed(msg)

        try:
            try:
                auth_decoded = base64.b64decode(auth[1]).decode('utf-8')
            except UnicodeDecodeError:
                auth_decoded = base64.b64decode(auth[1]).decode('latin-1')

            userid, password = auth_decoded.split(':', 1)
        except (TypeError, ValueError, UnicodeDecodeError, binascii.Error):
            msg = _('Invalid basic header. Credentials not correctly base64 encoded.')
            raise exceptions.AuthenticationFailed(msg)

        return self.authenticate_credentials(userid, password, request)

    def authenticate_credentials(self, userid, password, request=None):
        """
        Authenticate the userid and password against username and password
        with optional request for context.
        """
        credentials = {
            get_user_model().USERNAME_FIELD: userid,
            'password': password
        }
        user = authenticate(request=request, **credentials)

        if user is None:
            raise exceptions.AuthenticationFailed(_('Invalid username/password.'))

        if not user.is_active:
            raise exceptions.AuthenticationFailed(_('User inactive or deleted.'))

        return (user, None)

    def authenticate_header(self, request):
        return 'Basic realm="%s"' % self.www_authenticate_realm
get_authorization_header方法,去取得請求頭中HTTP_AUTHORIZATION的值HTTP_AUTHORIZATION會包含Basic關鍵字,以及後面的關鍵訊息:用戶名與密碼經過base64編碼後的字符串
authenticate_credentials方法,確認該用戶是否存在,最後返回**(user, None)**,也就是前面提到的user實例以及沒有其他額外的認證資訊authenticate_header方法為認證失敗時生成對應的響應頭sessionid來判斷是否有該用戶,同時enforce_csrf方法強制檢查請求中有無CCSRF token(一些不安全的HTTP方法:POST, PUT, PATCH與DELETE)REMOTE_USER變數可以選擇在settings.py中設置
# settings.py

REST_FRAMEWORK = {
    'DEFAULT_AUTHENTICATION_CLASSES': [
        'rest_framework.authentication.BasicAuthentication',
        'rest_framework.authentication.TokenAuthentication',
        'rest_framework.authentication.SessionAuthentication',
    ]
}
或是直接在視圖中調用
from rest_framework.authentication import BaseAuthentication

class WorkspaceViewSet(viewsets.ModelViewSet):
    authentication_classes = [BaseAuthentication]
    queryset = Workspace.objects.all()
    serializer_class = WorkspaceSerializer
    permission_classes = [permissions.IsAuthenticated]
這邊我就不會完整示範整個流程,主要是說明自定義的原理
我們在探討BasicAuthentication時可以了解到大致的流程如下
authenticate 方法
authenticate_credentials方法(可選)
exceptions.AuthenticationFailed
authenticate_header方法,改寫響應頭from rest_framework import authentication
from rest_framework import exceptions
class CustomAuthentication(authentication.BaseAuthentication):
def authenticate(self, request):
username = request.META.get('X_USERNAME')
if not username:
return None
try:
user = User.objects.get(username=username)
except User.DoesNotExist:
raise exceptions.AuthenticationFailed('No such user')
return (user, None)
接著我們來談也是DRF內建之一的認證方式:TokenAuthentication
相比於BasicAuthentication,SessionAuthentication更加的安全,因為不會每次請求都附帶用戶ID與密碼,但是如果是在前後端分離的開發情形,還有跨域等相關問題,使用SessionAuthentication會有較大的限制。因此在這樣的架構下,使用無狀態(服務端不需要儲存會話訊息)的Token認證會是更適合的選擇
Token認證適用場景如下:
我們等等會回來再重新複習整個流程,這邊先對大綱有基本的認知
# settings.py
INSTALLED_APPS = [
    ...
    'rest_framework.authtoken',
]

REST_FRAMEWORK = {
    'DEFAULT_AUTHENTICATION_CLASSES': [
        'rest_framework.authentication.TokenAuthentication',
    ],
}
前面有提到,每一個用戶都會有自己唯一的一組Token,因此生成Token可能有以下幾種情境:
前者的話,可以搭配Django的signals去實現,底下為官方文檔資訊:
接收用戶建立時的User's post_save signal來進行處理,但因為之前沒有特別提及有關Django signals的部分,這邊就不展開說明
from django.conf import settings
from django.db.models.signals import post_save
from django.dispatch import receiver
from rest_framework.authtoken.models import Token

@receiver(post_save, sender=settings.AUTH_USER_MODEL)
def create_auth_token(sender, instance=None, created=False, **kwargs):
    if created:
        Token.objects.create(user=instance)
而如果是已建立的用戶生成Token,則有幾種不同的方式:
./manage.py drf_create_token <username>
from rest_framework.authtoken import views

urlpatterns = [
    ...
    path("api-token-auth/", views.obtain_auth_token),
    ...
]
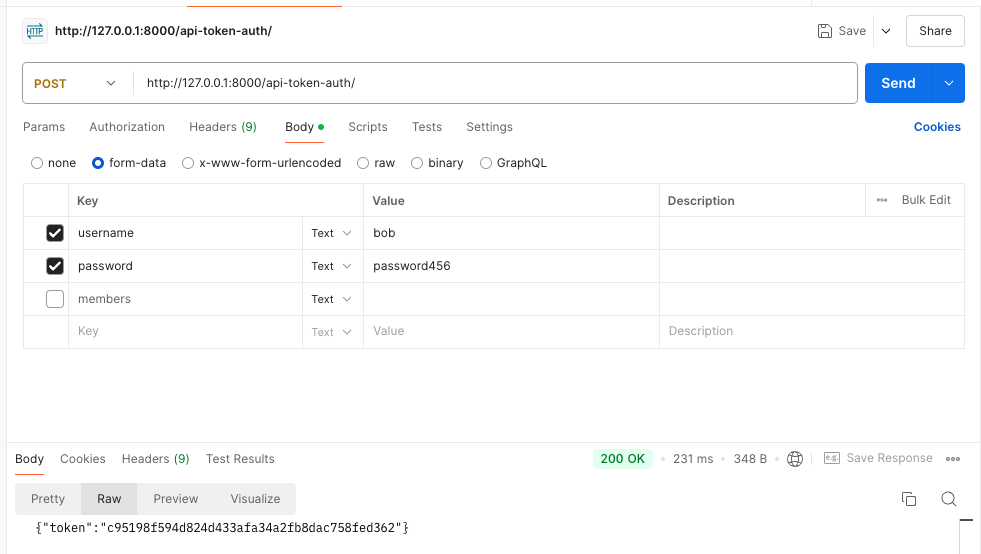
可以看到Token被儲存到剛剛遷移到DB的authtoken_token表中,也因此重複調用API,Token一旦建立除非經過刪除不然不會改變
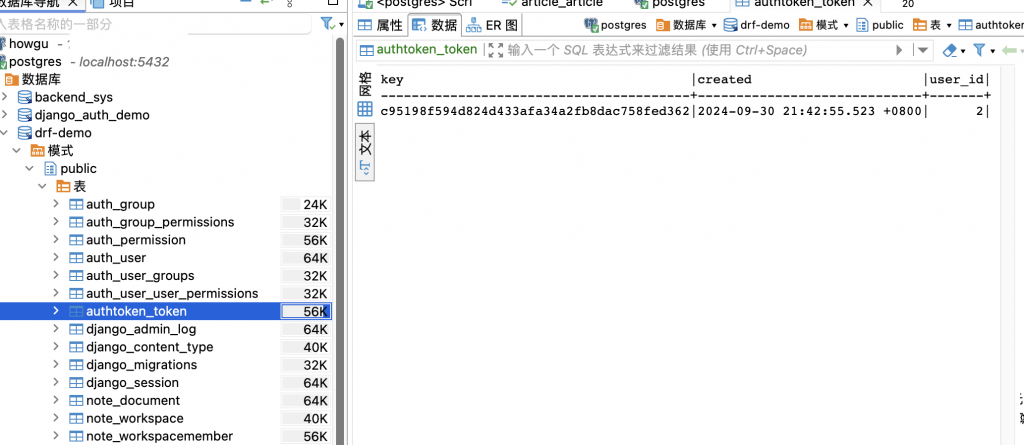
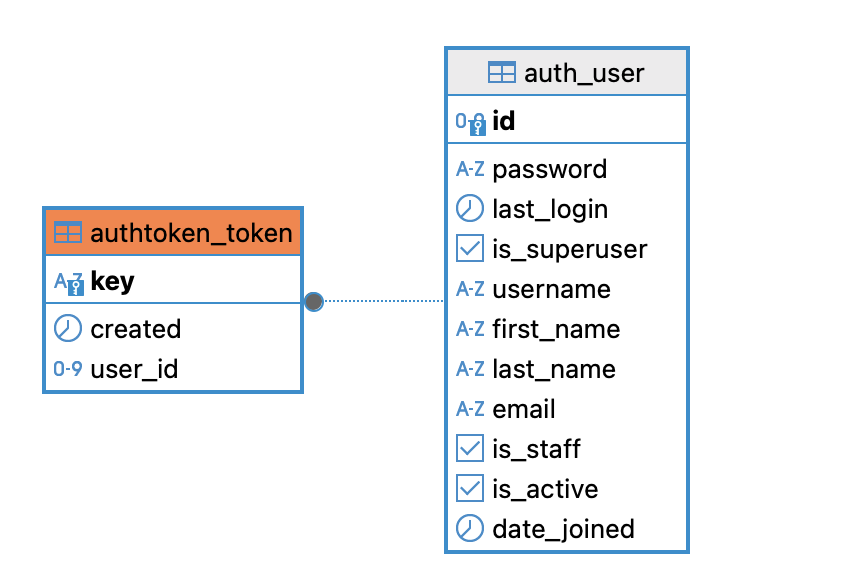
也能看到Token與User進行了綁定
那這個Token是怎麼生成的呢?路由導到obtain_auth_token視圖中,就是ObtainAuthToken視圖類別,相信經過前面的介紹,現在對視圖類別也很熟悉了
class ObtainAuthToken(APIView):
    ...

    def post(self, request, *args, **kwargs):
        serializer = self.get_serializer(data=request.data)
        serializer.is_valid(raise_exception=True)
        user = serializer.validated_data['user']
        token, created = Token.objects.get_or_create(user=user)
        return Response({'token': token.key})

obtain_auth_token = ObtainAuthToken.as_view()
看到在post方法中,找到序列化器AuthTokenSerializer 後,用輸入用戶名與密碼先確認用戶使否合法,最後再查找屬於該用戶的Token或是重新建立並且返回
因此如果想要自定義建立Token的流程,就是繼承ObtainAuthToken然後改寫post方法
from rest_framework.authtoken.views import ObtainAuthToken
from rest_framework.authtoken.models import Token
from rest_framework.response import Response

class CustomAuthToken(ObtainAuthToken):

    def post(self, request, *args, **kwargs):
        serializer = self.serializer_class(data=request.data,
                                           context={'request': request})
        serializer.is_valid(raise_exception=True)
        user = serializer.validated_data['user']
        token, created = Token.objects.get_or_create(user=user)
        return Response({
            'token': token.key,
            'user_id': user.pk,
            'email': user.email
        })
那我們現在已經拿到Token了,怎麼驗證的話前面BaseAuthentication 有看過類似的例子
再來看TokenAuthentication 架構也不會差太多,畢竟都是繼承BaseAuthentication然後改寫方法
authenticate 方法def authenticate(self, request):
auth = get_authorization_header(request).split()
if not auth or auth[0].lower() != self.keyword.lower().encode():
return None
if len(auth) == 1:
msg = _('Invalid token header. No credentials provided.')
raise exceptions.AuthenticationFailed(msg)
elif len(auth) > 2:
msg = _('Invalid token header. Token string should not contain spaces.')
raise exceptions.AuthenticationFailed(msg)
try:
token = auth[1].decode()
except UnicodeError:
msg = _('Invalid token header. Token string should not contain invalid characters.')
raise exceptions.AuthenticationFailed(msg)
return self.authenticate_credentials(token)
這邊的auth,也就是我們要在發送請求之前,需要在header附上的Token
curl的話會是如下:
curl -X GET http://127.0.0.1:8000/api/example/ -H 'Authorization: Token 9944b09199c62bcf9418ad846dd0e4bbdfc6ee4b'
而使用postman則會如圖所示,製作出對應的請求頭

authenticate_credentials
def authenticate_credentials(self, key):
        model = self.get_model()
        try:
            token = model.objects.select_related('user').get(key=key)
        except model.DoesNotExist:
            raise exceptions.AuthenticationFailed(_('Invalid token.'))

        if not token.user.is_active:
            raise exceptions.AuthenticationFailed(_('User inactive or deleted.'))

        return (token.user, token)
在model的部分如果沒有特別設定就會是rest_framework.authtoken.models import Token
此時要注意,請求中只有包含Token資料,並且仰賴這個Token去返回對應的User實例
視圖類別:
from rest_framework.authentication import TokenAuthentication

class WorkspaceViewSet(viewsets.ModelViewSet):
    authentication_classes = [TokenAuthentication]
視圖函式則是使用裝飾器調用:
from rest_framework.decorators import api_view, authentication_classes
from rest_framework.authentication import TokenAuthentication
from rest_framework.response import Response

@api_view(['GET'])
@authentication_classes([TokenAuthentication])
def my_view(request):
    # 視圖邏輯
    return Response({"message": "Hello, authenticated user!"})
我們再來回顧整個流程:
ObtainAuthToken拿到Token,ObtainAuthToken會驗證用戶名與密碼是否合法TokenAuthentication 從請求中找到用戶資料與Token,拿到Token表中比對AuthenticationFailed
從剛剛的過程中我們可以了解到只用DRF內建的Token認證可能有以下問題
authenticate_credentials 方法中可以發現,認證是只認Token,因此如果Token被盜用是無法辨別身份的因此要解決的話,就必須自定義Token模型,或是添加其他欄位來進行改進
但是沒辦法解決的是伺服器端一定得保留Token的相關資料,增加額外的壓力
我們今天了解了DRF中最基本的幾種認證身份的方式
BaseAuthentication 透過請求中的用戶名與密碼來進行驗證TokenAuthentication 則是改進密碼被攔截的風險,事先建立Token,並且依照Token來進行身份驗證,如果想要增進安全的話,則需要定期刷新或是額外自訂一些訊息進入Token中。但是還是有需要額外儲存Token的痛點而明天要介紹的**JWT(JSON Web Token)**認證,就是在此Token認證的基礎經過改量的一種認證方式,不用在服務端儲存資料,並且也內建過期時間等額外訊息來補全普通DRF Token認證的缺失,是一種在生產環境下更合適的認證方式
