
在之前我們已經把核心的功能補齊了,但是為了專案的完整度以及提升使用者體驗
我們會利用非同步的方式來進一步提升專案的完整性
以下是專案的系列文章,推薦第一次閱讀這個系列的讀者可以先看前面的文章了解整個專案架構
Django Channels、Async 和 Celery 的協同之舞: DocuMind專案介紹
Django Channels、Async 和 Celery 的協同之舞: 認識向量資料與Celery
Django Channels、Async 和 Celery 的協同之舞: 打造智能文檔問答系統
Django Channels、Async 和 Celery 的協同之舞: 透過channels建立AI聊天室
今日重點如下:
Django自從3.x版後就開始提升非同步的支持,並且是透過python的asgiref套件來實現
隨著版本更新,Django也在持續提升對於非同步的支持,例如5.0版後許多裝飾器也支援非同步
如果是在視圖中想使用非同步方法
以我們consumer中的connect方法為例:
async def connect(self):
    self.room_name = self.scope["url_route"]["kwargs"]["room_name"]
    self.room_group_name = f"chat_{self.room_name}"

    # 加入room group
    await self.channel_layer.group_add(self.room_group_name, self.channel_name)
可以看到寫的方法跟在JavaScript中的寫法不會有太大的區別,就是在函式名稱前面加上async,而內部的非同步方法則加上await。有設置await就一定要在函式加上async
但是在Django中有許多核心功能是有Async unsafe的情形,因為有全局狀態因此不支援協程
因此在Django特別要注意所處的方法中是非同步還是支援同步
from asgiref.sync import sync_to_async, async_to_sync

def connect(self):
    async_to_sync(self.channel_layer.group_add)(
            self.room_group_name,
            self.channel_name
    )
async def async_view(request):
    # 將同步函數轉換為異步
    sync_function_async = sync_to_async(sync_function)
    result = await sync_function_async()
    # 處理 result
database_sync_to_async裝飾器from asgiref.sync import database_sync_to_async
async def connect(self):
# 建立或獲取聊天室
self.chat = await self.get_or_create_chat(self.scope["user"])
@database_sync_to_async
def get_or_create_chat(self, user):
chat, _ = Chat.objects.get_or_create(room_name=self.room_name, owner=user)
return chat
Django也開始提升了ORM的非同步操作,不過因為我沒有實際操作過,如果有興趣的可以看官方文檔的補充
https://docs.djangoproject.com/en/4.2/topics/async/#queries-the-orm
介紹完在Django中怎麼使用非同步進行開發,那接著就來將我們的專案納入Async function
程式碼:https://github.com/class83108/DocuMind/tree/async_chat
將consumer轉換成非同步形式
from asgiref.sync import sync_to_async
from channels.generic.websocket import AsyncWebsocketConsumer

class ChatConsumer(AsyncWebsocketConsumer):
    async def connect(self):
        self.room_name = self.scope["url_route"]["kwargs"]["room_name"]
        self.room_group_name = f"chat_{self.room_name}"

        # 加入room group
        await self.channel_layer.group_add(self.room_group_name, self.channel_name)

        await self.accept()

    async def disconnect(self, close_code):
        # 離開room group
        await self.channel_layer.group_discard(self.room_group_name, self.channel_name)

    # Receive message from WebSocket
    async def receive(self, text_data):
        text_data_json = json.loads(text_data)
        message = text_data_json["message"]
        print(f"Received message: {message}", f"{time.time()}")

        # 發送加載中消息到room group
        await self.channel_layer.group_send(
            self.room_group_name,
            {"type": "chat.loading", "message": "正在處理您的請求..."},
        )
        print(f"Sent loading message: {message}", f"{time.time()}")

        # Start async task
        task = await sync_to_async(search_documents_and_answer.delay)(message)

        # Start checking task result
        await self.check_task_result(task.id)

    # Check task result
    async def check_task_result(self, task_id):
        max_attempts = 60  # 最多等待60秒
        attempts = 0
        while attempts < max_attempts:
            task = AsyncResult(task_id)
            if await sync_to_async(task.ready)():
                result = await sync_to_async(lambda: task.result)()
                # 發送消息到room group
                await self.channel_layer.group_send(
                    self.room_group_name,
                    {
                        "type": "chat.message",
                        "message": result["answer"],
                        "query": result["query"],
                        "results": result["results"],
                    },
                )
                break
            else:
                # Task not ready, wait for 1 second before checking again
                await asyncio.sleep(1)
                attempts += 1

        if attempts >= max_attempts:
            # 如果超過最大嘗試次數,則發送錯誤消息到room group
            await self.channel_layer.group_send(
                self.room_group_name,
                {
                    "type": "chat.message",
                    "message": "抱歉,我們無法處理您的請求",
                    "query": "",
                    "results": [],
                },
            )

    # Receive loading message from room group
    async def chat_loading(self, event):
        message = event["message"]
        # Send loading message to WebSocket
        await self.send(text_data=json.dumps({"type": "loading", "message": message}))

    # Receive message from room group
    async def chat_message(self, event):
        message = event["message"]
        query = event.get("query", "")
        results = event.get("results", [])

        # Send message to WebSocket
        await self.send(
            text_data=json.dumps(
                {
                    "type": "message",
                    "message": message,
                    "query": query,
                    "results": results,
                }
            )
        )
AsyncWebsocketConsumer類別,以支援非同步寫法sync_to_async
現在雖然我們的聊天室本身不需要非同步也能順利運作,但是為了應付之後更複雜的需求
轉換成非同步方法還是能夠更好的提升效能
我們嘗試在剛建立webSocket時,就使用非同步的方式建立Chat
在consumer內建立方法,並且使用@database_sync_to_async裝飾器
在Django實現非同步依賴asgiref套件,而在channels的database_sync_to_async與asgiref.sync.sync_to_async相當,均為讓同步的ORM能在非同步函式中使用
from channels.db import database_sync_to_async

@database_sync_to_async
    def get_or_create_chat(self, user):
        chat, _ = Chat.objects.get_or_create(room_name=self.room_name, owner=user)
        return chat
並且在connect方法中套用
async def connect(self):
        self.room_name = self.scope["url_route"]["kwargs"]["room_name"]
        self.room_group_name = f"chat_{self.room_name}"

        # 加入room group
        await self.channel_layer.group_add(self.room_group_name, self.channel_name)

        await self.accept()

        # 建立或獲取聊天室
        self.chat = await self.get_or_create_chat(self.scope["user"])
此時我們要來儲存聊天記錄,我們在每一次在群組內接收訊息與傳遞消息,但是如果每一次都要調用資料庫儲存會造成較大的壓力。我們可以在每次接收訊息時與傳遞訊息時,將訊息透過Redis儲存,而在斷連聊天室時再一次性將所有聊天記錄存到資料庫中,當然聰明的你也想到這會需要建立一個額外的任務交給Celery處理
@database_sync_to_async
def add_to_chat_history(self, sender, message):
    history_key = f"chat_history_{self.room_name}"
    history = cache.get(history_key) or []
    history.append({"sender": sender, "message": message})
    cache.set(history_key, history, timeout=None)
# Receive message from WebSocket
async def receive(self, text_data):
    text_data_json = json.loads(text_data)
    message = text_data_json["message"]

    # 將消息添加到聊天歷史記錄
    await self.add_to_chat_history(
        sender=self.scope["user"].username, message=message
    )
# Receive message from room group
async def chat_message(self, event):
    message = event["message"]
    query = event.get("query", "")
    results = event.get("results", [])

    # Send message to WebSocket
    await self.send(
            text_data=json.dumps(
                {
                    "type": "message",
                    "message": message,
                    "query": query,
                    "results": results,
                }
            )
    )

    # 將消息添加到聊天歷史記錄
    await self.add_to_chat_history(sender="DocuMind", message=message)
async def disconnect(self, close_code):
    await self.channel_layer.group_discard(self.room_group_name, self.channel_name)

    # 觸發異步保存任務
    await self.save_chat_history_async()

async def save_chat_history_async(self):
    save_chat_history.delay(self.chat.id, self.room_name)
@shared_task
def save_chat_history(chat_id, room_name):
    channel_layer = get_channel_layer()
    history_key = f"chat_history_{room_name}"

    # 從 channel_layer 獲取聊天記錄
    chat_history = async_to_sync(channel_layer.get)(history_key) or []

    try:
        chat = Chat.objects.get(id=chat_id)

        if chat_history:
            # 更新數據庫中的聊天記錄
            chat.history.extend(chat_history)
            chat.save()

            # 清除 channel_layer 中的臨時記錄
            async_to_sync(channel_layer.delete)(history_key)

        return f"Chat history saved for room {room_name}"
    except Chat.DoesNotExist:
        return f"Chat with id {chat_id} does not exist"
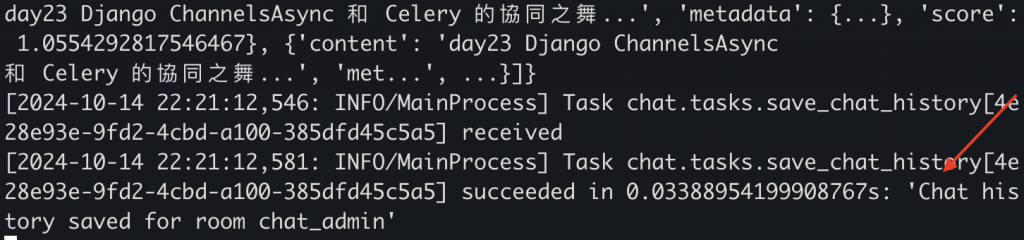
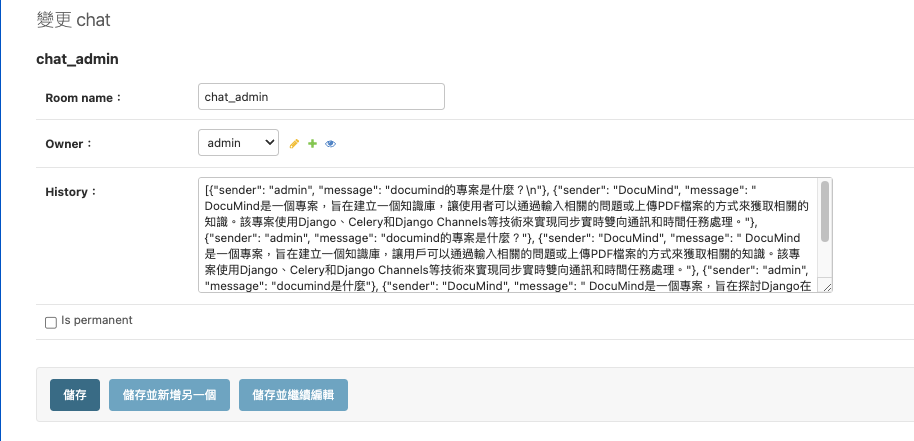
我們來看成果
可以看確實聊天記錄都被保存下來了
我們讓聊天室開啟時載入之前的聊天內容
class ChatConsumer(AsyncWebsocketConsumer):
    async def connect(self):
        ...

        # 加載聊天歷史記錄
        await self.load_chat_history()


    @database_sync_to_async
    def get_chat_history(self):
        return list(self.chat.history)

    async def load_chat_history(self):
        history = await self.get_chat_history()
        # 將整個歷史記錄作為一個批次發送
        await self.send(text_data=json.dumps({"type": "history", "messages": history}))
在前端的部分去做區分
this.socket.onmessage = (event) => {
                        const data = JSON.parse(event.data);
                        if (data.type === 'loading') {
                            console.log("Received loading message");
                            this.addMessage(data.message, 'system');
                        } else if (data.type === 'message') {
                            console.log("Received message");
                            this.handleIncomingMessage(data);
                        } else if (data.type === 'history') {
                            this.handleHistoryMessages(data.messages);
                        }
                    };

 handleHistoryMessages(messages) {
                    console.log("Received history messages");
                    console.log(messages);
                    this.messages = messages.map(msg => ({
                        id: Date.now(),
                        text: msg.message,
                        type: msg.sender === 'DocuMind' ? 'bot' : 'user'
                    }));

                },
但是我這邊有遇到bug,雖然我有添加id在陣列中但是還是無解
去掉後是不影響運作因此我也先進行了刪除,之後有時間再進行優化
Alpine Warning: x-for ":key" is undefined or invalid
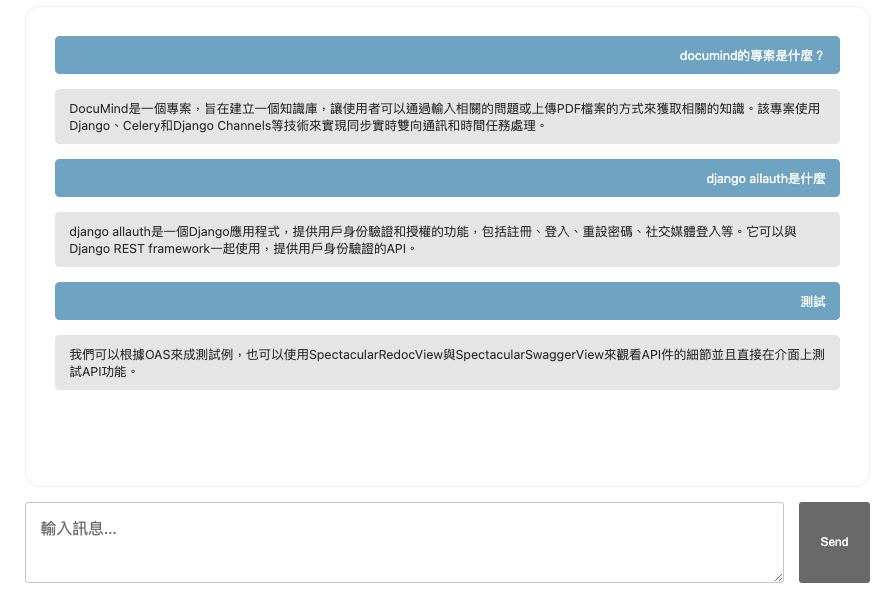
現在我們打開聊天室時,就可以看到先前的對話內容了
我們現在所有向量資料是全局使用,但是我們可能會想要在一次問答當中只挑選部分的資料當作參考資料,我們需要完成以下步驟:
首先建立PDF模型並且遷移到資料庫
# chat.models.py

class PDFDocument(models.Model):
    chatroom = models.ForeignKey(
        Chat, on_delete=models.CASCADE, related_name="pdf_documents"
    )
    uploaded_at = models.DateTimeField(auto_now_add=True)
    processed = models.BooleanField(default=False)
    text = models.TextField(default="")

    def __str__(self):
        return f"PDF for {self.chatroom.name}"
建立PDF上傳的API,其中store_pdf_vector之後再補上
# api.views.py

class PDFUploadAndSave(views.APIView):
    def post(self, request):

        pdf_file = request.data.get("pdf_file")

        chat_room_name = request.data.get("chat_room_name")

        if not pdf_file:
            return response.Response(
                {"error": "No PDF file provided"}, status=status.HTTP_400_BAD_REQUEST
            )

        try:
            pdf_content = pdf_file.read()
            text = extract_text(io.BytesIO(pdf_content))
            # 清理文本
            text = clean_text(text)

            # 保存PDF文檔
            chat_room = Chat.objects.get(room_name=chat_room_name)
            pdf_document = PDFDocument(chatroom=chat_room, text=text)
            pdf_document.save()

            # 開始處理PDF文檔
            store_pdf_vector.apply_async((chat_room.id, pdf_document.id))

            return response.Response(
                {
                    "success": "file saved successfully",
                    "file_name": f"{pdf_file.name}",
                },
                status=status.HTTP_201_CREATED,
            )

        except Exception as e:
            print(e)
            return response.Response(
                {"error": "Error processing PDF file"},
                status=status.HTTP_400_BAD_REQUEST,
            )

 # api.urls.py

 urlpatterns = [
    ...
    path(
        "upload-pdf-and-save/", PDFUploadAndSave.as_view(), name="upload-pdf-and-save"
    ),
]
修改前端頁面,使得聊天室能夠上傳PDF,並且渲染出已經上傳的PDF檔案
<div class="file-group">
            <form id="upload-form">
                {% csrf_token %}
                <div class="input-container">
                    <input type="file" id="pdf_file" name="pdf_file" accept="application/pdf"
                        hx-post="{% url 'api:upload-pdf-and-save' %}"
                        hx-trigger="change"
                        hx-swap="beforeend"
                        hx-encoding="multipart/form-data"
                        hx-vals='{"chat_room_name": "{{ room_name }}"}'
                        >

                </div>
            </form>
            <div id="file-container">
                <ul id="file-list" class="file-list"></ul>
            </div>
        </div>

 <script>
        document.body.addEventListener('htmx:afterRequest', function(event) {
            if (event.detail.successful) {
                var response = JSON.parse(event.detail.xhr.responseText);
                if (response.success) {
                    var fileItem = document.createElement('li');
                    fileItem.className = 'pdf-file-item';
                    fileItem.innerHTML = `
                        <span class="pdf-icon"><i class="fa-solid fa-file-pdf"></i></span>
                        <span class="file-name">${response.file_name}</span>
                    `;
                    document.getElementById('file-list').appendChild(fileItem);

                    // 清除文件輸入
                    document.getElementById('pdf_file').value = '';
                }
            }
        });
        </script>
我們在chat.tasks.py中建立對應的方法:
store_pdf_vector方法:其實跟之前在儲存文章時差不多,主要是元數據的不同@shared_task
def store_pdf_vector(chat_id: int, pdf_id: int) -> None:
try:
pdf_document = PDFDocument.objects.get(id=pdf_id)
# 獲取全局 Chroma 客戶端
vectorstore = get_vectorstore()
# 文本準備
text = pdf_document.text
# 文本分割
text_splitter = RecursiveCharacterTextSplitter(
chunk_size=500,
chunk_overlap=100,
length_function=len,
)
chunks = text_splitter.split_text(text)
# 創建 Document 對象列表
documents = [
Document(
page_content=chunk,
metadata={
"chat_id": chat_id,
"chunk_index": i,
},
)
for i, chunk in enumerate(chunks)
]
# 生成唯一 ID
uuids = [str(uuid.uuid4()) for _ in range(len(documents))]
# 將文章添加到現有的向量存儲中
vectorstore.add_documents(documents=documents, ids=uuids)
except Exception as e:
print(f"Error processing article: {str(e)}")
raise e
search_documents_and_answer方法:跟之前的方法幾乎沒有差別,唯一不同的是在搜尋範圍中加入聊天室的篩選@shared_task
def search_documents_and_answer(query: str, chat_id: int, num_results: int = 5) -> dict:
vectorstore = get_vectorstore()
# 執行相似性搜索,只搜索特定 chat_id 的文檔
results = vectorstore.similarity_search_with_score(
query,
k=num_results,
filter={"chat_id": chat_id}, # 添加 filter 參數來限制搜索範圍
)
print(f"Found {len(results)} results for chat_id: {chat_id}")
if len(results) == 0:
return {"query": query, "answer": "No results found", "results": []}
# 格式化結果
formatted_results = []
context = ""
for doc, score in results:
formatted_results.append(
{"content": doc.page_content, "metadata": doc.metadata, "score": score}
)
context += doc.page_content + "\n\n"
# 初始化語言模型
llm = OpenAI(temperature=0, openai_api_key=settings.OPENAI_API_KEY)
# 創建提示模板
prompt = PromptTemplate(
input_variables=["context", "query"],
template="根據以下信息回答問題:\n\n{context}\n\n問題: {query}\n\n答案:",
)
# 建立鏈 - 輸入提示,語言模型,輸出解析器
chain = prompt | llm | StrOutputParser()
# 調用鏈 - 將上下文和查詢作為輸入取代得答案
answer = chain.invoke({"context": context, "query": query})
return {
"query": query,
"answer": answer,
"results": formatted_results,
}
最後修改consumer中調用的方法,讓我們現在已聊天室為單位進行向量資料的篩選
# from articles.tasks import search_documents_and_answer
from chat.tasks import search_documents_and_answer
既然都完成了功能,就來看最後的結果如何~
在還沒有任何檔案上傳前,因為沒有儲存到向量資料庫,所以不會返回結果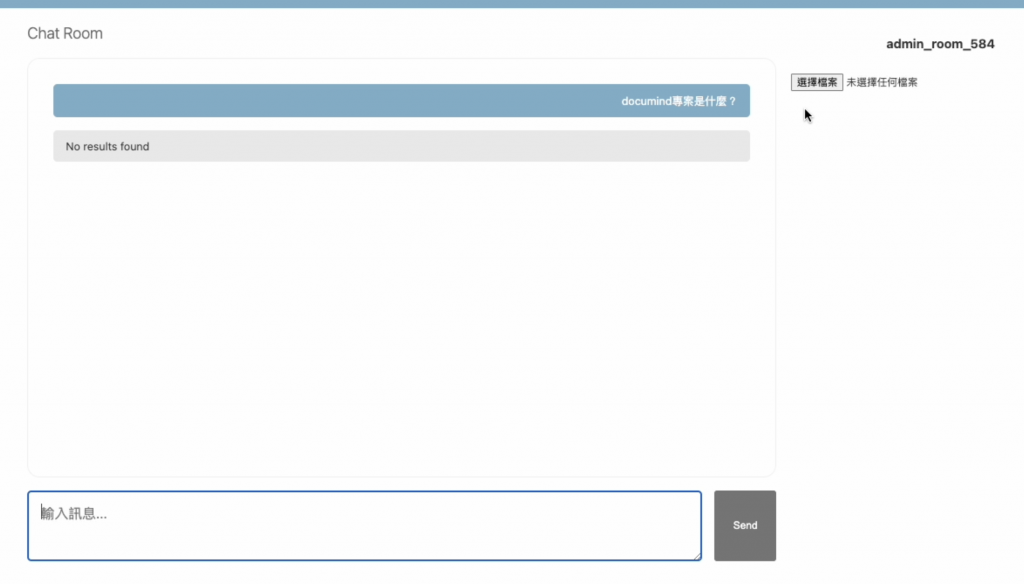
但是當我們上傳資料後,將資料存入向量資料庫後,就能成功搜尋到相關資料了

恭喜!透過完成最後的功能,來讓我們的專案更符合現實的應用
首先介紹Django在進行非同步的開發中,需要注意的事項與常見使用方式
最後我們透過將Async function納入專案之中,不但提升了使用體驗,也提高了專案的上限
雖然以一個專案來說,還有太多需要補齊的地方了
但是以一個介紹channels、Celery與Async function的小專案來說,我們已經把大部分需要知道的技術點完成,並且做了很好的結合~
至此這個專案告一段落,感謝所有看到這裡的讀者
