
在上一篇中,我們完成了專案的核心部分:建立個人智慧文庫
而今天則是要來優化使用者體驗,也就是透過channels來讓整個核心功能更像我們一般常見的Claude或是ChatGPT,具備聊天的功能
以下為整個專案的系列文章,如果是初次進入文章的朋友,可以去前面的文章來了解整個專案的架構:
Django Channels、Async 和 Celery 的協同之舞: DocuMind專案介紹
Django Channels、Async 和 Celery 的協同之舞: 認識向量資料與Celery
Django Channels、Async 和 Celery 的協同之舞: 打造智能文檔問答系統
今日重點:
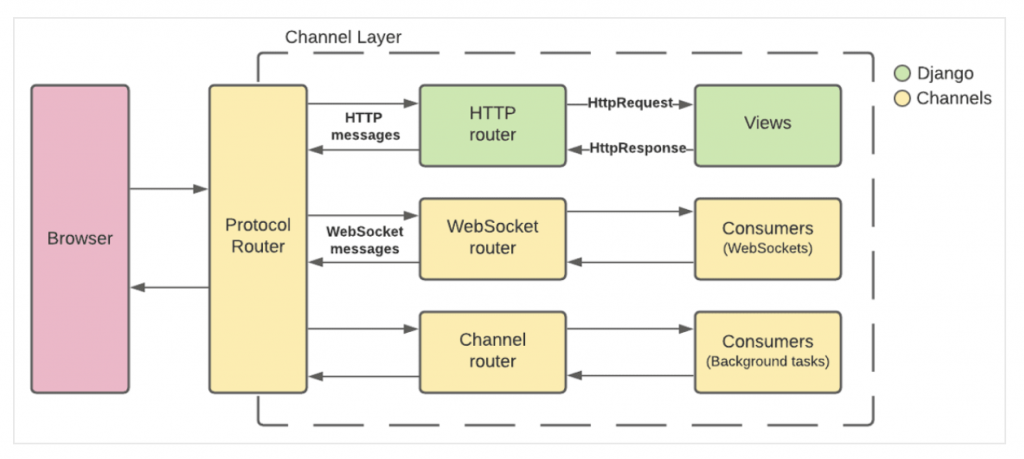
圖源:https://testdriven.io/blog/django-channels/
從上方的結構圖可以看到在Django中使用Channels能夠使用幾種路由協定來建立網頁應用
這也是我們前面最常使用的路由協定。當請求發送至路由時,會等待Django視圖處理請求並且返回HttpResponse,整體的流程是單向且同步的
在Django中這樣的模式實現方式:請求發送至url,而url對應的view來處理請求的業務邏輯,最後返回response
我們可以從兩個面向來區分HTTP與Websocket:scope(作用域)和 events(事件)
在Django中,通常是使用routing與consumers來取代一般HTTP視圖中的urls與views
# routing

websocket_urlpatterns = [
    re_path(r"ws/chat/(?P<room_name>\w+)/$", consumers.ChatConsumer.as_asgi()),
]
# consumers

from channels.generic.websocket import WebsocketConsumer
import json

class ChatConsumer(WebsocketConsumer):
    def connect(self):
        await self.accept()

    def disconnect(self, close_code):
        pass

    def receive(self, text_data):
        text_data_json = json.loads(text_data)
        message = text_data_json['message']

        await self.send(text_data=json.dumps({
            'message': f"You said: {message}"
        }))
在consumer中,定義了連接WebSocket、斷連WebSocket與接收到訊息時的不同邏輯
但是在網路應用下很難只需要單純的WebSocket應用,可能還會遇到以下場景:
因此Channel透過提供Channel layer,來滿足更複雜的應用場景
class ChatConsumer(WebsocketConsumer):
    def connect(self):
        self.room_name = "chat_room"
        self.room_group_name = f"chat_{self.room_name}"

        # Join room group
        async_to_sync(self.channel_layer.group_add)(
            self.room_group_name,
            self.channel_name
        )

        self.accept()

    def disconnect(self, close_code):
        # Leave room group
        async_to_sync(self.channel_layer.group_discard)(
            self.room_group_name,
            self.channel_name
        )

    def receive(self, text_data):
        text_data_json = json.loads(text_data)
        message = text_data_json['message']

        # Send message to room group
        async_to_sync(self.channel_layer.group_send)(
            self.room_group_name,
            {
                'type': 'chat_message',
                'message': message
            }
        )

    def chat_message(self, event):
        message = event['message']

        # Send message to WebSocket
        self.send(text_data=json.dumps({
            'message': message
        }))
recevie方法中,透過'type': 'chat_message' 來調用chat_message方法因為在專案中有使用不同的網路協定,所以需要在asgi.py中配置面對不同協定時要分配到哪一個路由
application = ProtocolTypeRouter(
    {
        "http": django_asgi_app,
        "websocket": AllowedHostsOriginValidator(
            AuthMiddlewareStack(URLRouter(websocket_urlpatterns))
        ),
    }
)
理論的部分到一個段落,我們接續把程式碼的部分補上
今日的程式碼:https://github.com/class83108/DocuMind/tree/channels
Daphne可以幫助啟動ASGI服務,透過在settings.py中設定後依然可以使用runserver指令啟動ASGI服務
poetry add 'channels[daphne]'
poetry add channels_redis
# settings.py
INSTALLED_APPS = [
	"daphne",
	...
]

# 配置ASGI應用
ASGI_APPLICATION = "documind.asgi.application"
# WSGI_APPLICATION = "documind.wsgi.application"

# asgi.py
import os

from channels.routing import ProtocolTypeRouter
from django.core.asgi import get_asgi_application

os.environ.setdefault("DJANGO_SETTINGS_MODULE", "documind.settings")
# Initialize Django ASGI application early to ensure the AppRegistry
# is populated before importing code that may import ORM models.
django_asgi_app = get_asgi_application()

application = ProtocolTypeRouter(
    {
        "http": django_asgi_app,
        # 之後會在這裡添加其他網路協定
    }
)
確認是ASGI/Daphne的development server來啟動專案,代表我們能夠使用WebSocket等功能
System check identified no issues (0 silenced).
October 12, 2024 - 00:17:20
Django version 4.2, using settings 'documind.settings'
Starting ASGI/Daphne version 4.1.2 development server at http://127.0.0.1:8000/
Quit the server with CONTROL-C.
python3 manage.py startapp chat

# settings.py
INSTALLED_APPS = [
    ...
    "chat",
]
在今天這篇文章中,我們還不會實際使用到這個模型。先進行架設是讓我們在後台有錨點可以操作,不用全部都自定義頁面
from django.db import models

class Chat(models.Model):
    room_name = models.CharField(max_length=255)
    owner = models.ForeignKey(
        "auth.User", on_delete=models.CASCADE, related_name="owned_chats"
    )
    history = models.JSONField(default=list)
    created_at = models.DateTimeField(auto_now_add=True)
    updated_at = models.DateTimeField(auto_now=True)

    def __str__(self):
        return self.room_name
在我們進入配置consumer跟routing之前,先來配置前端的部分
這邊的操作方式跟Django in 2024: Django Admin二次開發,打造屬於你的後台使用類似的方法,這邊就不再贅述
# chat.admin.py

@admin.register(Chat)
class ChatAdmin(admin.ModelAdmin):
    list_display = ("room_name", "owner", "created_at", "updated_at")
    search_fields = ("room_name", "history")

    def get_urls(self):
        urls = super().get_urls()
        custom_urls = [
            path(
                "create-room/",
                self.admin_site.admin_view(self.create_room_view),
                name="create_chat_room",
            ),
        ]
        return custom_urls + urls

    def create_room_view(self, request):
        context = dict(
            self.admin_site.each_context(request),
            room_name=request.user.username,
            title="New Chat Room",
        )
        if request.method == "GET":
            return render(request, "admin/chat_room.html", context)

    def changelist_view(self, request, extra_context=None):
        extra_context = extra_context or {}
        extra_context["show_create_chat_room"] = True
        return super().changelist_view(request, extra_context=extra_context)
建立templates/admin/chat_room.html,這邊有使用alpine.js來減少對DOM元素的相關操作
{% extends "admin/base_site.html" %}
{% load static %}
{% block extrahead %}
    <link rel="stylesheet" href="/static/css/chat.css">
    <script src="https://unpkg.com/alpinejs@3.13.5/dist/cdn.min.js" defer></script>
    {% endblock %}

    {% block content %}
    <div id="chat-container" x-data="chatApp()" class="chat-container">
        <div class="chat-group">
            <div id="chat-messages" class="chat-messages">
                <template x-for="message in messages" :key="message.id">
                    <div :class="['message', message.type + '-message']">
                        <span x-text="message.text"></span>
                    </div>
                </template>
            </div>
            <div id="chat-input" class="chat-input">
                <textarea
                x-model="newMessage"
                @compositionstart="isComposing = true"
                @compositionend="isComposing = false"
                @keydown="handleKeydown"
                @input="adjustTextareaHeight"
                placeholder="輸入訊息..."
                class="query-input"
                rows="1"
                x-ref="messageInput"></textarea>
                <button  class="send-btn" @click="sendMessage">Send</button>
            </div>
        </div>
    </div>
    <script>
        function chatApp() {
            return {
                messages: [],
                newMessage: '',
                socket: null,
                isComposing: false,
                init() {
                    this.connectWebSocket();
                    console.log("Chat app initialized");
                    this.$nextTick(() => {
                        this.adjustTextareaHeight();
                    });
                },
                connectWebSocket() {
                    const roomName = '{{ room_name }}_chat';
                    this.socket = new WebSocket(
                        'ws://' + window.location.host + '/ws/chat/' + roomName + '/'
                    );

                    this.socket.onmessage = (event) => {
                        const data = JSON.parse(event.data);
                        console.log("Received data:", data);
                        if (data.type === 'loading') {
                            this.addMessage(data.message, 'system');
                        } else if (data.type === 'message') {
                            setTimeout(() => {
                                if (this.messages.length > 0 && this.messages[this.messages.length - 1].type === 'system') {
                                    this.messages.pop();
                                }
                                this.addMessage(data.message, 'bot');
                            }, 1000);
                        }
                    };

                    this.socket.onclose = (event) => {
                        console.error('Chat socket closed unexpectedly');
                    };
                },
                sendMessage() {
                    if (this.newMessage.trim() === '') return;
                    console.log("Sending message:", this.newMessage);
                    this.addMessage(this.newMessage, 'user');
                    this.socket.send(JSON.stringify({
                        'message': this.newMessage
                    }));
                    this.newMessage = '';
                    this.$nextTick(() => {
                        this.adjustTextareaHeight();
                    });
                },
                addMessage(text, type) {
                    console.log("Adding message:", text, type);
                    const message = {
                        id: Date.now(),
                        text: text,
                        type: type
                    };
                    this.messages.push(message);
                    console.log("Updated messages:", JSON.parse(JSON.stringify(this.messages)));
                    this.$nextTick(() => {
                        const chatMessages = document.getElementById('chat-messages');
                        chatMessages.scrollTop = chatMessages.scrollHeight;
                    });
                },
                handleKeydown(event) {
                    if (event.key === 'Enter') {
                        if (event.shiftKey) {
                            // Shift+Enter: add newline
                            return;
                        } else if (!this.isComposing) {
                            // Enter without shift and not composing: send message
                            event.preventDefault();
                            this.sendMessage();
                        }
                    }
                },
                adjustTextareaHeight() {
                    const textarea = this.$refs.messageInput;
                    textarea.style.height = 'auto';
                    textarea.style.height = textarea.scrollHeight + 'px';
                }
            }
        }
    </script>

    {% endblock %}
因為使用alpine.js來處理邏輯,因此可能沒有那麼好理解,因此會先把每個部分拆分拆來解釋,最後再根據alpine.js的邏輯再梳理整個流程
connectWebSocket() {
    const roomName = 'chat_{{ room_name }}';
    this.socket = new WebSocket(
        'ws://' + window.location.host + '/ws/chat/' + roomName + '/'
    );
    // ...
}
這個函式負責建立WebSocket連接,使用當前主機地址和一個特定的房間名稱來創建WebSocket URL。{{ room_name }} 根據admin的函式,我們是先定義一個由username來建立的房間名,不過這不是非常重要,只要是字符串即可
this.socket.onmessage = (event) => {
    const data = JSON.parse(event.data);
    console.log("Received data:", data);
    if (data.type === 'loading') {
        this.addMessage(data.message, 'system');
    } else if (data.type === 'message') {
        setTimeout(() => {
            if (this.messages.length > 0 && this.messages[this.messages.length - 1].type === 'system') {
                this.messages.pop();
            }
            this.addMessage(data.message, 'bot');
        }, 1000);
    }
};
當接收到WebSocket的消息時,會根據消息的類型(這部分會在consumer中實現)來決定要如何顯示,並且可以看到如果是接收到message類型的話,就把上一筆的loading類型從this.messages中移除
sendMessage() {
    if (this.newMessage.trim() === '') return;
    console.log("Sending message:", this.newMessage);
    this.addMessage(this.newMessage, 'user');
    this.socket.send(JSON.stringify({
        'message': this.newMessage
    }));
    // ...
}
這個函式負責發送消息,首先檢查消息是否為空,然後將消息添加到this.newMessage列表中,最後通過WebSocket發送JSON格式的消息到伺服器
那我們已經知道WebSocket的實現部分,現在我們回過頭來看alpine.js的實現部分
通常在x-data中,會設定對象的方式x-data="{ open: false }",然後透過調控這些值來讓畫面做出動態效果。但是因為我們需要實現WebSocket的相關處理,所以用chatApp這個更複雜的對象
<div id="chat-container" x-data="chatApp()" class="chat-container">
設置出之後要呈現訊息的容器
<template x-for="message in messages" :key="message.id">
    <div :class="['message', message.type + '-message']">
        <span x-text="message.text"></span>
    </div>
</template>
我們針對訊息輸入後的操作做說明
<textarea
    x-model="newMessage"
    @compositionstart="isComposing = true"
    @compositionend="isComposing = false"
    @keydown="handleKeydown"
    @input="adjustTextareaHeight"
    placeholder="輸入訊息..."
    class="query-input"
    rows="1"
    x-ref="messageInput">
</textarea>
<button  class="send-btn" @click="sendMessage">Send</button>
最直觀的部分就是handleKeydown也會觸發sendMessage方法,因此點擊send或是在輸入問題後按下enter,就會傳送訊息給WebSocket。
而composition event的部分,則是因為我們輸入中文時,會需要按兩次Enter才代表送出,第一次Enter只是確認字是修改正確的。如果很單純的監聽keydown,按第一次Enter就送出太影響使用體驗
這部分跟Django或是WebSocket沒有任何關係,不知道composition event可以看最下方的參考資料
我們回到後端這邊,開始配置我們第一個Consumer
在chat應用下建立consumers.py
from asgiref.sync import async_to_sync
from celery.result import AsyncResult
from channels.generic.websocket import WebsocketConsumer

from articles.tasks import search_documents_and_answer

import time
import json

class ChatConsumer(WebsocketConsumer):
    def connect(self):
        self.room_name = self.scope["url_route"]["kwargs"]["room_name"]
        self.room_group_name = f"chat_{self.room_name}"

        # 加入room group
        async_to_sync(self.channel_layer.group_add)(
            self.room_group_name, self.channel_name
        )

        self.accept()

    def disconnect(self, close_code):
        # 離開room group
        async_to_sync(self.channel_layer.group_discard)(
            self.room_group_name, self.channel_name
        )

    # Receive message from WebSocket
    def receive(self, text_data):
        text_data_json = json.loads(text_data)
        message = text_data_json["message"]
        print(f"Received message: {message}")

        # 發送加載中消息到room group
        async_to_sync(self.channel_layer.group_send)(
            self.room_group_name,
            {"type": "chat.loading", "message": "正在處理您的請求..."},
        )

        # Start async task
        task = search_documents_and_answer.delay(message)

        # Start checking task result
        self.check_task_result(task.id)

    # Check task result
    def check_task_result(self, task_id):
        max_attempts = 60  # 最多等待60秒
        attempts = 0
        while attempts < max_attempts:
            task = AsyncResult(task_id)
            if task.ready():
                result = task.result
                # 發送消息到room group
                async_to_sync(self.channel_layer.group_send)(
                    self.room_group_name,
                    {
                        "type": "chat.message",
                        "message": result["answer"],
                        "query": result["query"],
                        "results": result["results"],
                    },
                )
                break
            else:
                # Task not ready, wait for 1 second before checking again
                time.sleep(1)
                attempts += 1

        if attempts >= max_attempts:
            # 如果超過最大嘗試次數,則發送錯誤消息到room group
            async_to_sync(self.channel_layer.group_send)(
                self.room_group_name,
                {
                    "type": "chat.message",
                    "message": "抱歉,我們無法處理您的請求",
                    "query": "",
                    "results": [],
                },
            )

    # Receive loading message from room group
    def chat_loading(self, event):
        message = event["message"]
        # Send loading message to WebSocket
        self.send(text_data=json.dumps({"type": "loading", "message": message}))

    # Receive message from room group
    def chat_message(self, event):
        message = event["message"]
        query = event.get("query", "")
        results = event.get("results", [])

        # Send message to WebSocket
        self.send(
            text_data=json.dumps(
                {
                    "type": "message",
                    "message": message,
                    "query": query,
                    "results": results,
                }
            )
        )
connect 方法:
disconnect 方法:
receive 方法:
check_task_result 方法:
chat_loading 方法:
chat_message 方法:
最後建立rounting,在同級目錄下建立rounting.py。讓我們能夠透過該路由建立WebSocket連線
from django.urls import re_path

from . import consumers

websocket_urlpatterns = [
    re_path(r"ws/chat/(?P<room_name>\w+)/$", consumers.ChatConsumer.as_asgi()),
]
既然都使用群組而非單一客戶端的方式來建立WebSocket,因此我們需要額外配置channel layer
# settings.py

CHANNEL_LAYERS = {
    "default": {
        "BACKEND": "channels_redis.core.RedisChannelLayer",
        "CONFIG": {
            "hosts": [f"redis://:{REDIS_PASSWORD}@{REDIS_HOST}:{REDIS_PORT}/0"],
        },
    },
}
最後來確認DEMO的效果
資料的持久化:
引入非同步:
在下一個章節,就針對這些部分進行調整,使得我們的DocuMind專案更符合實際應用的專案
