接下來幾天會介紹幾個 React 的設計模式,介紹模式時不會說明太多 React 基礎概念,如果對 React 不熟悉的推薦可以讀我之前的筆記文章~
今天要介紹的是 Higner-Order Component(HOC)模式,Higner-Order Component 中文稱作高階元件,HOC 是一個能在應用程式中重用元件邏輯的模式。
Higner-Order Component 是一個函式,此函式會接收一個元件作為參數,為這個元件加入特定功能,再回傳這個加工過、增強版的元件。被當作參數放入函式的又稱為 Wrapped Component (ChildComponent),因為它被 HOC 包住;而 Higher-Order Component 又稱作 Enhanced Component 或 Composed Component,但 HOC 其實是一個函式而非元件。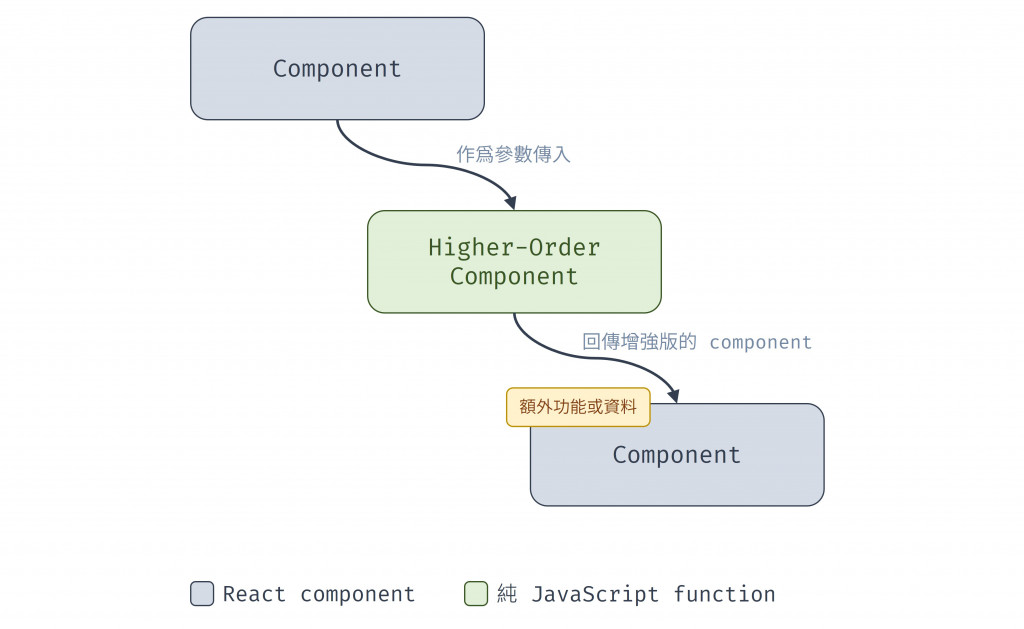
圖 1 HOC 示意圖(資料來源:自行繪製)
以下為一個 HOC 的範例,假設我們要為元件加上特定樣式(style),不希望這樣式只應用於單一元件,而是可被重用於其他元件,那我們可以按照以下步驟來建立並使用 HOC:
// 定義一個函式,這個函式接收元件作為參數
function withStyles(Component) {
  return (props) => {
    // 將style props 傳給這個元件,再加上該元件原先的 props
    const style = { padding: "10px", margin: "6px" };
    return <Component style={style} {...props} />;
  };
}
withStyles 的元件可以應用 style 這個 prop,這裡就是接收所有外部的 props 並應用到元件上。// 確保 Button 和 Text 可以將外部傳入的 props 都應用上去,如此才能將 withStyles 傳遞的樣式應用到元件
const Button = (props) => <button {...props}>Click me!</button>;
const Text = (props) => <p {...props}>Hello World!</p>;
withStyles 包住元件,得到加工後、有樣式的元件。// 透過 withStyles 函式幫元件加工,加上特定樣式
const StyledButton = withStyles(Button);
const StyledText = withStyles(Text);
// App.js
// 呼叫時使用 StyledButton 和 StyledText 來呼叫
export default function App() {
  return (
    <>
      <StyledButton />
      <StyledText />
    </>
  );
}
withLoading HOC前端應用經常需要從後端 API 取得資料,在還沒取得資料前,我們希望畫面先顯示 Loading 字樣,等到取得資料後再用資料渲染對應的畫面,而這種「資料還沒來,先顯示 Loading」的邏輯可重用在不同元件,又不想修改顯示資料的元件本身時,就可使用 HOC 的方式讓邏輯被不同元件共用。
withLoading HOC,這個 HOC 會收到一個元件和一個 fetchData 的方法,負責請求資料,並在還沒取得資料時顯示 "Loading..."。const withLoading = (WrappedComponent, fetchData) => {
return function WithLoadingComponent(props) {
const [data, setData] = useState(null);
const [isLoading, setIsLoading] = useState(true);
useEffect(() => {
// 從 API 抓取資料
fetchData()
.then((response) => {
setData(response);
setIsLoading(false);
})
.catch((error) => {
console.error("Error fetching data:", error);
setIsLoading(false);
});
}, []);
if (isLoading) {
return <p>Loading...</p>;
}
// 將請求成功後的資料和原有的 props 傳給元件
return <WrappedComponent data={data} {...props} />;
};
};
export default withLoading;
const UserList = ({ data }) => {
  return (
    <ul>
      {data.map((user) => (
        <li key={user.id}>{user.name}</li>
      ))}
    </ul>
  );
};

export default UserList;
// 定義請求的方法
const fetchUsers = async () => {
  const response = await fetch('https://jsonplaceholder.typicode.com/users');
  if (!response.ok) {
    throw new Error('Failed to fetch users');
  }
  return response.json();
};

// 使用 HOC 增強 UserList 元件
const EnhancedUserList = withLoading(UserList, fetchUsers);

const App = () => (
  <div>
    <h1>User List</h1>
    <EnhancedUserList />
  </div>
);

export default App;
完整程式碼請見連結。
HOC 可透過組合來為元件加上多種功能,承接上面 withLoading 範例,我們可以再加上一個 withTheming HOC 來告訴元件現在的主題顏色是什麼,以下為 withTheming 定義:
const withTheming = (WrappedComponent) => {
  return function WithThemingComponent(props) {
    const [theme, setTheme] = useState("light");

    // 定義主題顏色
    const themeColors = {
      light: { backgroundColor: "#fff", color: "#000" },
      dark: { backgroundColor: "#333", color: "#fff" },
    };

    const currentTheme = themeColors[theme];

    return (
      <div style={{ padding: "10px" }}>
        <button onClick={() => setTheme(theme === "light" ? "dark" : "light")}>
          Toggle Theme
        </button>
        {/* 將主題顏色作為 prop 傳遞給 WrappedComponent */}
        <WrappedComponent theme={currentTheme} {...props} />
      </div>
    );
  };
};
接著我們需要調整顯示資料的元件 UserList,來讓它依據主題顏色變化。
// 修改 UserList 以接收主題顏色
const UserList = ({ data, theme }) => {
  return (
    <ul style={{ backgroundColor: theme.backgroundColor, color: theme.color }}>
      {data.map((user) => (
        <li key={user.id}>{user.name}</li>
      ))}
    </ul>
  );
};
最後在 App.js 應用時,就可用 withLoading 和 withTheming 包住 UserList,得到加強版的 UserList。
const fetchUsers = async () => {
  //...
};

// 組合 withLoading 和 withTheming,得到加強版的 UserList
const EnhancedUserList = withTheming(withLoading(UserList, fetchUsers));

const App = () => (
  <div>
    <h1>User List</h1>
    <EnhancedUserList />
  </div>
);
完整程式碼請見連結。
React 官方提供的 memo 方法就是一種 higher order component,透過 memo 包裹住元件,以優化元件的 render 效能,使用方式如下:
import { memo } from "react";

function Child(props) {
  return (
    <>
      <div>Hello, {props.name}</div>
      <button onClick={props.showAlert}>alert</button>
    </>
  );
}

const MemoizedChild = memo(Child); // 以 memo 方法來包裝 Child component,產生 MemoizedChild 這加工過的新 component
當元件 re-render 時,memo 會檢查這個 Child component 的 props 與前次 render 的 props 是否完全相同:
更多介紹請見此篇文章:[React] 認識 useCallback、useMemo,了解 hooks 運作原理,文章內有介紹 memo 的使用和適合情境~
withRouter)React Router 使用 withRouter HOC 來將路由相關的 props(如:history、location、match)傳遞給元件,元件就可從 props 存取路由資訊。
import { withRouter } from 'react-router-dom';

const MyComponent = ({ location }) => (
    <div>You are now at {location.pathname}</div>
)

export default withRouter(MyComponent);
withLoading 不在乎 WrappedComponent 是怎樣的元件、也不關心具體要取得哪個資料function withStyles(Component) {
return props => {
const style = { padding: '0.5rem', margin: '1rem', color: "blue" }
return <Component style={style} {...props} />
}
}
const Button = () => <button style={{ color: 'red' }}>Click me!</button>
const StyledButton = withStyles(Button)
withStyles 為元件加上 style props,但 Button 元件已經有一個 style props,兩個 style 會產生衝突,後面的會覆寫前面的(以上述範例來說,最後按鈕的顏色是 red 而非 blue)。function withStyles(Component) {
return (props) => {
// withStyles 只傳遞樣式,而不進行合併
const style = { padding: "0.5rem", margin: "1rem", color: "blue" };
return <Component style={style} {...props} />;
};
}
// props.style 是 Button 收到 withStyles 傳入的 style prop,合併傳入自己的 style
// Button 自己定義的樣式 "red",會覆蓋 withStyles 傳入的樣式
const Button = (props) => (
<button
style={{
...props.style,
color: "red",
}}
>
Click me!
</button>
);
const StyledButton = withStyles(Button)
withLoading 和 withTheming 的範例來說,當包裹的 HOC 越多,會越難看出是誰傳這個 prop 給元件,也因此導致除錯和擴展的困難不知道大家還記不記得 Day 9 提過的 Decorator 模式,HOC 模式和 Decorator 模式是有一些相似處的。
相同處在於:
而不同之處在於: