在雲端原生應用盛行的今日,確保應用程式安全存取 Google Cloud Platform (GCP) 資源至關重要。OAuth 2.0 是一種業界標準的授權框架,允許第三方應用程式在不洩露使用者密碼的情況下安全地存取使用者資料。
為了提升安全性及簡化登入流程,Grafana 支援透過 GCP OAuth API 進行身份驗證。本篇文章將提供一個逐步指南,教你如何設定 Grafana,使其能與 Google Cloud Platform 整合,並使用 Google 帳戶安全地登入。
將涵蓋從 GCP 專案設定、OAuth 同意螢幕配置,到 Grafana 設定檔修改等所有必要步驟。 無論你是 Grafana 新手還是經驗豐富的使用者,這篇教學都將幫助你快速掌握 GCP OAuth 的整合技巧,提升你的 Grafana 使用體驗,並強化系統安全性。 跟著我們的步驟,輕鬆打造更安全便捷的監控平台。
GCP OAuth 2.0 提供了一個安全且靈活的機制,讓應用程式可以存取使用者資料。 了解 OAuth 2.0 的運作流程和不同授權類型,可以幫助開發者構建更安全可靠的應用程式。 使用 Google 提供的 Client Libraries 可以簡化 OAuth 2.0 的整合過程。 務必遵循最佳實務,以確保應用程式的安全性。
GCP OAuth 2.0 的運作流程:
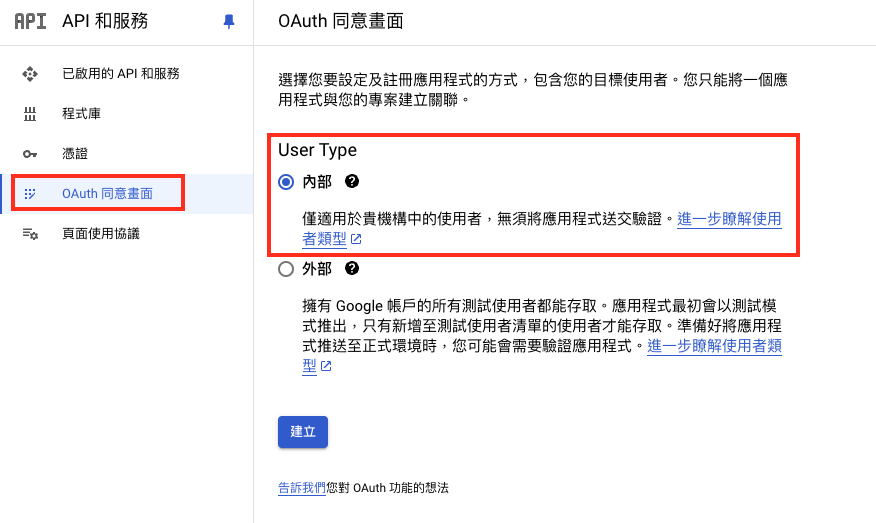
進入 API & Services 頁面,點選 OAuth 同意畫面設定,如果讀者已經設定過了,可以跳過這個步驟,直接進入到設定 Credentials(憑證) 步驟。
設定同意畫面,選擇內部,因為 Grafana 通常是給內部使用的系統,點選建立。
需要擁有自己公司網域的 Email,只對公司網域的使用者 Email 進行開放登入。
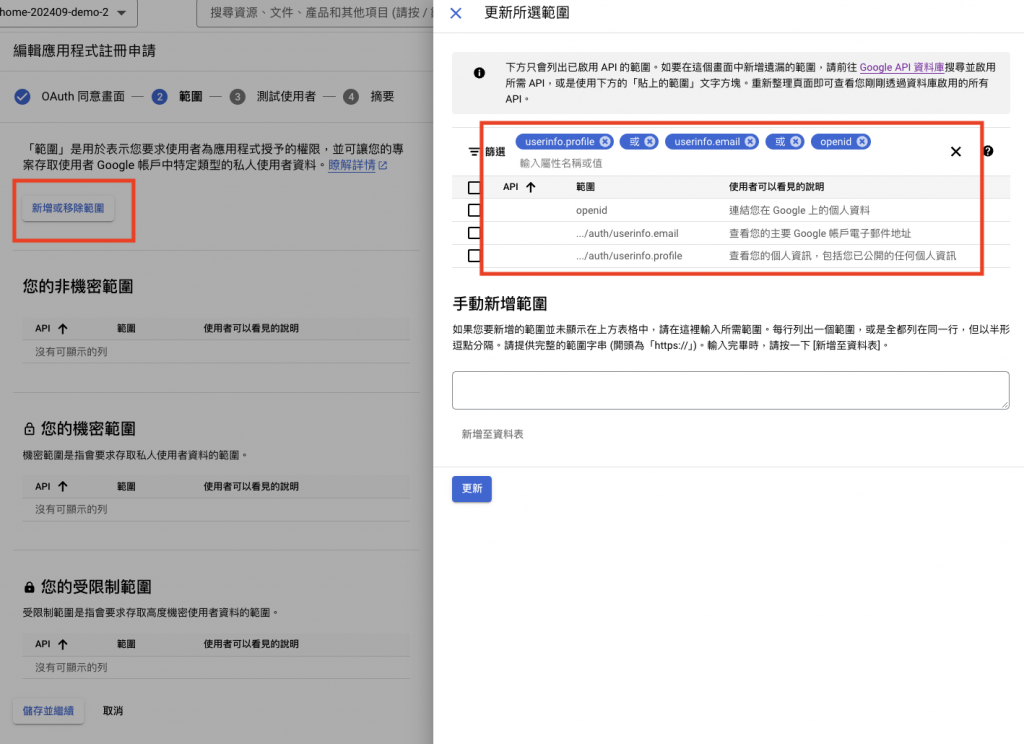
將 userinfo.profile, openid, userinfo.email 三項新增至 您的非機密範圍
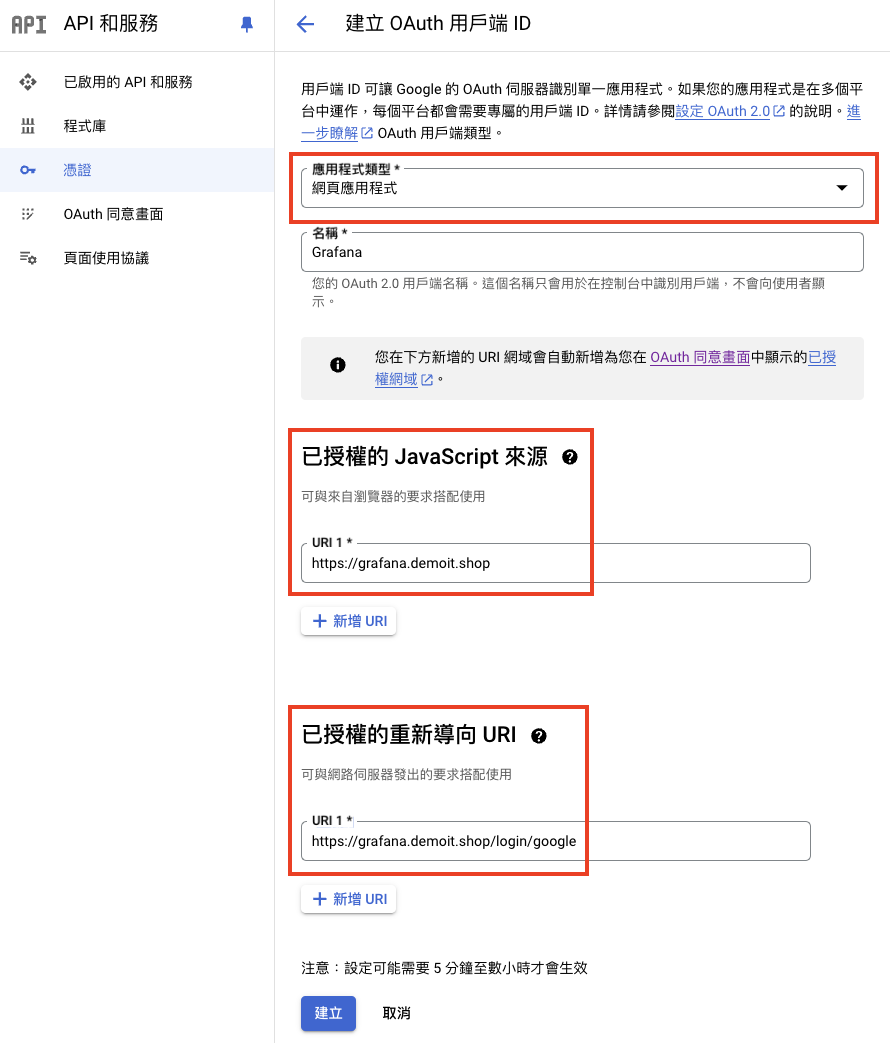
設定完成登入頁面後,點擊左側選單中的 Credentials(憑證),點擊創建 OAuth client ID

選擇網頁應用程式,已授權的 JavaScript 來源填入自建的 https://Grafana網址,已授權的重新導向 URI 填入 https://Grafana網址/login/google,設定完成後點擊建立。
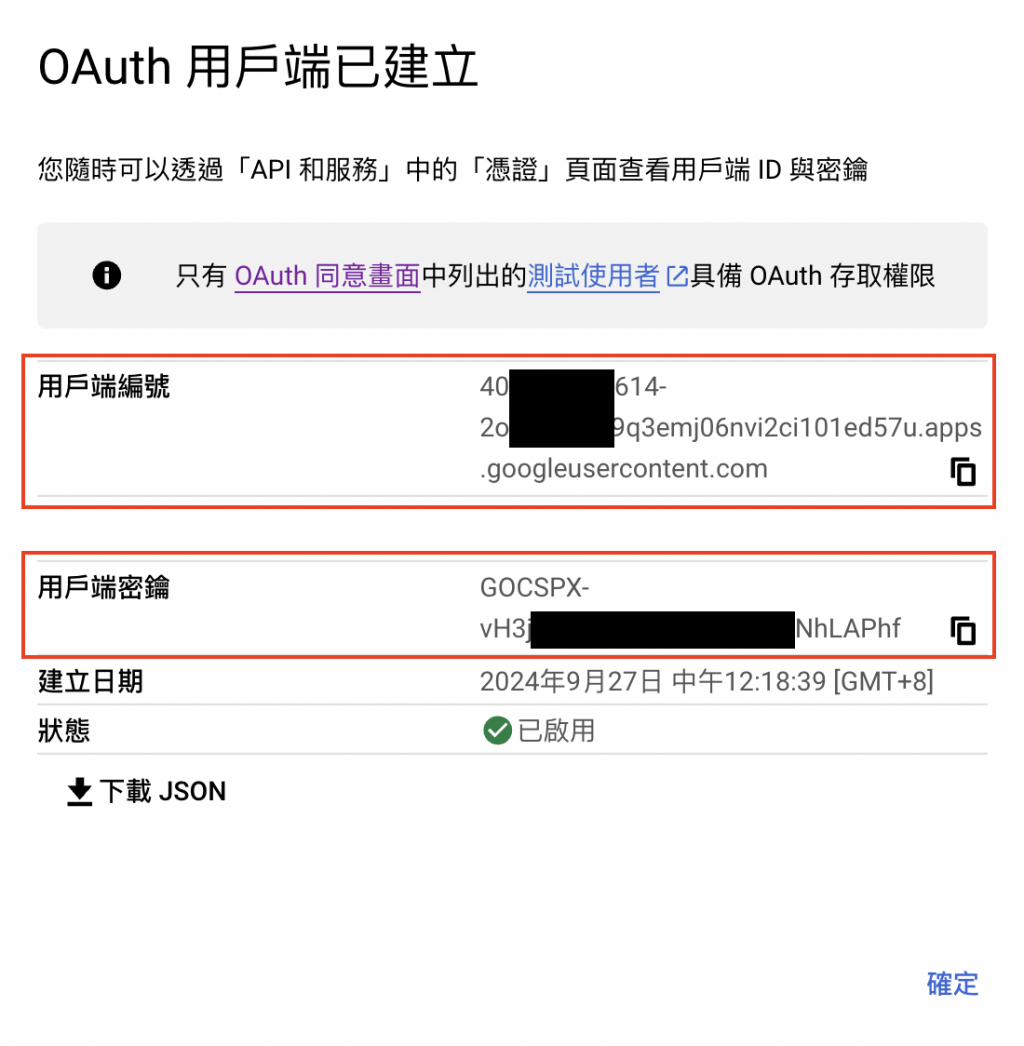
會彈出 OAuth 用戶端已建立 視窗,紀錄下 用戶端編號 及 用戶端密鑰,待會設定 Grafana Config 會使用到。
使用 Helm Chart 安裝 Grafana
$ helm repo add grafana https://grafana.github.io/helm-charts
$ helm pull grafana/grafana --version=8.5.1
這裡為了方便示範先將 assertNoLeakedSecrets 關閉,否則去檢查 auth.google.client_secret 機密是否存在。通常在正式環境中會使用 Vault, GCP Secret Manager 等工具紀錄機密資訊,再由 External Secret Manager 引入進來,詳情請看 Day17 GKE 秘密封印:External Secret Manager & Reloader 及 Grafana 官方文件
values.yaml
# values.yaml
ingress:
  enabled: true # 開啟 Ingress
  ingressClassName: external-nginx
  annotations:
    cert-manager.io/cluster-issuer: letsencrypt-demo
  labels: {}
  path: /
  pathType: Prefix
  hosts:
    - grafana.demoit.shop
  tls:
    - secretName: grafana.demoit.shop-tls
      hosts:
      - grafana.demoit.shop

persistence:
  type: pvc
  enabled: true # 開啟 PVC
  storageClassName: standard
  accessModes:
    - ReadWriteOnce
  size: 10Gi

grafana.ini:
  server:
    root_url: https://grafana.demoit.shop #改成使用者的 Grafana 網址
  auth.google:
    enabled : true
    client_id : # Google OAuth 用戶端編號
    client_secret : # Google OAuth 用戶端密鑰
    scopes : https://www.googleapis.com/auth/userinfo.profile https://www.googleapis.com/auth/userinfo.email
    auth_url : https://accounts.google.com/o/oauth2/auth
    token_url : https://accounts.google.com/o/oauth2/token
    api_url : https://openidconnect.googleapis.com/v1/userinfo
    allowed_domains : demoit.shop # 改成使用者的 Gmail 網域,需購買 Google Workspace
    hosted_domain : demoit.shop # 改成使用者的網域
    allow_sign_up : true
    use_pkce : true
    use_refresh_token : false
    allow_assign_grafana_admin : true
    auto_login : false
# 先將 assertNoLeakedSecrets 關閉,否則去檢查 auth.google.client_secret 會失敗
assertNoLeakedSecrets: false
以上有幾個部分需要注意:
$ helm upgrade --install grafana -f values.yaml . -n grafana --create-namespace
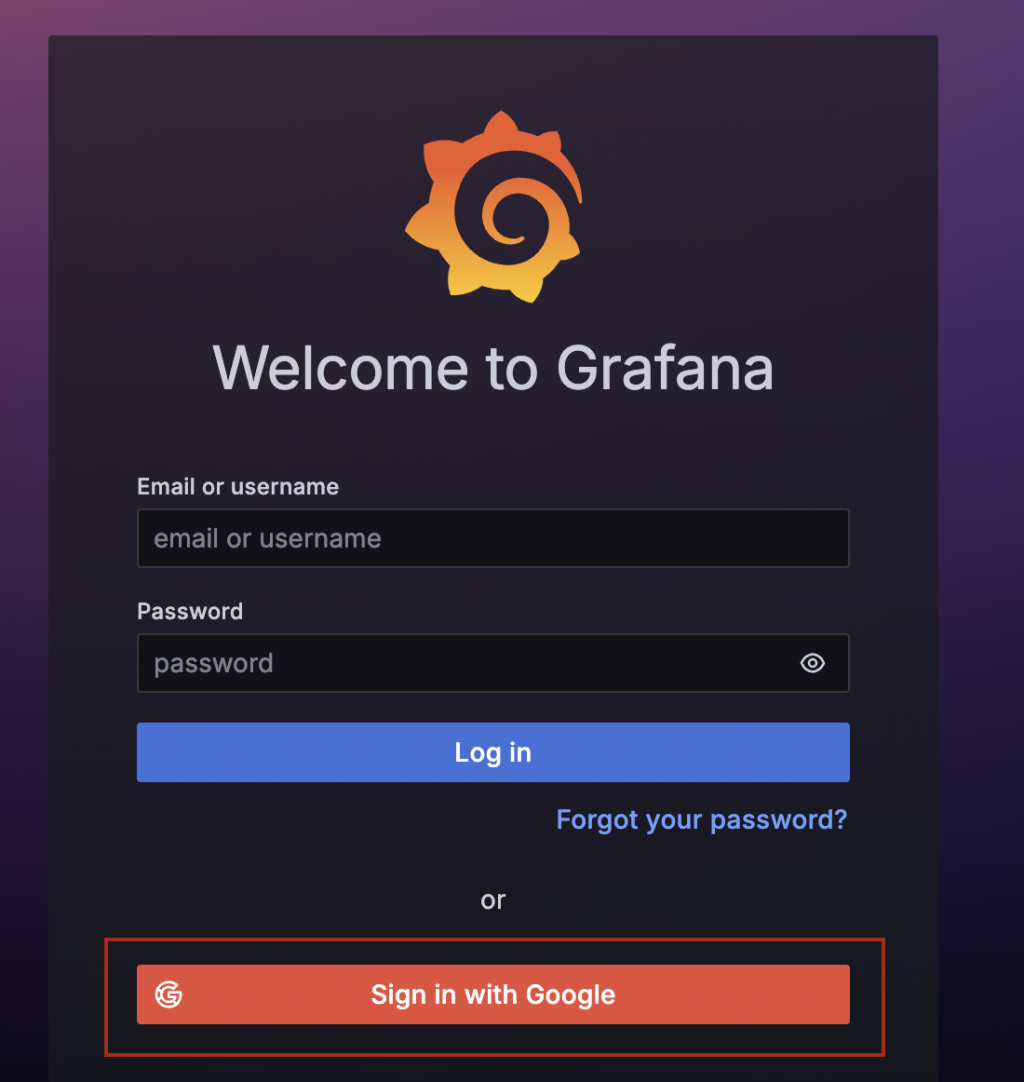
開啟 Grafana 網頁,會發現多了一個 Sign in with Google 的選項,點擊 Sign in with Google。
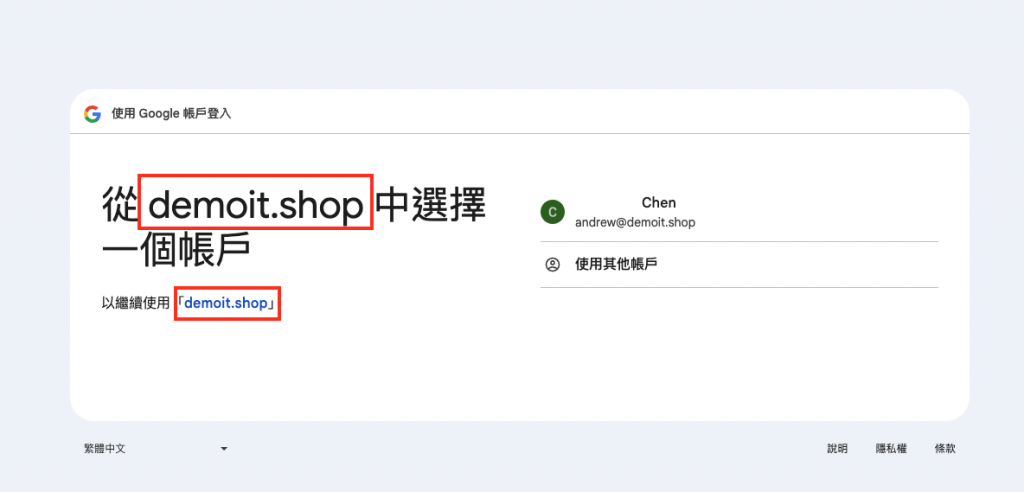
會跳轉到 Google OAuth 2.0 帳號驗證頁面,需要符合 Grafana 中設定的帳號才有資格登入。
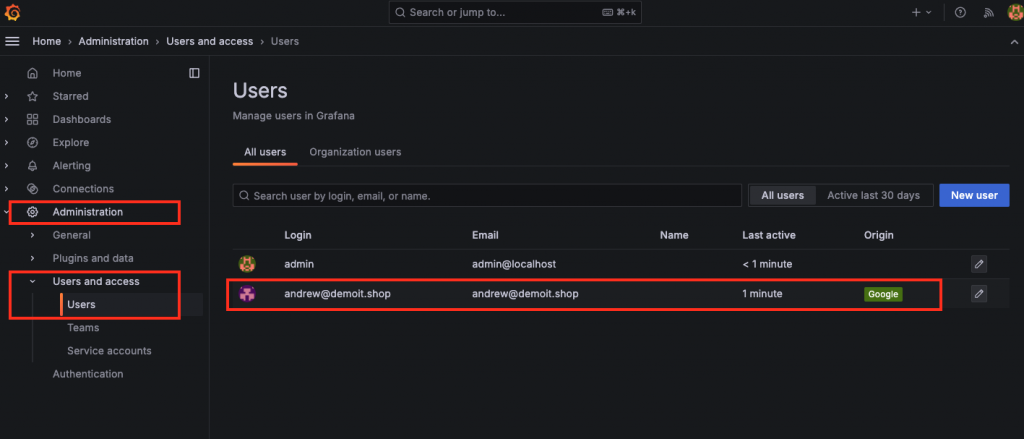
接下來,使用 Admin 帳號登入(Admin 密碼可以去 Secret 物件查看),會發現剛剛使用 Google 登入的帳號已經記錄下來,可以調整其權限。
本篇介紹 Grafana 結合 GCP OAuth 2.0 進行 Gmail 使用者認證登入,不再需要使用帳號密碼來管理 Grafana 使用者,針對 Gmail 網域進行限制,非常符合企業的需求,使 IT 帳密管理變得更為輕鬆,只需要針對 Google WorkSpace 進行使用者管理。
以 SRE 常使用的工具來說,例如 Gitlab, Argocd, ElasticSearch 等都可以進行 GCP OAuth 2.0 設定,設定的步驟和本篇的教學大同小異,使用者可以參考本篇教學,舉一反三,將 GCP OAuth 2.0 整合到更多系統中。 除了提升安全性之外,也簡化了使用者登入流程,提升使用體驗。
如果讀者需要 Grafana 更詳盡的介紹可以接著參考 Blueswen 寫的 Grafana Zero to Hero - Management:使用者管理,這裡是他今年寫的 Grafana Zero to Hero 鐵人賽系列文。
另一個作者 mikehsu0618 今年寫的 後 Grafana 時代的自我修養鐵人賽系列文也很不錯,非常推薦給對 Grafana 有興趣的讀者。