在網站的世界裡認證授是我們一定會遇到的問題,認證(Authentication)你是否為合法使用者,授權(Authorization)你可以訪問那些頁面。 前面提到過cookie-based authentication的方式,使用者輸入帳號密碼驗證無誤後,在後端產生session id儲存在Server memory並設置在cookie中返回給user瀏覽器,使用者接下來的請求cookie都會自動帶上cookie訪問server,server端只需要確認傳的sessionId有效就可以通過認證。
這樣做會有一些問題,其一當使用者太多會耗太多Server上資源,再者綁定在單一的domain上,想要實作多個domain指登入一次就需要考慮session如何共享的問題,一般可以將sessionId存在redis db讓多個AP Server存取來解決這個問題。今日就來看看JWT如何來做認證授權。
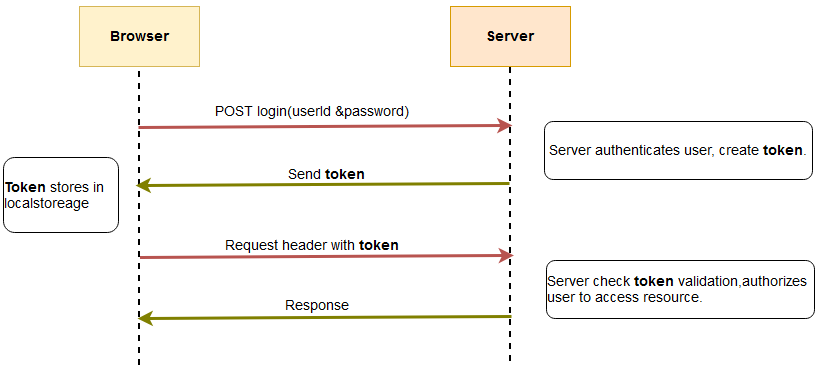
確認使用者登入資訊後產生token回傳給Client,Client將token存放在瀏覽器的localStoreage或sessionStorage中,下次請求的時候將cookie設置在hearder中,目前主流技術使用JWT來實現。
JSON Web Token(JWT),顧名思義這個token會用JSON物件進行封裝,JWT由三個部分組成:header、payload、signature,header會放置加密算法的訊息,payload會放置一些使用者的資訊,signature的作用是驗證資訊未被竄改過,即資訊的完整性(integrity)。整個JWT生成大致就像下面的流程:
知道上面的原理就可以自己來試著寫寫看
@WebServlet("/TokenServlet")
public class TokenServlet extends HttpServlet {
    @Override
    protected void doGet(HttpServletRequest req, HttpServletResponse resp) throws ServletException, IOException {
        String header = "{\"alg\":\"HS256\"}";
        String claims = "{\"sub\":\"Joe\"}";

        String encodedHeader = Base64.getUrlEncoder().encodeToString(header.getBytes("UTF-8"));
        String encodedClaims = Base64.getUrlEncoder().encodeToString( claims.getBytes("UTF-8") );

        String concatenated = encodedHeader + '.' + encodedClaims;

        String key = "signature_key";
        try {

            SecretKey secretKey = getMySecretKey(key);
            byte[] signature = hmacSha256( concatenated, secretKey );
            System.out.println(signature.toString());
            String compact = concatenated + '.' + Base64.getUrlEncoder().encodeToString( signature );
            System.out.println("encrypt:"+ compact );

            System.out.println("========generate========");
            String[] split = compact.split("\\.");
            System.out.println(split[0]);
            System.out.println(split.length);
            System.out.println("header:"+new String(Base64.getUrlDecoder().decode(split[0])));
            System.out.println("payload:"+new String(Base64.getUrlDecoder().decode(split[1])));
            System.out.println("signature:"+Base64.getUrlDecoder().decode(split[2]));

            System.out.println("=======validate=========");
            String headerAndClaims = split[0].toString()+"."+split[1].toString();
            System.out.println(headerAndClaims);
            byte[] hash = hmacSha256( headerAndClaims, secretKey );
            String signatureValidate = Base64.getUrlEncoder().encodeToString(hash);
            //完整性驗證
            System.out.println(split[2]);
            System.out.println(signatureValidate.equals(split[2]));

        } catch (NoSuchAlgorithmException e) {
            throw new RuntimeException(e);
        } catch (InvalidKeyException e) {
            throw new RuntimeException(e);
        }

    }

    private byte[] hmacSha256(String concatenated, SecretKey secretKey) throws InvalidKeyException, NoSuchAlgorithmException {
        Mac mac = Mac.getInstance("HmacSHA256");
        mac.init((SecretKeySpec)secretKey);
        return mac.doFinal( concatenated.getBytes());
    }

    private SecretKey getMySecretKey(String key) throws UnsupportedEncodingException {
        SecretKeySpec secretKeySpec = new SecretKeySpec(key.getBytes("UTF-8"), "SHA-256");
        return secretKeySpec;
    }
}
當然你可以不用那麼累全部都自己來,但是走過土法煉鋼的方式才是能清楚知道原理,也才能更了解其他現成套件的用法,JJWT就是滿常見的Java JWT開源套件
import jjwt package
  <dependencies>
    <dependency>
      <groupId>io.jsonwebtoken</groupId>
      <artifactId>jjwt-api</artifactId>
      <version>0.12.6</version>
    </dependency>
    <dependency>
      <groupId>io.jsonwebtoken</groupId>
      <artifactId>jjwt-impl</artifactId>
      <version>0.12.6</version>
      <scope>runtime</scope>
    </dependency>
    <dependency>
      <groupId>io.jsonwebtoken</groupId>
      <artifactId>jjwt-jackson</artifactId> <!-- or jjwt-gson if Gson is preferred -->
      <version>0.12.6</version>
      <scope>runtime</scope>
    </dependency>
  </dependencies>
create JWTokenServlet
@WebServlet("/JWTokenServlet")
public class JWTokenServlet extends HttpServlet {
    // case01 自定義的 Secret Key 字符串,請確保密鑰長度足夠不然會抱錯
    private static final String SECRET_KEY = "SecretKey12345aaaaaaaaaaaaaaaaaaaaaaaaaaaaaa"; //

    // case01 將自定義的字符串密鑰轉換為 SecretKey 對象
    private static final Key key = new SecretKeySpec(
            SECRET_KEY.getBytes(StandardCharsets.UTF_8),
            SignatureAlgorithm.HS256.getJcaName());

    //case02 由api幫忙產key這裡使用 HMAC SHA256 算法
    //private static final SecretKey key = Keys.secretKeyFor(SignatureAlgorithm.HS256);

    // Token 有效期設置
    private static final long EXPIRATION_TIME = 1000 * 60 * 30; // 30 minutes

    @Override
    protected void doGet(HttpServletRequest req, HttpServletResponse resp) throws ServletException, IOException {
        String token =Jwts.builder()
                .setSubject("joe") // Token 持有者(用戶)
                .setIssuedAt(new Date()) // Token 發行時間
                //.setExpiration(new Date(System.currentTimeMillis() - EXPIRATION_TIME)) // case03設置過期時間
                .setExpiration(new Date(System.currentTimeMillis() + EXPIRATION_TIME))
                .signWith(key) // 使用自定義 Secret Key 簽名
                .compact();
        System.out.println(token);
        String token2 = "eyJhbGciOiJIUzI1NiJ9.eyJzdWIiOiJqb2UifQ.BSYS75uTwiZo61aPYYbTsatv09PanHZvpgrFChkFty1B";

            try {
                Claims claims = Jwts.parser()
                        .setSigningKey(key) // 使用相同的 Secret Key 來驗證 Token
                        .build()
                        .parseSignedClaims(token)//如果時間超過或是完整性沒過都會拋exception
                        .getBody();
                boolean isValid = claims.getExpiration().after(new Date());
                System.out.println(isValid);
                System.out.println(claims);
            }catch(ExpiredJwtException e){
                System.out.println("token expired");
                e.printStackTrace();
            }catch(SignatureException e){
                System.out.println("signature error");
                e.printStackTrace();
            }

    }
}
正常訪問就是使用自訂義的Secret Key
將case01的部分註解起來,並把case02註解打開,測試一下
將case03的註解打開並把下一行註解,測試一下ExpiredJwtException
將case4的token改成token2,測試一下SignatureException
