在公司的專案管理和 KPI 參考指標中,Azure DevOps Services 的 Boards 已成為不可或缺的工具。透過任務卡系統,能夠將專案細分為每個人的具體工作,並記錄開發進度、預計完成日期、優先級等重要資訊。這些卡片允許團隊成員相互查看並協作,成為我們日常進度管理的核心。
為了提升效率與使用體驗,我們計劃將 Boards 功能整合到 Backstage 中,讓開發者能夠在統一介面中即時預覽任務卡片,無需頻繁切換至 DevOps Boards 操作。透過一目瞭然的任務列表,開發者可以在短時間快速掌握工作排程,如有需要時再一鍵跳轉至 Boards 進行近一步的操作,這項功能的整合將使 Backstage 個更為全面。
為了取得 Boards 上的資料,到我們採用了 DevOps Boards Servicess 提供的強大查詢功能——Azure Work Item Query Language (WIQL)。WIQL 允許我們使用類似 SQL 的語法,對工作項目進行精確查詢。無論是根據優先級、狀態還是負責人篩選任務,WIQL 都能靈活地處理各種需求。我們能夠將 WIQL 查詢結果以 API 形式傳入 Backstage,並挑選出該使用者關聯的工作卡片,按照重要程度來排序顯示在個人首頁中,預覽效果如下圖。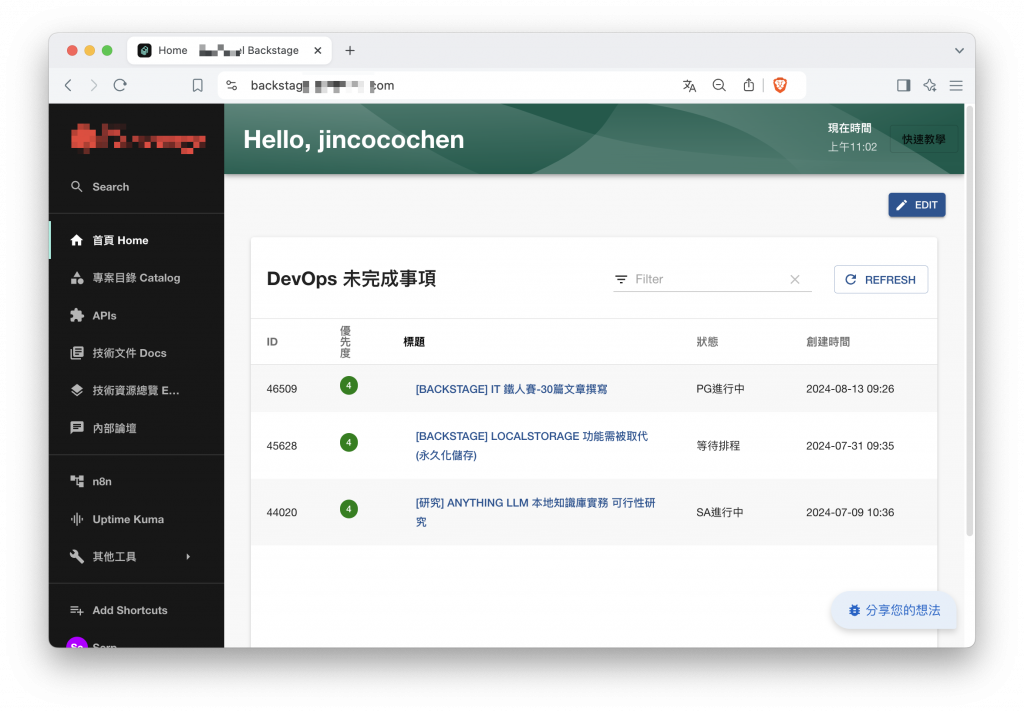
點擊標題後可以跳轉頁面到 DevOps Boards Services 的卡片內容中進行進一步修改。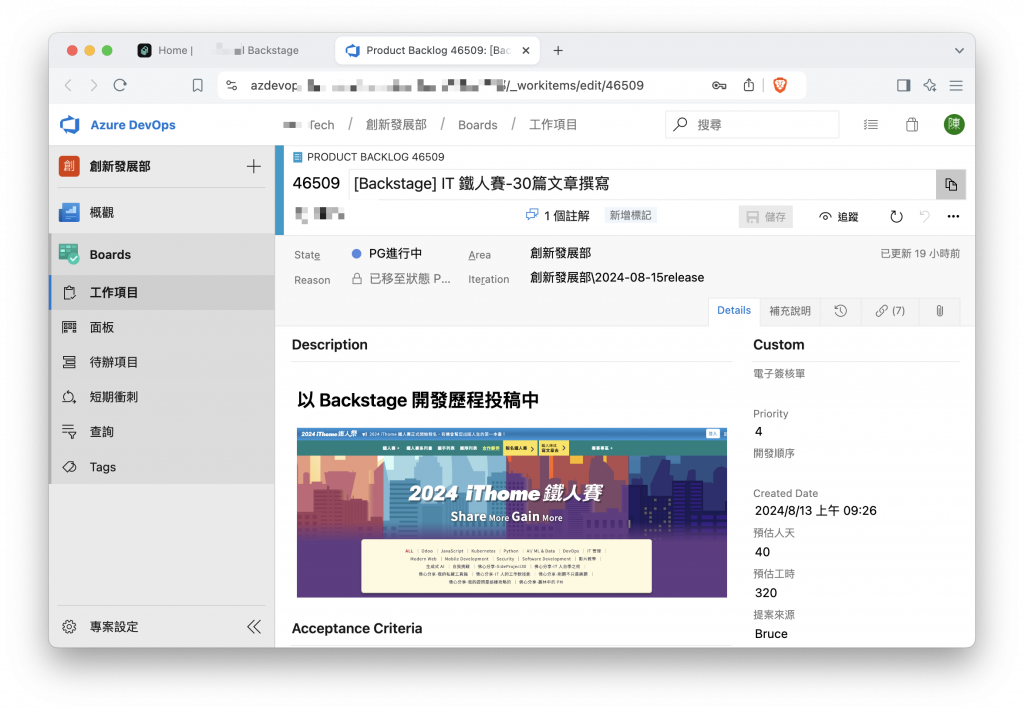
Backstage 整合 Boards 的核心理念,並不是要完全取代它,而是作為一個備忘錄、捷徑的形式,如同手機中的小工具日曆,只將重點的資訊呈現,讓使用者能夠在平時不經意間快速瀏覽,避免意外忘記或是能夠快速整理手中事項。所以只在 Backstage 上做查詢權限的功能,修改卡片的功能就依靠 Boards 原本的頁面功能即可,雖然要在 Backstage 上製作能夠創建的功能也是可行的,全看使用情境。
Backstage 整合 Boards 的核心理念並非取代它,而是作為一種備忘錄或捷徑,類似手機中的小工具日曆,僅呈現關鍵資訊,讓使用者能夠快速瀏覽,避免遺忘重要事項或便於整理當前任務。Backstage 的功能重點在於查詢權限,讓使用者輕鬆查看卡片狀態,而卡片的編輯和操作仍然依賴於 Boards 原有的介面功能。
我們認為這樣的設計能夠減少開發者在不同工具之間切換的頻率,同時保持操作上的靈活性。雖然實務上也可以在 Backstage 上實現修改任務卡的功能,取決於具體使用情境和需求。
在前面我們已經提到,WIQL 是一個強大的查詢工具,類似 SQL,能夠靈活地篩選和查詢 DevOps Boards 中的工作項目。接下來,我們將說明如何在 Backstage 中利用 WIQL 的 API,實現這些查詢功能並整合到開發者日常的工作流中,我們可以使用 Azure DevOps 的 REST API 來執行 WIQL 查詢。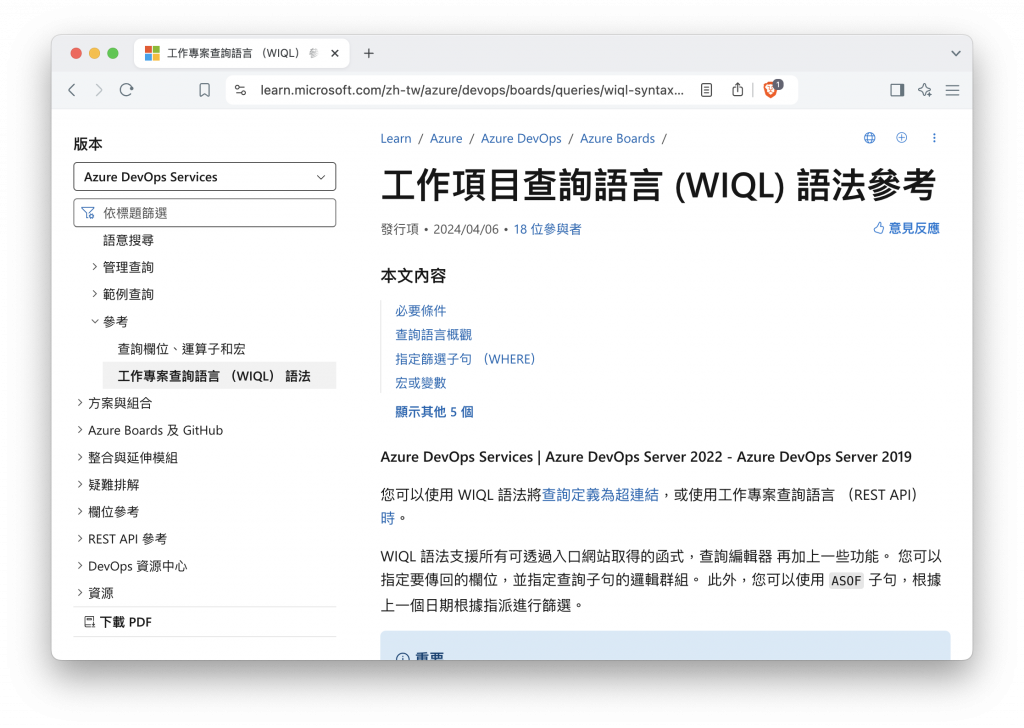
我們透過 Backstage 建立前端插件直接進行 POST 請求,發送 WIQL 查詢語句,篩選出符合條件的工作項目。以下是一個簡單的查詢範例:
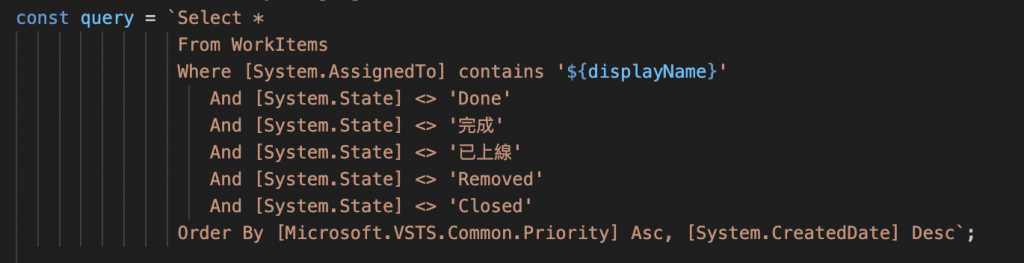
要實現這項功能的架構較為單純,我們只需建立一個前端插件就可以完成整體功能。首先,我們先建立一個檔案處理 api 的部分,除了引用必要套件、定義類別,還要定義 api 的呼叫介面,讓我們後面撰寫的前端頁面能夠使用這個 api 的方法取得資料。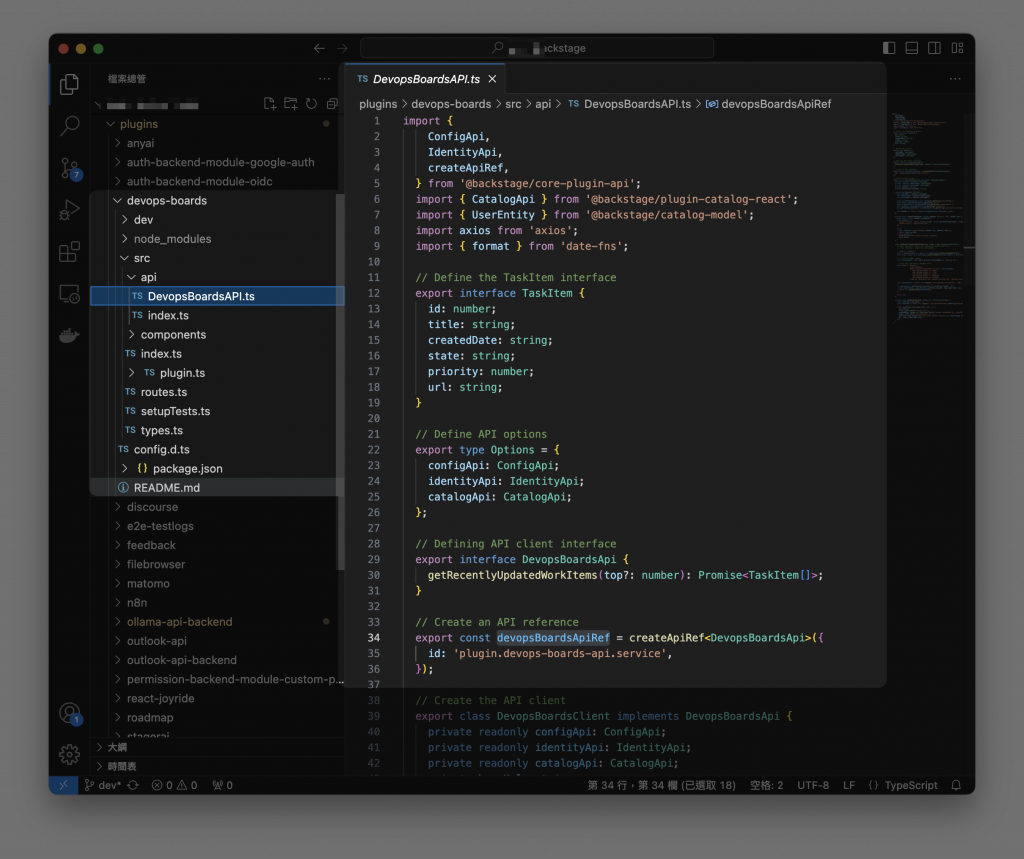
接下來我們要進行 API 的相關設定。如果你參考過之前的文章《使用 Backstage Catalog 目錄連結 Azure DevOps Server 地端專案》,那麼這裡的設定將會非常熟悉。幸運的是,我們可以重複例用相同的設定檔,如 host 網址和組織資訊,都保持不變,並且仍然需要使用憑證來進行認證,這樣就可以組成與 Boards API 互動的基本路徑。剩下的步驟就是發送查詢請求,並根據前面設定的 WIQL 查詢語法,檢索相關的工作項目。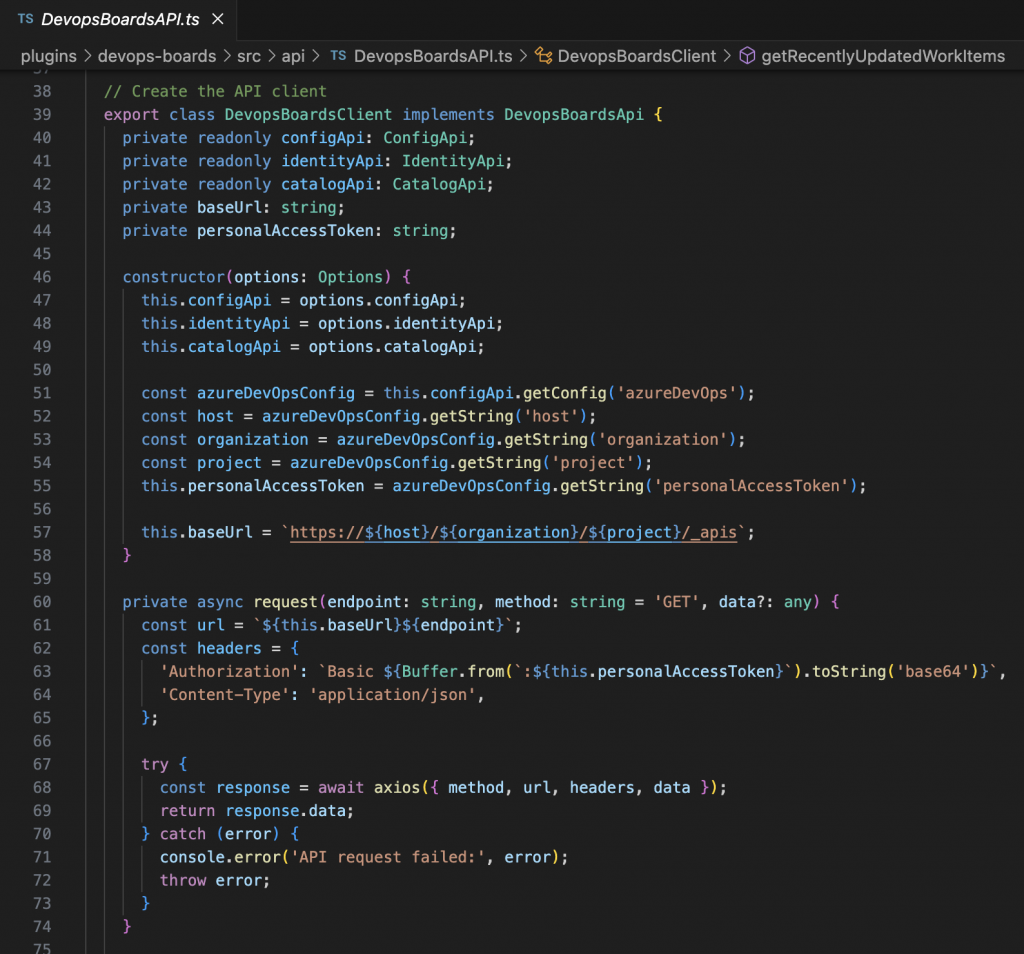
首先要先從用戶實體中去出使用者名稱。如果沒有找到顯示名稱,則使用 'Unknown User' 作為默認值,由於我們前面同步 AD 員工的資料,所以在 DevOps 上的使用者名稱都會相同的,再丟入查詢比對。
如果查詢包含結果,則取得所有工作卡片的 ID,並調用 getWorkItems 方法來獲取這些工作卡片的詳細訊息,如果沒有找到工作卡片,返回一個空數組。
最後步驟我們需要將過濾過的工作卡片進行進一步查詢,我們針對卡片的詳細資訊,將卡片 id 帶入網址請求所有詳細資料,最後將 API 傳回的內容取出所需的屬性,並格式化為 TaskItem 類型輸出結果。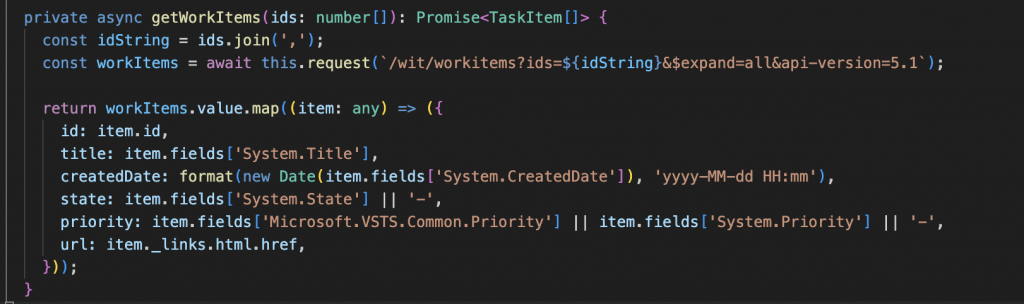

在撰寫前端介面之前,我們必須先引用剛剛定義好的 API 介面與類別,讓前端頁面能夠引用該 API 功能。
import React, { useEffect, useState } from 'react';
import { useApi } from '@backstage/core-plugin-api';
import {
  Table,
  Progress,
  ResponseErrorPanel,
  TableColumn,
} from '@backstage/core-components';
import { Button, Chip, makeStyles } from '@material-ui/core';
import { Refresh as RefreshIcon } from '@material-ui/icons';
import { TaskItem } from '../types';
import { devopsBoardsApiRef } from '../api/DevopsBoardsAPI';

const useStyles = makeStyles(() => ({
  container: {
    width: '100%',
  },
  priority1: { backgroundColor: 'red', color: 'white' },
  priority2: { backgroundColor: 'orange', color: 'white' },
  priority3: { backgroundColor: 'blue', color: 'white' },
  priority4: { backgroundColor: 'green', color: 'white' },
  priority5: { backgroundColor: 'grey', color: 'white' },
  priorityDefault: { backgroundColor: 'grey', color: 'white' },
}));

const priorityColorMap = {
  1: 'priority1',
  2: 'priority2',
  3: 'priority3',
  4: 'priority4',
  5: 'priority5',
};

const columns: TableColumn[] = [
  {
    title: 'ID',
    field: 'id',
    width: '10%',
  },
  {
    title: '優先度',
    field: 'priority',
    width: '8%',
    render: (row: Partial<TaskItem>) => {
      const classes = useStyles();
      const priorityClass = priorityColorMap[row.priority as keyof typeof priorityColorMap] || 'priorityDefault';
      return (
        <Chip
          label={row.priority}
          size="small"
          // @ts-ignore
          className={classes[priorityClass]}
        />
      );
    },
  },
  {
    title: '標題',
    field: 'title',
    highlight: true,
    width: '40%',
    render: (row: Partial<TaskItem>) => (
      <Button color="primary" href={row.url} target="_blank" rel="noopener noreferrer">
        {row.title}
      </Button>
    ),
  },
  {
    title: '狀態',
    field: 'state',
    width: '15%',
  },
  {
    title: '創建時間',
    field: 'createdDate',
    width: '20%',
  },
];

export const DevopsBoardsComponent = () => {
  const classes = useStyles();
  const [tasks, setTasks] = useState<TaskItem[]>([]);
  const [loading, setLoading] = useState<boolean>(true);
  const [error, setError] = useState<Error>();
  const devopsBoardsApi = useApi(devopsBoardsApiRef);

  const fetchData = async () => {
    setLoading(true);
    try {
      const fetchedTasks = await devopsBoardsApi.getRecentlyUpdatedWorkItems(20);
      setTasks(fetchedTasks);
      setError(undefined);
    } catch (err) {
      setError(err as Error);
    } finally {
      setLoading(false);
    }
  };

  useEffect(() => {
    fetchData();

    // Set up an interval to fetch data every 5 minutes
    const intervalId = setInterval(() => {
      fetchData();
    }, 5 * 60 * 1000); // 5 minutes in milliseconds
    // Clean up the interval when the component unmounts
    return () => clearInterval(intervalId);

  }, [devopsBoardsApi]);

  const RefreshButton = () => (
    <Button
      color="primary"
      variant="outlined"
      onClick={fetchData}
      startIcon={<RefreshIcon />}
    >
      Refresh
    </Button>
  );

  return (
    <div className={classes.container}>
      {loading && <Progress />}
      {error && <ResponseErrorPanel error={error} />}
      {!loading && !error && (
        <Table
          options={{
            search: true,
            paging: true,
            pageSize: 10,
            padding: 'dense',
          }}
          data={tasks}
          columns={columns}
          title="DevOps 未完成事項"
          actions={[
            {
              icon: () => <RefreshButton />,
              tooltip: 'Refresh',
              isFreeAction: true,
              onClick: fetchData,
            },
          ]}
        />
      )}
    </div>
  );
};

export default DevopsBoardsComponent;
https://learn.microsoft.com/zh-tw/azure/devops/boards/queries/wiql-syntax?view=azure-devops