內部可變性(Interior mutability)是 Rust 中的一種設計模式,讓我們能改變不可變參考的值。
之前就有提過 Rust 的編譯檢查是保守的,而有些程式碼特性是無法透過分析程式碼檢測出,因此我們需要一個機制,讓我們確定某段程式碼有遵循借用規則,但是編譯器無法理解並保證的時候,繞過編譯器的檢查。RefCell<T> 是 Rust 內不可變性的具體實現之一,用於編譯期無法保證借用規則的情況下,仍然能夠在運行期檢查和強制執行借用規則。
需要注意的幾個點:
RefCell<T> 它還是需要遵守原本的借用規則,只是它的檢查不是在編譯期,而是變成程式執行的時候檢查,如果違反規則程式會 panic 導致程式立即終止。RefCell<T> 是透過 unsafe 區塊實現的,本質上它繞過了 Rust 的借用檢查器,代表使用它會增加程式的不安全性。RefCell<T> 只適用於單執行緒的情況,如果是多執行緒可以考慮用Mutex。一些使用情境舉例:
Rc<T> 共享所有權的又想變更值的情況,因為 Rc<T> 提供的都是不可變參考,具體來說例如遞迴樹狀結構。Rc<T>與RefCell<T>先來驗證 Rc<T> 會遇到的問題。
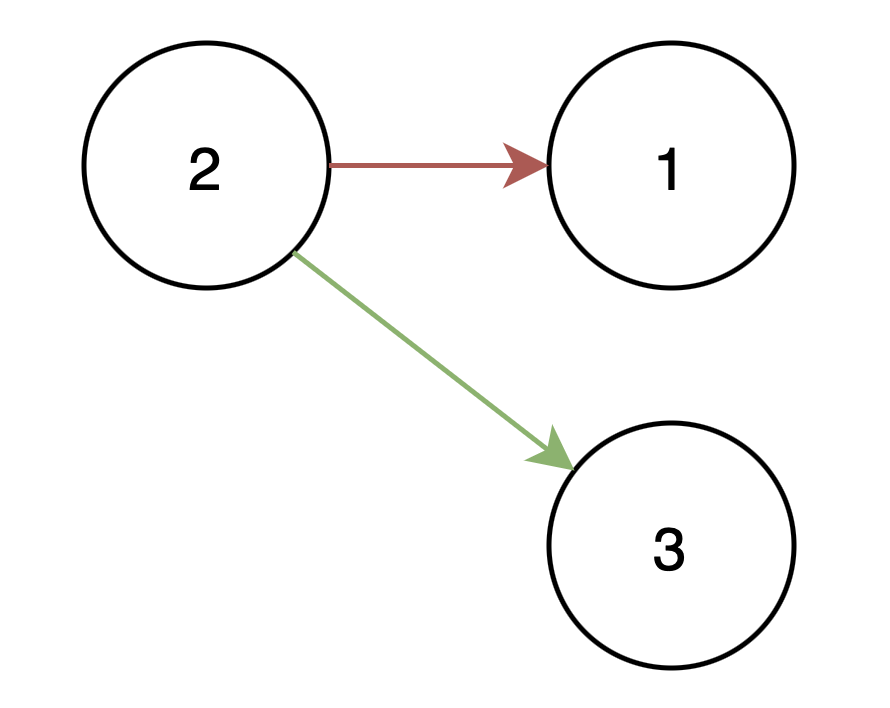
我們重新設計 Node 結構代表節點,每個節點有節點上的數值,以及指向下一個節點的指標。
以下是接下來程式碼要做的事:
有三個節點,2 一開始指向 1,想把 2 後面改成接 3。
首先看最一開始用 Box<T> 的版本要怎麼改變節點連接:
#[derive(Debug)]
struct Node<T> {
    value: T,
    next: Option<Box<Node<T>>>,
}

impl<T> Node<T> {
    fn new(value: T, next: Option<Box<Node<T>>>) -> Box<Self> {
        Box::new(Node { value, next })
    }
}

fn main() {
    let node1 = Node::new(1, None);
    let mut node2 = Node::new(2, Some(node1));
    let node3 = Node::new(3, None);
    println!("{:?}", node2); // Node { value: 2, next: Some(Node { value: 1, next: None }) }

    node2.next = Some(node3);
    println!("{:?}", node2); // Node { value: 2, next: Some(Node { value: 3, next: None }) }
}
可以看到必須要用可變參考才能做這件事,那如果直接改成用 Rc<T> 呢?
use std::rc::Rc;

#[derive(Debug)]
struct Node<T> {
    value: T,
    next: Option<Rc<Node<T>>>,
}

impl<T> Node<T> {
    fn new(value: T, next: Option<Rc<Node<T>>>) -> Rc<Self> {
        Rc::new(Node { value, next })
    }
}

fn main() {
    let node1 = Node::new(1, None);
    let mut node2 = Node::new(2, Some(Rc::clone(&node1)));
    let node3 = Node::new(3, None);
    node2.next = Some(node3)
}
可以看到編譯錯誤:
error[E0594]: cannot assign to data in an `Rc`
  --> src/main.rs:20:5
   |
20 |     node2.next = Some(node3)
   |     ^^^^^^^^^^ cannot assign
   |
   = help: trait `DerefMut` is required to modify through a dereference, but it is not implemented for `Rc<Node<i32>>`
這邊就可以看到因為 Rc<T> 沒有實作 DerefMut 特徵,可以理解為不支援可變參考,意思就是我們沒辦法去再去更改節點連接的關係了。
如果要改變節點的next 就需要Rc<T>和RefCell<T> 搭配使用了。
use std::cell::RefCell;
use std::rc::Rc;

#[derive(Debug)]
struct Node<T> {
    value: T,
    next: Option<Rc<RefCell<Node<T>>>>,
}

impl<T> Node<T> {
    fn new(value: T, next: Option<Rc<RefCell<Node<T>>>>) -> Rc<RefCell<Self>> {
        Rc::new(RefCell::new((Node { value, next })))
    }
}

fn main() {
    let node1 = Node::new(1, None);
    let node2 = Node::new(2, Some(Rc::clone(&node1)));
    let node3 = Node::new(3, None);
    println!("origin: {:?}", node2);

    node2.borrow_mut().next = Some(Rc::clone(&node3)); // 取得可變參考並更改 next
    println!("modified: {:?}", node2);
}
結果如下,2 後面的節點順利從 1 改成 3 了:
origin: RefCell { value: Node { value: 2, next: Some(RefCell { value: Node { value: 1, next: None } }) } }
modified: RefCell { value: Node { value: 2, next: Some(RefCell { value: Node { value: 3, next: None } }) } }
RefCell<T>用法RefCell<T> 有提供 borrow 和 borrow_mut 方法:
borrow 回傳智慧指標型別 Ref<T>,對應不可變參考(&)。borrow_mut 回傳智慧指標型別 RefMut<T>,對應可變參考(&mut)。
這兩個型別都有實作 Deref特徵,所以可以當成一般參考一樣的方式來使用。
RefCell<T> 會追蹤當前有多少 Ref<T> 和 RefMut<T> 智慧指標存在,一樣會有計數器來管理,呼叫對應的方法計數加一,當對應的智慧指標離開作用域那計數就會減一。
也因此不支援多執行緒的情況,因為RefCell<T>的計數器不是執行緒安全的。
透過這樣的方式任何類似共享所有權的結構我們都可以去改變它的數值。
RefCell<T>執行期報錯接著觀察一下透過 RefCell<T> 違反借用規則的行為:
fn main() {
    let node1 = Node::new(1, None);
    let node2 = Node::new(2, Some(Rc::clone(&node1)));
    println!("origin: {:?}", node2);
    let node3 = Node::new(3, None);

    let mut node2_ref_mut = node2.borrow_mut(); // 可變借用
    let node2_ref = node2.borrow(); // 不可變借用
    node2_ref_mut.next = Some(Rc::clone(&node3));
    println!("modified: {:?}", node2);
}
上面我們同時做了可變借用與不可變借用:
origin: RefCell { value: Node { value: 2, next: Some(RefCell { value: Node { value: 1, next: None } }) } }
thread 'main' panicked at src/main.rs:23:27:
already mutably borrowed: BorrowError
note: run with `RUST_BACKTRACE=1` environment variable to display a backtrace
就會在程式執行到一半的時候跳出 BorrowError 中斷程式,可以觀察到借用檢查從編譯期移動到了執行期,也代表會有額外的性能耗損。
再看延遲初始化的實現的例子。有些物件初始化成本比較高,或是不一定會用到,延遲初始化帶來的好處是節省記憶體、避免不必要的計算等。具體來說我們希望程式執行後某個條件才初始化它,同時我們又希望對外部來說調用它都是不可變的,那也很適合用RefCell<T> 來處理。一開始程式執行的時候我們會先最簡易初始化這個物件,但還沒真正操作把資料放進去。等到有人呼叫它的時候才做完整初始化,並且之後每次呼叫就會拿到已經完成初始化的物件而不用再次初始化,所以也可以用來實現單例模式(singleton pattern)。
如果沒有RefCell<T> 我們就失去這個彈性,只能最開始就完成這個物件的初始化,之後不能再變動它。
use std::cell::{RefCell};
use std::rc::Rc;

struct LazyInit {
    value: RefCell<Option<Rc<String>>>,
}

impl LazyInit {
    fn new() -> Self {
        LazyInit {
            value: RefCell::new(None),
        }
    }

    fn get_or_init(&self) -> Rc<String> {
        if self.value.borrow().is_none() {
            println!("Initializing...");
            let new_value = Rc::new("Initialized!".to_string());
            *self.value.borrow_mut() = Some(new_value.clone());
        }

        self.value.borrow().as_ref().unwrap().clone()
    }
}

fn main() {
    let lazy = LazyInit::new();

    println!("1st visit");
    let first_visit = lazy.get_or_init();
    println!("value: {}", first_visit);

    println!("2nd visit");
    let second_visit = lazy.get_or_init();
    println!("value: {}", second_visit);
}
執行結果如下:
1st visit
Initializing...
value: Initialized!
2nd visit
value: Initialized!
最後來看看為什麼Rc<T>和RefCell<T>的搭配會造成 Rust 的記憶體泄漏(memory leak)。
use std::cell::RefCell;
use std::rc::Rc;
struct Node<T> {
value: T,
next: Option<Rc<RefCell<Node<T>>>>,
}
impl<T> Node<T> {
fn new(value: T) -> Rc<RefCell<Self>> {
Rc::new(RefCell::new(Node { value, next: None }))
}
}
fn main() {
// 原本節點都是獨立的
let node1 = Node::new(1);
let node2 = Node::new(2);
node1.borrow_mut().next = Some(Rc::clone(&node2)); // 把 node1 指向 node2
node2.borrow_mut().next = Some(Rc::clone(&node1)); // 把 node2 指向 node1
// 以下驗證兩者形成循環
println!("node1 value: {}", node1.as_ref().borrow().value); // node1 一開始的值
let mut current = Some(Rc::clone(&node1)); // 要移動的指標
println!(
"current value: {}",
current.as_ref().unwrap().borrow().value
); // 一開始在 node1
if let Some(node) = current {
current = node.borrow().next.clone(); // 移動到下一個節點
println!("current moved");
println!(
"current value: {}",
current.as_ref().unwrap().borrow().value
);
println!(
"current is node1: {}",
Rc::ptr_eq(&node1, ¤t.clone().unwrap())
);
if let Some(node) = current {
current = node.borrow().next.clone(); // 移動到下一個節點
println!("current moved");
println!("current value:{}", current.as_ref().unwrap().borrow().value);
println!(
"current is node1: {}",
Rc::ptr_eq(&node1, ¤t.unwrap())
);
}
}
println!("node1 strong count: {}", Rc::strong_count(&node1)); // 觀察強引用計數
}
node1 value: 1
current value: 1
current moved
current value: 2
current is node1: false
current moved
current value:1
current is node1: true
node1 strong count: 2
可以看到透過 RefCell<T> 我們把原本獨立的 Node 互相作為指標指向的下一個 Node,這樣它們的計數就永遠不可能歸零,雖然在這邊的情境不會有影響,因為 main 執行完就結束了,但是在其他更複雜的情境就有可能因為記憶體泄漏造成程式崩潰。
Weak<T>為了解決循環引用問題,Rust 提供了 Weak<T> 弱引用。和之前看到的 Rc::strong_count做對比,還有另外一個關聯函數式 Rc::weak_count, Weak<T> 只會增加對象的 weak_count,而決定能不能釋放目標記憶體的只有strong_count,因此即使有多個 Weak<T> 指向同一個對象,也不會阻止該對象被釋放。
Weak<T> 無法直接使用,只能通過 upgrade 方法升級為 Option<Rc<T>> 後才能使用,如果被引用的對象已經被釋放會升級失敗,upgrade 方法會返回 None,用這樣的設計強迫處理失敗的邏輯。
我們可以用 Rc::downgrade 關聯函數取得弱引用。
上面的例子改成弱引用的版本:
use std::cell::RefCell;
use std::rc::{Rc, Weak};
struct Node {
value: i32,
next: Option<Weak<RefCell<Node>>>,
}
fn main() {
let node1 = Rc::new(RefCell::new(Node {
value: 1,
next: None,
}));
let node2 = Rc::new(RefCell::new(Node {
value: 2,
next: None,
}));
node1.borrow_mut().next = Some(Rc::downgrade(&node2)); // 弱引用
node2.borrow_mut().next = Some(Rc::downgrade(&node1));
let mut current = Some(Rc::clone(&node1));
if let Some(node) = current {
current = match &node.borrow().next { // 多處理弱引用邏輯
Some(weak_ref) => weak_ref.upgrade(),
None => None,
};
println!("current moved");
println!(
"current value: {}",
current.as_ref().unwrap().borrow().value
);
println!(
"current is node1: {}",
Rc::ptr_eq(&node1, ¤t.clone().unwrap())
);
if let Some(node) = current {
current = match &node.borrow().next {
Some(weak_ref) => weak_ref.upgrade(),
None => None,
};
println!("current moved");
println!("current value:{}", current.as_ref().unwrap().borrow().value);
println!(
"current is node1: {}",
Rc::ptr_eq(&node1, ¤t.unwrap())
);
}
}
println!("node1 strong count: {}", Rc::strong_count(&node1)); // 1, 最一開始的 node1
}
可以觀察到就算形成同樣的結構,強引用的計數不會因為受到弱引用影響。這樣就不用擔心因為引用計數問題而導致記憶體無法釋放,而弱引用那邊則是要使用的時候,都要檢查是不是還有效才能使用,所以 Error handling 的邏輯會在使用弱引用那邊,因為多了檢查和轉換也會有額外的效能耗損。
Rust 的內部可變性機制,透過RefCell<T>很適合那些只希望只變動一次,或是變動需要由內部管理的情境,這樣可以限制對外部來說,在使用的時候都是不可變的,但又可以在特定情況做變動,例如延遲初始化、狀態機等等。
除此之外,透過 RefCell<T>、Rc<T> 和 Weak<T> 的組合,在我們編寫複雜數據結構和實現特定設計模式時提供了極大的靈活性。它讓我們能夠在保持 Rust 嚴格的借用規則的同時,實現一些在傳統語言中更為容易的特性,例如共享所有權、循環引用等等。
然而,過度依賴內部可變性會帶來一些潛在問題。大量使用 RefCell<T>、Rc<T> 和 Weak<T> 等類型會使得程式碼邏輯變得複雜,增加了理解和維護的難度,我自己在看這邊的時候也是腦袋快打結了,尤其是那個好幾層泛型😂。
同時,因為把原本在編譯的檢查轉移到程式執行的時候,不可避免會影響程式效能,此外,內部可變性也可能引入一些微妙的 bug,例如循環引用導致的記憶體洩漏。
因此在使用內部可變性時,我們應謹慎權衡其帶來的便利性和潛在風險。只有在確實需要共享可變狀態且沒有其他更安全、更簡單的替代方案時,才考慮使用內部可變性。
