今天我們來講一下如何通知系統來顯示訊息,讓你可以在通知欄就看到APP傳遞的消息。
先附上程式碼,如下
package com.example.myapplication

import android.Manifest
import android.app.NotificationChannel
import android.app.NotificationManager
import android.content.Context
import android.content.pm.PackageManager
import android.os.Build
import android.os.Bundle
import androidx.activity.ComponentActivity
import androidx.activity.compose.setContent
import androidx.activity.result.ActivityResultLauncher
import androidx.activity.result.contract.ActivityResultContracts
import androidx.compose.foundation.layout.*
import androidx.compose.material3.Button
import androidx.compose.material3.Text
import androidx.compose.runtime.Composable
import androidx.compose.ui.Alignment
import androidx.compose.ui.Modifier
import androidx.compose.ui.platform.LocalContext
import androidx.compose.ui.tooling.preview.Preview
import androidx.core.app.NotificationCompat
import androidx.core.app.NotificationManagerCompat
import androidx.core.content.ContextCompat

class MainActivity : ComponentActivity() {
    // 用於權限請求的 ActivityResultLauncher
    private lateinit var requestPermissionLauncher: ActivityResultLauncher<String>

    override fun onCreate(savedInstanceState: Bundle?) {
        super.onCreate(savedInstanceState)
        // 在 onCreate 中註冊 ActivityResultLauncher
        requestPermissionLauncher = registerForActivityResult(
            ActivityResultContracts.RequestPermission()
        ) { isGranted: Boolean ->
            if (isGranted) {
                // 使用者授權,顯示通知
                showNotification(this)
            } else {
                // 使用者拒絕授權
                println("通知權限被拒絕")
            }
        }
        setContent {
            NotificationApp()
        }
    }

    @Composable
    fun NotificationApp() {
        val context = LocalContext.current

        Box(
            modifier = Modifier.fillMaxSize(),
            contentAlignment = Alignment.Center
        ) {
            Button(onClick = {
                // 先檢查權限是否已經被授權
                if (Build.VERSION.SDK_INT >= Build.VERSION_CODES.TIRAMISU) {
                    if (ContextCompat.checkSelfPermission(
                            context, Manifest.permission.POST_NOTIFICATIONS
                        ) == PackageManager.PERMISSION_GRANTED
                    ) {
                        // 已經有權限,顯示通知
                        showNotification(context)
                    } else {
                        // 請求權限
                        requestPermissionLauncher.launch(Manifest.permission.POST_NOTIFICATIONS)
                    }
                } else {
                    // 對於 Android 13 以下版本,直接顯示通知
                    showNotification(context)
                }
            }) {
                Text(text = "顯示通知")
            }
        }
    }

    // 顯示通知的函數
    private fun showNotification(context: Context) {
        val channelId = "my_channel_id"
        val notificationId = 1

        // 檢查權限
        if (Build.VERSION.SDK_INT >= Build.VERSION_CODES.TIRAMISU &&
            ContextCompat.checkSelfPermission(
                context, Manifest.permission.POST_NOTIFICATIONS
            ) != PackageManager.PERMISSION_GRANTED
        ) {
            // 如果沒有通知權限,則不顯示通知
            println("通知權限未被授權,無法顯示通知")
            return
        }

        // 創建通知頻道(針對 Android 8.0 及以上)
        if (Build.VERSION.SDK_INT >= Build.VERSION_CODES.O) {
            val name = "My Channel"
            val descriptionText = "Channel for app notifications"
            val importance = NotificationManager.IMPORTANCE_DEFAULT
            val channel = NotificationChannel(channelId, name, importance).apply {
                description = descriptionText
            }

            // 註冊頻道到系統
            val notificationManager: NotificationManager =
                context.getSystemService(Context.NOTIFICATION_SERVICE) as NotificationManager
            notificationManager.createNotificationChannel(channel)
        }

        // 建立通知
        val builder = NotificationCompat.Builder(context, channelId)
            .setSmallIcon(android.R.drawable.ic_dialog_info)
            .setContentTitle("新通知")
            .setContentText("這是通知的內容,顯示在狀態欄")
            .setPriority(NotificationCompat.PRIORITY_DEFAULT)

        // 顯示通知
        with(NotificationManagerCompat.from(context)) {
            notify(notificationId, builder.build())
        }
    }
}

@Preview(showBackground = true)
@Composable
fun NotificationAppPreview() {
    val mainActivity = MainActivity()
    mainActivity.NotificationApp()
}
在Android 13 (API 33)及以上版本中,顯示通知需要POST_NOTIFICATIONS權限,這是一個執行時權限。因此,我們需要在應用運行時向使用者請求這個權限。
在MainActivity的onCreate方法中,我們使用ActivityResultLauncher註冊了一個權限請求的
// 用於權限請求的 ActivityResultLauncher
private lateinit var requestPermissionLauncher: ActivityResultLauncher<String>

override fun onCreate(savedInstanceState: Bundle?) {
    super.onCreate(savedInstanceState)
    // 在 onCreate 中註冊 ActivityResultLauncher
    requestPermissionLauncher = registerForActivityResult(
        ActivityResultContracts.RequestPermission()
    ) { isGranted: Boolean ->
        if (isGranted) {
            // 使用者授權,顯示通知
            showNotification(this)
        } else {
            // 使用者拒絕授權
            println("通知權限被拒絕")
        }
    }
    setContent {
        NotificationApp()
    }
}
當我們點擊按鈕時,NotificationApp()會檢查權限狀態並根據結果顯示通知或請求權限。
@Composable
fun NotificationApp() {
    val context = LocalContext.current

    Box(
        modifier = Modifier.fillMaxSize(),
        contentAlignment = Alignment.Center
    ) {
        Button(onClick = {
            // 先檢查權限是否已經被授權
            if (Build.VERSION.SDK_INT >= Build.VERSION_CODES.TIRAMISU) {
                if (ContextCompat.checkSelfPermission(
                        context, Manifest.permission.POST_NOTIFICATIONS
                    ) == PackageManager.PERMISSION_GRANTED
                ) {
                    // 已經有權限,顯示通知
                    showNotification(context)
                } else {
                    // 請求權限
                    requestPermissionLauncher.launch(Manifest.permission.POST_NOTIFICATIONS)
                }
            } else {
                // 對於 Android 13 以下版本,直接顯示通知
                showNotification(context)
            }
        }) {
            Text(text = "顯示通知")
        }
    }
}
在Android 8.0 (API 26)及以上的版本中,系統引入了「通知頻道」(Notification Channel)的概念。通知頻道是一種用來分組管理通知的方式,使用者可以對不同頻道的通知行為進行個別控制,例如聲音、震動或顯示優先級等。每個通知必須屬於一個頻道,否則在 Android 8.0 及以上的裝置上無法顯示通知。
if (Build.VERSION.SDK_INT >= Build.VERSION_CODES.O) {
    val name = "My Channel"
    val descriptionText = "Channel for app notifications"
    val importance = NotificationManager.IMPORTANCE_DEFAULT
    val channel = NotificationChannel(channelId, name, importance).apply {
        description = descriptionText
    }

    // 註冊頻道到系統
    val notificationManager: NotificationManager =
        context.getSystemService(Context.NOTIFICATION_SERVICE) as NotificationManager
    notificationManager.createNotificationChannel(channel)
}
上面的程式碼用來創建通知頻道,需要包含設置頻道的唯一ID、名稱、描述和重要性:
使用NotificationCompat.Builder來構建通知,並使用NotificationManagerCompat來顯示。
if (Build.VERSION.SDK_INT >= Build.VERSION_CODES.O) {
    val name = "My Channel"
    val descriptionText = "Channel for app notifications"
    val importance = NotificationManager.IMPORTANCE_DEFAULT
    val channel = NotificationChannel(channelId, name, importance).apply {
        description = descriptionText
    }

    // 註冊頻道到系統
    val notificationManager: NotificationManager =
        context.getSystemService(Context.NOTIFICATION_SERVICE) as NotificationManager
    notificationManager.createNotificationChannel(channel)
}
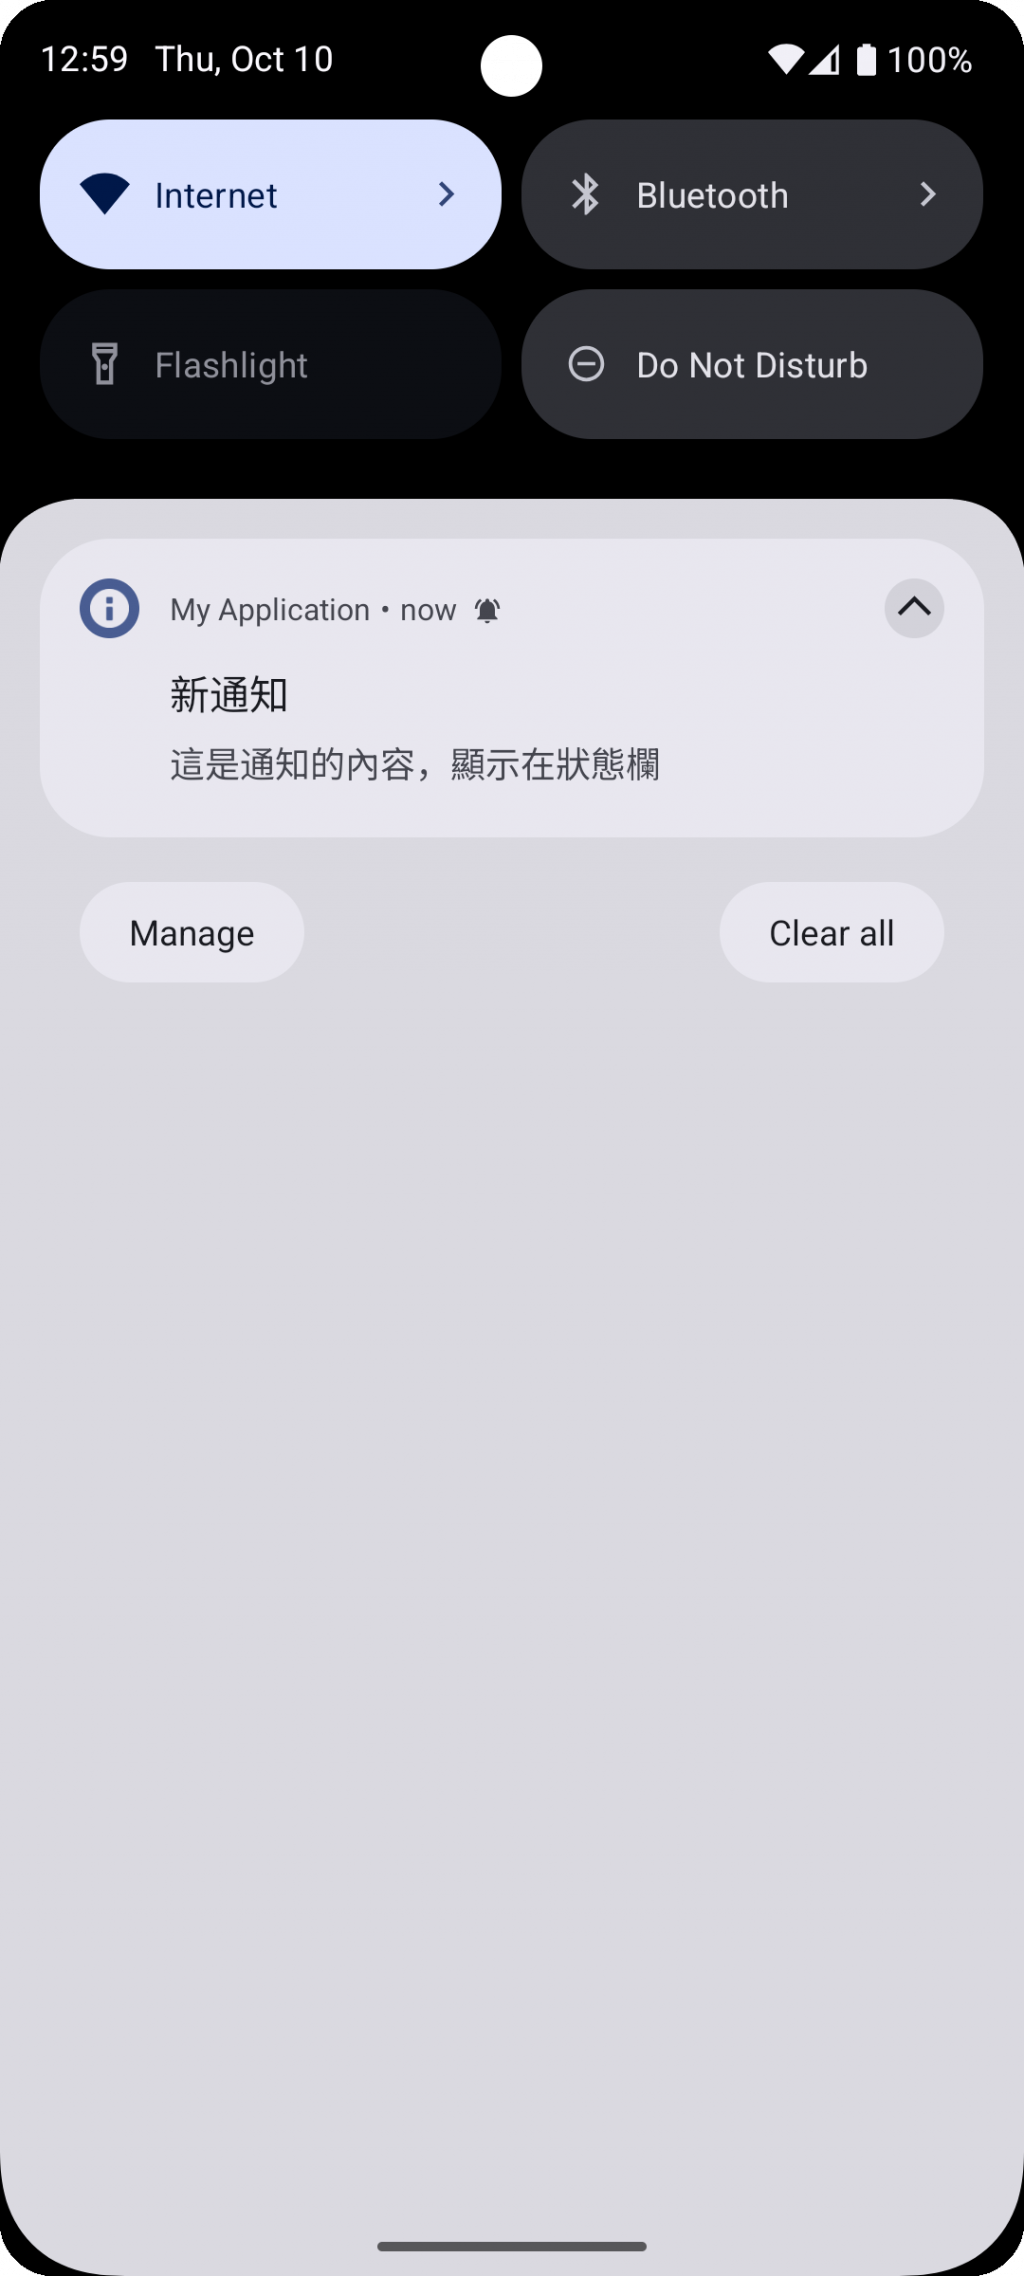
APP執行後的呈現結果如下

今天我們講了Android的Notification系統和如何建立Notification Channel,讓我們能再通知欄跳訊息給使用者,今天的內容就到這邊,讓我明天再見。
