延續昨天 Day 25 中在看 Cargo 時看到的 cargo test,因為實在有點好奇 Rust 版的單元測試怎麼寫,今天就試著來學著寫寫看。
完整程式碼可以參考這個 GitHub 連結。
這裡就用一個經典的加減運算代表某個我們想測試的 utility function:
pub fn add(a: i8, b: i8) -> i8 {
    a + b
}

pub fn sub(a: i8, b: i8) -> i8 {
    a - b
}

fn main() {
    // 這段也可以不寫,主要只是想模擬主程式執行時的輸出值
    let result_array = [add(55, 66), sub(55, 66)];
    println!("{:?}", result_array);
}
語法的部份下面會另外一起做解釋,這邊重點先放在學會怎麼寫一個測試並執行它。接著我們可以在上面程式之後,試著加一段 Rust 版本的單元測試:
#[cfg(test)]
mod tests {
    use super::*;

    #[test]
    fn test_add() {
        assert_eq!(add(2, 3), 5);
        assert_eq!(add(-1, 1), 0);
        assert_eq!(add(0, 0), 0);
        assert_eq!(add(-5, -7), -12);
    }

    #[test]
    fn test_sub() {
        assert_eq!(sub(5, 3), 2);
        assert_eq!(sub(-1, 1), -2);
        assert_eq!(sub(0, 0), 0);
        assert_eq!(sub(-5, -7), 2);
    }
}
此時再試著執行 cargo test 或如果是 VS Code 可以點擊該單元測試區塊上的 Run Tests 按鈕,可以看到測試執行通過的資訊:
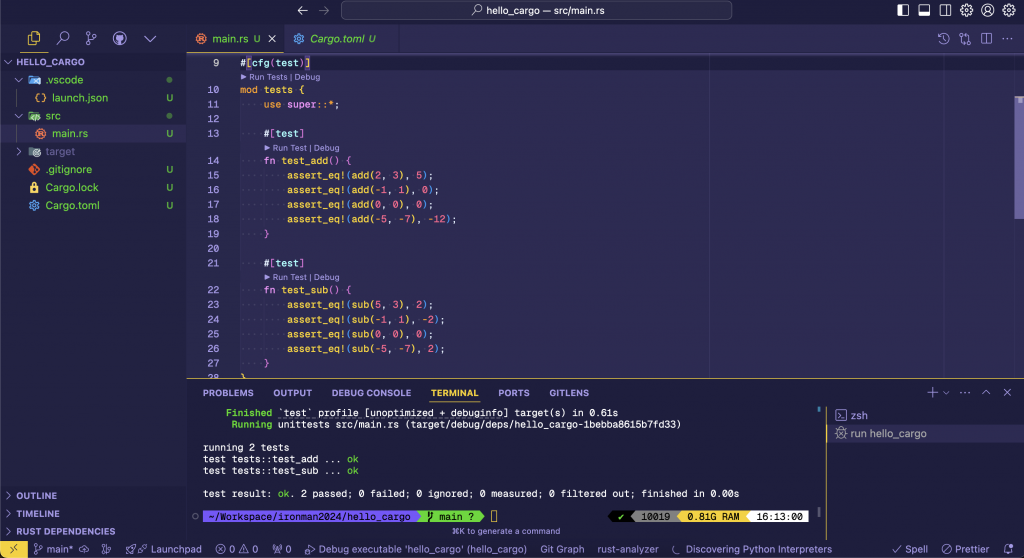
這樣應該就算是一個單元測試版本的 hello world 了,那以下就來了解一下其中的語法以及進階的使用方式。
為了方便解釋我將其中加減運算的函式拆到另一個 utils.rs 檔案來:
// utils.rs
pub fn add(a: i8, b: i8) -> i8 {
    a + b
}

pub fn sub(a: i8, b: i8) -> i8 {
    a - b
}

#[cfg(test)]
mod tests {
    use super::*;

    #[test]
    fn test_add() {
        assert_eq!(add(2, 3), 5);
        assert_eq!(add(-1, 1), 0);
        assert_eq!(add(0, 0), 0);
        assert_eq!(add(-5, -7), -12);
    }

    #[test]
    fn test_sub() {
        assert_eq!(sub(5, 3), 2);
        assert_eq!(sub(-1, 1), -2);
        assert_eq!(sub(0, 0), 0);
        assert_eq!(sub(-5, -7), 2);
    }
}
// main.rs
mod utils;

fn main() {
    let result_array = [utils::add(55, 66), utils::sub(55, 66)];
    println!("{:?}", result_array);
}
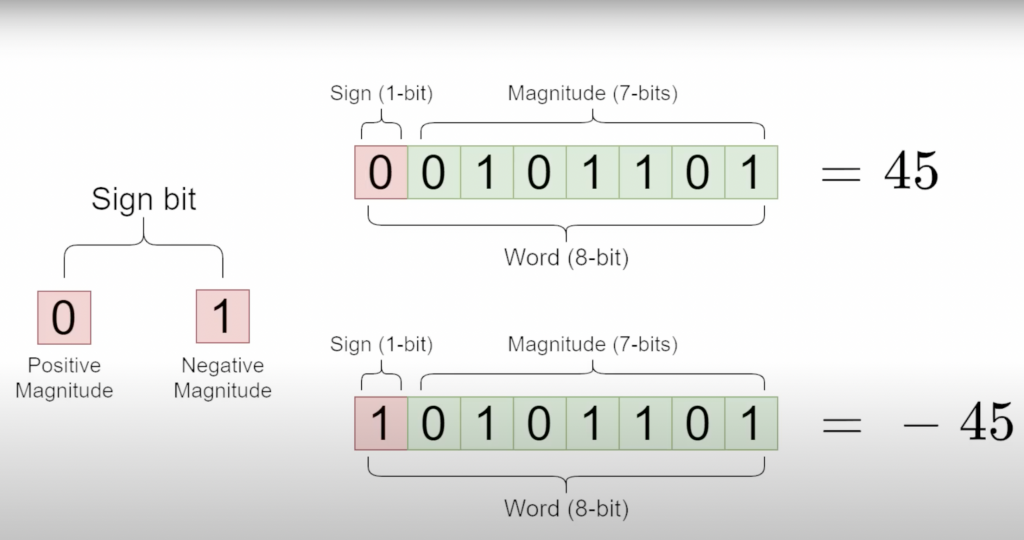
這裡的函式寫法看起來有點像 TypeScript,每個參數以及回傳值都有指定型別,而這裡都是 i8。i8 指的是 8 位元的整數 (integer),因為需包含正負號與 0,這個整數允許的範圍會是在 -2^7 到 2^7 - 1 之間,也就是只能是 -128 到 127 之間的整數。看張圖可能會有種突然回憶起高中的計算機概論的感覺:
而至於需要幾位元的整數都可以按需調整,如果全都是正整數也可以用 u8 代表 unsigned,也就是正負號的位元不需被佔用,因此可以包含更大的值 (ref)。而順帶一提如果要允許小數的話就會是 f8 這樣,代表 floating number 的意思。
這個 pub 看起來是指程式中的公私有的定義(ref)。在 Rust 中預設每個模組都是私有的,也就是只有在這個模組中的作用域可以讀取得到,如果要讓這些 function 可以在不同檔案間去載入,會需要將它設為 pub 讓其他模組中可以讀取得到。
這裡可以試著在 utils.rs 中去拿掉這個 pub 後用 cargo run 編譯試試看,會看到這樣的錯誤:
error[E0603]: function `sub` is private
 --> src/main.rs:4:52
  |
4 |     let result_array = [utils::add(55, 66), utils::sub(55, 66)];
  |                                                    ^^^ private function
  |
note: the function `sub` is defined here
 --> src/utils.rs:5:1
  |
5 | fn sub(a: i8, b: i8) -> i8 {
  | ^^^^^^^^^^^^^^^^^^^^^^^^^^^^^

For more information about this error, try `rustc --explain E0603`.
error: could not compile `hello_cargo` (bin "hello_cargo") due to 2 previous errors
甚至也可以用 cargo test 去執行測試,會看到類似的錯誤。看到 main.rs 中會看到 mod utils、utils::add 這些語法,雖然概念上不太一樣,但可以以類似的 JS 語法來理解:
import utils from utils;

utils.add(55, 66);
也就是說在不同模組之間要能導出、載入這些 function 在 Rust 中會需要用 pub、use、:: 這些語法來實現。
另外補充一下,在專案中的 Cargo.toml 中會看到裡面有 package 這個關鍵字,這裡在想那這樣 crate 與 package 都是指套件嗎?翻閱了教學手冊有講解這個點,擷取文件中的這段如下:
- Packages: A Cargo feature that lets you build, test, and share crates
- Crates: A tree of modules that produces a library or executable
- Modules and use: Let you control the organization, scope, and privacy of paths
- Paths: A way of naming an item, such as a struct, function, or module
簡單整理的話可以是這樣:
package 包含 crates,每個 crate 裡面又在包含數個 modules
package 被視為一個 Cargo 專案,可能引用多個 crate 來產出另一個 crate
crate 被視為套件module 被視為模組,就是每個包含特定邏輯的程式碼片段,裡面有自己的作用域、function、變數等use 就像是 JavaScript 中的 import
pub 雖然概念上不同,但可以說為了要達到類似 export 的效果要將自己設定為公開 (public):: 這個運算子取得對應的變數或函式最後看到測試語法的部份:
#[cfg(test)]
mod tests {
    use super::*;

    #[test]
    fn test_add() {
        assert_eq!(add(2, 3), 5);
        assert_eq!(add(-1, 1), 0);
        assert_eq!(add(0, 0), 0);
        assert_eq!(add(-5, -7), -12);
    }

    #[test]
    fn test_sub() {
        assert_eq!(sub(5, 3), 2);
        assert_eq!(sub(-1, 1), -2);
        assert_eq!(sub(0, 0), 0);
        assert_eq!(sub(-5, -7), 2);
    }
}
關於測試的寫法可以參考文件這段,筆記一些語法:
#[cfg(test)]:代表只有在執行 cargo test 時才執行 (ref)mod tests、#[test]:定義測試的區塊,在想這可能可以理解為類似 jest 中的 describe 與 it 吧,用一個模組來把某個 test suite 中的單元測試案例包起來use super::*;:將父層模組的所有項目引入這個測試模組的作用域assert_eq!:看到 ! 就可以知道是某種操作的巨集 (marco),這裡顧名思義就是在斷言是否相等這邊繼續參考文件內容來嘗試一些關於測試中的其他語法:
#[cfg(test)]
mod tests {
    use super::*;

    // ...

    #[test]
    #[should_panic]
    fn some_error() {
        panic!("oh no!");
    }
}
這個 panic! 參考文件是 Rust 中做錯誤處理的語法,從這段說明看起來 Rust 的錯誤處理分兩種:
Result<T, E> 來表示,用途類似用來提示使用者的警告panic! 會將程式停止執行,讓開發者能快速地在編譯過程中就知道需要處理錯誤而將一個想要斷言應該錯誤的測試案例,可以用 #[should_panic] 來標記,因此這段測試就會正常通過。
那這個語法實際上有什麼用?可以試著在原本的 add 中加上一段會處理錯誤的邏輯,並加上一個測試案例讓它能觸發這個 panic:
pub fn add(a: i8, b: i8) -> i8 {
  if a > 50 || b > 50 {
      panic!("請輸入小於 50 的值!你輸入的 a 是 {}, b 是 {}", a, b);
  }
  a + b
}

#[cfg(test)]
mod tests {
    use super::*;

    #[test]
    fn some_error() {
        assert_eq!(add(55, 66), 121);
    }
}
當今天沒加上 #[should_panic] 的狀況下去執行測試,會遇到執行錯誤,並顯示這樣的訊息:
---- utils::tests::some_error stdout ----
thread 'utils::tests::some_error' panicked at src/utils.rs:3:7:
請輸入小於 50 的值!你輸入的 a 是 55, b 是 66
這時只要補上 #[should_panic] 就能正確去斷言這個測試案例:
#[test]
#[should_panic]
fn some_error() {
    assert_eq!(add(55, 66), 121);
}
但在使用 #[should_panic] 時如果只寫上面這樣,其實會連不是原模組裡的 panic 錯誤都被抓進來,而造成可能誤判的狀況。看個例子,假設今天是像這樣的測試:
#[test]
#[should_panic]
fn some_error() {
    assert_eq!(add(12, 34), 46);
    panic!("不是程式碼中的 panic");
}
這時我們的輸入值皆小於 50,所以並不會觸發 add 中的 panic,但因為在這個測試中另外發生了 panic,所以這測試仍會通過,為了更準確的去指定只要抓 add 中的 panic,會需要加點料:
#[test]
#[should_panic(expected = "請輸入小於 50 的值")]
fn some_error() {
    assert_eq!(add(12, 34), 46);
    panic!("不是程式碼中的 panic");
}
像上面這樣用 expected 去指定 panic 中的錯誤訊息要包含怎樣的 substring,這時再去執行這個測試,就會如預期的遇到錯誤了:
note: panic did not contain expected string
      panic message: `"不是程式碼中的 panic"`,
 expected substring: `"請輸入小於 50 的值"`

failures:
    utils::tests::some_error

test result: FAILED. 0 passed; 1 failed; 0 ignored; 0 measured; 2 filtered out; finished in 0.02s
今天從昨天的 cargo test 延伸學習了如何寫一個簡單的 Rust 單元測試,並趁機會把一些前面沒提到的語法觀念補上,了解了數字型別、模組導出載入方式、錯誤處理等,也小小的體驗到了在初學一個新語言的前期各種學習曲線還很低時的成就感。
另外關於測試其實還有更多進階內容,有興趣的讀者歡迎再參考下面的延伸資料。
文章同步發表於個人部落格