一直在想要不要寫這個主題,因為 Visual Editing 這個需要介紹的技術實在太多了,從 Sanity 本身的設定到 Next.js 前端專案的設定,是一個需要相對廣泛理解才能使用的技術。
Visual Editing 可以在 Sanity 編輯頁面的同時,即時看到編輯後網頁的樣子:
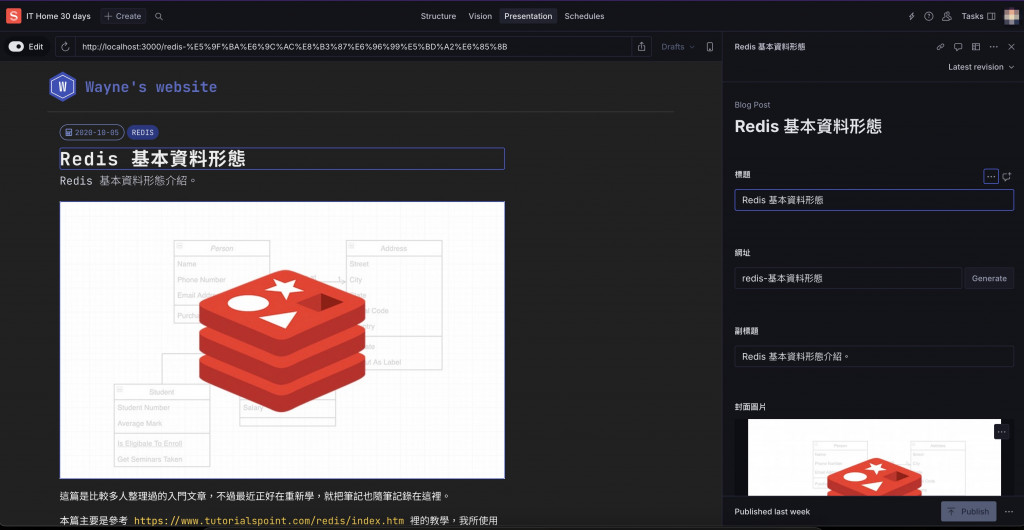
一開始設定,在 Sanity 的 sanity.config.ts 引入 sanity/presentation 的 presentationTool,並且設定 previewUrl:
// ...
import {presentationTool} from 'sanity/presentation'

export default defineConfig({
	// ...
  plugins: [
	  // ...
    presentationTool({
      previewUrl: 'http://localhost:3000',
    }),
  ],
	// ...
})
因為我的 Next.js 專案跟 Sanity 專案是的專案,這邊就設定為 Next.js 的服務位置。
設定完後再到 Next.js 專案內設定:
.
├── app
│   ├── layout.tsx // 前端頁面
│   └── sanity
│       ├── lib
│       │   ├── client.ts // Sanity 連線模組
// ...
Next.js 的話主要是在 createClient 的設定, apiVersion 可以設定今天的日子,Sanity 會自動從當日開始找最新的版本。
然後再設定 stega 的 enabled 為 true 跟 studioUrl 為 Sanity 服務的 http://localhost:3333
import { createClient } from "next-sanity";
import { dataset, projectId } from "../env";
import imageUrlBuilder from "@sanity/image-url";
import type { SanityImageSource } from "@sanity/image-url/lib/types/types";

export const client = createClient({
  projectId,
  dataset,
  useCdn: true,
  apiVersion: "2024-10-05", // 選擇最新的
  stega: {
    enabled: true, // 全站開啟
    studioUrl: "http://localhost:3333", // Sanity 的服務位置
  },
});

// ...
到這邊還沒設定完,還要在前端頁面引入 next-sanity 的 <VisualEditing />:
// ...

import { VisualEditing } from "next-sanity";

// ...

export default function RootLayout({
  children,
}: Readonly<{
  children: React.ReactNode;
}>) {
  return (
    <html lang="en">
      <body>
        <Navbar />
        {children}
        <VisualEditing /> {/* 引入 VisualEditing 設定 */}
      </body>
    </html>
  );
}
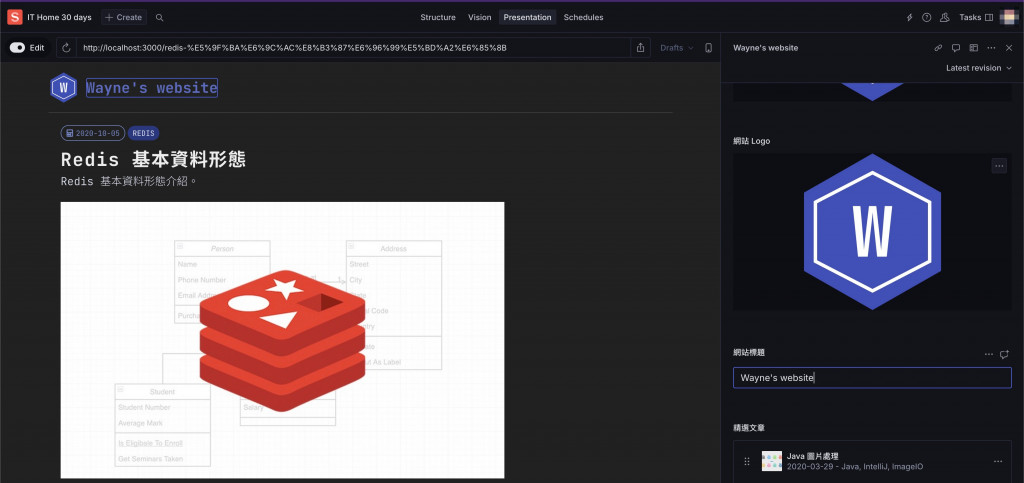
設定到這邊初步的連動就可以算是設定好了,就會有上面的看到的連動畫面了。
但現在還有幾個問題:
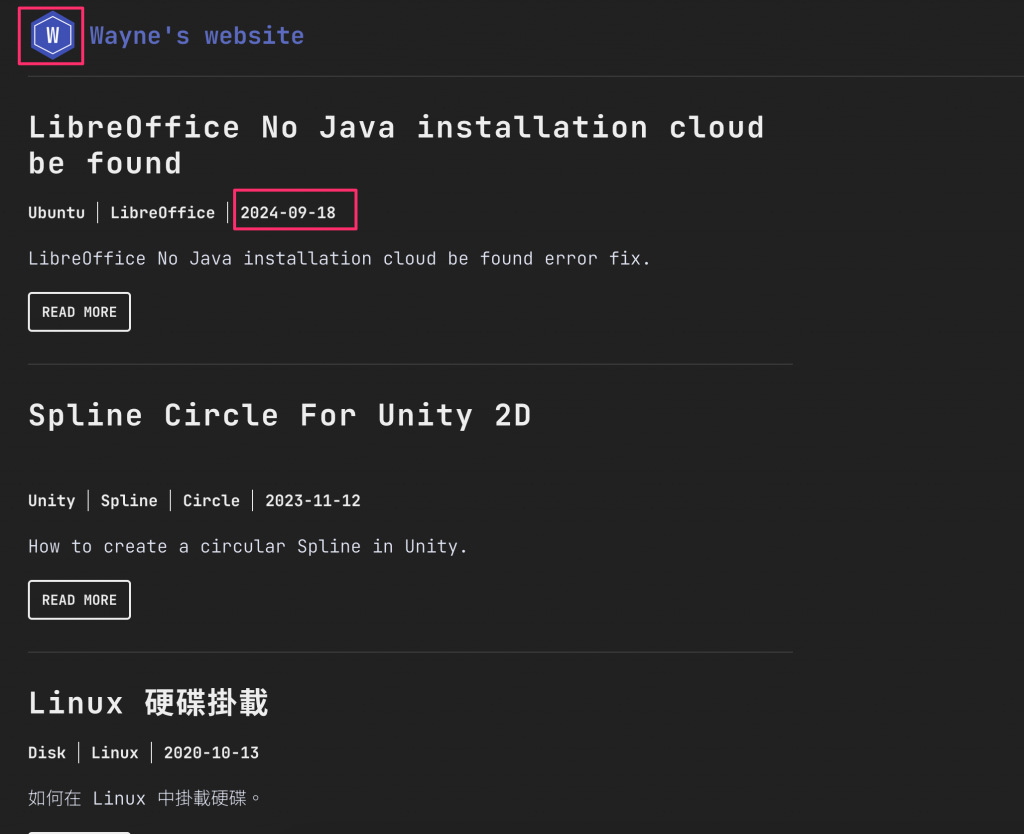
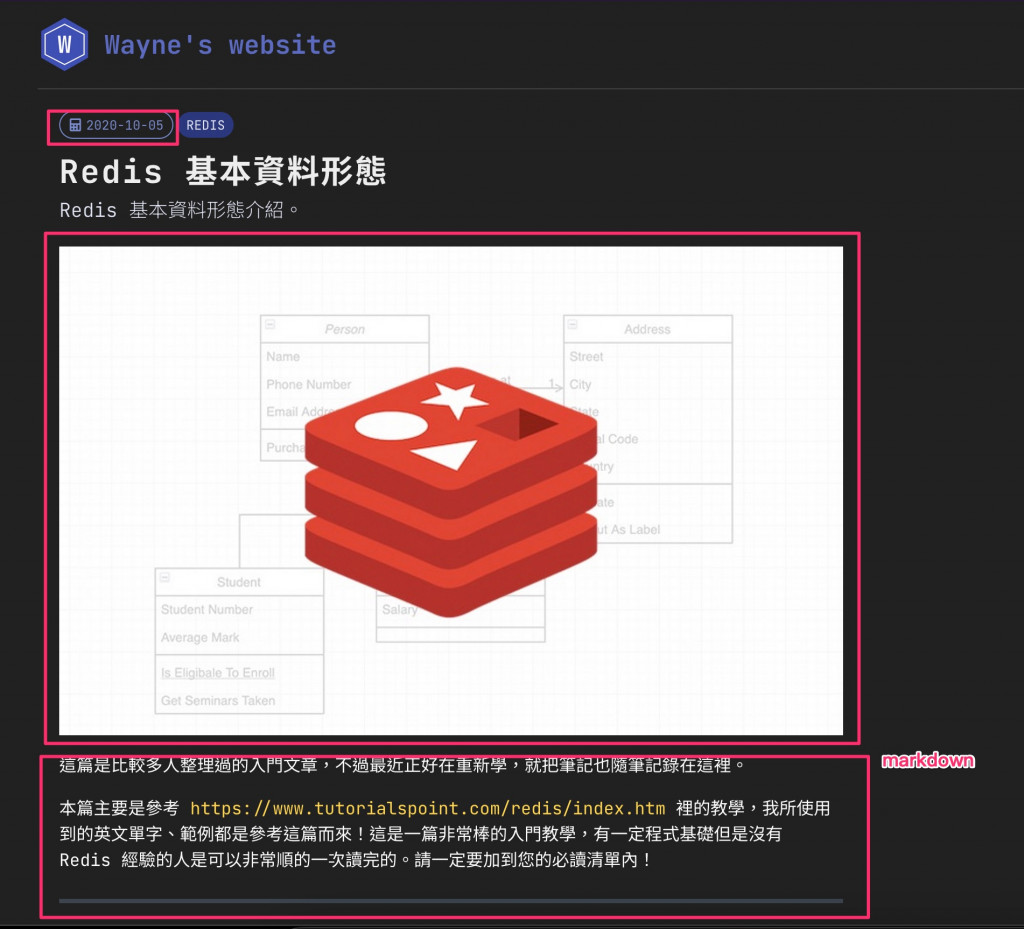
首頁中的 Logo 圖片跟日期沒有 click-to-edit 功能,
click-to-edit 是 Sanity 對可編輯的標籤的稱呼
大多數的字串欄位都可以直接推斷出來
type 是image,date或是從 plugin 來的markdown就無法直接推斷出來。
在引入 stega 跟 <VisualEditing /> 的同時, Sanity 會根據 client.fetch() 內的查詢語法跟引入的 html 標籤自行推斷 click-to-edit 欄位的連動。
但是像說 image 在使用的時候不僅包裹了一層 <SanityImage>,還用了 @sanity/image-url 處理過 url 結構,對於這種經過複雜處理的 Sanity 通常無法直接推斷出對應的 Sanity 欄位。
講自行推斷其實不精準,而是由查詢語法 Content Source Maps 判斷出來的
這時候要怎麼辦?
這時候就可以透過手動 Overlays 的動作來完成 click-to-edit 的建立。
因為使用的是 Next.js 專案 ,可以直接從 next-sanity 中引入 createDataAttribute,再用 createDataAttribute 定義物件 id, type,取得 attr() 方法,再由 attr() 方法建立出 click-to-edit 的 Content Source Maps ( CSM ),傳到任何一個標籤的 data-sanity 屬性中:
// ./app/[slug]/page.tsx

import { client } from "@/app/sanity/lib/client";
import { createDataAttribute } from "next-sanity";

export default async function Post({ params }: { params: { slug: string } }) {
  const { slug } = params;

  const post = await client.fetch(BLOG_POSTS_BY_SLUG_QUERY, {
    slug: decodeURI(slug),
  });

  // ...

  const attr = createDataAttribute({
    id: post._id,
    type: post._type,
  });

  return (
    <div className="post max-w-screen-md p-5">
      <div className="flex text-xs">
        <div
          data-sanity={attr("publishedAt")}  // <- 指定 publishedAt 欄位為 click-to-edit
          className="flex items-center px-2 py-1 border-primary-300 text-primary-300 border rounded-3xl"
        >
          <FaCalculator className="mr-1" />
          <span>{post.publishedAt}</span>
        </div>
        {/*  */}
      </div>
      {/* ... */}
    </div>
  );
}
可以看到在這邊使用了 createDataAttribute() 方法傳入了 id 與 type 取得了 attr,並且傳入 "publishedAt" 作為參數,這樣在 Sanity 的 Presentation 頁面就會連結到對應的欄位了。
可是還有一個問題,那就是在 Next.js 的 Visual Editing 模式下的網址會有錯誤:
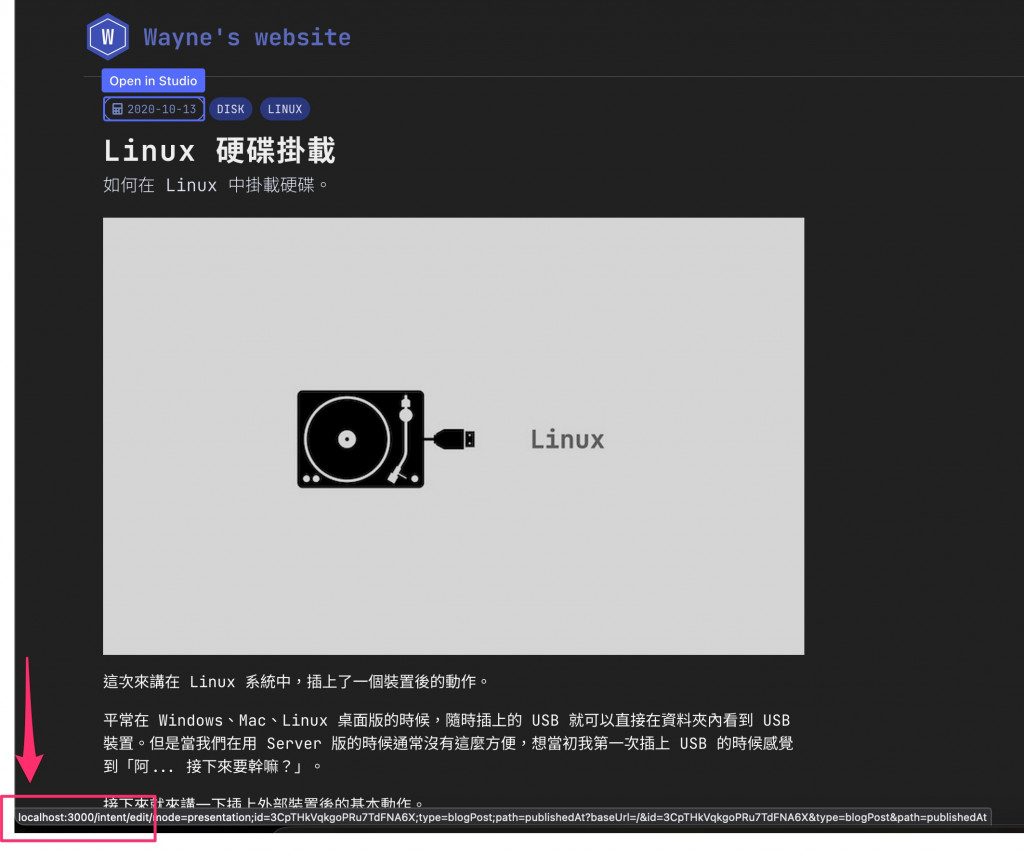
這問題就出在 createDataAttribute() 預設的 url 是跟著 Next.js 專案本身的 url,可是應該要是當初在 ./app/sanity/lib/client.ts 中設定的 http://localhost:3333 才對。
而 createDataAttribute() 也確實提供了 baseUrl 參數讓我們設定:
const attr = createDataAttribute({
  baseUrl: studioUrl,
  id: post._id,
  type: post._type,
});
但是總不想要每次用到 createDataAttribute() 的時候都重複設定 baseUrl,
這時候就可以使用到 createDataAttribute() 建立後的 combine() 方法了。
先回到 Next.js 專案中:
.
├── README.md
├── app
│   ├── [slug]
│   │   └── page.tsx // <- 文章內容
│   ├── components
│   │   ├── PostPreview.tsx // <- 首頁文章預覽
// ...
│   └── sanity
│       ├── lib
│       │   ├── client.ts // <- Sanity 連線設定檔
// ...
在 ./app/sanity/lib/client.ts 中從 next-sanity 再引入 createDataAttribute 並且設定他的 baseUrl,並且命名為 baseDataAttribute:
import { createClient, createDataAttribute } from "next-sanity";
// ...

export const client = createClient({
  projectId,
  dataset,
  useCdn: true,
  apiVersion: "2024-10-05",
  stega: {
    enabled: true,
    studioUrl: "http://localhost:3333",
  },
});

// 設定 baseUrl,並且 export 出去
export const baseDataAttribute = createDataAttribute({
  baseUrl: "http://localhost:3333",
});
再到 ./app/[slug]/page.tsx:
// ./app/[slug]/page.tsx

import { client, baseDataAttribute } from "@/app/sanity/lib/client";
//...

export default async function Post({ params }: { params: { slug: string } }) {
  const { slug } = params;

  const post = await client.fetch(BLOG_POSTS_BY_SLUG_QUERY, {
    slug: decodeURI(slug),
  });

  // ...

	// 使用 combine 連結 baseUrl 資訊,再傳入 id 與 type
  const attr = baseDataAttribute.combine({
    id: post._id,
    type: post._type,
  });

  return (
    <div className="post max-w-screen-md p-5">
      <div className="flex text-xs">
        <div
          data-sanity={attr("publishedAt")} // <- 指定 publishedAt 欄位為 click-to-edit
          className="flex items-center px-2 py-1 border-primary-300 text-primary-300 border rounded-3xl"
        >
          <FaCalculator className="mr-1" />
          <span>{post.publishedAt}</span>
        </div>
        {/*  */}
      </div>
      {/* ... */}
    </div>
  );
}
這樣就不用每次重複定義 baseUrl 了。
首頁的文章預覽卡片也可以這樣改:
"use client";
import Link from "next/link";
import { baseDataAttribute } from "@/app/sanity/lib/client";
import type { BlogPost } from "@/app/sanity/types";
import NProgress from "nprogress";

export default function PostPreview({ post }: { post: BlogPost }) {
  const attr = baseDataAttribute.combine({
    id: post._id,
    type: post._type,
  });
  return (
    <li className="py-8 border-b border-b-neutral-800">
      <h2 className="text-3xl tracking-wider font-bold text-neutral-200">
        <Link href={`/${post.slug.current}`}>{post.title}</Link>
      </h2>
      <div className="text-base font-bold text-neutral-200 mt-5">
        {post.tags?.map((tag) => (
          <span
            className="px-3 first:pl-0 border-r border-r-neutral-200"
            key={tag}
          >
            {tag}
          </span>
        ))}
        <span className="px-3" data-sanity={attr("publishedAt")}>
          {post.publishedAt}
        </span>
      </div>
      <h3 className="text-lg font-light mt-5">{post.subtitle}</h3>
      <div className="mt-5">
        <Link
          className="inline-block border-2 border-neutral-200 text-neutral-200 px-3 py-2 text-sm font-bold rounded uppercase"
          href={`/${post.slug.current}`}
          onClick={() => NProgress.start()}
        >
          Read More
        </Link>
      </div>
    </li>
  );
}
本篇到這邊告一段落,Sanity Visual Editing 的功能可以說是只套用上 35% - 40% 而已。
想想現在顯而易見可優化的問題有:
等待這些問題處理完後才可以說是完全導入了 Sanity Visual Editing