在Day18我們提過使用Servlet如何達到文件上下傳,今日我們來看看Spring MVC如何幫我們達到這一個部分
(1) 請參考Day27 0.創建module
(2) 使用JSON相關設置請參考Day29 (2)
#### (1) multipart-config設定
從官網文件知道我們可以使用Java的方式對DispatchServlet進行配置或是使用web.xml的方式進行設置一個暫存檔案路徑,如果直接設置/tmp資料夾會因為我們運行在intellij裡面的tomcat暫存路徑並未產生而產生錯誤訊息Temporary upload location is not valid,所以這邊我們會寫一個已經產生的路徑進行配置
web.xml針對DispatchServlet設定暫存資料夾
使用該註解並設定MultipartFile作為接收參數
<servlet>
        <servlet-name>springmvc</servlet-name>
        <servlet-class>org.springframework.web.servlet.DispatcherServlet</servlet-class>
        <multipart-config>
            <location>H:\\tmp</location>
            <max-file-size>20848820</max-file-size>
            <max-request-size>418018841</max-request-size>
            <file-size-threshold>1048576</file-size-threshold>
        </multipart-config>
    </servlet>
@Controller
public class FileController {

    @GetMapping("index")
    public String fileUpload(){
        return "index";
    }

    @PostMapping("fileUpload")
    @ResponseBody
    public String fileUpload(@RequestParam("fileImage")MultipartFile file) throws IOException {
        String fileName = file.getOriginalFilename();
        System.out.println(fileName);
        file.transferTo(new File("H:\\00_fileupload\\" + fileName));

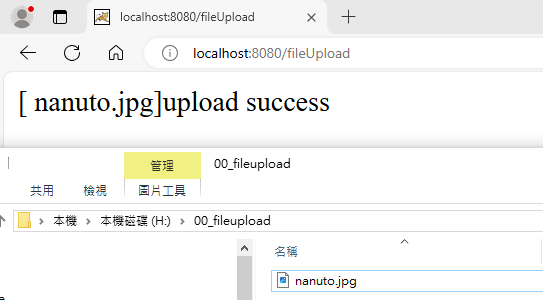
        return "[ "+file.getOriginalFilename()+"]upload success";
    }
}

檔案下載我們需要設置Content-Type所以我們需要透過ResponseEntity來協助我們達成,記得要引用json相關依賴的lib否則會出現‵No converter for [class org.springframework.core.io.InputStreamResource]‵錯訊
同樣寫在FileController中
@Autowired
    private ServletContext context;

    @GetMapping("fileDownload")
    public ResponseEntity<InputStreamResource> fileDownload() throws IOException {
        String fileName = "火影忍者.jpg";
        String filePath = context.getRealPath("download")+ File.separator+fileName;

        FileInputStream fis = new FileInputStream(filePath);
        InputStreamResource resource = new InputStreamResource(fis);

        String filenameUrlEncode = URLEncoder.encode(fileName, "UTF-8");

        ResponseEntity entity = ResponseEntity.ok()
                .contentType(MediaType.APPLICATION_OCTET_STREAM) //設定檔案類型
                .contentLength(fis.available())
                //告訴瀏覽器是檔案下載
                .header("Content-Disposition", "attachment; filename="+filenameUrlEncode)
                .body(resource);

        return entity;
    }

