前情提要:昨天我們初步理解了Kubernetes 基礎架構與組件間的關係。也簡單建立了第一個 Pod。
從 Docker Compose 到 Kubernetes Pod 的完整轉換

核心概念對比表
| 概念 | Docker Compose | Kubernetes Pod |
|---|---|---|
| 最小單位 | Container | Pod (包含 1+ Container) |
| 網路 | 共享 Docker 網路 | Pod 內共享 IP 和 Port |
| 存儲 | Volume 掛載 | Volume 在 Pod 內共享 |
| 生命週期 | docker-compose up/down |
Pod 創建/刪除 |
| 重啟策略 | restart: always |
restartPolicy: Always |
| 環境變數 | environment: |
env: 或 envFrom: |
| 資源限制 | deploy.resources |
resources.limits |
K8s 有許多種資源的類型可以建立、修改跟管理的對象。每種資源都有特定的用途和行為。
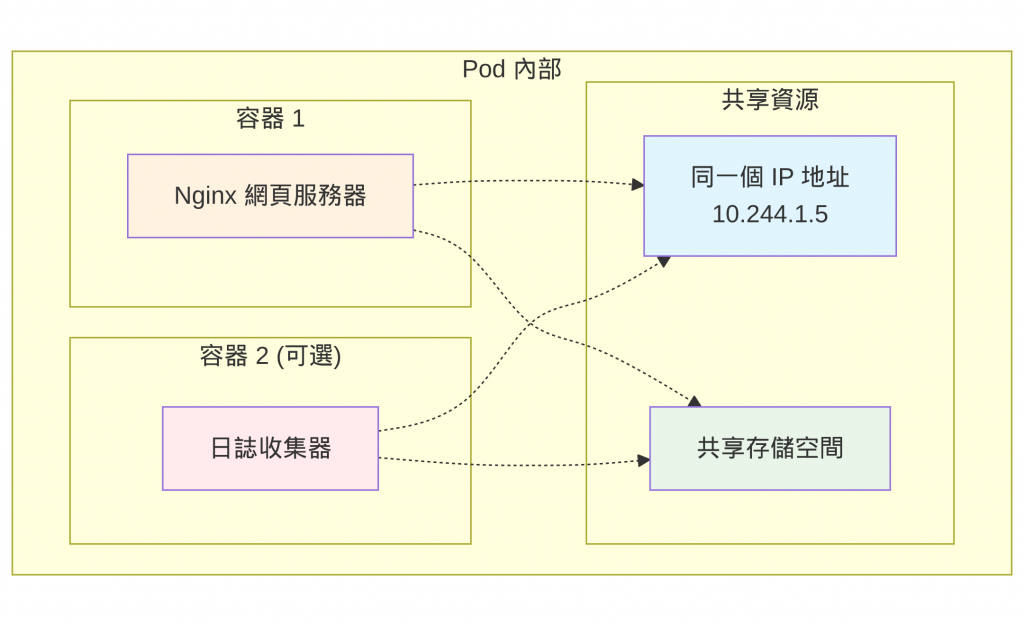
Pod 則是其中一種資源,它最小的可部署單位,包含一個或多個容器。
用生活化的比喻理解
想像你要搬家到一個新的公寓: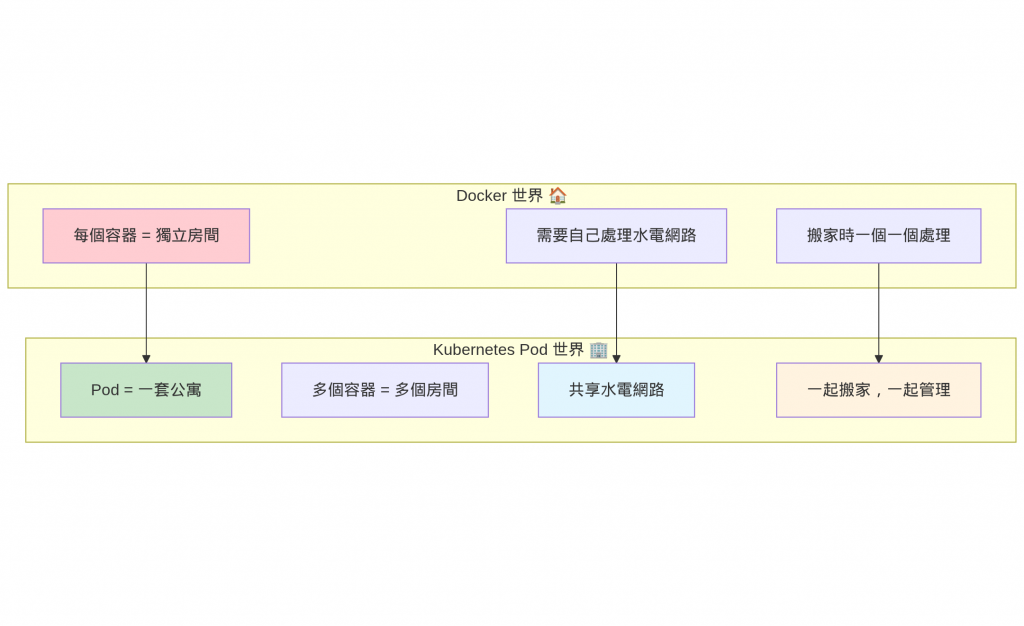
Pod 就是 Kubernetes 的「公寓套房」!
Docker Compose 的問題:
# docker-compose.yml - 無法真正「綁定」容器
version: '3'
services:
app:
  image: nginx
sidecar:
  image: busybox
  # ❌ 如果 app 掛了,sidecar 不會自動重啟
  # ❌ 無法保證它們在同一台機器上
Kubernetes Pod 的解決方案:
# pod.yaml - 容器生死與共
apiVersion: v1
kind: Pod
metadata:
name: app-with-sidecar
spec:
containers:
- name: app
  image: nginx
- name: sidecar
  image: busybox
# ✅ 同生共死,同一 IP,共享存儲
所以可以得知Pod 的三個關鍵特點
基本結構對比
# Docker Compose 版本
version: '3'
services:
web:
  image: nginx:1.29.0-otel
  ports:
    - "8080:80"
  environment:
    - ENV=production
  restart: always
  mem_limit: 512m
  cpus: 0.5
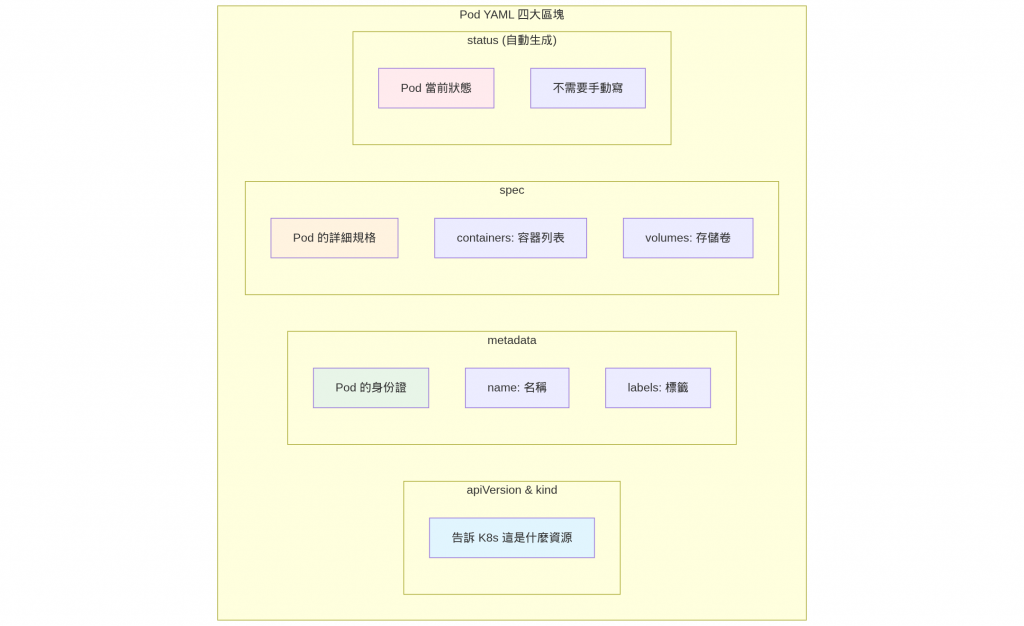
# simple-pod.yaml
apiVersion: v1     # API 版本
kind: Pod          # 資源類型
metadata:          # Pod 的基本資訊
    name: web-pod    # Pod 名稱
    labels:        # 標籤(用於識別)
      app: web
      environment: production
spec:                # Pod 的詳細規格
    restartPolicy: Always
    containers:    # 容器列表
        - name: web   # 容器名稱
      image: nginx:1.29.0-otel    # 使用的 image
      ports:                    # Port 設定
      - containerPort: 80
        name: http
      env:
      - name: ENV
        value: "production"
      resources:
        requests:
          memory: "256Mi"
          cpu: "250m"
        limits:
          memory: "512Mi"
          cpu: "500m"
# simple-pod.yaml
apiVersion: v1
kind: Pod
metadata:
name: simple-nginx
labels:
  app: nginx
  tier: frontend
spec:
containers:
- name: nginx
  image: nginx:1.29.0-otel
  ports:
  - containerPort: 80
# 部署 Pod
kubectl apply -f simple-pod.yaml

# 查看 Pod 狀態
kubectl get pods
kubectl get pods -o wide

# 查看 Pod 詳細資訊
kubectl describe pod simple-nginx

# 實時觀察 Pod 狀態變化
kubectl get pods --watch
這練習主要是讓我們來觀察 Pod 被建立時的狀態變化。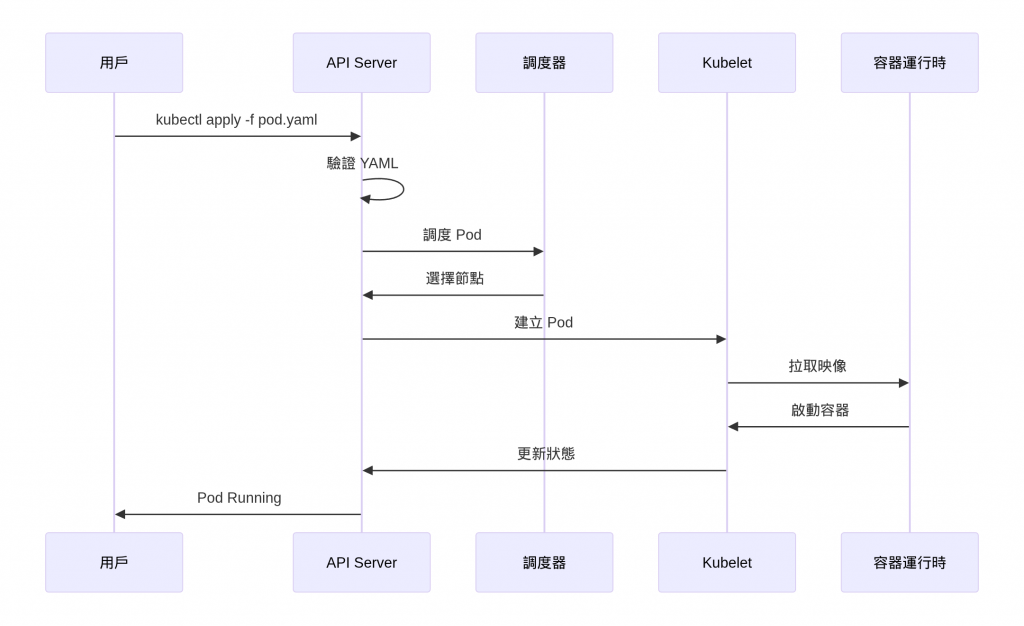
新增了環境變數、healthcheck
# docker-compose.yml
version: '3'
services:
app:
  image: nginx:1.29.0-otel
  environment:
    - NODE_ENV=production
    - DATABASE_URL=postgres://db:5432/myapp
  mem_limit: 512m
  cpus: 0.5
  healthcheck:
    test: ["CMD", "curl", "-f", "http://localhost/health"]
    interval: 30s
    timeout: 10s
    retries: 3
# advanced-pod.yaml
apiVersion: v1
kind: Pod
metadata:
name: advanced-nginx
labels:
  app: nginx
  version: v1.0
spec:
containers:
- name: nginx
  image: nginx:1.21

  # Port 配置
  ports:
  - containerPort: 80
    name: http
    protocol: TCP

  # 環境變數 - 多種方式
  env:
  - name: NODE_ENV
    value: "production"
  - name: DATABASE_URL
    value: "postgres://db:5432/myapp"
  - name: POD_NAME
    valueFrom:
      fieldRef:
        fieldPath: metadata.name
  - name: POD_IP
    valueFrom:
      fieldRef:
        fieldPath: status.podIP

  # 資源限制
  resources:
    requests:  # 最小需求
      memory: "128Mi"
      cpu: "100m"
    limits:    # 最大限制
      memory: "512Mi"
      cpu: "500m"

  # 存活探針 (Liveness Probe)
  livenessProbe:
    httpGet:
      path: /
      port: 80
    initialDelaySeconds: 30  # 啟動後 30 秒開始檢查
    periodSeconds: 10        # 每 10 秒檢查一次
    timeoutSeconds: 5        # 超時時間 5 秒
    failureThreshold: 3      # 失敗 3 次重啟容器

  # 就緒探針 (Readiness Probe)
  readinessProbe:
    httpGet:
      path: /
      port: 80
    initialDelaySeconds: 5   # 啟動後 5 秒開始檢查
    periodSeconds: 5         # 每 5 秒檢查一次
    timeoutSeconds: 3        # 超時時間 3 秒
    failureThreshold: 3      # 失敗 3 次從服務中移除

# Pod 重啟策略
restartPolicy: Always  # Always, OnFailure, Never
在 Docker compose 我們通常會設定 healthcheck 來檢查,而 k8s 提供了多種檢查探針。
各類檢查探針職責

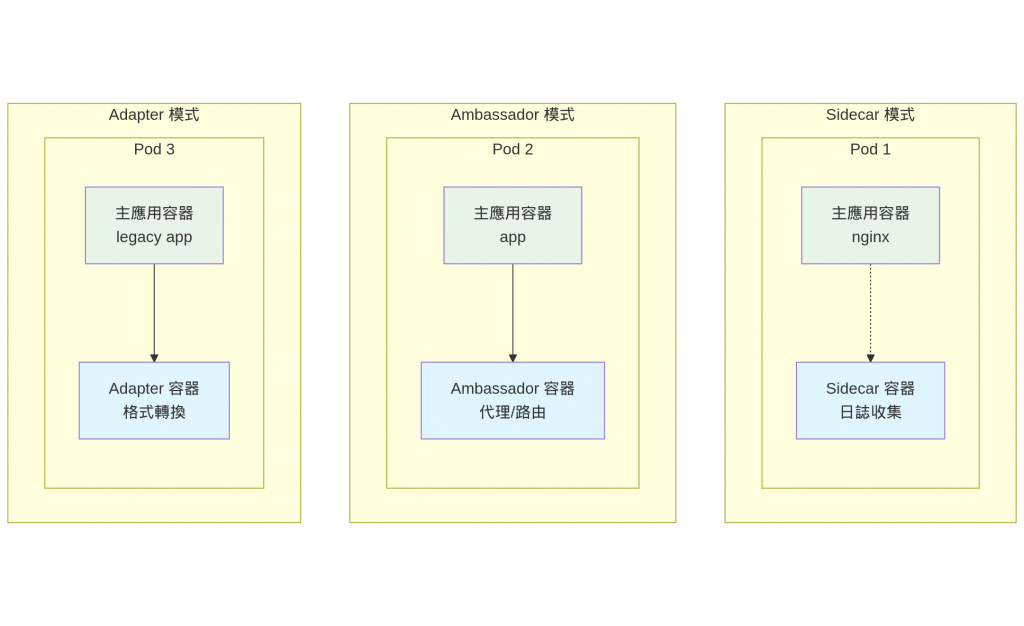
常見的多容器模式
multi-container-pod.yaml
# multi-container-pod.yaml - 多容器 Pod
apiVersion: v1
kind: Pod
metadata:
  name: web-with-sidecar
  labels:
    app: web
spec:
  # 定義共享volume
  volumes:
  - name: shared-logs
    emptyDir: {}
  - name: config
    configMap:
      name: fluent-config

  # 初始化容器 - 準備工作
  initContainers:
  - name: init-logs
    image: busybox:1.35
    command: ['sh', '-c', 'mkdir -p /var/log/nginx && chmod 777 /var/log/nginx']
    volumeMounts:
    - name: shared-logs
      mountPath: /var/log/nginx

  # 主要容器列表
  containers:
  # 主容器 - Web 服務
  - name: web
    image: nginx:1.29.0-otel
    ports:
    - containerPort: 80

    # 掛載共享日誌volume
    volumeMounts:
    - name: shared-logs
      mountPath: /var/log/nginx

    # 自定義 nginx 配置,輸出日誌到共享volume
    command: ["/bin/sh"]
    args:
    - -c
    - |
      echo 'access_log /var/log/nginx/access.log;' > /etc/nginx/conf.d/logging.conf
      nginx -g 'daemon off;'

  # Sidecar 容器 - 日誌收集
  - name: log-collector
    image: fluent/fluent-bit:1.8

    # 掛載相同的日誌卷
    volumeMounts:
    - name: shared-logs
      mountPath: /var/log/nginx
      readOnly: true
    - name: config
      mountPath: /fluent-bit/etc

    # 資源限制
    resources:
      requests:
        memory: "64Mi"
        cpu: "50m"
      limits:
        memory: "128Mi"
        cpu: "100m"
fluent-config.yaml
apiVersion: v1
kind: ConfigMap
metadata:
  name: fluent-config
data:
  fluent-bit.conf: |
    [SERVICE]
        Flush         1
        Log_Level     info
        Daemon        off

    [INPUT]
        Name              tail
        Path              /var/log/nginx/access.log
        Parser            nginx
        Tag               nginx.access
        Refresh_Interval  5

    [OUTPUT]
        Name  stdout
        Match *
這裡會需要 ConfigMap 的原因是
分離配置和程式碼 - FluentBit 需要配置文件來知道「從哪裡讀日誌」、「怎麼處理」、「輸出到哪裡」,隨時可以修改和重用。不然配置需要 hard coding 在容器裡,要改配置就得重建整個映像檔
# 部署 ConfigMap
kubectl apply -f fluent-config.yaml

# 建立 Pod
kubectl apply -f multi-container-pod.yaml

# 觀察 Pod 狀態
kubectl get pods web-with-sidecar
一開始應該會如下這樣
NAME               READY   STATUS            RESTARTS   AGE
web-with-sidecar   0/2     PodInitializing   0          19s
過陣子才會變成
NAME               READY   STATUS    RESTARTS   AGE
web-with-sidecar   2/2     Running   0          41s
測試多容器功能
建立 Port forwarding
kubectl port-forward pod/web-with-sidecar 8080:80

# 1. 產生一些訪問日誌
curl http://localhost:8080
curl http://localhost:8080/test
curl http://localhost:8080/api

# 2. 查看 sidecar 日誌收集
kubectl logs web-with-sidecar -c log-collector

# 3. 查看 nginx 日誌
kubectl logs web-with-sidecar -c web

# 4. 檢查共享volume中的日誌文件
kubectl exec web-with-sidecar -c web -- ls -la /var/log/nginx/
kubectl exec web-with-sidecar -c web -- tail /var/log/nginx/access.log
容器之間的互動如下︰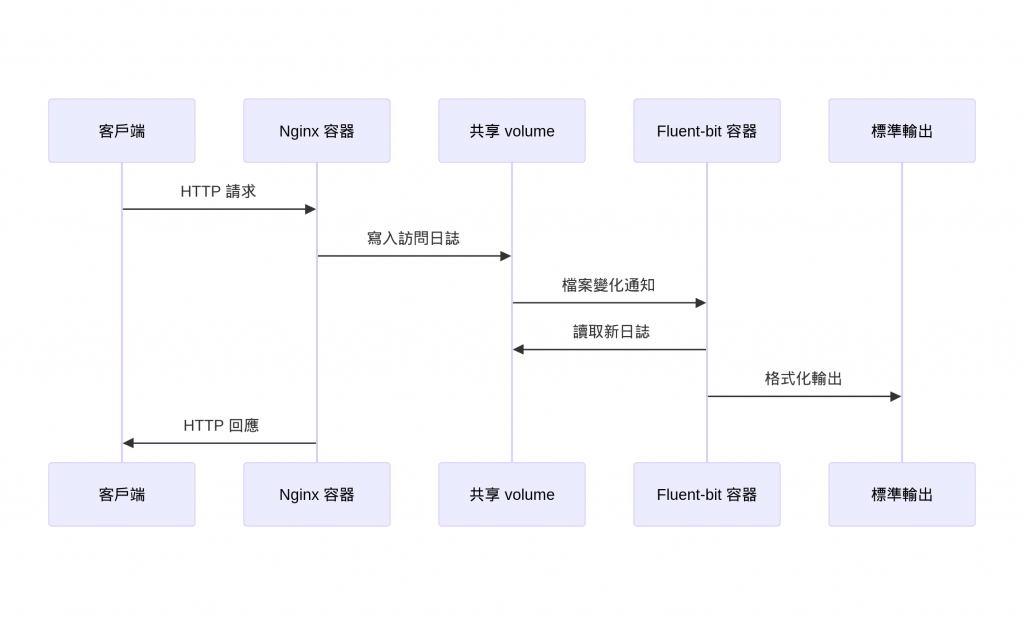
清理資源 - 移除 Pod 和 ConfigMap
# 刪除多容器 Pod
kubectl delete -f multi-container-pod.yaml

# 刪除 ConfigMap
kubectl delete -f fluent-config.yaml
or 直接指定資源名稱刪除
# 刪除 Pod
kubectl delete pod web-with-sidecar
kubectl delete pod simple-nginx
kubectl delete pod advanced-nginx

# 刪除 ConfigMap
kubectl delete configmap fluent-config
驗證清理結果
# 確認 Pod 已刪除
kubectl get pods

# 確認 ConfigMap 已刪除
kubectl get configmap

# 查看所有資源狀態
kubectl get all
如果真不幸,Pod 建立一直有問題,我們能參考這張圖來排解問題。由上(細顆粒)到下(相對粗的顆粒)依序來檢查問題。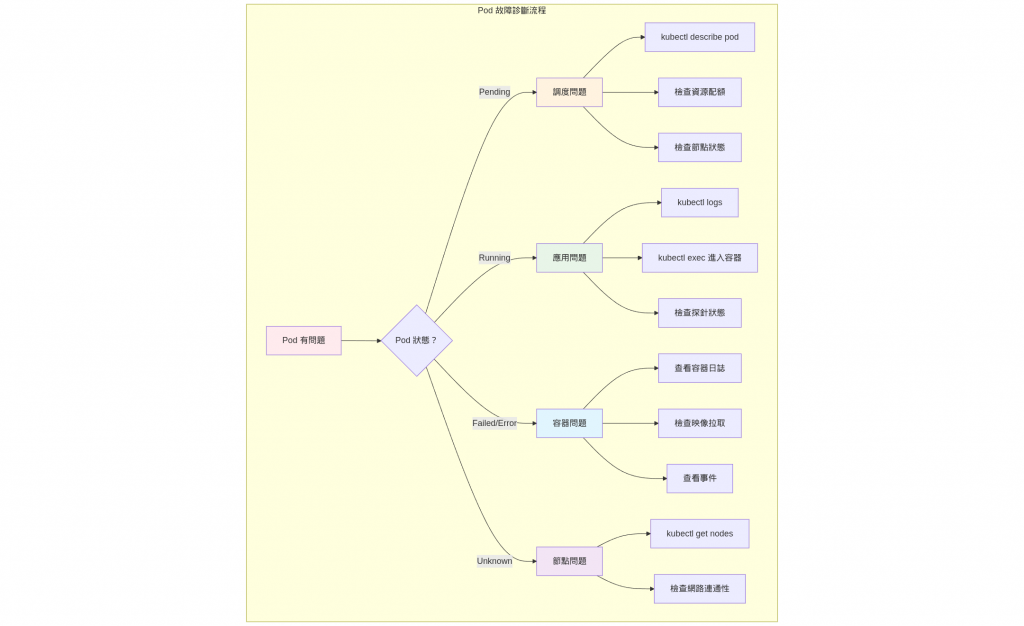
通過今天的學習,我們應該能自己動手把日常維護開發的專案,寫出一份 Pod 類型的 YAML 檔案了。本質上 Docker compose 怎寫,Pod YAML 大差不差照樣搬,只是需要多點 metadata 的描述。


 iThome鐵人賽