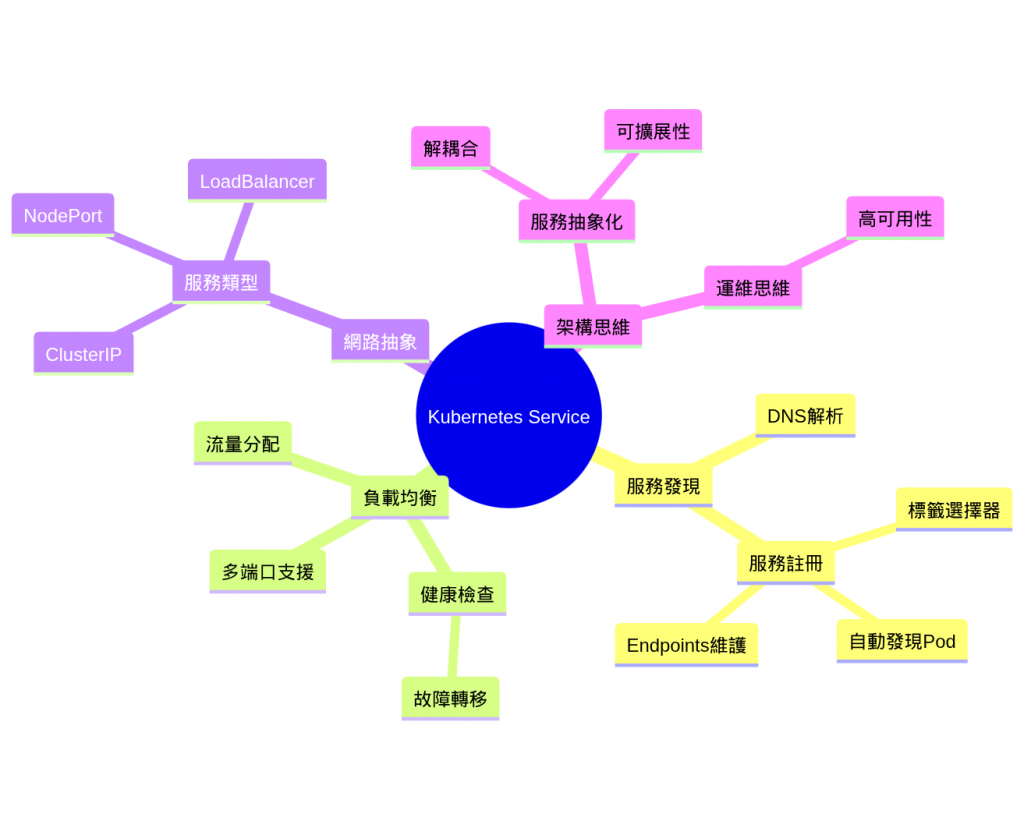
Service 基礎 - Pod 間溝通的穩定橋樑 🌉
還記得昨天我們學會了 RBAC 權限控制,讓每個 Pod 都有了明確的身份嗎?但是各位,光有身份還不夠!就像餐廳裡的服務生有了工作證,但顧客要如何找到他們點餐呢?今天我們要學習 K8s 的核心網路概念:Service!
想像你經營一家連鎖餐廳,每天都有服務生請假、新人報到,座位也會調整,顧客總不能每次都要重新找人吧?我們需要一個「總服務台」,不管後面的服務生怎麼變動,顧客都能透過「總服務台」得到服務。這就是 Service 要解決的問題!
✅ 理解 Service 的核心概念與必要性
✅ 掌握 ClusterIP、NodePort、LoadBalancer 三種服務類型
✅ 實作基礎的 Pod 間通訊
✅ 了解服務發現的基本原理
沒有 Service 的災難場景 😱
# 😱 災難場景:直接使用 Pod IP 通訊
> kubectl get pods -o wide

NAME                    READY   STATUS    RESTARTS   AGE   IP
payment-api-7d4b8c-xyz  1/1     Running   0          2m    10.244.1.15
payment-api-7d4b8c-abc  1/1     Running   0          2m    10.244.2.23

# 前端應用嘗試連接支付服務
> curl http://10.244.1.15:8080/api/payment
# ❌ 如果這個 Pod 重啟了,IP 就變了!

# 5分鐘後 Pod 重啟...
> kubectl get pods -o wide

NAME                    READY   STATUS    RESTARTS   AGE   IP
payment-api-7d4b8c-xyz  1/1     Running   1          7m    10.244.1.89  # IP 變了!
這會造成什麼問題?
🔴 IP 不穩定:Pod 重啟後 IP 會改變
🔴 無法 Load balacning:只能連到一個 Pod
🔴 高可用性差:一個 Pod 掛了,服務就中斷
🔴 維護困難:每次部署都要更新所有調用方的配置設定
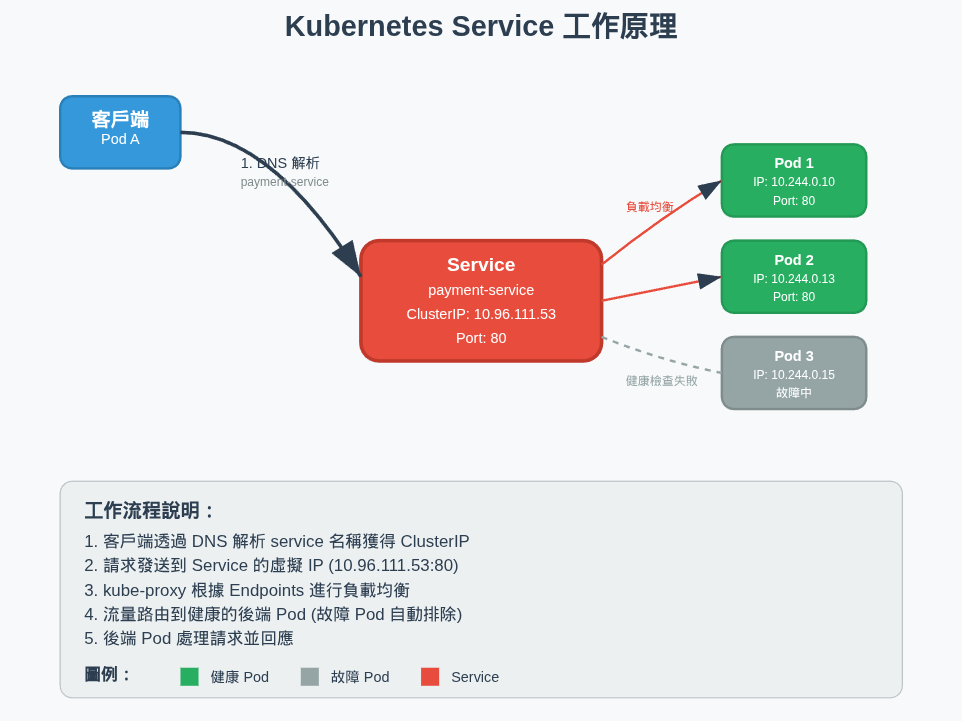
Service 就像餐廳的「總服務台」:
顧客 → 總服務台 → 分配給可用的服務生
Pod  →  Service  → 路由到健康的後端 Pod
apiVersion: v1
kind: Service
metadata:
  name: payment-service        # 服務名稱(DNS 名稱)
  namespace: prod-env
  labels:
    app: payment-api
    tier: backend
spec:
  selector:                    # 🎯 選擇器:決定哪些 Pod 屬於這個服務
    app: payment-api
    version: v1
  ports:                       # 🔌 端口映射
  - name: http                 # 端口名稱
    port: 80                   # Service 對外端口
    targetPort: 8080           # Pod 內部端口
    protocol: TCP
  - name: https
    port: 443
    targetPort: 8443
    protocol: TCP
  type: ClusterIP              # 🏷️ 服務類型
1. 標籤選擇器 (Label Selector)
   Service 透過標籤找到對應的 Pod

2. 端點 (Endpoints)
   Kubernetes 自動維護 Pod IP 列表

3. 負載均衡
   流量自動分配到健康的 Pod

4. DNS 解析
   可以透過服務名稱訪問
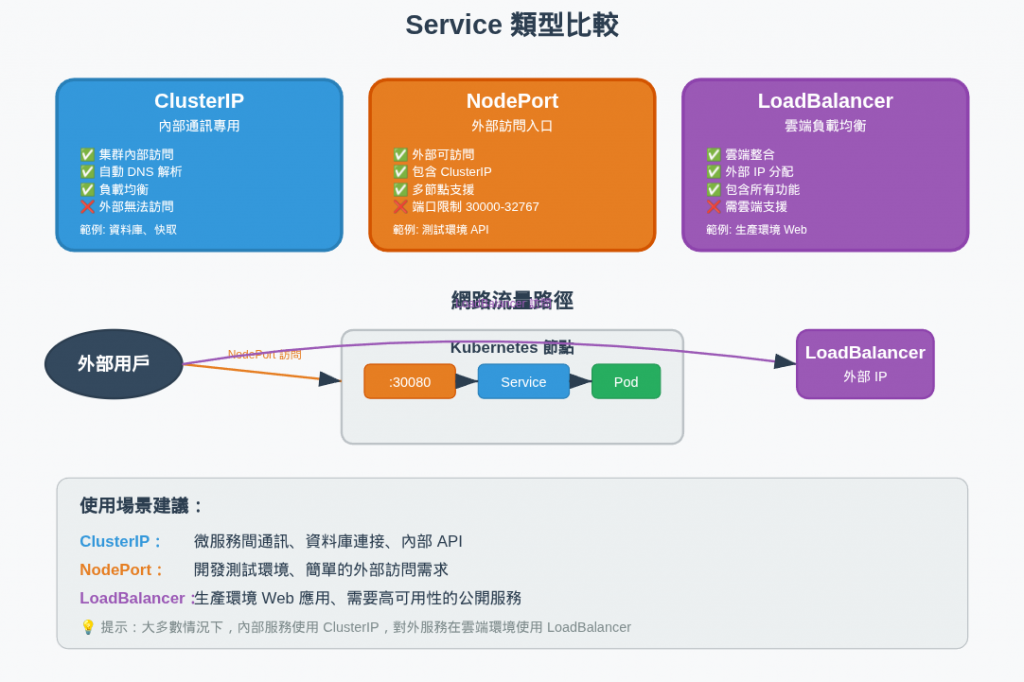
使用場景:Pod 之間的內部通訊(最常用)
# cluster-ip-service.yaml
apiVersion: v1
kind: Service
metadata:
  name: payment-service
  namespace: prod-env
spec:
  type: ClusterIP              # 預設類型
  selector:
    app: payment-api
  ports:
  - port: 80
    targetPort: 8080
特點:
# 在 cluster 內部可以這樣訪問
curl http://payment-service.prod-env.svc.cluster.local/api/payment
# 或簡化版本(同命名空間)
curl http://payment-service/api/payment
使用場景:需要從cluster外部訪問服務
# nodeport-service.yaml
apiVersion: v1
kind: Service
metadata:
  name: web-frontend-service
  namespace: prod-env
spec:
  type: NodePort
  selector:
    app: web-frontend
  ports:
  - port: 80                   # Service 內部端口
    targetPort: 3000           # Pod 端口
    nodePort: 30080            # 節點端口(30000-32767)
    protocol: TCP
特點:
# 可以透過任何節點 IP 訪問
curl http://192.168.1.100:30080
curl http://192.168.1.101:30080
使用場景:在雲端環境中提供外部 load balancer
特點:
✅ 雲端提供商自動建立 load balancer
✅ 分配外部 IP 地址
✅ 自動包含 NodePort 和 ClusterIP 功能
❌ 需要雲端環境支援
❌ 需要額外費用
場景設定:電商系統架構
我們要建立一個簡單的電商系統:
API Gateway → 後端服務群
            ├── 商品服務
            └── 支付服務
backend-services.yaml
# backend-services.yaml
---
# 商品服務
apiVersion: apps/v1
kind: Deployment
metadata:
  name: product-service
  namespace: ecommerce
spec:
  replicas: 3
  selector:
    matchLabels:
      app: product-service
  template:
    metadata:
      labels:
        app: product-service
        tier: backend
    spec:
      containers:
      - name: product-api
        image: nginx:alpine
        ports:
        - containerPort: 80
        env:
        - name: SERVICE_NAME
          value: "product-service"

---
# 支付服務
apiVersion: apps/v1
kind: Deployment
metadata:
  name: payment-service
  namespace: ecommerce
spec:
  replicas: 2
  selector:
    matchLabels:
      app: payment-service
  template:
    metadata:
      labels:
        app: payment-service
        tier: backend
    spec:
      containers:
      - name: payment-api
        image: nginx:alpine
        ports:
        - containerPort: 80
        env:
        - name: SERVICE_NAME
          value: "payment-service"
backend-services-svc.yaml
# backend-services-svc.yaml
---
# 商品服務 Service
apiVersion: v1
kind: Service
metadata:
  name: product-service
  namespace: ecommerce
  labels:
    app: product-service
    tier: backend
spec:
  type: ClusterIP
  selector:
    app: product-service
  ports:
  - name: http
    port: 80
    targetPort: 80

---
# 支付服務 Service
apiVersion: v1
kind: Service
metadata:
  name: payment-service
  namespace: ecommerce
  labels:
    app: payment-service
    tier: backend
spec:
  type: ClusterIP
  selector:
    app: payment-service
  ports:
  - name: http
    port: 80
    targetPort: 80
api-gateway.yaml
# api-gateway.yaml
---
apiVersion: apps/v1
kind: Deployment
metadata:
  name: api-gateway
  namespace: ecommerce
spec:
  replicas: 2
  selector:
    matchLabels:
      app: api-gateway
  template:
    metadata:
      labels:
        app: api-gateway
        tier: frontend
    spec:
      containers:
      - name: gateway
        image: nginx:alpine
        ports:
        - containerPort: 80
        # 這裡可以配置 nginx 反向代理到後端服務
        # upstream product-service.ecommerce.svc.cluster.local
        # upstream payment-service.ecommerce.svc.cluster.local

---
# API Gateway Service (NodePort 讓外部可以訪問)
apiVersion: v1
kind: Service
metadata:
  name: api-gateway
  namespace: ecommerce
spec:
  type: NodePort  #  NodePort 讓外部可以訪問
  selector:
    app: api-gateway
  ports:
  - name: http
    port: 80
    targetPort: 80
    nodePort: 30080
# 建立命名空間
kubectl create namespace ecommerce

# 部署所有服務
kubectl apply -f backend-services.yaml
kubectl apply -f backend-services-svc.yaml
kubectl apply -f api-gateway.yaml
# 檢查部署狀態
> kubectl get all -n ecommerce

NAME                                   READY   STATUS    RESTARTS   AGE
pod/api-gateway-7545577594-cqw4m       1/1     Running   0          5s
pod/api-gateway-7545577594-vdvff       1/1     Running   0          5s
pod/payment-service-7459685677-984r6   1/1     Running   0          14s
pod/payment-service-7459685677-w2t7z   1/1     Running   0          14s
pod/product-service-6bc7d4fb76-lmbnx   1/1     Running   0          14s
pod/product-service-6bc7d4fb76-mrhtb   1/1     Running   0          14s
pod/product-service-6bc7d4fb76-zlrq8   1/1     Running   0          14s

NAME                      TYPE        CLUSTER-IP     EXTERNAL-IP   PORT(S)        AGE
service/api-gateway       NodePort    10.96.249.20   <none>        80:30080/TCP   5s
service/payment-service   ClusterIP   10.96.111.53   <none>        80/TCP         9s
service/product-service   ClusterIP   10.96.228.69   <none>        80/TCP         9s

NAME                              READY   UP-TO-DATE   AVAILABLE   AGE
deployment.apps/api-gateway       2/2     2            2           5s
deployment.apps/payment-service   2/2     2            2           14s
deployment.apps/product-service   3/3     3            3           14s

NAME                                         DESIRED   CURRENT   READY   AGE
replicaset.apps/api-gateway-7545577594       2         2         2       5s
replicaset.apps/payment-service-7459685677   2         2         2       14s
replicaset.apps/product-service-6bc7d4fb76   3         3         3       14s
從上方的 api-gateway pod 任選一個來測試
# 進入 API Gateway Pod 測試內部通訊
kubectl exec -it api-gateway-7545577594-cqw4m -n ecommerce -- sh

# 在 Pod 內部測試服務發現
/ # nslookup product-service
Server:		10.96.0.10
Address:	10.96.0.10:53

** server can't find product-service.cluster.local: NXDOMAIN

** server can't find product-service.cluster.local: NXDOMAIN

** server can't find product-service.svc.cluster.local: NXDOMAIN


** server can't find product-service.svc.cluster.local: NXDOMAIN

Name:	product-service.ecommerce.svc.cluster.local
Address: 10.96.228.69


/ # curl http://product-service/
<!DOCTYPE html>
<html>
<head>
<title>Welcome to nginx!</title>
# 成功!透過服務名稱就能訪問
# 成功!負載會自動分配到 3 個 Pod 中的一個
# 檢查 Service 是否存在
> kubectl get svc -n ecommerce

NAME              TYPE        CLUSTER-IP     EXTERNAL-IP   PORT(S)        AGE
api-gateway       NodePort    10.96.249.20   <none>        80:30080/TCP   11m
payment-service   ClusterIP   10.96.111.53   <none>        80/TCP         11m
product-service   ClusterIP   10.96.228.69   <none>        80/TCP         11m

# 檢查 Endpoints(後端 Pod 列表)
> kubectl get endpoints payment-service -n ecommerce

Warning: v1 Endpoints is deprecated in v1.33+; use discovery.k8s.io/v1 EndpointSlice
NAME              ENDPOINTS                       AGE
payment-service   10.244.0.10:80,10.244.0.13:80   12m
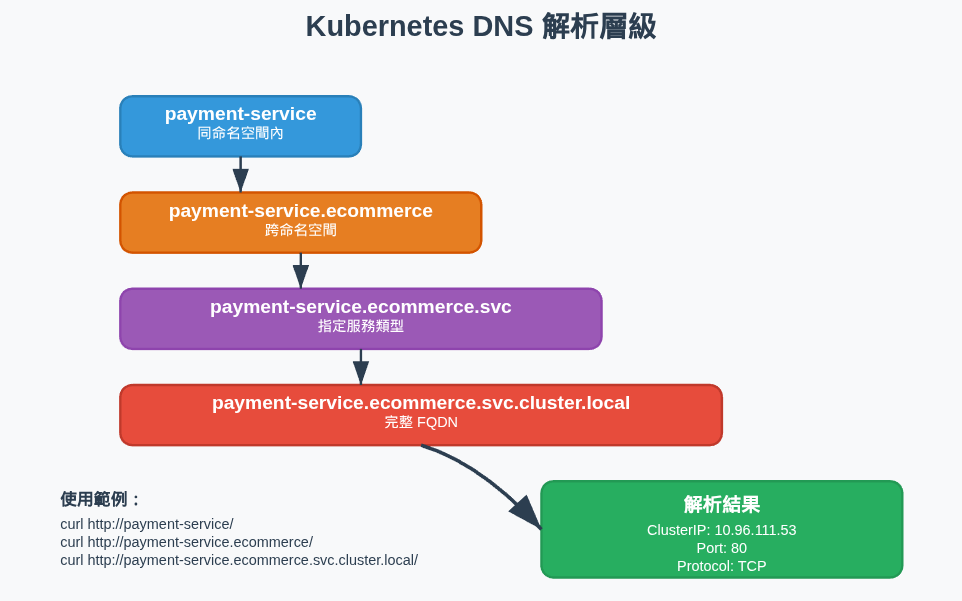
Kubernetes 內建 DNS 服務,提供以下解析規則:
# 同命名空間內
curl http://service-name/

# 跨命名空間
curl http://service-name.namespace-name/

# 完整 FQDN
curl http://service-name.namespace-name.svc.cluster.local/
DNS 解析層級:
service-name                           # 同命名空間
    ↓
service-name.namespace                 # 跨命名空間
    ↓
service-name.namespace.svc             # 服務類型
    ↓
service-name.namespace.svc.cluster.local # 完整域名
1. Session 親和性 (Session Affinity)
apiVersion: v1
kind: Service
metadata:
  name: stateful-app-service
spec:
  selector:
    app: stateful-app
  ports:
  - port: 80
    targetPort: 8080
  sessionAffinity: ClientIP        # 🎯 同一客戶端總是路由到同一 Pod
  sessionAffinityConfig:
    clientIP:
      timeoutSeconds: 3600         # session timeout
2. 服務開多個 Port
apiVersion: v1
kind: Service
metadata:
  name: multi-port-service
spec:
  selector:
    app: web-app
  ports:
  - name: http                     # 🔌 HTTP 端口
    port: 80
    targetPort: 8080
  - name: https                    # 🔐 HTTPS 端口
    port: 443
    targetPort: 8443
  - name: metrics                  # 📊 監控端口
    port: 9090
    targetPort: 9090
在 Docker Compose 中,您可以這樣自定義網路:
# docker-compose.yml
version: '3.8'
services:
 web:
   image: nginx
   networks:
     frontend:
       ipv4_address: 172.20.0.10    # 🎯 自定義容器 IP

 api:
   image: node:alpine
   networks:
     backend:
       ipv4_address: 172.21.0.20    # 🎯 自定義容器 IP

networks:
 frontend:
   driver: bridge
   ipam:
     config:
       - subnet: 172.20.0.0/24      # 🌐 自定義網段
         gateway: 172.20.0.1

 backend:
   driver: bridge
   ipam:
     config:
       - subnet: 172.21.0.0/24      # 🌐 自定義網段
         gateway: 172.21.0.1
在 Kubernetes 中,概念是相似的,但實現方式不同:
首先需要自定義網段範圍,才可以自定義 IP。
# kubernetes-services.yaml - 在既定範圍內自定義
---
# Cluster 管理員預先設定的 Service CIDR: 10.96.0.0/16
apiVersion: v1
kind: Service
metadata:
  name: web-service
spec:
  type: ClusterIP
  clusterIP: 10.96.100.10          # 🎯 可自定義,但必須在 10.96.0.0/16 範圍內
  selector:
    app: web
  ports:
  - port: 80
    targetPort: 80

---
apiVersion: v1
kind: Service
metadata:
  name: api-service
spec:
  type: ClusterIP
  clusterIP: 10.96.100.20          # 🎯 可自定義 Service IP
  selector:
    app: api
  ports:
  - port: 3000
    targetPort: 3000

---
apiVersion: v1
kind: Service
metadata:
  name: database-service
spec:
  type: ClusterIP
  clusterIP: 10.96.100.30          # 🎯 可自定義 Service IP
  selector:
    app: database
  ports:
  - port: 5432
    targetPort: 5432
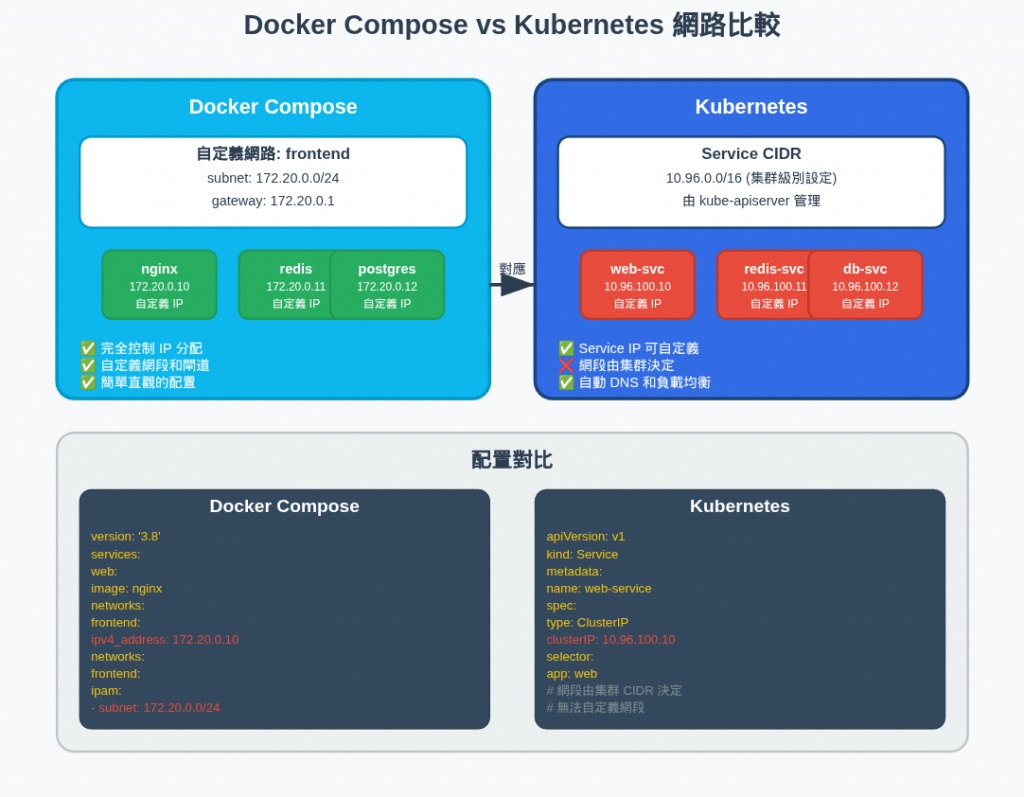
在 🐳 Docker Compose:像是「自己的家」,想怎麼裝潢就怎麼裝潢。
而在 ☸️ K8s:像是「大樓公寓」,在既定規則下可以自定義室內配置。所以我們必須先規劃 IP 分配策略,再使用工具自動化管理
架構設計的思維
具體實現 → 抽象 Interface → 穩定契約
Pod IP   →  Service   →  DNS 名稱
核心概念:
┌─────────┐    ┌─────────┐    ┌─────────┐
│服務 A    │    │服務 B    │    │服務 C    │
│         │◄──►│         │◄──►│         │
└─────────┘    └─────────┘    └─────────┘
     ▲              ▲              ▲
     │              │              │
┌─────────┐    ┌─────────┐    ┌─────────┐
│Service A│    │Service B│    │Service C│
└─────────┘    └─────────┘    └─────────┘