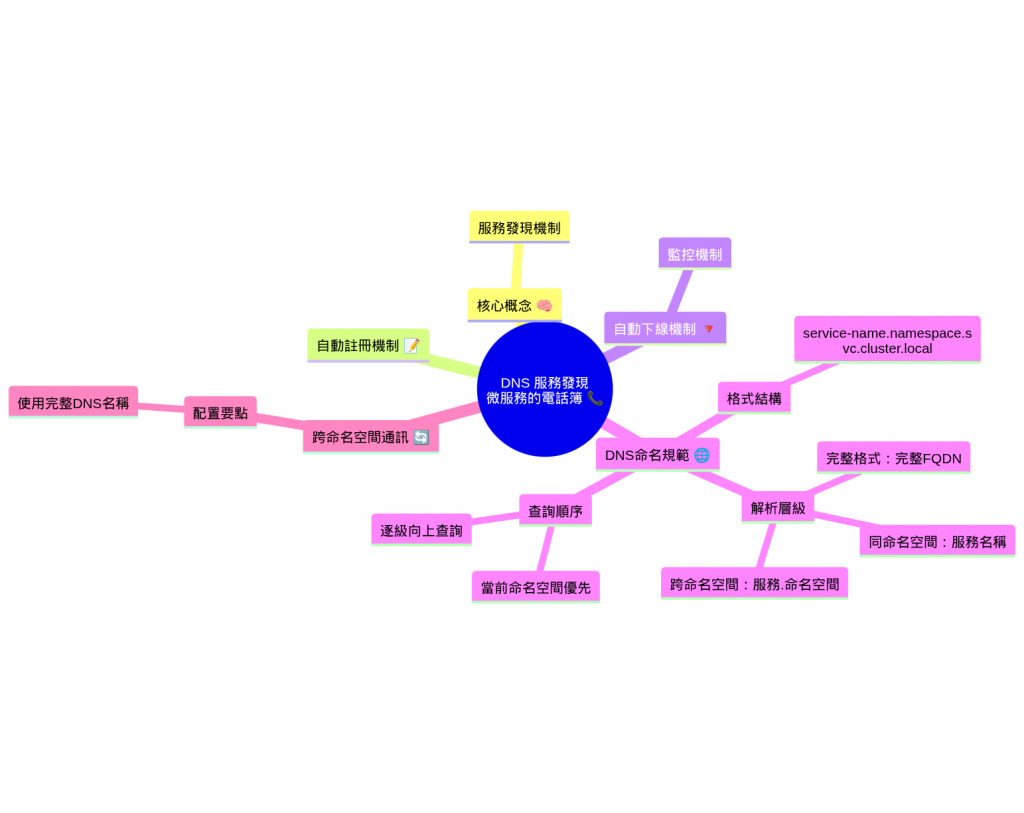
昨天我們學會了 Service 這個「總服務台」,讓 Pod 之間能夠穩定通訊。但各位想想,如果每次要找服務都得記住 IP 地址,那不是很麻煩嗎?就像打電話要背電話號碼一樣!今天我們要學習 Kubernetes 的 DNS 服務發現,它就像是微服務世界的「電話簿」!
想像一下,您在一家大型購物中心工作,每次要聯絡其他部門都要記住分機號碼:財務部 1001、人事部 1002、IT部 1003...這樣很容易搞混對吧?如果有個「內部電話簿」,只要說「幫我轉財務部」就能自動接通,那該多方便!這就是 DNS 服務發現要解決的問題!
✅ 理解 Kubernetes DNS 自動服務發現機制
✅ 掌握服務自動註冊與下線流程
✅ 學會服務間 DNS 通訊設定與查詢
✅ 實作跨命名空間的服務發現
服務發現 (Service Discovery) 就是讓應用程式能夠自動找到並連接到其他服務的機制。
傳統方式 😰:需要明確知道 IP
curl http://10.96.111.53:80/api/payment

DNS 方式 😍:
curl http://payment-service/api/payment
搭配 Day 6 的健康探針
服務註冊的完整流程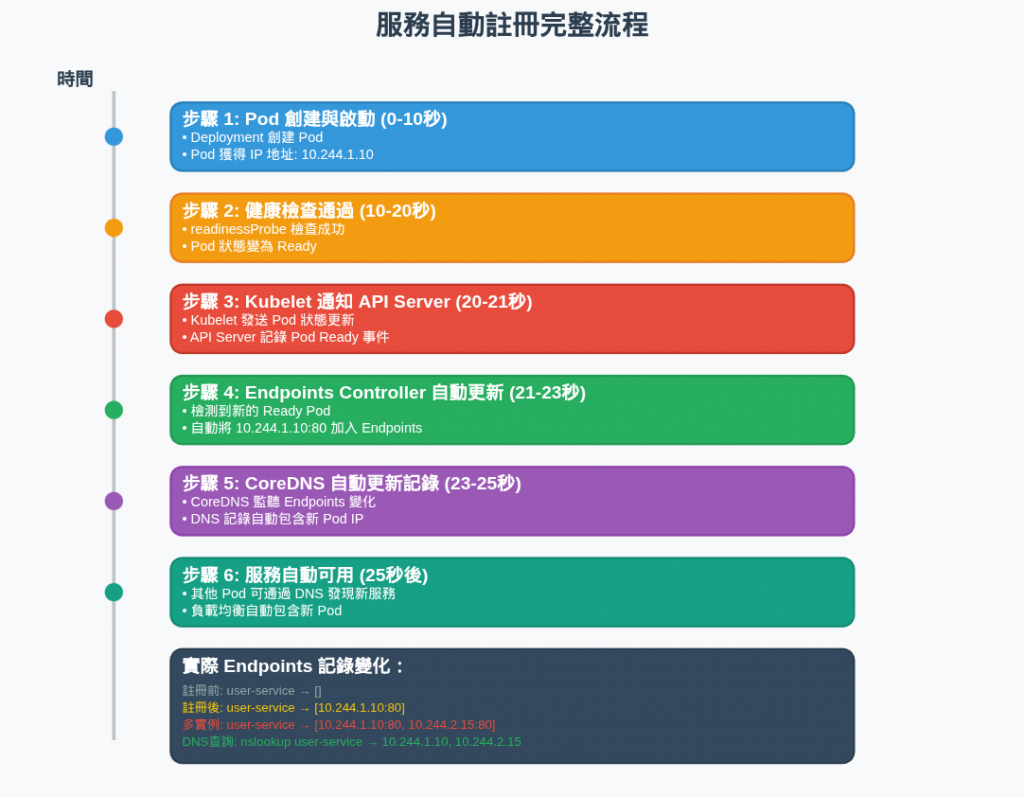
# 1. 準備監控 Endpoints 變化
kubectl get endpoints -n backend --watch &

# 2. 創建新的服務部署
kubectl apply -f - <<EOF
apiVersion: apps/v1
kind: Deployment
metadata:
  name: demo-service
  namespace: backend
spec:
  replicas: 0  # 先設為 0,觀察註冊過程
  selector:
    matchLabels:
      app: demo-service
  template:
    metadata:
      labels:
        app: demo-service
    spec:
      containers:
      - name: demo
        image: nginx:alpine
        ports:
        - containerPort: 80
        readinessProbe:
          httpGet:
            path: /
            port: 80
          initialDelaySeconds: 5
          periodSeconds: 3
---
apiVersion: v1
kind: Service
metadata:
  name: demo-service
  namespace: backend
spec:
  selector:
    app: demo-service
  ports:
  - port: 80
    targetPort: 80
EOF

# 3. 觀察初始狀態(無 Endpoints)
kubectl get endpoints demo-service -n backend
# 輸出: NAME           ENDPOINTS   AGE
#       demo-service   <none>      10s

# 4. 擴展到 2 個實例,觀察自動註冊
kubectl scale deployment demo-service -n backend --replicas=2

# 5. 即時觀察註冊過程
kubectl get endpoints demo-service -n backend --watch
# 你會看到:
# demo-service   <none>                    30s
# demo-service   10.244.1.50:80           45s  # 第一個 Pod 註冊
# demo-service   10.244.1.50:80,10.244.2.51:80   60s  # 第二個 Pod 註冊
搭配 Day 6 的健康探針
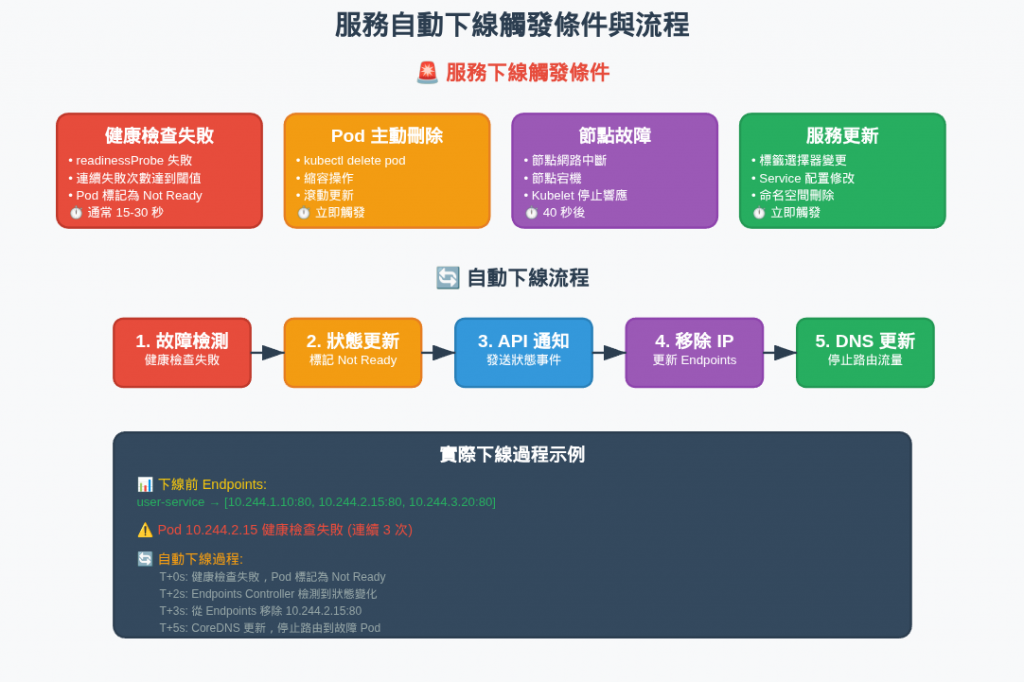
健康檢查和自動移除
# 1. 部署測試服務
kubectl apply -f - <<EOF
apiVersion: apps/v1
kind: Deployment
metadata:
  name: health-test
  namespace: backend
spec:
  replicas: 3
  selector:
    matchLabels:
      app: health-test
  template:
    metadata:
      labels:
        app: health-test
    spec:
      containers:
      - name: nginx
        image: nginx:alpine
        ports:
        - containerPort: 80
        readinessProbe:
          httpGet:
            path: /
            port: 80
          initialDelaySeconds: 5
          periodSeconds: 5
          failureThreshold: 2  # 🎯 失敗 2 次就下線
        livenessProbe:
          httpGet:
            path: /
            port: 80
          initialDelaySeconds: 10
          periodSeconds: 10
          failureThreshold: 3
---
apiVersion: v1
kind: Service
metadata:
  name: health-test-service
  namespace: backend
spec:
  selector:
    app: health-test
  ports:
  - port: 80
    targetPort: 80
EOF

# 2. 觀察初始狀態
kubectl get pods -n backend -l app=health-test
kubectl get endpoints health-test-service -n backend

# 輸出示例:
# NAME                          READY   STATUS    RESTARTS   AGE
# health-test-7d4b8f9c8-abc12   1/1     Running   0          30s
# health-test-7d4b8f9c8-def34   1/1     Running   0          30s
# health-test-7d4b8f9c8-ghi56   1/1     Running   0          30s
#
# NAME                  ENDPOINTS                                    AGE
# health-test-service   10.244.1.20:80,10.244.2.21:80,10.244.3.22:80   30s

# 3. 開始監控 Endpoints 變化
kubectl get endpoints health-test-service -n backend --watch &

# 4. 模擬服務故障 - 停止其中一個 Pod 的 nginx
POD_NAME=$(kubectl get pods -n backend -l app=health-test -o jsonpath='{.items[0].metadata.name}')
echo "模擬 Pod $POD_NAME 故障..."

kubectl exec -n backend $POD_NAME -- sh -c "nginx -s stop"

# 5. 觀察自動下線過程
# 你會看到類似輸出:
# health-test-service   10.244.1.20:80,10.244.2.21:80,10.244.3.22:80   1m
# health-test-service   10.244.2.21:80,10.244.3.22:80                   1m  # 故障 Pod 自動移除

# 6. 驗證 Pod 狀態
kubectl get pods -n backend -l app=health-test
# 你會看到其中一個 Pod 的 READY 狀態變為 0/1

# 7. 測試 DNS 解析(故障 Pod 不再出現)
kubectl run test-client --rm -i --tty --image=curlimages/curl -n backend -- sh
/ # nslookup health-test-service
# 只會返回健康的 Pod IP
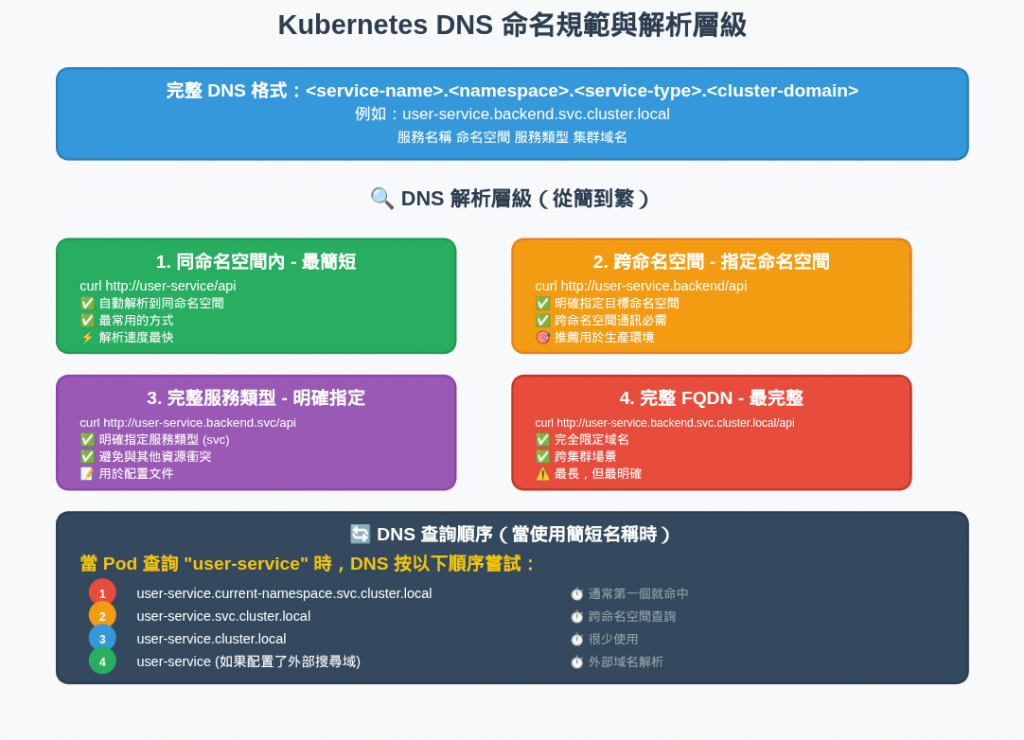
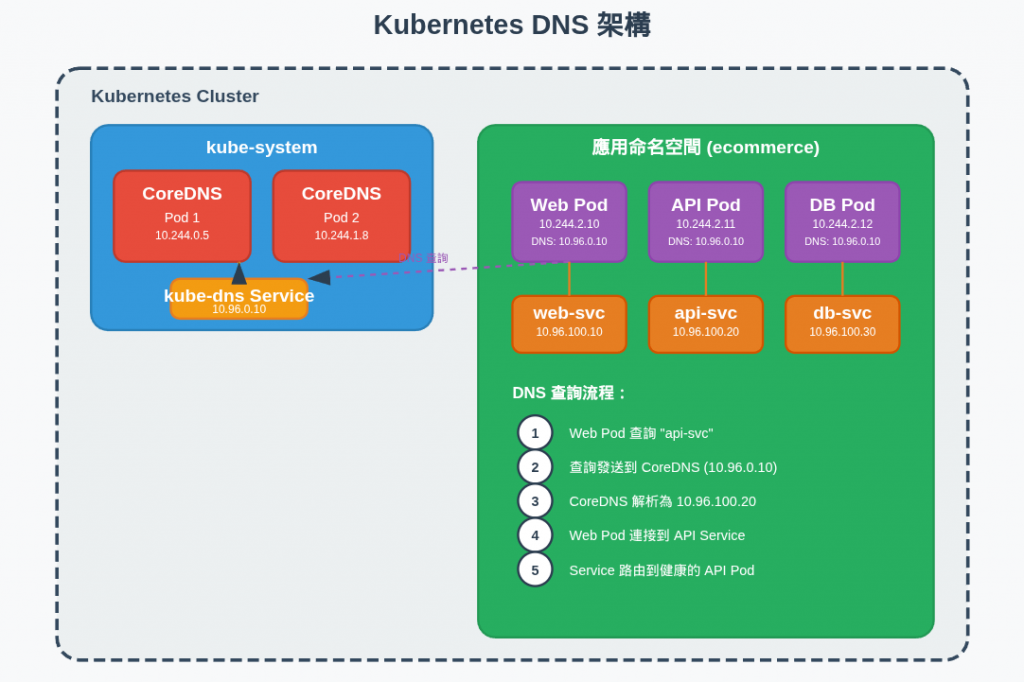
DNS 解析規則詳解 📋
<service-name>.<namespace>.<service-type>.<cluster-domain>
例如︰
payment-service.ecommerce.svc.cluster.local
    ↓           ↓         ↓        ↓
 服務名稱    命名空間   服務類型  cluster 域名
🎯 DNS 格式記憶法:
「服務.空間.類型.域名」
就像地址:「姓名.社區.建築類型.城市」
# 同命名空間內 - 最簡短,直接服務名稱
curl http://payment-service/api/v1/pay

# 跨命名空間 - 指定命名空間
curl http://payment-service.ecommerce/api/v1/pay

# 完整服務類型 - 明確指定
curl http://payment-service.ecommerce.svc/api/v1/pay

# 完整 FQDN - 最完整
curl http://payment-service.ecommerce.svc.cluster.local/api/v1/pay
當 Pod 查詢 payment-service 時,DNS 會按以下順序嘗試:
1. payment-service.current-namespace.svc.cluster.local
2. payment-service.svc.cluster.local
3. payment-service.cluster.local
4. payment-service (如果配置了搜尋域)
演示跨命名空間通訊。
API Gateway 在 frontend 命名空間,要訪問 backend 和 data 命名空間的服務。
必須使用完整的 DNS 名稱才能跨命名空間解析。
# microservices-communication.yaml
---
# 前端命名空間
apiVersion: v1
kind: Namespace
metadata:
  name: frontend
---
# API Gateway部署
# 前端的 nginx 需要將請求轉發到後端的不同微服務
# 使用 DNS 名稱而非 IP,讓配置更穩定可靠
apiVersion: apps/v1
kind: Deployment
metadata:
  name: api-gateway
  namespace: frontend
spec:
  replicas: 2
  selector:
    matchLabels:
      app: api-gateway
  template:
    metadata:
      labels:
        app: api-gateway
    spec:
      containers:
      - name: gateway
        image: nginx:alpine
        ports:
        - containerPort: 80
        env:
        # 🎯 跨命名空間 DNS 配置
        - name: USER_SERVICE_URL
          value: "http://user-service.backend.svc.cluster.local"
        - name: PRODUCT_SERVICE_URL
          value: "http://product-service.backend.svc.cluster.local"
        - name: ORDER_SERVICE_URL
          value: "http://order-service.backend.svc.cluster.local"
        # 🎯 資料庫服務 DNS 配置
        - name: POSTGRES_HOST
          value: "postgres-service.data.svc.cluster.local"
        - name: REDIS_HOST
          value: "redis-service.data.svc.cluster.local"
        volumeMounts:
        - name: nginx-config
          mountPath: /etc/nginx/conf.d
      volumes:
      - name: nginx-config
        configMap:
          name: gateway-config
---
# API Gateway 配置
apiVersion: v1
kind: ConfigMap
metadata:
  name: gateway-config
  namespace: frontend
data:
  default.conf: |
    upstream user_backend {
        # 🎯 使用 DNS 名稱,自動 load balancing
        server user-service.backend.svc.cluster.local:80;
    }

    upstream product_backend {
        server product-service.backend.svc.cluster.local:80;
    }

    upstream order_backend {
        server order-service.backend.svc.cluster.local:80;
    }

    server {
        listen 80;

        # 用戶服務路由
        location /api/users/ {
            proxy_pass http://user_backend/;
            proxy_set_header Host $host;
            proxy_set_header X-Real-IP $remote_addr;
        }

        # 商品服務路由
        location /api/products/ {
            proxy_pass http://product_backend/;
            proxy_set_header Host $host;
            proxy_set_header X-Real-IP $remote_addr;
        }

        # 訂單服務路由
        location /api/orders/ {
            proxy_pass http://order_backend/;
            proxy_set_header Host $host;
            proxy_set_header X-Real-IP $remote_addr;
        }

        # 健康檢查
        location /health {
            return 200 "OK";
            add_header Content-Type text/plain;
        }
    }
---
apiVersion: v1
kind: Service
metadata:
  name: api-gateway-service
  namespace: frontend
spec:
  type: LoadBalancer  # 對外暴露
  selector:
    app: api-gateway
  ports:
  - port: 80
    targetPort: 80
DNS 查詢與測試工具
# 1. 部署 DNS 測試工具
kubectl apply -f - <<EOF
apiVersion: apps/v1
kind: Deployment
metadata:
 name: dns-test-tool
 namespace: frontend
spec:
 replicas: 1
 selector:
   matchLabels:
     app: dns-test-tool
 template:
   metadata:
     labels:
       app: dns-test-tool
   spec:
     containers:
     - name: dns-tool
       image: tutum/dnsutils
       command: ["sleep", "3600"]
EOF

# 2. 進入測試 Pod
kubectl exec -it -n frontend deployment/dns-test-tool -- bash

# 3. 測試各種 DNS 解析層級
root@dns-test-tool:/# nslookup api-gateway-service
# 同命名空間解析
Server:		10.96.0.10
Address:	10.96.0.10#53
Name:	api-gateway-service.frontend.svc.cluster.local
Address: 10.96.50.10

root@dns-test-tool:/# nslookup user-service.backend
# 跨命名空間解析
Server:		10.96.0.10
Address:	10.96.0.10#53
Name:	user-service.backend.svc.cluster.local
Address: 10.96.100.10

root@dns-test-tool:/# nslookup postgres-service.data.svc.cluster.local
# 完整 FQDN 解析
Server:		10.96.0.10
Address:	10.96.0.10#53
Name:	postgres-service.data.svc.cluster.local
Address: 10.96.20.10

# 4. 測試實際 HTTP 連接
root@dns-test-tool:/# curl -I http://user-service.backend/
HTTP/1.1 200 OK
Server: nginx/1.21.5

root@dns-test-tool:/# curl -I http://product-service.backend.svc.cluster.local/
HTTP/1.1 200 OK
Server: nginx/1.21.5

# 5. 測試 DNS 解析時間
root@dns-test-tool:/# time nslookup user-service.backend
# 觀察解析時間

# 6. 查看 DNS 配置
root@dns-test-tool:/# cat /etc/resolv.conf
nameserver 10.96.0.10
search frontend.svc.cluster.local svc.cluster.local cluster.local
options ndots:5
關鍵流程回顧
1. 自動註冊 ⬆️
2. 負載分散 ⚖️
3. 健康監控 💓
4. 自動下線 ⬇️
5. DNS 更新 🔄
✅ 使用明確的 DNS 名稱:跨命名空間時使用完整格式
✅ 配置適當的健康檢查:快速發現和處理故障
✅ 監控服務發現狀態:建立監控和告警機制
✅ 優化 DNS 配置:減少查詢延遲
✅ 測試故障場景:驗證自動下線機制
這就是 Kubernetes DNS 服務發現的完整機制!它讓微服務之間的通訊變得簡單可靠,就像有了一本永遠更新的「電話簿」📞