本文接下來要介紹的便是重頭戲 — 部署 trino-elt 的流程,此部分在部署腳本 deploy.sh 的這個區塊很清楚的呈現了出來,包含:
# deploy.sh
trino-elt)
  use_variables "trino:${IMAGE_TAG}"
  use_namespace
  deploy_trino_elt_chart
  deploy_custom_chart "external-secrets"
  deploy_custom_chart "service-monitors"
  update_secrets "${SERVICE_NAME}"
  check_deploy_status trino-elt-coordinator
  check_deploy_status trino-elt-worker
;;
而我們再細看一下部署 trino-elt 這段,可以看到先前提過的,我們拿 Trino 官方 helm chart 當基底,先以 shared 路徑下的 chart 對基底做第一次渲染,再以指定環境 ($ENVIRONMENT) 的 chart 對基底做第二次渲染:
# deploy.sh
function deploy_trino_elt_chart() {

  helm repo add trino https://trinodb.github.io/charts/
  helm repo update
  cat $PROJECT_PATH/deployment/helm/$ENVIRONMENT/trino-elt.*yaml \
  | helm upgrade --install trino-elt trino/trino \
    --version "0.23.1" \
    --values "$PROJECT_PATH/deployment/helm/shared/trino-elt.yaml" \
    --values - \
    --set-string "image.tag=${IMAGE_TAG}"
}
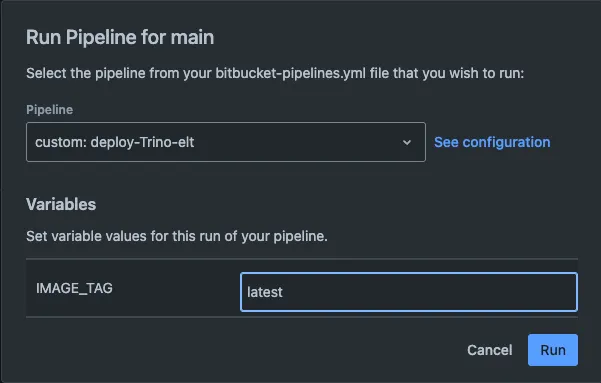
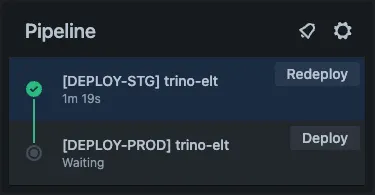
設定完成後就可以在 Bitbucket 的 UI 上看到執行這個 Pipeline 的選項 (如下圖一) ,執行後便自動部署到 Staging 環境,並暫停 pipeline 且提供手動部署到 Production 環境的選項避免誤按直接蓋掉線上環境 (如下圖二)。
說明完如何以 CI/CD 腳本執行 Trino Cluster 的部署後,梳理一下我們部署的流程以及團隊如何在開發及部署間對 Trino 做版本管理:
而 Trino deploy 的版本則記錄在 build.env,再以參數的方式餵進 Dockerfile 並於重新 build image 時生效,這樣可以清楚讓其他開發者知道目前的 Trino 版本,並且僅在有版本變更時才進行 build image:
# build.env
TRINO_VERSION=471
OPENJDK_VERSION=23
# bitbucket-pipelines.yaml
custom:
  build-image:
    - variables:
        - name: IMAGE_NAME
          default: debezium
          allowed-values:
            - debezium
            - xxx
            - flink
            - trino-elt
        - name: IMAGE_TAG
          default: staging
    - step:
        name: "Validate IMAGE_TAG"
        script:
          - |
            if [[ "${IMAGE_TAG}" = "latest" && "${BITBUCKET_BRANCH}" != "main" ]]; then
              echo "IMAGE_TAG cannot be set to \"latest\""
              exit 1
            fi
    - step: *build-image
系列文明日《冰山不止一角,Iceberg 與 S3 (一)》,將聚焦於 Trino 最常搭配的 Catalog 之一 — Iceberg on S3。本篇將先介紹 Iceberg 的核心概念,並進一步說明它與 S3 的結合與應用。
My Linkedin: https://www.linkedin.com/in/benny0624/
My Medium: https://hndsmhsu.medium.com/