在戀愛中,對方能不能讀懂你的情緒,比起回覆的內容更重要。昨天(Day 7),我為 AI 雲端情人加上了 Quick Reply 小話題;今天讓她更有溫度——能根據我的心情回應。
(參考:https://developers.line.biz/en/docs/messaging-api/overview/)
⸻
🧠 情感分析的想法
如果我說「今天心情很糟」,她不該只回「收到」,而是安慰我:「別難過,我一直都在陪你 ♥」。
如果我說「好爽,今天股票漲停!」,她就該用興奮的語氣跟著開心。
我把 情感分析(Sentiment Analysis) 分成四類:😀 正向、😐 中性、😞 負向、😡 生氣。
(參考:https://platform.openai.com/docs/guides/prompt-engineering)
⸻
💻 程式片段(Day 8:情感分析)
這裡示範一個簡單版本:先用 LLM 判斷情緒,再依照結果改寫回覆。
(參考:https://platform.openai.com/docs/api-reference/chat)
# analyze_sentiment:呼叫 LLM 判斷情緒
# 回傳:positive / neutral / negative / angry
async def analyze_sentiment(text: str) -> str:
    resp = await client.chat.completions.create(
        model="gpt-4o-mini",
        messages=[
            {"role": "system", "content": "你是一個情感分析助手,輸出文字情緒標籤"},
            {"role": "user", "content": f"請判斷這句話的情緒:{text}。只回傳一個標籤:positive, neutral, negative, angry"}
        ],
        max_tokens=10,
        temperature=0
    )
    return resp.choices[0].message.content.strip().lower()

# 根據情緒改寫回覆語氣
async def handle_message_with_emotion(user_id: str, msg: str):
    sentiment = await analyze_sentiment(msg)

    if sentiment == "positive":
        reply_text = "哇~聽起來你好開心呢!🥳 我也替你高興!"
    elif sentiment == "negative":
        reply_text = "別難過,我會一直陪著你。抱抱你 ❤️"
    elif sentiment == "angry":
        reply_text = "冷靜點嘛~來跟我聊聊,我幫你舒壓 🤗"
    else:
        reply_text = "我懂了,謝謝你跟我分享。😊"

    return reply_text
⸻
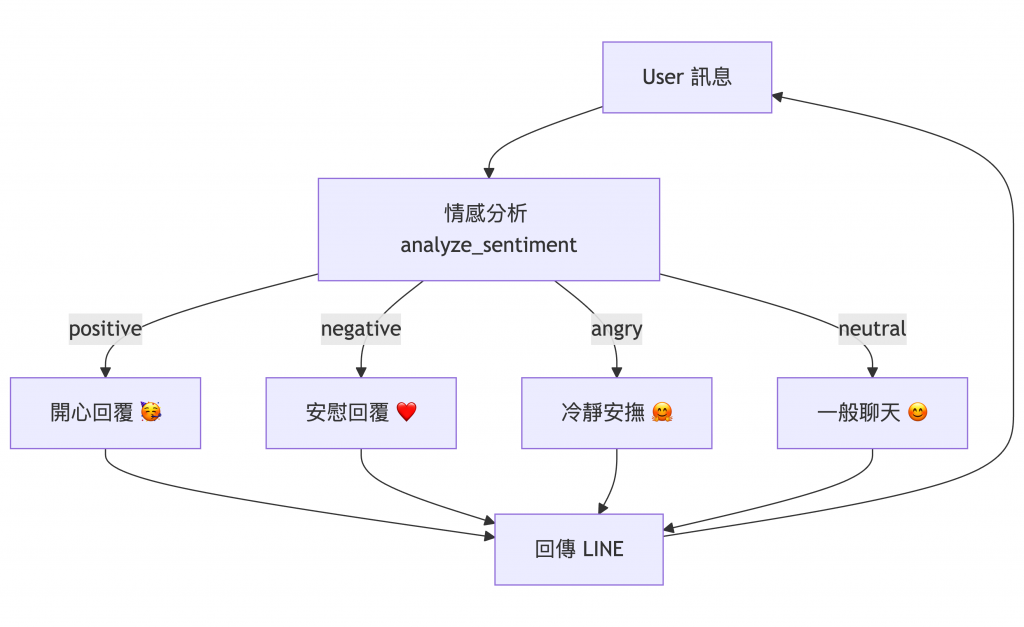
📈 流程圖(Day 8:情感分析)
⸻
🎯 成果
現在 AI 雲端情人不只是「會講話」「會記憶」「會給話題」,還能「感受我的心情」:
• 我開心時,她會跟著我一起興奮
• 我難過時,她會安慰我
• 我生氣時,她會先安撫、幫我冷靜
就像《雲端情人》裡的 AI 一樣,開始擁有「共情💖」的能力。
(參考:https://www.imdb.com/title/tt1798709/)
⸻
❓情緒分析這個功能 要怎麼實作?
不必自己刻一大本「好詞 +1、壞詞 −1」的詞典,也不必硬算情感向量。既然已使用 LLM,就把語意判斷交給它:看上下文、懂暗示、抓語氣 的效果遠勝純規則。
(參考:https://platform.openai.com/docs/guides/prompt-engineering)
⸻
🧱 架構觀念:把「情感判斷」做成一個 Function Box
對外介面只有兩件事:
1. 輸入:使用者訊息文字
2. 輸出:標準化結果(label、confidence、rationale)
內部實作可混合:
• LLM(0-shot / few-shot)—主力、最快上線
• 本地/傳統 ML — 選配、省 token,但要算力與維運
• 關鍵詞規則 — 保底 fallback(例如偵測髒話→標成 angry)
(參考:https://platform.openai.com/docs/guides/function-calling https://huggingface.co/docs/transformers/main_classes/pipelines)
⸻
💻 實作 A(建議):用 LLM 直接判斷,輸出 JSON
(參考:https://platform.openai.com/docs/api-reference/chat https://console.groq.com/docs/api-reference)
# sentiment_box.py —— LLM 版 Function Box,統一輸出 JSON
import os, json
from typing import Literal, Dict, Any, Optional
from openai import OpenAI
from groq import Groq

OPENAI_MODEL = os.getenv("OPENAI_MODEL", "gpt-4o-mini")
GROQ_MODEL   = os.getenv("GROQ_MODEL", "llama-3.1-8b-instant")  # 新版 Groq 型號

client_oai = OpenAI(api_key=os.getenv("OPENAI_API_KEY"))
client_groq = Groq(api_key=os.getenv("GROQ_API_KEY"))

Label = Literal["positive", "neutral", "negative", "angry"]

def _safe_parse_json(s: str) -> Dict[str, Any]:
    try:
        return json.loads(s)
    except Exception:
        return {"label": "neutral", "confidence": 0.5, "rationale": "parse_error"}

def analyze_sentiment_llm(
    text: str,
    provider: Literal["openai","groq"]="openai",
    fewshot: Optional[list[dict]] = None,
) -> Dict[str, Any]:
    sys = (
        "你是情感分析器,請輸出 JSON:"
        '{"label":"positive|neutral|negative|angry","confidence":0~1,"rationale":"簡述原因"}'
        " 僅輸出 JSON,勿加多餘文字。"
    )
    usr = f"判斷這段文字的情緒:{text}"

    messages = [{"role":"system","content":sys}]
    if fewshot:
        messages += fewshot
    messages.append({"role":"user","content":usr})

    if provider == "openai":
        resp = client_oai.chat.completions.create(
            model=OPENAI_MODEL, messages=messages, temperature=0, max_tokens=60
        )
        raw = resp.choices[0].message.content or "{}"
        return _safe_parse_json(raw)

    resp = client_groq.chat.completions.create(
        model=GROQ_MODEL, messages=messages, temperature=0, max_tokens=60
    )
    raw = resp.choices[0].message.content or "{}"
    return _safe_parse_json(raw)

在主流程使用(把 label 丟進 system prompt):
(參考:https://platform.openai.com/docs/guides/prompt-engineering)

from sentiment_box import analyze_sentiment_llm, Label

def build_system_prompt_with_emotion(label: Label) -> str:
    return f"""
你是溫柔的 AI 女友,要根據使用者情緒調整語氣。
情緒標籤:{label}
- positive:活潑興奮,跟著開心,多用表情與讚美。
- negative:溫柔安慰,給具體陪伴與支持。
- angry:先安撫、共情,再協助紓解與建議。
- neutral:自然聊天,別太矯情。
請用繁體中文回覆,語氣自然、有溫度。
""".strip()
⸻
💻 實作 B(選配):本地/傳統 NLP 備案 ---不建議---
在 Render 上不太建議(安裝大、吃 RAM、多冷啟延遲),但給一個保底範例:
(參考:https://huggingface.co/docs/transformers/pipeline_tutorial)local_fallback_sentiment.py(選配)
from transformers import pipeline
clf = pipeline("sentiment-analysis", model="distilbert-base-multilingual-cased")def analyze_sentiment_local(text: str) -> dict:
pred = clf(text)[0] # {'label': 'POSITIVE'|'NEGATIVE'|... , 'score': 0.99}
label_map = {"POSITIVE":"positive", "NEGATIVE":"negative", "NEUTRAL":"neutral"}
label = label_map.get(pred["label"].upper(), "neutral")
return {"label": label, "confidence": float(pred["score"]), "rationale": "hf_pipeline"}
⸻
🧪 驗收腳本(煙霧測試)
(參考:https://platform.openai.com/docs/guides/evals)
# sentiment_smoketest.py
from sentiment_box import analyze_sentiment_llm

samples = {
    "positive": ["好爽,今天股票漲停!", "太開心了~你最懂我!"],
    "negative": ["心情好糟,什麼都不順。", "唉,真的累爆了……"],
    "angry":    ["可惡,整個專案被亂改!", "被氣到頭痛,超想砸電腦。"],
    "neutral":  ["今天天氣還不錯。", "等一下去買咖啡。"],
}

ok, total = 0, 0
for expect, arr in samples.items():
    for s in arr:
        total += 1
        pred = analyze_sentiment_llm(s, provider="openai")["label"]
        print(f"[{expect}] {s} => {pred}")
        ok += int(pred == expect)

print(f"Accuracy (粗估):{ok}/{total} = {ok/total:.2%}")
⸻
🧯 營運細節
• 快取:同一句 60 秒內別重判,省 token。
• 隱私:只保留必要片段(Day 6 已做)。
(參考:https://fastapi.tiangolo.com/advanced/middleware/ https://openai.com/policies/usage-policies)
⸻


 iThome鐵人賽