
昨天已經為我們現在站內信的 SpringBoot 專案加上了 WebSocket 最最最基礎的配置,並且生成了一個很陽春的客戶端畫面來測試連接效果,今天要實際將 WebSocket 的連接整合進站內信的功能,然後明天再用 Redis Pub/Sub 來保存連接的狀態,實現分布式環境下的推送功能。
今天實作的內容也不算多,主要是為隔天的擴展打下基礎,首先會先把 MailInbox,也就是用戶收件匣的信件保存挪到站內信的 Service 層,原先是在 Consumer 那邊做,但其實沒必要,應該是在站內信內容保存好,就應該把信件發到用戶收件匣了,而且這件事要在通知推送前做完的原因是,避免先讓用戶收到推送通知,結果打開收件匣發現沒有信件。
@Override
@Transactional
public void sendMail(MailSendTO mailSendTO) {
    var mail = new Mail();
    var role = roleRepo.findByRoleType(mailSendTO.getReceiverRole())
            .orElseThrow(() -> new BaseException(StatusCode.REQ_PARAM_ERR, "Role type does not exist"));

    mail.setTitle(mailSendTO.getTitle());
    mail.setSender(mailSendTO.getSender());
    mail.setContent(mailSendTO.getContent());
    mail.setReceiverRoleId(role.getRoleId());
    mailRepo.saveAndFlush(mail);

    var userIds = userRoleRepo.findUserIdByRoleId(role.getRoleId());
    var mailInboxes = new ArrayList<MailInbox>();
    userIds.forEach(userId -> {
        var mailInbox = new MailInbox();
        mailInbox.setMailId(mail.getMailId());
        mailInbox.setUserId(userId);
        mailInboxes.add(mailInbox);
    });
    mailInboxRepo.saveAll(mailInboxes);

    var notificationTO = NotificationTO.builder()
            .mailId(mail.getMailId())
            .userIds(userIds)
            .title(mail.getTitle())
            .content("Your have a new message")
            .build();

    kafkaSender.send(Topic.NOTIFICATION, notificationTO);
}
再來我們會需要創建一了新的推送 TO NotificationTO 來把信件相關資訊用 Kafka 推送出去,到我們站內信的 Topic NOTIFICATION :
@Getter
@Setter
@Builder
@AllArgsConstructor
@NoArgsConstructor
public class NotificationTO {

    private Long mailId;
    private List<Integer> userIds;
    private String title;
    private String content;
    private String sender;

    @Builder.Default
    private Long timestamp = System.currentTimeMillis();
}
這邊加上 @NoArgsConstructor 是因為今天在測試時拋出錯誤,錯誤原因是 ObjectMapper 在反序列化時需要無參建構子,缺少了就會拋出類似的例外訊息:
Cannot construct instance of NotificationTO (no Creators, like default constructor, exist)
接著我們 Kafka Consumer 監聽到消息後就會立馬執行推送的業務邏輯,因此這邊也需要建立一個新的 Service 類別 NotificationService :
@KafkaListener(topics = Topic.NOTIFICATION)
public void processMailNotification(String content) {
    log.info("Receive topic [{}] and message=[{}]", Topic.NOTIFICATION, content);
    try {
        var om = new ObjectMapper();
        var notification = om.readValue(content, NotificationTO.class);
        notificationService.pushToUsers(notification);
    } catch (Exception e) {
        log.warn("Failed to process mail task", e);
    }
}
我們會在這個實作類裡注入昨天寫好的 SessionManager ,用他來實際的推送訊息給 WebSocket 的客戶端,當然在推送前前後端就已經連接好了,測試時會是像昨天一樣用一個按鈕發送 http call 來做協議升級,實際場景就是瀏覽器載入等等的時機:
@Slf4j
@Service
@RequiredArgsConstructor
public class NotificationServiceImpl implements NotificationService {

    private final SessionManager sessionManager;

    @Override
    public void pushToUsers(NotificationTO notification) {
        var userIds = notification.getUserIds();
        var success = 0;
        var total = userIds.size();

        for (var userId : userIds) {
            if (sessionManager.sendMessage(userId, notification.getTitle() + notification.getContent())) {
                success++;
            }
        }

        log.info("Push result: {}/{} users received notification", success, total);
    }

}
我們分別打開兩個瀏覽器並連接上了兩個用戶,然後發送一則站內信,看看兩個用戶是否都能即時收到通知: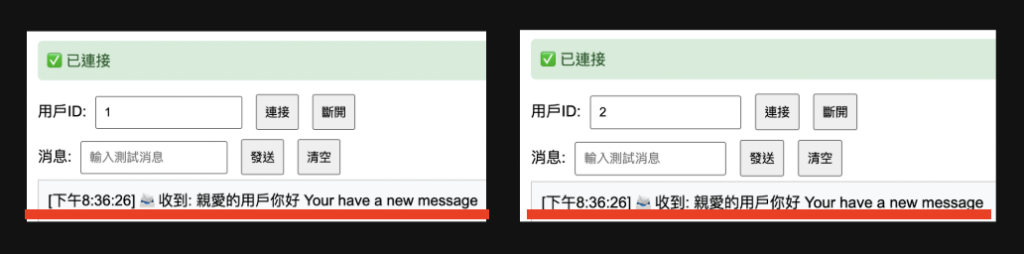
簡化的 Log:
2025-09-07T20:36:26.294+08:00  : Receive topic [NOTIFICATION] and message=[{"mailId":6,"userIds":[1,2],"title":"親愛的用戶你好 ","content":"Your have a new message","sender":null,"timestamp":1757248586279}]
2025-09-07T20:36:26.297+08:00  : Push result: 2/2 users received notification
測試成功,兩個用戶都在站內信發送後,成功在前端收到通知了!
今天完成基本的站內信通知推送,算是有點一圓我的小夢,因為當初在找工作時,我一直覺得我的網站系統應該還要多個全站通知比較完整,但因為時間跟能力的考量下最後放棄,覺得有點可惜,而且還有當時其實不太知道怎麼做,現在至少有能力把最陽春的流程實作出來了,雖然很簡陋,但底層的邏輯已經一定程度上搞懂了。明天繼續為我們的通知系統做擴展吧,現在的系統只要到一定的用戶量,似乎避免不了水平擴展,這時就需要規劃分布式的策略了。

 iThome鐵人賽