截至目前為止,我們一直都還沒有提到 生命週期。
但...是的,沒錯!
跟各大框架一樣,Web Component 也有生命週期。
其實光看到這四個字,心裡就已經開始抗拒了 (ι´Дン)ノ
但生命週期,其實是學習 Web Component 的關鍵,他定義了元件在出生、更新、消失 等不同階段下的行為,也可以讓我們更有效的控制元件。
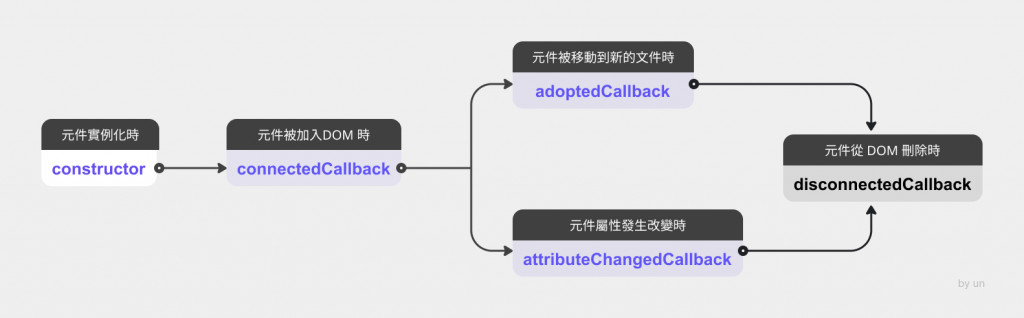
在元件實例化時被呼叫,通常使用於初始化元件的狀態或設定預設值。
在前幾篇文章中其實已經使用了很多次,我們一直在 constructor() 中初始化元件,像是建立 Shadow DOM 或套用 template。
要注意的是,這時候的元件還沒加入 DOM,所以無法操作尺寸或讀取外部屬性。
// 建構函數
constructor() {
  super();

  const shadowRoot = this.attachShadow({ mode: 'open' }); // 初始化 shadowRoot
  const cloneNode = spinnerTemplate.content.cloneNode(true);
  shadowRoot.appendChild(cloneNode); // 初始化內容,加入 template
}
類似 Angular: ngAfterViewInit 、 React: componentDidMount
當元件首次被加入 DOM 時,通常使用於初始化操作,像是綁定事件、呼叫 API 等等...
這個時候,元件已經被添加到 DOM 了,並且可以訪問到其他 DOM 元素。
connectedCallback() {
  this.timer = setInterval(() => console.log('timer'), 1000); // 加入計時器
  this.shadowRoot.querySelector('.spinner')
    .addEventListener('click', () => {console.log('click')}) // 綁定事件
}
類似 Angular: ngOnDestroy 、 React: componentWillUnmount
當元件從DOM 移除時觸發。通常用於清理定時器或取消事件監聽。
// 綁定事件時
connectedCallback() {
  this.shadowRoot.querySelector('.spinner')
    .addEventListener('click', this.handleSpinnerClick.bind(this));
}

// 移除事件時
disconnectedCallback() {
  clearInterval(this.timer);
  this.shadowRoot.querySelector('.spinner')
    .removeEventListener('click', this.handleSpinnerClick.bind(this));
}
attributeChangedCallback 會在下一篇文章中詳細解釋
當元件的屬性改變時觸發。可以監聽屬性發生的變化,並取得舊值與新值做後續運用。
attributeChangedCallback(name, oldValue, newValue) {
  console.log(`${name} 屬性,原本的值是 ${oldValue},變成了 ${newValue}`);
}
當一個 Custom Element 被從一個 document 移動到另一個 document 時,通常運用在跨
iframe移動,或是跨window.open出來的新視窗移動。
這個其實是 Web Component 生命週期裡最少人用到的一個。
adoptedCallback(oldDocument, newDocument) {
  console.log(oldDocument, newDocument);
}
範例:
const spinner = document.createElement('cat-spinner');
document.body.appendChild(spinner);

// 打開一個新視窗
const newWindow = window.open('', '', 'width=300,height=200');

// 把 spinner 加入到新視窗中
newWindow.document.body.appendChild(spinner);
在這個過程中,adoptedCallback 就會被呼叫,因為 spinner 從舊 document 中被領養到新的 document。
接下來我們將 cat-spinner 升級一下,利用生命週期,變成可以加入 progress 的元件。
一樣先在 constructor 時初始化影子樹、template。
setLoadingProgress 函式setLoadingProgress = function() {
const spinner = this.shadowRoot.querySelector('.spinner-container');
const label = spinner.querySelector('.label');
this.progress = 0;
// 每秒 +10%
this.timer = setInterval(() => {
if (this.progress < 100) {
this.progress += 10;
label.innerText = `${this.progress}%`;
} else {
clearInterval(this.timer);
label.textContent = "完成!";
}
}, 1000);
}
connectedCallback,初始化 timer connectedCallback() {
const cloneNode = spinnerTemplate.content.cloneNode(true);
this.shadowRoot.appendChild(cloneNode);
this.setLoadingProgress(); // 初始化 timer
}
disconnectedCallback,加上清除 timer 機制,當元件被清除時要清除 timer,避免記憶體洩漏。 disconnectedCallback() {
// 清除計時器,避免記憶體洩漏
clearInterval(this.timer);
}

今天就到這啦~
接下來我們要深入探討一下,到底怎麼使用 attributeChangedCallback 來監聽屬性變更!

