在昨天,我們已經學會了 Web Component 的 生命週期。
接下來要深入了解 Web Component 生命週期中的 attributeChangedCallback。
如果今天我們想要控制的不是內容,而是這個元件的屬性 像是外觀或行為,你就會使用到這個重要的生命週期!
所以接下來我們就來深入的討論如何更改元件的 屬性(attribute)吧!
在設計元件時,屬性是外部開發者能直接設定在標籤上的值,用來影響元件的行為與外觀。
所以在開始前可以先思考:這個元件要提供哪些屬性,才能讓使用者更方便的調整?
回到我們現在在設計的元件 cat-spinner,你認為它會有什麼樣的屬性?
從外觀來看,可能有:
從狀態來看,可能有:
我們先提供 4 個核心屬性給 cat-spinner:
宣告屬性、 監聽屬性變化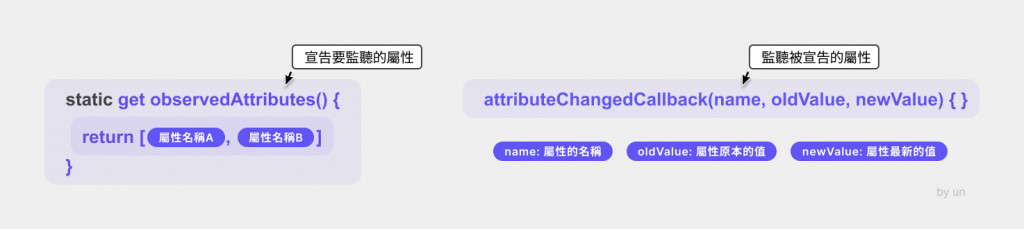
const spinnerTemplate = document.createElement('template');

spinnerTemplate.innerHTML = `
  <style>
    .spinner-container {
      display: flex;
      align-items: center;
      gap: 8px;
    }

    /***** 先提供預設屬性 *****/
    .spinner {
      border: 3px solid #ddd;
      border-top-color: #4a32e3;
      border-radius: 50%;
      width: 16px;
      height: 16px;
      animation: spin 1s linear infinite;
    }

    .label {
      font-size: 14px;
      font-weight: 600;
    }

    /***** SIZE *****/
    .small {
      width: 16px;
      height: 16px;
    }

    .medium {
      width: 24px;
      height: 24px;
    }
    .large {
      width: 40px;
      height: 40px;
    }

    @keyframes spin {
      to {
        transform: rotate(360deg);
      }
    }
  </style>

  <div class="spinner-container">
    <!-- spinner-->
    <div class="spinner"></div>

    <!-- 預設的 label -->
    <span class="label">Loading...</span>
  </div>
`;
其實我們可以透過 this.getAttribute("屬性") 來取得標籤的內容。但它只是一次性的抓取當前值,不會自動通知你屬性變化。
要知道變化的話就要透過靜態方法 static get observedAttributes(),回傳一個陣列,列出所有需要監聽的屬性名稱。
現在我們想要監聽的屬性有:label, size, color, loading
static get observedAttributes() {
  return ['label', 'size', 'color', 'loading'];
}
在 Web Component 中,如果我們希望元件能對外部傳入的屬性做出反應,就必須讓元件監聽屬性變化。
透過 attributeChangedCallback(name, oldValue, newValue),你就可以在屬性發生變化時執行你要觸發的後續動作。
attributeChangedCallback(name, oldValue, newValue) {
  const spinner = this.shadowRoot.querySelector('.spinner');
  const label = this.shadowRoot.querySelector('.label');

  switch (name) {
    case 'label':
      label.textContent = newValue || 'Loading...';
      break;

    case 'size':
      spinner.className = `spinner ${newValue || 'small'}`;
      break;

    case 'color':
      spinner.style.borderTopColor = newValue || '#4a32e3';
      break;

    case 'loading':
      console.log(this.hasAttribute('loading'), oldValue, newValue)
      spinner.style.display = (this.hasAttribute('loading') && newValue === 'false')
        ? 'none' : 'flex';
      break;
  }
}
一般的 html 相信大家已經很熟悉了,在使用原生的元件時,我們可以在 <button disabled>送出</button> 標籤上加入 disabled 就可以控制元件的禁用狀態,而自定義元件的使用方式也是一樣的。
我們一樣在標籤上加入屬性,然後在元件內部 監聽 屬性變化。
依據上方定義的幾種屬性,你可以寫成以下的程式碼:
  <body>
    <div style="display: flex; align-items: center; gap: 16px; padding: 20px">
      <h2>Web Component</h2>

      <cat-spinner></cat-spinner>
      <cat-spinner label="等待奴才中..." size="large" color="#e34a4a" loading></cat-spinner>
      <cat-spinner label="處理飼料中..." size="small" color="#000000" loading></cat-spinner>
      <cat-spinner label="主子來啦~🐱🐱🐱" size="medium" loading="false"></cat-spinner>
    </div>

    <script src="spinner.js"></script>
  </body>
得到的結果:

