做好一些前置功課之後,可以嘗試建立一個 Node.js 專案試試了
以前都是用右鍵建立資料夾,再把資料夾拖到 VS Code 去使用,這樣使用 VS Code 的 Terminal 就不用管路徑問題很方便,但趁這次還是整理練習一下終端機指令好了。
| Unix/Linux 指令 | Windows PowerShell | Windows CMD | 說明 |
|---|---|---|---|
pwd |
pwd 或 Get-Location |
cd |
顯示目前路徑 |
ls |
ls 或 Get-ChildItem |
dir |
列出檔案和目錄 |
ls -l |
ls -l 或 Get-ChildItem -Format List |
dir |
詳細列出檔案 |
ls -la |
ls -Force 或 Get-ChildItem -Force |
dir /a |
列出所有檔案(含隱藏) |
ls -R |
ls -Recurse |
dir /s |
遞迴列出子目錄 |
cd /path/to/dir |
cd C:\path\to\dir |
cd C:\path\to\dir |
切換到指定目錄 |
cd .. |
cd .. |
cd .. |
回到上層目錄 |
cd ~ |
cd ~ 或 cd $env:USERPROFILE |
cd %USERPROFILE% |
回到使用者家目錄 |
cd - |
cd - |
無對應 | 切換到上一個目錄 |
| Unix/Linux 指令 | Windows PowerShell | Windows CMD | 說明 |
|---|---|---|---|
mkdir dirname |
mkdir dirname |
mkdir dirname |
建立目錄 |
mkdir -p path/to/dir |
New-Item -ItemType Directory -Force -Path path\to\dir |
需逐層建立 | 建立多層目錄 |
rmdir dirname |
rmdir dirname |
rmdir dirname |
刪除空目錄 |
rm filename |
Remove-Item filename |
del filename |
刪除檔案 |
rm -f filename |
Remove-Item filename -Force |
del filename /f |
強制刪除檔案 |
rm -r dirname |
Remove-Item dirname -Recurse |
rmdir dirname /s |
遞迴刪除目錄 |
rm -rf dirname |
Remove-Item dirname -Recurse -Force |
rmdir dirname /s /q |
強制遞迴刪除 |
cp source dest |
Copy-Item source dest |
copy source dest |
複製檔案 |
cp -r source dest |
Copy-Item source dest -Recurse |
xcopy source dest /e |
遞迴複製目錄 |
mv oldname newname |
Move-Item oldname newname |
move oldname newname |
移動/重新命名 |
touch filename |
New-Item filename -ItemType File |
echo. > filename |
建立空檔案 |
| Unix/Linux 指令 | Windows PowerShell | Windows CMD | 說明 |
|---|---|---|---|
cat filename |
Get-Content filename |
type filename |
顯示檔案內容 |
less filename |
Get-Content filename | more |
more filename |
分頁顯示檔案 |
head filename |
Get-Content filename -Head 10 |
無直接對應 | 顯示檔案前10行 |
tail filename |
Get-Content filename -Tail 10 |
無直接對應 | 顯示檔案後10行 |
tail -f filename |
Get-Content filename -Wait |
無直接對應 | 即時監看檔案更新 |
wc -l filename |
(Get-Content filename).Count |
find /c /v "" filename |
計算檔案行數 |
grep pattern filename |
Select-String pattern filename |
find "pattern" filename |
搜尋檔案內容 |
這邊我們先執行 mkdir node_test 就可以在電腦中找到新增的資料夾,接著移動到該資料夾的路經cd node_test
然後我們用 VS Code 打開資料夾,執行 npm init -y 就可以看到出現一個 package.json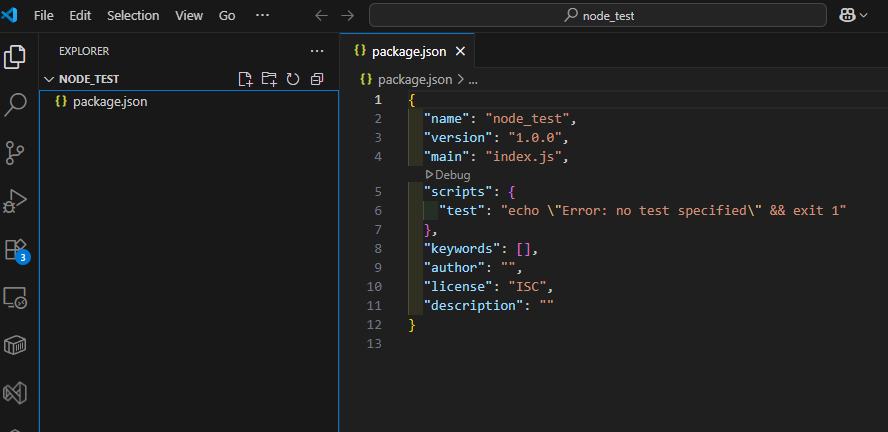
關於 package.json 還會延伸出很多東西,之後有機會再整理在後面的篇幅
接下來執行 touch index.js 看看會如何
不意外的 Windows 系統不支援此指令,所以我們要用 echo "" > index.js 代替
成功的話就會出現 index.js 的檔案了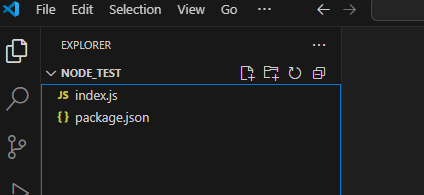
再來我們去官網複製範例程式碼來測試看看
import { createServer } from 'node:http';

const hostname = '127.0.0.1';
const port = 3000;

const server = createServer((req, res) => {
  res.statusCode = 200;
  res.setHeader('Content-Type', 'text/plain');
  res.end('Hello World');
});

server.listen(port, hostname, () => {
  console.log(`Server running at http://${hostname}:${port}/`);
});
執行 node index.js
成功的話應該會打印出console.log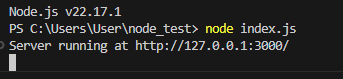
也可以到瀏覽器去看看 http://127.0.0.1:3000/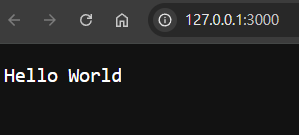
關於 http 就留到後面 2 天後再寫。
這邊沒有梗圖,是真的會寫!!
每次修改程式碼都要重新執行 node index.js 是非常麻煩的事,所以有了 nodemon。
科技始終來自於惰性,所以順著惰性,我們直接安裝在全域,就不用每個專案都裝一次。
npm install nodemon -g
安裝成功後可以透過 nodemon -v 看版本號。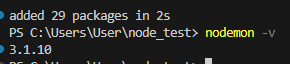
使用起來也很簡單從 node index.js 改成 nodemon index.js 就好,
接下來只要有修改內容,就會自動重啟了。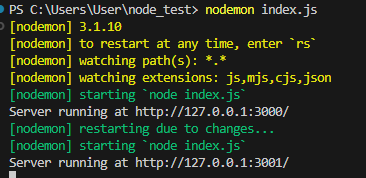


 iThome鐵人賽