前端完成 Entra ID 認證後,接著我們開始往後端(backend)API 推進。今日的目標是讓後端在收到前端 API 請求後,能夠認證請求中附帶的 token 資訊,確認登入者身份,之後再執行其他業務邏輯程式:
//fetch-wrapper.ts
import { useAuthStore } from '@/stores/auth'; // Entra ID 認證完成後存放於 auth store 中

//物件,包含各種 HTTP 方法
export const fetchWrapper = {
  get: request('GET'),
  post: request('POST'),
  put: request('PUT'),
  delete: request('DELETE'),
  postBlob: postBlob
};

interface temp {
  method: string;
  headers: Record<string, string>;
  body?: string | FormData;
}

export interface ApiRspMessage<T> {
  success: boolean;
  message: string;
  data: T;
}
export interface ActionRsp {
    success: boolean;
    message: string;
}

//協助組合查詢參數
export function appendQueryParam(apiUri: string, paramName: string, paramValue: string) {
  if (paramValue !== undefined && paramValue !== null && paramValue !== '') {
    apiUri += `&${paramName}=${paramValue.toString()}`;
  }
  return apiUri;
}

//產生對應 HTTP 方法的請求函式。
function request(method: string) {
  return (url: string, body?: object) => {
    console.log('request body', body);

    const requestOptions: temp = {
      method,
      headers: authHeader(url)
    };

    // 檢查 body 是否為 FormData,如果是,則不設置 Content-Type
    if (body) {
      if (body instanceof FormData) {
        // 如果是 FormData,則不設置 Content-Type
        requestOptions.body = body;
      } else {
        // 如果是非 FormData,則設置 Content-Type 並轉換為 JSON
        requestOptions.headers['Content-Type'] = 'application/json';
        requestOptions.body = JSON.stringify(body);
      }
    }

    return fetch(url, requestOptions)
      .then(response => {
        return handleResponse(response);
      })
      .catch(error => {
        console.error(`Error fetching ${url}:`, error);
        throw error;

      });

  };

}

// 產生帶有認證資訊的 header
function authHeader(url: string): Record<string, string> {
  // return auth header with jwt if user is logged in and request is to the api url
  const { user } = useAuthStore(); // Entra ID 認證後取回的登入者資訊存放 useAuthStore 中
  const isLoggedIn = !!user?.token;
  const isApiUrl = url.startsWith(import.meta.env.VITE_API_URL);
  if (isLoggedIn && isApiUrl) {
     return { Authorization: `Bearer ${user.token}` }; // 將 token 資訊放於 Header 中
  } else {
    return {};
  }
}

//統一處理 API 回應,包含錯誤處理
function handleResponse<T>(response: Response): Promise<T> {
  return response.text().then((text: string) => {
    const data = text && JSON.parse(text);
    if (!response.ok) {
      const { user, logout } = useAuthStore();
      if ([401, 403].includes(response.status) && user) {
        // auto logout if 401 Unauthorized or 403 Forbidden response returned from api
        logout();
      }
      let error: string = (data && data.message) || response.statusText;
      const rspMessage :string = "reauest.url : " + response.url +',reauest.status : ' + response.status.toString() + ',error :  ' + error;
      error = rspMessage + error;
      console.error(' error:', error);
      return Promise.reject(error);
    }
    // Ensure data is of type UserData
    return data as T;
  });

}
//POST 並取得 blob 檔案
async function postBlob(url: string, body?: object) {
  const requestOptions: any = {
    method: 'POST',
    headers: authHeader(url)
  };

  if (body) {
    requestOptions.headers['Content-Type'] = 'application/json';
    requestOptions.body = JSON.stringify(body);
  }
  const resp = await fetch(url, requestOptions);
  if (!resp.ok) throw new Error('Network error');
  return await resp.blob();

}
//Interface  取得API 回應中的Data 會將資料以此轉為物件,並存放資料,供前端程式存取。
export interface ifSerInfo {
  id: string,
  username?:  string,
  deptId: string | null | undefined,
  deptName: string | null | undefined,
  compName: string | null | undefined,
  email :  string | null,
}
async feachUserInfo() {
      try {
        const respData: ifSerInfo = await fetchWrapper.get(baseUrl) as ifSerInfo ;
        localStorage.setItem('respData', JSON.stringify(respData));
        this.loginResult = true;
        this.loginMsg = "Login Success";
      } catch (error: any) {
        console.error('Failed to fetch user info', error);

      }

    }
await this.feachUserInfo();//呼叫後端回傳登入者員工資訊
Audience 的值,詳細步驟可參閱官方網站 微軟註冊應用程式服務文件
新增 backendAPI .net core 專案,接手前端請求後與 Entra ID 進行互動(下圖黃底的區塊):
圖10-1:後端承接服務情求架構圖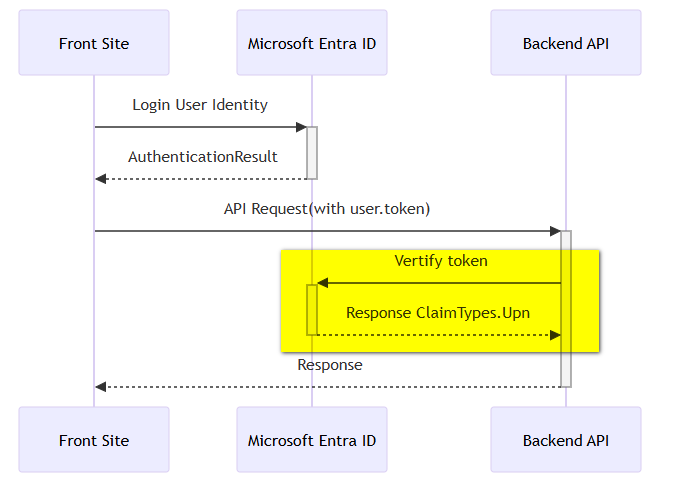
appsetting.json ,輸入以下 Azure AD 設定:
//請先於專案的 appsetting.json 加入 azure AD 驗證服務需要的參數
"AzureAd": {
    "Instance": "https://login.microsoftonline.com/", // Azure AD 登入入口網址
    "Domain": "", // 組織的 Azure AD 網域
    "ClientId": "", // 註冊於 Azure AD 的應用程式 (client) ID
    "TenantId": "", // Azure AD 租戶識別碼
    "Audience": "", // 預期的 JWT Token  (audience),API 的應用程式識別字串,確保權杖是發給這個 API 的
    "Scope": "ReadProfile", // 權限範圍 (scope),通常用於 API 權限控管 (ClientID)
    "SignedOutCallbackPath": "/signout-callback-oidc",
    "ClientCapabilities": ["cp1"]
  }
Program.cs : 將 appsetting.json 綁定到驗證選項,並且設定驗證機制//設定 JWT 驗證機制,並整合 Azure AD 作為身分驗證**
/*
* 驗證權杖的發行者(Issuer)與受眾(Audience)是否正確。
* 驗證權杖是否過期(Lifetime)。
* 驗證權杖簽章(IssuerSigningKey)。
* 設定時鐘誤差為 0,提升安全性。
*/
builder.Services.AddAuthentication(JwtBearerDefaults.AuthenticationScheme)
.AddMicrosoftIdentityWebApi(options =>
{
Configuration.Bind("AzureAd", options);
options.TokenValidationParameters = new Microsoft.IdentityModel.Tokens.TokenValidationParameters
{
ValidateIssuer = true,
ValidIssuer = $"https://login.microsoftonline.com/{Configuration["AzureAd:TenantId"]}/v2.0",
ValidateAudience = true,
ValidAudience = Configuration["AzureAd:Audience"],
ValidateLifetime = true,
ClockSkew = TimeSpan.Zero,
ValidateIssuerSigningKey = true
};
}, options => { Configuration.Bind("AzureAd", options); });
builder.Services.Configure<JwtBearerOptions>(JwtBearerDefaults.AuthenticationScheme, options =>
{
options.Events = new JwtBearerEvents
{
OnMessageReceived = context =>
{
context.HttpContext.Items["StartValidate"] = DateTime.Now;
Log.Information("收到JWT,開始驗證,時間: {time}", context.HttpContext.Items["StartValidate"]);
return Task.CompletedTask;
},
OnAuthenticationFailed = context =>
{
var start = context.HttpContext.Items["StartValidate"] as DateTime?;
var end = DateTime.Now;
if (start.HasValue)
{
Log.Warning("JWT 驗證失敗,時間: {end},耗時: {duration} ms", end, (end - start.Value).TotalMilliseconds);
}
return Task.CompletedTask;
},
OnTokenValidated = async context =>
{
var start = context.HttpContext.Items["StartValidate"] as DateTime?;
var end = DateTime.Now;
string payloadInfo = "";
var identity = context.Principal.Identity as ClaimsIdentity;
// 嘗試解析 JWT payload
if (identity != null)
{
var upn = identity.Claims.FirstOrDefault(c => c.Type == ClaimTypes.Upn)?.Value;
payloadInfo = $"upn: {upn}";
}
if (start.HasValue)
{
Log.Information("{payloadInfo} JWT 驗證完成,時間: {end},耗時: {duration} ms", payloadInfo, end, (end - start.Value).TotalMilliseconds);
}
await Task.CompletedTask;
}
};
});
using Core.Models.Dto;
using System.Security.Claims;
using Microsoft.AspNetCore.Mvc;
using Microsoft.AspNetCore.Authorization;
namespace backendAPI.Controllers
{
    [Authorize]
    [ApiController]
    [Route("api/[controller]")]
    public class UserInfoController : ControllerBase
    {
       [HttpGet]
       [ProducesResponseType(typeof(UserInfoDto), 200)]
       public async Task<IActionResult> GetLoginUserInfo()
       {
         var emailClaim = User.FindFirst(ClaimTypes.Upn)?.Value;
         Console.WriteLine($"emailClaim: {emailClaim}");
         return Ok();
      }
   }
}
啟動服務,透過前端呼叫後端 GetLoginUserInfo API,確認可以通過驗證取得登入者資訊。
圖10-3:各檔案間與資料流的關係圖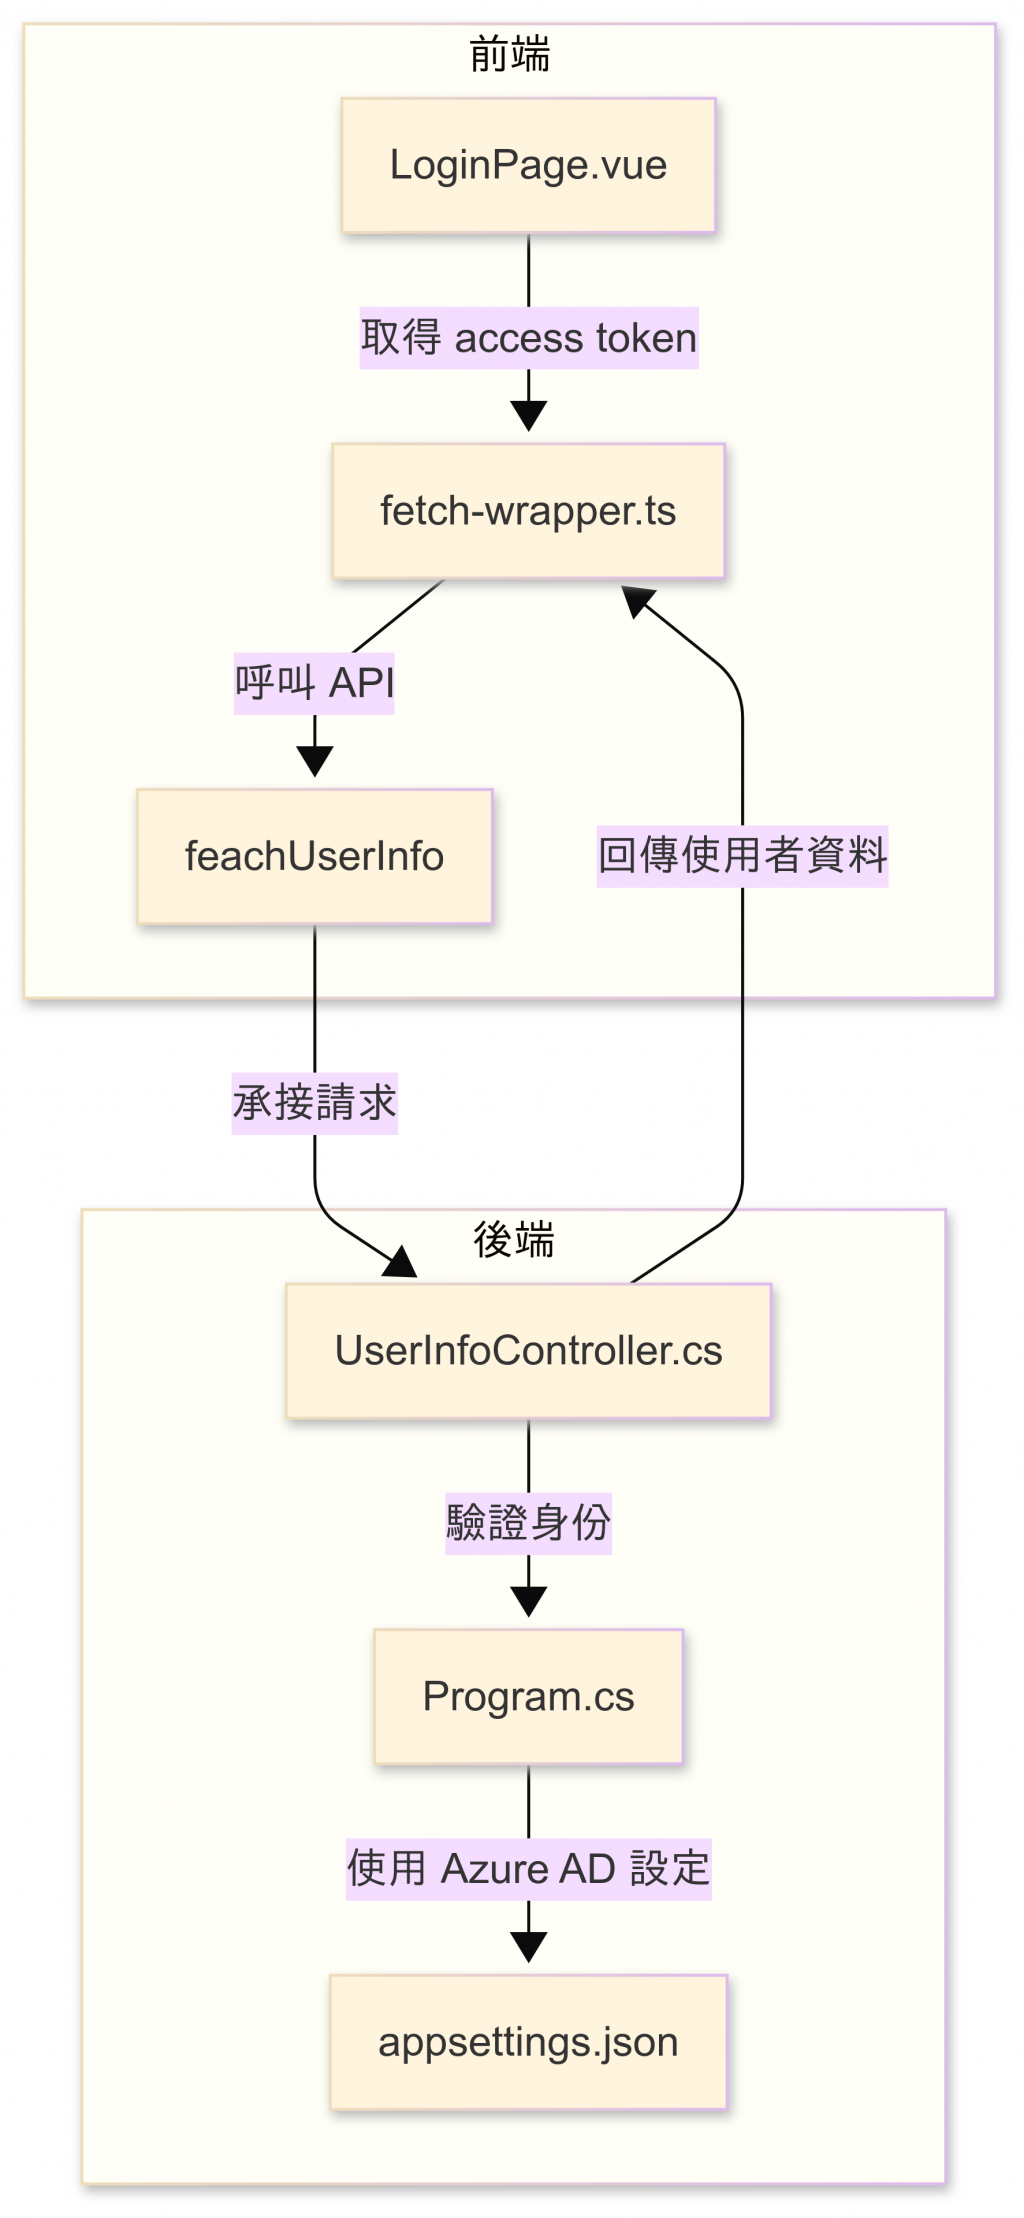


 iThome鐵人賽