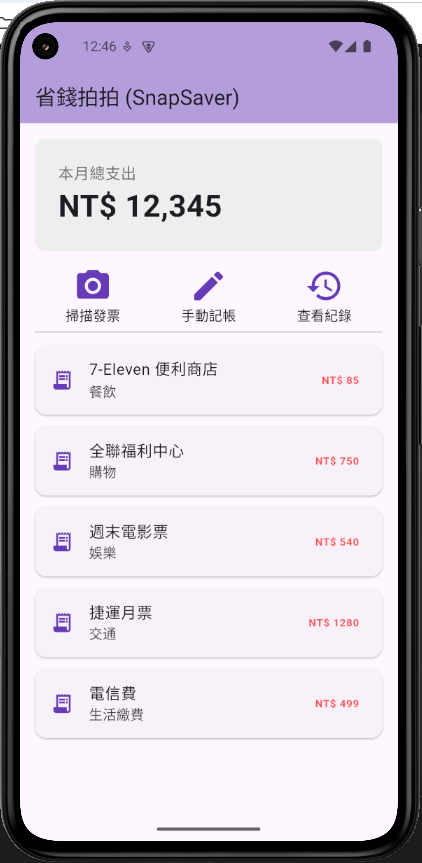
大家好,歡迎來到第六天的旅程!在 Day 5,我們成功地從一張白紙打造出「省錢拍拍」的首頁,掌握了 Column、Row 與 Container 的佈局技巧。
今天將學習 Flutter 中處理可滾動列表的王牌 Widget:ListView,並搭配 Card 與 ListTile,打造出一個既美觀又高效的動態交易紀錄列表。
在 Flutter 中,Column 和 Row 會試圖一次性地計算並渲染其所有的子元件。當子元件的總高度(對 Column 而言)或總寬度(對 Row 而言)超過螢幕的顯示範圍時,就會發生 Overflow 錯誤。
雖然我們可以使用 SingleChildScrollView 來包裹 Column 讓它變得可以滾動,但這是一個效能不佳的做法。因為它依然會一次性渲染列表中的所有項目,即使是那些在螢幕外根本看不到的項目。如果列表有數百個項目,這將會造成嚴重的性能問題。
ListView.builder 是一個「懶加載 (lazy-loading)」的列表建構器。它的核心理念是:只創建和渲染那些當前正顯示在螢幕上的列表項。當使用者滾動列表時,它會智慧地回收滑出螢幕的項目,並創建即將進入螢幕的新項目。這種機制確保了即使有成千上萬筆資料,App 也能保持流暢的滾動性能。
ListView.builder 有兩個必填的核心屬性:
itemCount: 告訴 ListView 總共有多少個項目。itemBuilder: 一個回呼函式 (Callback Function),它會接收 context 和項目索引 index,並根據這個索引回傳對應的列表項 Widget。在能夠連接後端資料庫之前,我們先在程式中創建一些假資料來模擬消費紀錄。
lib/main.dart 檔案的頂部(import 語句下方),新增一個 Transaction 類別來定義我們資料的結構。HomePage 類別的內部,創建一個假資料列表。請注意:由於
transactions列表是在程式運行時才被建立的(它並非一個編譯時期的常數),我們必須移除HomePageWidget 建構子前面的const關鍵字,Transaction類別的建構子也是同理。
// lib/main.dart (在 import 下方)
class Transaction {
  final String title;
  final String category;
  final double amount;
  final DateTime date;

  // 我們也移除這個建構子的 const,因為 DateTime.now() 不是常數
  Transaction({
    required this.title,
    required this.category,
    required this.amount,
    required this.date,
  });
}

class MyApp extends StatelessWidget {
  const MyApp({super.key});

  @override
  Widget build(BuildContext context) {
    return MaterialApp(
      // 關閉右上角的 Debug 標籤
      debugShowCheckedModeBanner: false,
      title: 'SnapSaver',
      theme: ThemeData(
        colorScheme: ColorScheme.fromSeed(seedColor: Colors.deepPurple),
        useMaterial3: true,
      ),
      // 移除 'const' 關鍵字
      home: HomePage(),
    );
  }
}

class HomePage extends StatelessWidget {
  // 關鍵修正:移除 'const' 關鍵字
  HomePage({super.key});

  // 建立一個假資料列表
  final List<Transaction> transactions = [
    Transaction(title: '7-Eleven 便利商店', category: '餐飲', amount: 85, date: DateTime.now()),
    Transaction(title: '全聯福利中心', category: '購物', amount: 750, date: DateTime.now()),
    Transaction(title: '週末電影票', category: '娛樂', amount: 540, date: DateTime.now()),
    Transaction(title: '捷運月票', category: '交通', amount: 1280, date: DateTime.now()),
    Transaction(title: '電信費', category: '生活繳費', amount: 499, date: DateTime.now()),
    Transaction(title: '午餐:牛肉麵', category: '餐飲', amount: 180, date: DateTime.now()),
    Transaction(title: '蝦皮購物', category: '購物', amount: 1250, date: DateTime.now()),
  ];

  @override
  Widget build(BuildContext context) {
    // ...
  }
}
現在,萬事俱備。我們將 Column 佈局與 ListView 結合起來。
重要觀念:當你在一個
Column內部直接放置ListView時,會發生錯誤。因為Column給予子元件無限的垂直空間,但ListView需要一個有限的、確切的高度。為了解決這個問題,我們需要用ExpandedWidget 來包裹ListView,告訴它:「請填滿Column中所有剩餘的空間」。
Expanded 是一個 **彈性佈局 (Flexible Layout)**的 Widget,用來在 Row 或 Column 中,
讓子元件自動填滿剩餘的可用空間。
Card 是 Flutter 提供的一種 UI 容器,
它模仿了 Material Design 的卡片風格,有圓角、陰影,在視覺上提供層次感與區隔。
修改 HomePage 的 build 方法:
// 分隔線
  const Padding(
     padding: EdgeInsets.symmetric(horizontal: 16.0),
     child: Divider(),
  ),
  // 使用 Expanded 包裹 ListView.builder
  Expanded(
    child: ListView.builder(
      itemCount: transactions.length,
      itemBuilder: (BuildContext context, int index) {
        final transaction = transactions[index];
        return Card(
          margin: const EdgeInsets.symmetric(
            horizontal: 16.0,
            vertical: 6.0,
          ),
          child: ListTile(
            leading: const Icon(
              Icons.receipt_long,
              color: Colors.deepPurple,
            ),
            title: Text(transaction.title),
            subtitle: Text(transaction.category),
            trailing: Text(
              'NT\$ ${transaction.amount.toStringAsFixed(0)}',
              style: const TextStyle(
                color: Colors.redAccent,
                fontWeight: FontWeight.bold,
              ),
            ),
          ),
        );
      },
    ),
  ),

程式碼解析:
Column 的最下方,我們使用 Expanded 來包裹 ListView.builder,解決了高度限制的問題。itemCount 直接設為我們假資料列表的長度。itemBuilder 中,我們為每個列表項返回一個 Card Widget,內部包裹 ListTile 來呈現資料。Card 內部包裹著 ListTile,它極大地簡化了列表項的佈局。我們將 title, category, amount 等資料輕鬆地放入 ListTile 的 title, subtitle, trailing 屬性中。今天我們學習了 Flutter 中,處理長列表最高效的元件之一:ListView.builder。不僅理解了它「懶加載」的核心原理,還學會了使用 Expanded 來處理它在 Column 中的佈局問題,並搭配 Card 和 ListTile 打造出專業、美觀的列表項。
明天,我們將來處理 App 的「門面」問題,深入探索 ThemeData,為「省錢拍拍」客製化一套專屬的色彩與字體主題。
