今天來製作視角目標鎖定 (Target Locking)
從相機位置往前方發射一個 碰撞檢測,
如果命中指定的物件類型,則會將目標鎖定在第一個被擊中的物件上。
接著角色會 朝向目標,並且將相機稍微提高一些,以獲得更好的視角。
(有GIF需要載入)
在 iThome30daysCharacter.h 設置標頭:
變數:
UPROPERTY(Category="Character: Camera", EditAnywhere, BlueprintReadOnly)
AActor* TargetActor;

UPROPERTY(Category="Character: Camera", EditAnywhere, BlueprintReadWrite)
bool bIsTargetLocking;
函式:
UFUNCTION(BlueprintCallable, Category="Input")
virtual void DoTargeting(float DeltaTime, float TargetZOffset=100.f, float CamHeight = 140.f, float RInterpSpeed = 10.f, float VInterpSpeed = 10.f);

UFUNCTION(BlueprintCallable, Category="Input", meta=(bIgnoreSelf="true", WorldContext="WorldContextObject", AutoCreateRefTerm="ActorsToIgnore"))
virtual void TargetLockCam(float TraceStartXOffset, float TraceLength, float TraceRadius, TArray<TEnumAsByte<EObjectTypeQuery>> ObjectTypes, TArray<AActor*> ActorsToIgnore, EDrawDebugTrace::Type DrawDebugType, float DebugDuration);
首先,我們需要一個檢測方式來找出角色前方是否有可鎖定的目標。這裡使用 Sphere Trace For Objects,由相機位置往角色面朝方向延伸一段距離。
偵測邏輯如下:
FHitResult OutHit;
FVector Start = FollowCamera->GetComponentLocation() + FollowCamera->GetForwardVector() * TraceStartXOffset;
FVector End = FollowCamera->GetComponentLocation() + FollowCamera->GetForwardVector() * TraceLength;
const bool bHit = UKismetSystemLibrary::SphereTraceSingleForObjects(
        this,                                    // WorldContext
        Start,                                   // Start
        End,                                     // End(不移動,只是球體)
        TraceRadius,                             // 半徑
        ObjectTypes,                             // 偵測類型
        false,                                   // bTraceComplex
        ActorsToIgnore,                          // 忽略清單
        DrawDebugType,                           // Debug 顯示
        OutHit,                                  // 結果
        true,                                    // 忽略自己
        FLinearColor::Red,                       // Trace 顏色
        FLinearColor::Green,                     // Hit 顏色
        DebugDuration                            // Debug 持續時間
    );

當 Sphere Trace 擊中任何符合條件的物件時,會返回第一個命中的 Object。
從 Out Hit 可拿到命中 Object 的資料,像是 Actor、Location、Distance。
if (bHit) TargetActor = OutHit.GetActor();

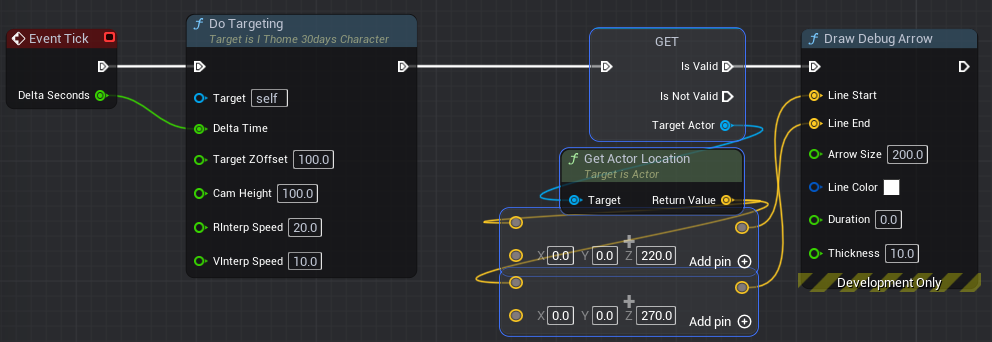
在 Tick 裡檢查是否有有效的 TargetActor:
// Target Rotation
FVector TargetDir = TargetActor->GetActorLocation() - GetActorLocation() + FVector(0,0,TargetZOffset);
FRotator TargetR = FMath::RInterpTo(Controller->GetControlRotation() , TargetDir.Rotation(), DeltaTime, 10.f);
Controller->SetControlRotation(TargetR);

為了提供更好的視角,我們可以在鎖定目標時:
if (bIsTargetLocking)
{
    // Target Cam Height
    float CurLoc1 = CameraBoom->GetRelativeLocation().Z;
    float TartgetZ1 = FMath::FInterpTo(CurLoc1, CamHeight, DeltaTime, 10.f);
    CameraBoom->SetRelativeLocation(FVector(0,0,TartgetZ1));
}else
{
    // OG Cam Height
    float CurLoc0 = CameraBoom->GetRelativeLocation().Z;
    float TargetZ0 = FMath::FInterpTo(CurLoc0, 0, DeltaTime, 10.f);
    CameraBoom->SetRelativeLocation(FVector(0,0,TargetZ0));
}

void AiThome30daysCharacter::TargetLockCam(float TraceStartXOffset, float TraceLength, float TraceRadius, TArray<TEnumAsByte<EObjectTypeQuery>> ObjectTypes, TArray <AActor*> ActorsToIgnore, EDrawDebugTrace::Type DrawDebugType, float DebugDuration)
{
	if (TargetActor != nullptr)
	{
		TargetActor = nullptr;
		bIsTargetLocking = false;
		return;
	}
	FHitResult OutHit;
	FVector Start = FollowCamera->GetComponentLocation() + FollowCamera->GetForwardVector() * TraceStartXOffset;
	FVector End = FollowCamera->GetComponentLocation() + FollowCamera->GetForwardVector() * TraceLength;
	const bool bHit = UKismetSystemLibrary::SphereTraceSingleForObjects(
			this,                                    // WorldContext
			Start,                                   // Start
			End,                                     // End(不移動,只是球體)
			TraceRadius,                             // 半徑
			ObjectTypes,                             // 偵測類型
			false,                                   // bTraceComplex
			ActorsToIgnore,                          // 忽略清單
			DrawDebugType,                           // Debug 顯示
			OutHit,                               // 結果
			true,                                    // 忽略自己
			FLinearColor::Red,                     // Trace 顏色
			FLinearColor::Green,                       // Hit 顏色
			DebugDuration                            // Debug 持續時間
		);
	if (bHit) TargetActor = OutHit.GetActor();
	bIsTargetLocking = true;
}
void AiThome30daysCharacter::DoTargeting(float DeltaTime, float TargetZOffset, float CamHeight, float RInterpSpeed, float VInterpSpeed)
{
	if (bIsTargetLocking && TargetActor && Controller)
	{
		// Target Rotation
		FVector TargetDir = TargetActor->GetActorLocation() - GetActorLocation() + FVector(0,0,TargetZOffset);
		FRotator TargetR = FMath::RInterpTo(Controller->GetControlRotation() , TargetDir.Rotation(), DeltaTime, 10.f);
		Controller->SetControlRotation(TargetR);

		// Target Cam Height
		float CurLoc1 = CameraBoom->GetRelativeLocation().Z;
		float TartgetZ1 = FMath::FInterpTo(CurLoc1, CamHeight, DeltaTime, 10.f);
		CameraBoom->SetRelativeLocation(FVector(0,0,TartgetZ1));
	}else
	{
		// OG Cam Height
		float CurLoc0 = CameraBoom->GetRelativeLocation().Z;
		float TargetZ0 = FMath::FInterpTo(CurLoc0, 0, DeltaTime, 10.f);
		CameraBoom->SetRelativeLocation(FVector(0,0,TargetZ0));
	}
}
在 Blueprint 裡接的方式: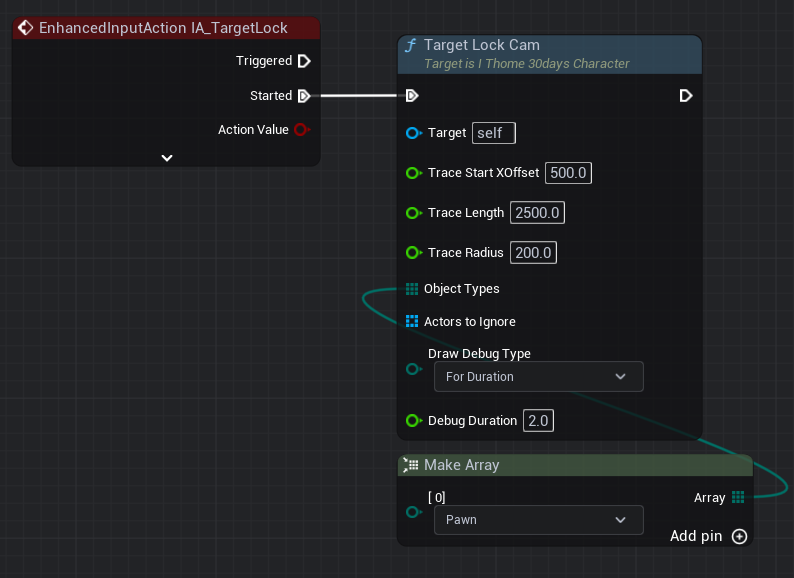
喔對前面忘記說了,要新增一個 IA_TargetLock,然後在 IMC_Defualt 設置按鍵。
另外,我 GIF 裡面使用的綠色沙包是 /Variant_Combat/Blueprints/Interactables/BP_CombatDummy,然後 Object Type 建議改成 Pawn,預設是 World Dynamic。
也可以自訂,在 Target Lock Cam 功能那再 Add pin 就可以了。

