延續上一篇,今天繼續進行 SVG 線條動畫之讓筆畫動起來!
如果沒看過上一篇也沒關係,因為上一篇著重在 SVG 線條的繪製與軟體操作步驟,本篇才是讓動畫動起來的核心,可以直接服用!(產出如下)
<body class="flex flex-col justify-center items-center h-screen bg-[#19365d]">

    // 這裡放你的 svg(從 Figma 或 Adobe Illustrator 直接貼上)

    // 下面是我想搭配的文字,可以省略
    <div class="-mt-36">
     <p class="w-80 text-xs ml-20 text-[#e3c37b]">
      <span>My</span> <span>drawing</span> <span>was</span> <span>not</span> <span>a</span> <span>picture</span> <span>of</span> <span>a</span> <span>hat.</span><br>
      <span>It</span> <span>was</span> <span>a</span> <span>picture</span> <span>of</span> <span>a</span> <span>boa</span> <span>constrictor</span> <span>digesting</span> <span>an</span> <span>elephant.</span>
    </p>
    </div>
</body>
先讓文字不要在畫面上顯示。
const path = document.querySelector("path");
const text = document.querySelector("p");
const words = document.querySelectorAll("p span");

gsap.set(words, { opacity: 0, y: -30 });
path 是 svg 裡面的 <path>,接下來都會來操作它。
const length = path.getTotalLength();

path.style.strokeDasharray = length;
path.style.strokeDashoffset = length;
getTotalLength() 是 JavaScript API,專門用來取得 svg 的路徑長度,會回傳一個數值。strokeDasharray 以及 strokeDashoffset 分別對應 CSS 屬性的 stroke-dasharray 跟 stroke-dashoffset,以下將藉由車子的例子來分享這裡的概念: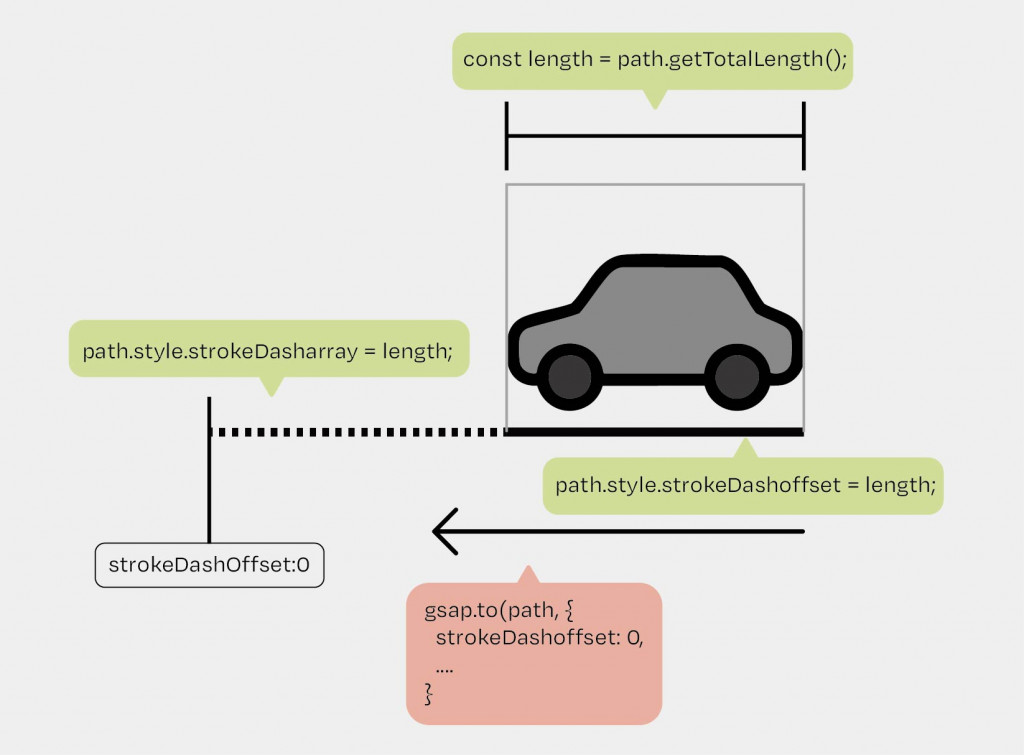
想像一下,我們現在有一台車,我們先量了一下這台車多長:
const length = path.getTotalLength();
接著,這裏就像是幫車子特製跟車身一樣長的軌道,讓它能夠前後移動:
path.style.strokeDasharray = length;
因為原本的路徑是一條完整的實線,無法直接做偏移效果(也就是沒辦法有視覺上移動的感覺),因此我們才先把它設定為一段長度剛好等於車身的虛線(軌道)。
然後,我們把這台車先往後推,停到跟車身一樣長的車庫裡(所以現在看不到任何線):
path.style.strokeDashoffset = length;
最後,我們要做的筆畫動畫,其實就是把車子慢慢從車庫裡開出來:
gsap.to(path, {
  strokeDashoffset: 0,
  duration: 6,
  ease: "power1.inOut",
  delay: 0.5,
  onComplete: () => {
    gsap.to(words, {
      opacity: 1,
      y: 0,
      duration: 1,
      ease: "back.out(1.7)",
      stagger: 0.1
    });
  }
});
當 strokeDashoffset 從 length 漸漸變成 0,就好像車子逐漸從車庫裡出現,於是整條線條就像是被人用筆「畫出來」一樣了!

