在了解了 IPC 的基礎概念後,我們來深入探討其中最常用的機制:Command。Command 是前端向後端發起請求,並獲取回應的標準途徑,讓我們的 Webview 介面能夠安全地驅動強大的 Rust 後端邏輯。

Command 本質上是一個被特殊標記的 Rust 函式。Tauri 會自動將這個函式暴露給前端,使其可以透過 JavaScript 呼叫。這種「白名單」式的設計確保了極高的安全性,因為只有被 #[tauri::command] 巨集(Macro)明確標記的函式才能被前端存取,杜絕了任意程式碼執行的風險。
補充說明:巨集(Macro)是 Rust 語言的特性,能在編譯時期自動生成代碼。
#[tauri::command]會自動處理序列化、反序列化和 IPC 通訊的細節,讓開發者專注於業務邏輯。
透過 Command,我們可以輕鬆實現以往在瀏覽器中無法完成的功能,例如讀取本地設定檔、執行複雜的資料處理、或是與資料庫互動。
讓我們用當初在 Day04 自動建立的範例,來看看怎麼用 Command。
在 src-tauri/src/lib.rs 中,我們定義一個 Rust 函式,並用巨集標記它:
// 使用 `#[tauri::command]` 巨集將其標記為一個 Command
#[tauri::command]
fn greet(name: &str) -> String {
    format!("Hello, {}! You've been greeted from Rust!", name)
}

#[cfg_attr(mobile, tauri::mobile_entry_point)]
pub fn run() {
    tauri::Builder::default()
        .plugin(tauri_plugin_opener::init())
        // 使用 `generate_handler!` 巨集註冊我們定義的 Command
        .invoke_handler(tauri::generate_handler![greet])
        .run(tauri::generate_context!())
        .expect("error while running tauri application");
}
在 Vue 元件中,我們使用 @tauri-apps/api 套件提供的 invoke 函式來呼叫後端 Command。
import { ref } from "vue";
import { invoke } from "@tauri-apps/api/core";

const greetMsg = ref("");
const name = ref("");

async function greet() {
  greetMsg.value = await invoke("greet", { name: name.value });
}
Tauri 支援直接傳遞複雜的 JavaScript 物件給 Rust。讓我們看一個更實際的例子:
後端定義:
use serde::{Deserialize, Serialize};

#[derive(Serialize, Deserialize)]
struct UserInfo {
    name: String,
    age: u32,
    email: String,
}

#[derive(Serialize, Deserialize)]
struct ApiResponse {
    success: bool,
    message: String,
    user_id: Option<u32>,
}

#[tauri::command]
fn create_user(user: UserInfo) -> ApiResponse {
    // 模擬建立使用者的邏輯
    println!("正在建立使用者: {} ({}歲)", user.name, user.age);

    ApiResponse {
        success: true,
        message: format!("使用者 {} 建立成功!", user.name),
        user_id: Some(12345),
    }
}
前端呼叫:
import { invoke } from "@tauri-apps/api/core";
async function createNewUser() {
try {
const userData = {
name: "張小明",
age: 25,
email: "ming@example.com"
};
const response = await invoke("create_user", { user: userData });
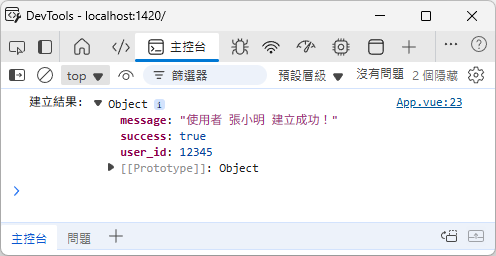
console.log("建立結果:", response);
} catch (error) {
console.error("建立失敗:", error);
}
}
記得在 lib.rs 中註冊新的 Command:
.invoke_handler(tauri::generate_handler![greet, create_user])
在真實世界中,許多操作並非立即完成,且有可能失敗。Tauri 的 Command 機制對此提供了優雅的支援。
非同步 Command:只需將 Rust 函式簽名改為 async fn,Tauri 就會自動在背景執行緒中執行它,避免阻塞 UI。
錯誤處理:讓 Rust 函式回傳 Result<T, E> 型別。當回傳 Ok(value) 時,前端 invoke 會成功解析出 value。當回傳 Err(error) 時,前端的 await invoke(...) 會拋出一個異常,可以被 try...catch 區塊捕獲。
#[tauri::command]
async fn check_file_exists(path: String) -> Result<bool, String> {
    // 這裡是一個模擬的耗時操作
    tokio::time::sleep(std::time::Duration::from_secs(1)).await;

    if std::path::Path::new(&path).exists() {
        Ok(true)
    } else {
        // 當回傳 Err 時,前端的 invoke Promise 會被 reject
        Err("找不到指定的檔案".to_string())
    }
}
在前端呼叫時,如果 Rust 回傳 Ok(value),invoke 的 Promise 會 resolve 並回傳 value。如果 Rust 回傳 Err(error_message),Promise 則會 reject,並將 error_message 作為錯誤原因,可以被 catch 區塊捕獲。
Command 是 Tauri 應用中實現「前端發起,後端執行」這種互動模式的基石。透過 #[tauri::command] 和 invoke,我們可以輕鬆且安全地在 JavaScript 與 Rust 之間傳遞結構化資料,並優雅地處理同步與非同步任務。
然而,Command 是一對一的「請求-回應」模式。如果我們需要後端主動、持續地向前端推送訊息,例如通知進度條更新或發送即時聊天訊息,就需要使用明天要介紹的:Event。


 iThome鐵人賽