表單元件可以說是環繞在網頁中的各個角落,你在開發上不想遇到他都很困難。
舉凡登入畫面、購物車、基本資料又或是你平時在跟 AI 互動的輸入框,這些都是表單元件的其中之一。
表單元件,看似簡單,其實都深藏不露,一個小小的 input 就要做到很多事情,像是輸入、輸出、點擊、聚焦、錯誤處理等等的表單大小事。
關於表單元件其實要學的東西有很多,接下來的幾天,我們會針對自訂表單元件進行探討。
在前面幾天,我們已經能夠建立獨立運作的 Web Component。
但當自訂的元件要和表單整合時,問題就出現了!
因為我們使用了 Shadow DOM 封裝元素:瀏覽器不知道你這個自定元件原來是要跟表單整合的 (((゚Д゚;)))。
說到這裡可能還不是很清楚,不如我們就做個實驗看看吧!
input.js
class CustomInput extends HTMLElement {
  constructor() {
    super();
    const shadow = this.attachShadow({ mode: 'open' });
    shadow.innerHTML = `<input type="text" />`;
  }
}

customElements.define('custom-input', CustomInput);
我們在外部使用,並且利用原生 form 的特性,將表單 submit,看看內容會取得什麼。
index.html
<form>
  <label>BLACK PINK</label>
  <custom-input name="answer"></custom-input>
  <label>YOUR</label>
  <input type="text" name="blink"/>
  <button type="submit">送出</button>
</form>

<script>
document.querySelector('form').addEventListener('submit', e => {
  e.preventDefault();

  // 我們使用 formData 來取值
  const formData = new FormData(e.target);

  console.log(formData.get('answer'));// 這裡你會發現拿到 null
  console.log(formData.get('blink')); // 原生 input 可以正常取得值
});
</script>

結果發現,在一般的狀況下,外部是無法透過 formData 取得自訂表單元件內容的,因為瀏覽器只認得 原生可表單關聯元素 (form-associated elements) ,所以即使這個自訂元件已經是包了 input ,他也不是表單關聯元素的一員,自然無法取得內容。
當然,你也可以利用前面章節提到的 getter/setter 提供外部一個 get value 的方式,透過 getter 來拿到自定元件中的值。
但是身為一個表單元件,不會只有單純的取值,而是會希望這個元件能夠繼承一些表單元件的屬性、方法。
如果現在希望表單元件可以被原生的 formData 認得,那應該怎麼做呢?
在 HTML 規範中有提出了 Form-associated custom elements (FACE) 的概念,讓自訂元素可以登記成表單的一部分。
formAssociated我們需要使用到 formAssociated 建立自定元件與表單的關聯。這樣在外部使用時,若將自訂元素放入 <form> ,瀏覽器會自動將該元素與表單建立關聯。
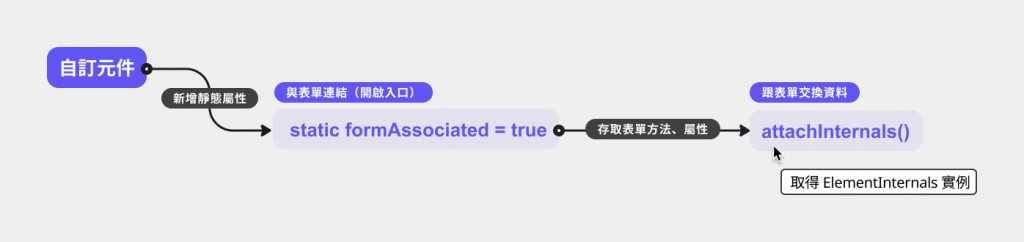
新增靜態屬性,告訴瀏覽器將這個自訂元素視為表單控制的元件:
static formAssociated = true;
ElementInternals 存取方法和屬性呼叫 attachInternals() 取得 ElementInternals 物件,將其存於變數中(ElementInternals 是瀏覽器提供的一個 API)。
這時,你就可以存取表單控制元件的方法和屬性,讓你能夠建立自訂的表單元素,並且管理表單相關功能。
setFormValue。setValidity。當你做到以上兩個步驟,你就已經將你的自訂元件告訴瀏覽器他要跟表單產生關係了!
input.js
class CustomInput extends HTMLElement {
  static formAssociated = true;

  constructor() {
    super();
    this._internals = this.attachInternals();
    const shadowRoot = this.attachShadow({ mode: 'open' });
    const cloneNode = this.render().cloneNode(true);
    shadowRoot.appendChild(cloneNode);
  }

  connectedCallback() {
    // 因為前面有 `attachInternals` 所以可以呼叫表單元件的方法,將值寫入
    const input = this.shadowRoot.querySelector('input');
    input.addEventListener('input', e => {
      // 使用表單方法 setFormValue,同步欄位的值到表單元件中
      this._internals.setFormValue(e.target.value);
    });
  }

  render() {
    const template = document.createElement('template');
    template.innerHTML = `
      <input type="text">
    `

    return template.content;
  }
}

customElements.define('custom-input', CustomInput);
index.html
<body>
    <form>
      <custom-input name="first"></custom-input>
      <button type="submit">Submit</button>
    </form>

    <script src="input.js"></script>
    <script>
      const form = document.querySelector('form');
      form.addEventListener('submit', e => {
        e.preventDefault();
        const formData = new FormData(form);
        console.log(formData.get('first'));
      })
    </script>
  </body>
如果我們建立的元件裡面並不是放置 <input> 欄位,而是一個用 <div> 做出來看起來像是輸入框的 input 可以嗎?
答案是可以的!只要我們有這兩個重要的關鍵 formAssociated + ElementInternals。
那就直接 coding 吧!
完整程式碼如下:
class CustomInput extends HTMLElement {
  static formAssociated = true;

  constructor() {
    super();
    this._internals = this.attachInternals();
    const shadowRoot = this.attachShadow({ mode: 'open' });
    const cloneNode = this.render().cloneNode(true);
    shadowRoot.appendChild(cloneNode);
  }

  connectedCallback() {
    // 因為前面有 `attachInternals` 所以可以呼叫表單元件的方法,將值寫入
    const div = this.shadowRoot.querySelector('div');
    div.addEventListener('input', e => {
      // 使用表單方法 setFormValue,同步欄位的值到表單元件中
      this._internals.setFormValue(e.target.textContent || e.target.innerText || '');
    });
  }

  render() {
    const template = document.createElement('template');
    template.innerHTML = `
      <style>
        div {
           border: 1px solid #999999;
           border-radius: 4px;
           padding: 2px 4px;
        }
      </style>

      <!--   使用一個假的 input   -->
      <div contenteditable="true"></div>
    `

    return template.content;
  }
}

customElements.define('custom-input', CustomInput);
以上,當你在外部使用時,就算裡面是一個假的 input 也能夠在 formData 中取得內容!
試著在外部的 html 插入這個元件看看吧!
記得,要讓自訂表單元件被瀏覽器認得,有兩個關鍵:
static formAssociated = true:宣告自己是表單元素this._internals = this.attachInternals():存取表單控制元件的方法和屬性。先了解以上兩點,就能讓自訂元件正式成為表單的一員。
之後表單元件不僅僅可以傳值,還能進一步驗證、或是顯示錯誤訊息等功能,接下來就一步一步實作吧!

