為了確保 CustomInput 元件穩定性以及功能正確性,我們需要加入單元測試。
上一篇使用了 Vite 建立開發環境,在這一篇將使用 Vitest 來進行單元測試,這是一個與 Vite 高度整合的測試框架,支援 TypeScript 和 Web Component 測試。
vitest 以及 @open-wc/testing (適用於 Web Component 撰寫的測試工具)npm i vitest @open-wc/testing --save-dev
jsdom 提供類似瀏覽器的 DOM APInpm i jsdom --save-dev
vitest.config.ts
import { defineConfig } from 'vitest/config';

export default defineConfig({
  test: {
    environment: 'jsdom', // 使用 jsdom 模擬瀏覽器環境(在 Node.js 裡面提供類似瀏覽器的 DOM API)
    globals: true, // 啟用全域測試 API(如 describe、it)
    setupFiles: './test/vitest.setup.ts', // 測試前的初始化檔案
  },
});
tsconfig.json
{
  "compilerOptions": {
    "moduleResolution": "node",
    "target": "esnext",
    "module": "esnext",
    "strict": true,
    "esModuleInterop": true,
    "skipLibCheck": true,

    "types": ["vitest/globals"] // 新增:讓 TypeScript 也能吃到測試型別設定
  },
  "include": ["src/**/*"]
}
package.json 加入 vitest 測試語法{
"scripts": {
"test": "vitest run",
"test:watch": "vitest",
"dev": "vite",
"build": "vite build",
"preview": "vite preview"
},
}
index.ts 新增公開給外部使用的型別:import CustomInput from "./custom-input";
customElements.define("un-custom-input", CustomInput);
export default CustomInput;
// 新增提供給外部用的型別
export interface CustomInputElement extends HTMLElement {
currentValue: string; // 可讀寫的值
checkValidity(): boolean; // 確認驗證內容
reportValidity(): boolean; // 回報驗證結果
}
新建測試資料夾 test,並在資料夾內建立 vitest.setup.ts 、 custom-input.test.ts 的測試檔案。
jsdom 預設不支援 ElementInternals 與 form-associated custom elements。所以 attachInternals() 本身在 jsdom 裡不存在,我們會需要先建立假的 API,才有辦法測試元件中的 setFormValue() 或是 setValidity 等等方法。class MockInternals {
private currentValue = '';
public setFormValue(value: any) {
this.currentValue = value;
}
public getFormValue() {
return this.currentValue;
}
public setValidity() {}
}
Object.defineProperty(HTMLElement.prototype, 'attachInternals', {
value: function () {
return new MockInternals();
},
});
@open-wc/testing 以及 vitest 加入我們需要用到的方法或屬性。fixture:在 DOM 中建立一個測試用的元素並返回這個元素的參考。html:一個標記模板(template literal)函式,返回一個 HTML 片段給 fixture。import { fixture, html } from '@open-wc/testing';
import { describe, beforeEach, it, expect } from "vitest";
import CustomInput from "../src/custom-input" // 匯入 CustomInput
beforeEach 在執行每個測試前,都先抓取自訂元件的元素describe('Day 21: Test CustomInput', () => {
// 為了避免取不到自訂元件,在測試文件的一開始先重新定義元件
customElements.define('un-custom-input', CustomInput);
let customInput: CustomInput;
beforeEach(async () => {
customInput = await fixture(html`<un-custom-input></un-custom-input>`) as CustomInput;
});
});
import { fixture, html } from '@open-wc/testing';
import { describe, beforeEach, it, expect } from "vitest";

import CustomInput from "../src/custom-input"

describe('Day 21: Test CustomInput', () => {
  // 為了避免取不到自訂元件,在測試文件的一開始先重新定義元件
  customElements.define('un-custom-input', CustomInput);
  let customInput: CustomInput;

  beforeEach(async () => {
    customInput = await fixture(html`<un-custom-input></un-custom-input>`) as CustomInput;
  });

  // 測試元件是否正確被建立
  it('should create customInput', () => {
    const customInputElement = customInput.shadowRoot;

    expect(customInputElement).to.exist;
  });

  // 測試元件是否能取得預設值
  it('with default value: should get default value', () => {
    customInput.setAttribute('value', 'su su su supernova');

    expect(customInput.currentValue).to.equal('su su su supernova');
  });

  // 測試元件是否可以正確顯示 placeholder
  it('without default value: should get placeholder', () => {
    const customInputElement = customInput.shadowRoot!.querySelector('.custom-input');

    expect(customInput.currentValue).to.equal('');
    expect(customInputElement?.classList.contains('placeholder')).to.be.true;
  });

  // 測試輸入時是否正確更新值
  it('should get value when typing', () => {
    const customInputElement = customInput.shadowRoot!.querySelector('.custom-input')! as HTMLInputElement;

    customInputElement.innerText = 'hello, value changed!';
    const event = new Event('input', { bubbles: true, cancelable: true });
    customInputElement.dispatchEvent(event);

    expect(customInput.currentValue).to.equal('hello, value changed!');
  });
});
還記得我們有在 package.json 加入了測試語法 test: vitest run 嗎?
接下來就在 terminal 中執行測試:
npm run test
來看看測試結果吧!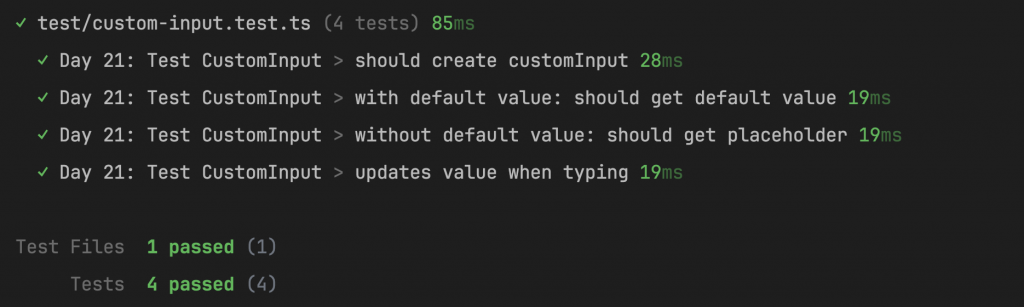
完整程式碼:https://github.com/unlinun/2025-WC-Input
關於測試,其實有非常多的東西可以深入學習,但因為我們的主題是 Web Component,也就不做太多詳述了。
有興趣的朋友,也可以去看看我隊友的 playwright 測試(同樣可以使用在 web component)。
你也可以搭配其他的測試工具,像是 jest 或是 E2E 測試的 cypress 或許都是一個選項。
參考資料:https://cn.vitest.dev/guide
參考資料:https://pjchender.dev/npm/note-vite-vitest/
那麼今天替自訂元件加入單元測試結束~接下來,終於要進入打包流程了!
明天見(躺平) ԅ(¯﹃¯ԅ)
同場加映,看了這一屆鐵人賽滷肉飯的系列文,今日同事分享的好吃滷肉飯,肥肉入口即化,真滴讚: