前面幾天一直在 index.html 與 input.js 之間切換,一直沒有進入整體專案架構的規劃。
今天我們將一起整理整理專案的資料夾與結構,建立更好的開發環境,讓後續開發更順利!
前一篇文章,我們利用 npm init 初始化專案,並且利用 npm i typescript --save-dev 加入了 Typescript 以及初始化 tsconfig.json。
接下來我們先將整體元件架構重構,並搭配 Vite 建立開發環境,一起提升開發效率!
src 資料夾。input.ts 重新命名為 custom-input.ts,並且移動至 src 的資料夾中。// export 自訂元件,讓外部可以取用
++ export default class CustomInput extends HTMLElement {
移除原本位於 `index.ts` 中定義 custom-input 的程式碼
-- customElements.define("un-custom-input", CustomInput);
src 資料夾中新增一個 index.ts 文件,引入剛剛匯出的 CustomInput。import CustomInput from "./custom-input";
// 改為在 index.ts 資料夾中定義自訂元件(改為自己想要的名稱: un-custom-input)
customElements.define("un-custom-input", CustomInput);
export default CustomInput;
目前的專案架構會如下:
project-root/
├── src/
│   ├── custom-input.ts
│   ├── index.ts
├── index.html
├── package.json
├── tsconfig.json
Vite 建立開發環境之前我們都是在 index.html 中,直接引入 index.js,但隨著加入了 TypeScript 的關係,會需要手動執行 npx tsc 編譯成 .js 檔案,效率實在太低了(身為前端就是希望可以看到畫面快速渲染),為了可以即時預覽,我們需要用另一種方式建構開發環境。
這時候我們就會需要使用到 Vite。
相信有在做前端開發,使用 Vue 或 React,一定大多有接觸過 Vite。
Vite是一個現代化的前端工具,專為快速開發和打包而設計。支援 TypeScript、ES Modules,且對 Web Component 的打包有很好的支援度。
接下來就一起利用 Vite 來建立開發環境,讓我們可以更快速的執行 CustomInput 元件!
npm install vite --save-dev
vite.config.ts,並加入以下內容:import { defineConfig } from 'vite';
export default defineConfig({
build: {
outDir: 'dist', // 輸出目錄
sourcemap: true,
lib: {
entry: 'src/index.ts', // 打包的入口
name: 'CustomInput', // 要輸出的全域變數名稱
fileName: 'custom-input', // 要輸出的檔案名稱
formats: ['es', 'umd'], // 支援 ES Module 與 UMD 格式
},
},
});
package.json,加入 Vite 相關指令:npm run dev:啟動 Vite 開發伺服器,支援 hot reload。{
"scripts": {
"dev": "vite"
}
}
tsconfig.json 中的內容,確保 TypeScript 設定可以搭配 Vite 和 ES Modules:{
"compilerOptions": {
"moduleResolution": "node",
"target": "esnext",
"module": "esnext",
"strict": true,
"esModuleInterop": true,
"skipLibCheck": true
},
"include": ["src/**/*"] // 修正位置
}
index.html,使用模組化方式引入自訂元件:<script type="module" src="/src/index.ts"></script> 引入自訂元件。<body>
<form style="display: flex; flex-direction: column; gap: 8px; padding: 32px;">
<!-- 改為新定義的名稱 -->
<un-custom-input
name="content"
value="defaultValue"
required
max-length="5"
>
</un-custom-input>
<input type="text" required>
<button type="submit">Submit</button>
</form>
<!-- 使用 module 方式引入自訂元件 -->
<script type="module" src="/src/index.ts"></script>
<!-- 以下略... -->
</body>
npm run dev
terminal 可以看到以下畫面,打開 localhost:5173 看看是否有成功。
畫面出現了!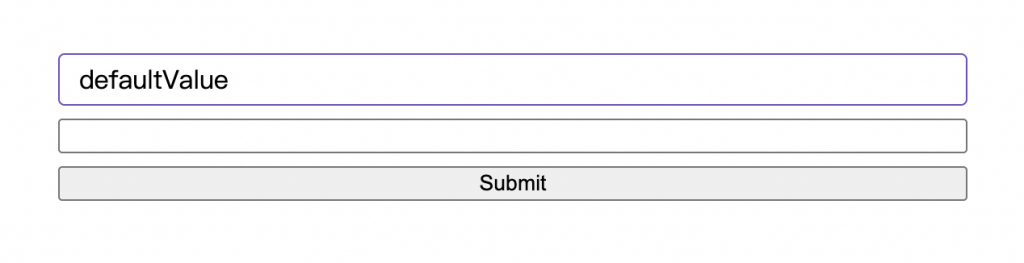
完整程式碼看這裡:https://github.com/unlinun/2025-WC-Input
前面落落長講了好幾篇的概念,好像太晚提到開發環境了 (́=◞౪◟=‵),花了一段時間重新架構。
現在,已經更好提升了開發速度,那下一篇,就來說說單元測試吧!

