
LAG: 這個路由反向代理的服務是什麼?
同時A: 這個是用WCF(Windows Communication Foundation)寫的WEB服務。問題是它原本提供的輸入/輸出格式是SOAP。但現在比較常使用JSON,所以寫了一個轉換的程式轉接。
Apache APISIX也可以充當這種輕量格式轉換的轉接器角色。在更早之前較流行使用XML作爲網路上交換的格式,而其實SOAP也是符合XML格式的協議。API7有一篇關於這個轉換過程的部落格文章「無需二次開發,SOAP-to-REST 簡化企業使用者的業務遷移和整合」。
不過讓我們自己動手來做做看。
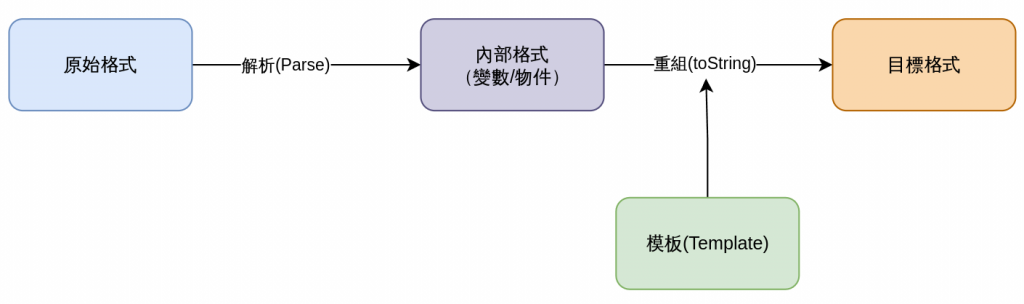
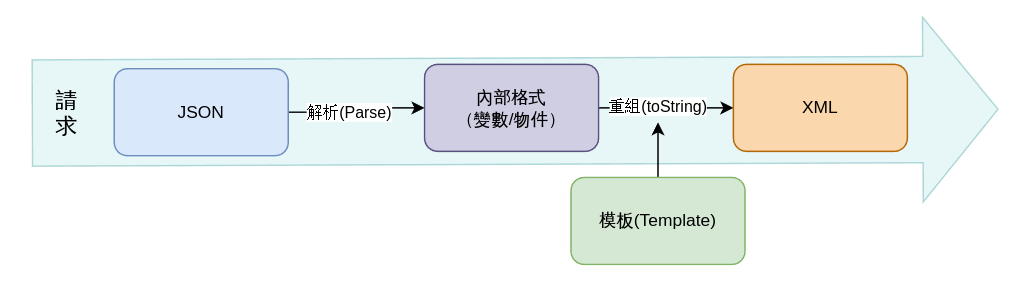
格式轉換的過程大致能這麼描述:讀取並解析輸入的原始來源,轉換成內部變數/物件,再重組成目標需求的格式字串。

不管是開發前端渲染頁面,還是單純的程式字串組成,可能都有用過「字串模板」。來看個簡單的JS例子:
var a = 1;
var b = 2;
var c = a + b;
console.log(`${a} + ${b} = ${c}`);  // => 1 + 2 = 3
可以把「字串模板」的概念套用到這個流程當中:
在請求(Request)和回覆(Response)階段都有這些階段:
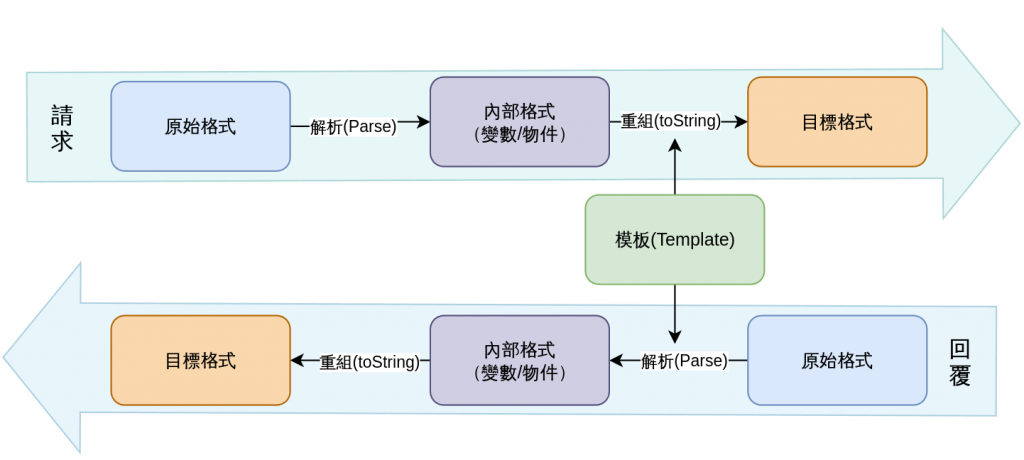
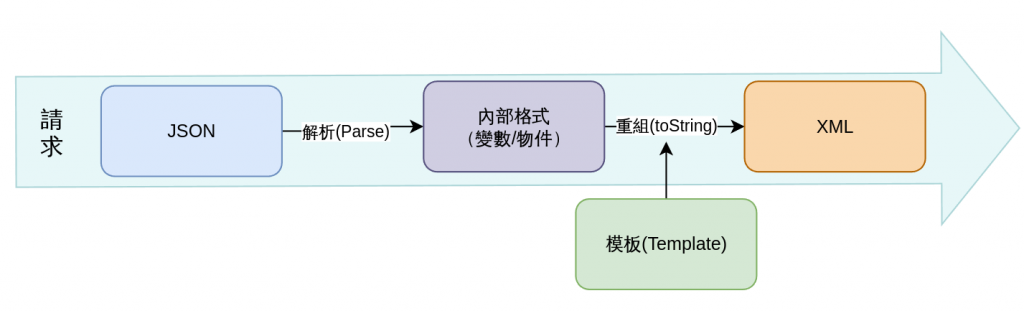
在這個流程中,APISIX可以自行解析特定格式的輸入請求,包含XML和JSON格式。並依照提供的模板(Template)轉換成目標格式。因此其實我們只需要提供「模板」即可:
<?xml version='1.0' encoding='utf-8'?>
<upstream name="{{name}}" pass_host="{{pass_host}}" scheme="{{scheme}}" type="{{type}}">
   {% for _, node in ipairs(nodes) do %}
   <node weight="{{node.weight}}">
      <host>{{node.host}}</host>
      <port>{{node.port}}</port>
   </node>
   {% end %}
   <timeout connect="{{timeout.connect}}" send="{{timeout.send}}" read="{{timeout.read}}"/>
   <keepalive-pool idle_timeout="{{keepalive_pool.idle_timeout}}" requests="{{keepalive_pool.requests}}" size="{{keepalive_pool.size}}"/>
</upstream>
APISIX使用lua-resty-template作爲模板引擎。其中一部分語法除了目標格式外,是使用Lua語言格式。對於Lua程式語言有興趣的話,可以參考另一個鐵人賽系列「30天Lua重拾筆記」。兩個格式的切換是透過一些語法完成,舉幾個例子來說:
{{表達式}}: 將Lua表達式結果替換到字串模板相對位置中,且會進行HTML的跳脫轉義。例如<h1>{{variable}}</h1>,如果變數variable值是<Hello World>,則最終目標內容會變成<h1><Hello World></h1>
{*表達式*}: 將Lua表達式結果替換到字串模板相對位置中。同樣<h1>{*variable*}</h1>模板,則最終目標內容會變成<h1><Hello World></h1>
{% Lua程式碼片段 %}: 插入Lua程式碼片段。解析上面的模板,並一併說明Lua程式碼片段使用方式。首先先看到node的部分:
{% for _, node in ipairs(nodes) do %}
<node weight="{{node.weight}}">
  <host>{{node.host}}</host>
  <port>{{node.port}}</port>
</node>
{% end %}
前後被{% for _ in x do %}和{% end %}包裹起來,這段Lua程式碼片段組成了Lua的迴圈結構。也就是會迭代nodes變數,並將權重、主機位置和監聽端口依照模板位置填入。
是的,可能已經發現了:這很像在設定APISIX的上游。沒錯,來源JSON格式內容確實就是一個示範的上游請求格式,例如:
{
  "nodes": [
    {
      "host": "httpbin.org",
      "port": 443,
      "weight": 1
    },
    {
      "host": "localhost",
      "port": 443,
      "weight": 1
    }
  ],
  "timeout": {
    "connect": 6,
    "send": 6,
    "read": 6
  },
  "type": "roundrobin",
  "scheme": "https",
  "pass_host": "pass",
  "name": "origin httpbin",
  "keepalive_pool": {
    "idle_timeout": 60,
    "requests": 1000,
    "size": 320
  }
}
為了驗證這個轉換機制起作用,需要一個Server回覆的內容就是請求的內容。所以這裡會使用Beeceptor提供的HTTP Echo Server,它會將請求內容以JSON格式回覆回來。
我們可以透過APISIX的Admin API建立一個新路由:
curl --request PUT \
  --url http://127.0.0.1:9180/apisix/admin/routes/echo-server \
  --header 'Content-Type: application/json' \
  --header 'User-Agent: insomnia/11.5.0' \
  --header 'X-API-KEY: SaiTJp7TEa9K39oy7D5A4ouXmdqHvL9a' \
  --data '{
  "uri": "/echo",
  "name": "Echo Server",
  "methods": [
    "GET",
    "POST"
  ],
  "upstream": {
    "nodes": [
      {
        "host": "echo.free.beeceptor.com",
        "port": 443,
        "weight": 1
      }
    ],
    "timeout": {
      "connect": 6,
      "send": 6,
      "read": 6
    },
    "type": "roundrobin",
    "hash_on": "vars",
    "scheme": "https",
    "pass_host": "node",
    "keepalive_pool": {
      "idle_timeout": 60,
      "requests": 1000,
      "size": 320
    }
  },
  "status": 1
}'
此處指定了路由ID。
因為在使用body-transformer插件時,可能無法透過Dashboard WEB UI設定。
這個路由匹配規則是請求路徑為/echo,這會是等會兒會使用的端點。反向代理的上游位置只設定了一個: https://echo.free.beeceptor.com:443 。需要特別注意的是,pass_host的設定為node,也就是當轉發請求給上游時,會依照上游設定的方式,在請求Headers提供Host資訊。若維持預設pass,可能會存在問題。
{
  "uri": "/echo",
  "name": "Echo Server",
  "methods": [
    "GET",
    "POST"
  ],
  "upstream": {
    "nodes": [
      {
        "host": "echo.free.beeceptor.com",
        "port": 443,
        "weight": 1
      }
    ],
    "timeout": {
      "connect": 6,
      "send": 6,
      "read": 6
    },
    "type": "roundrobin",
    "hash_on": "vars",
    "scheme": "https",
    "pass_host": "node",
    "keepalive_pool": {
      "idle_timeout": 60,
      "requests": 1000,
      "size": 320
    }
  },
  "status": 1
}
立刻來發一個請求看看:
curl --request POST \
--url http://127.0.0.1:9080/echo \
--header 'Content-Type: application/json' \
--header 'User-Agent: insomnia/11.6.0' \
--data '{
"nodes": [
{
"host": "httpbin.org",
"port": 443,
"weight": 1
},
{
"host": "<Hello World>",
"port": 443,
"weight": 1
}
],
"timeout": {
"connect": 6,
"send": 6,
"read": 6
},
"type": "roundrobin",
"scheme": "https",
"pass_host": "pass",
"name": "origin httpbin",
"keepalive_pool": {
"idle_timeout": 60,
"requests": 1000,
"size": 320
}
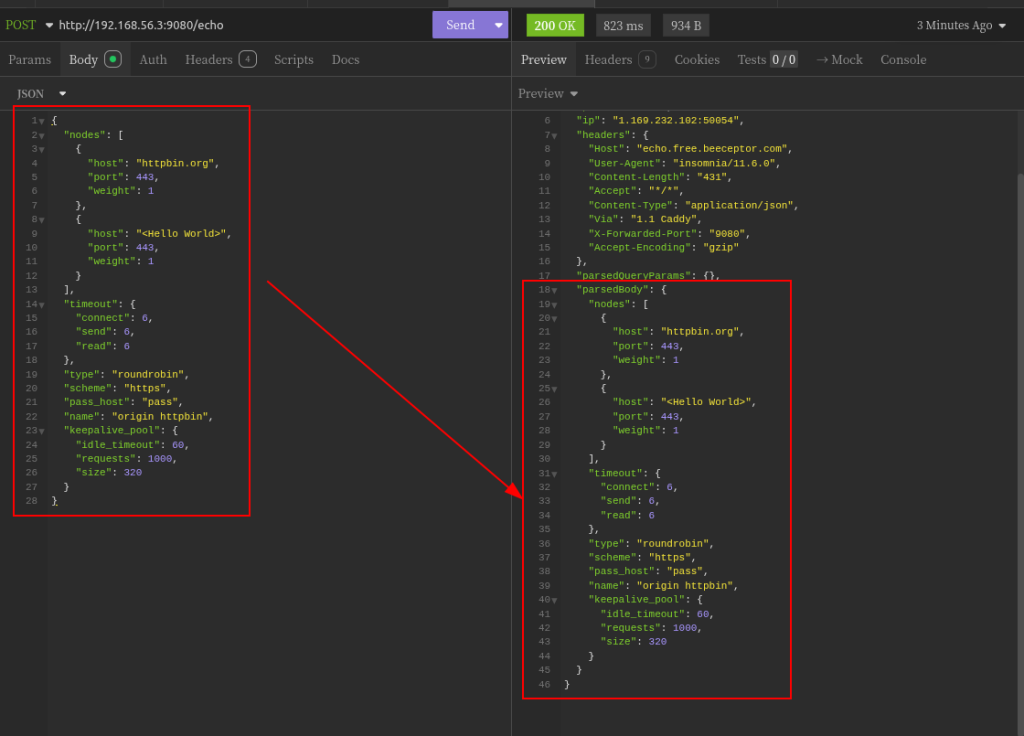
}'
會得到像下面這樣的回覆,注意parsedBody部分,將請求原封不同的回覆回來:
{
	"method": "POST",
	"protocol": "https",
	"host": "echo.free.beeceptor.com",
	"path": "/echo",
	"ip": "127.0.01:50054",
	"headers": {
		"Host": "echo.free.beeceptor.com",
		"User-Agent": "insomnia/11.6.0",
		"Content-Length": "431",
		"Accept": "*/*",
		"Content-Type": "application/json",
		"Via": "1.1 Caddy",
		"X-Forwarded-Port": "9080",
		"Accept-Encoding": "gzip"
	},
	"parsedQueryParams": {},
	"parsedBody": {
		"nodes": [
			{
				"host": "httpbin.org",
				"port": 443,
				"weight": 1
			},
			{
				"host": "<Hello World>",
				"port": 443,
				"weight": 1
			}
		],
		"timeout": {
			"connect": 6,
			"send": 6,
			"read": 6
		},
		"type": "roundrobin",
		"scheme": "https",
		"pass_host": "pass",
		"name": "origin httpbin",
		"keepalive_pool": {
			"idle_timeout": 60,
			"requests": 1000,
			"size": 320
		}
	}
}
接著在請求啓用body-transformer這個Plugin看看,但需要稍微調整一下<Request Template>:
此外還利用
proxy-rewritePlugin,將請求的Context-Type申明成XML格式。
curl --request PATCH \
  --url http://127.0.0.1:9180/apisix/admin/routes/echo-server/plugins \
  --header 'Content-Type: application/json' \
  --header 'User-Agent: insomnia/11.5.0' \
  --header 'X-API-KEY: SaiTJp7TEa9K39oy7D5A4ouXmdqHvL9a' \
  --data '{
	"body-transformer": {
		"_meta": {
			"disable": false
		},
		"request": {
			"template": "<Request Template>",
			"input_format": "json"
		}
	},
	"proxy-rewrite": {
		"headers": {
			"set": {
				"Content-Type": "text/xml"
			}
		}
	}
}'
由於啓用Plugin的API內容是JSON格式,需要將請求替換模板調整成符合格式,因此需要將上方的<Request Template>替換成:
<?xml version='1.0' encoding='utf-8'?><upstream name=\"{{name}}\" pass_host=\"{{pass_host}}\" scheme=\"{{scheme}}\" type=\"{{type}}\">{% for _, node in ipairs(nodes) do %}<node weight=\"{{node.weight}}\"><host>{{node.host}}</host><port>{{node.port}}</port></node>{% end %}<timeout connect=\"{{timeout.connect}}\" send=\"{{timeout.send}}\" read=\"{{timeout.read}}\"/><keepalive-pool idle_timeout=\"{{keepalive_pool.idle_timeout}}\" requests=\"{{keepalive_pool.requests}}\" size=\"{{keepalive_pool.size}}\"/></upstream>
上面程式碼透過執行下面程式碼片段得到:
cat <<EOF | awk '{gsub(/"/,"\\\"");};1' | awk '{$1=$1};1' | tr -d '\r\n'
<原始程式碼片段>
EOF
或是也可以替換成Base64的編碼格式:
PD94bWwgdmVyc2lvbj0nMS4wJyBlbmNvZGluZz0ndXRmLTgnPz4KPHVwc3RyZWFtIG5hbWU9Int7
bmFtZX19IiBwYXNzX2hvc3Q9Int7cGFzc19ob3N0fX0iIHNjaGVtZT0ie3tzY2hlbWV9fSIgdHlw
ZT0ie3t0eXBlfX0iPgogICB7JSBmb3IgXywgbm9kZSBpbiBpcGFpcnMobm9kZXMpIGRvICV9CiAg
IDxub2RlIHdlaWdodD0ie3tub2RlLndlaWdodH19Ij4KICAgICAgPGhvc3Q+e3tub2RlLmhvc3R9
fTwvaG9zdD4KICAgICAgPHBvcnQ+e3tub2RlLnBvcnR9fTwvcG9ydD4KICAgPC9ub2RlPgogICB7
JSBlbmQgJX0KICAgPHRpbWVvdXQgY29ubmVjdD0ie3t0aW1lb3V0LmNvbm5lY3R9fSIgc2VuZD0i
e3t0aW1lb3V0LnNlbmR9fSIgcmVhZD0ie3t0aW1lb3V0LnJlYWR9fSIvPgogICA8a2VlcGFsaXZl
LXBvb2wgaWRsZV90aW1lb3V0PSJ7e2tlZXBhbGl2ZV9wb29sLmlkbGVfdGltZW91dH19IiByZXF1
ZXN0cz0ie3trZWVwYWxpdmVfcG9vbC5yZXF1ZXN0c319IiBzaXplPSJ7e2tlZXBhbGl2ZV9wb29s
LnNpemV9fSIvPgo8L3Vwc3RyZWFtPgo=
上面是為了文章閱讀好看,但替換時不需要換行: PD94bWwgdmVyc2lvbj0nMS4wJyBlbmNvZGluZz0ndXRmLTgnPz4KPHVwc3RyZWFtIG5hbWU9Int7bmFtZX19IiBwYXNzX2hvc3Q9Int7cGFzc19ob3N0fX0iIHNjaGVtZT0ie3tzY2hlbWV9fSIgdHlwZT0ie3t0eXBlfX0iPgogICB7JSBmb3IgXywgbm9kZSBpbiBpcGFpcnMobm9kZXMpIGRvICV9CiAgIDxub2RlIHdlaWdodD0ie3tub2RlLndlaWdodH19Ij4KICAgICAgPGhvc3Q+e3tub2RlLmhvc3R9fTwvaG9zdD4KICAgICAgPHBvcnQ+e3tub2RlLnBvcnR9fTwvcG9ydD4KICAgPC9ub2RlPgogICB7JSBlbmQgJX0KICAgPHRpbWVvdXQgY29ubmVjdD0ie3t0aW1lb3V0LmNvbm5lY3R9fSIgc2VuZD0ie3t0aW1lb3V0LnNlbmR9fSIgcmVhZD0ie3t0aW1lb3V0LnJlYWR9fSIvPgogICA8a2VlcGFsaXZlLXBvb2wgaWRsZV90aW1lb3V0PSJ7e2tlZXBhbGl2ZV9wb29sLmlkbGVfdGltZW91dH19IiByZXF1ZXN0cz0ie3trZWVwYWxpdmVfcG9vbC5yZXF1ZXN0c319IiBzaXplPSJ7e2tlZXBhbGl2ZV9wb29sLnNpemV9fSIvPgo8L3Vwc3RyZWFtPg==
同樣可以透過以下指令取得:
base64 -w0 <<EOF <原始程式碼片段>
EOF
在發送一次請求到Echo端點看看,這次得到的結果:
{
"method": "POST",
"protocol": "https",
"host": "echo.free.beeceptor.com",
"path": "/echo",
"ip": "1.169.232.102:55532",
"headers": {
"Host": "echo.free.beeceptor.com",
"User-Agent": "insomnia/11.6.0",
"Content-Length": "423",
"Accept": "*/*",
"Content-Type": "text/xml",
"Via": "1.1 Caddy",
"X-Forwarded-Port": "9080",
"Accept-Encoding": "gzip"
},
"parsedQueryParams": {},
"parsedBody": "<?xml version='1.0' encoding='utf-8'?>\n<upstream name=\"origin httpbin\" pass_host=\"pass\" scheme=\"https\" type=\"roundrobin\">\n <node weight=\"1\">\n <host>httpbin.org</host>\n <port>443</port>\n </node>\n <node weight=\"1\">\n <host><Hello World></host>\n <port>443</port>\n </node>\n <timeout connect=\"6\" send=\"6\" read=\"6\"/>\n <keepalive-pool idle_timeout=\"60\" requests=\"1000\" size=\"320\"/>\n</upstream>"
}
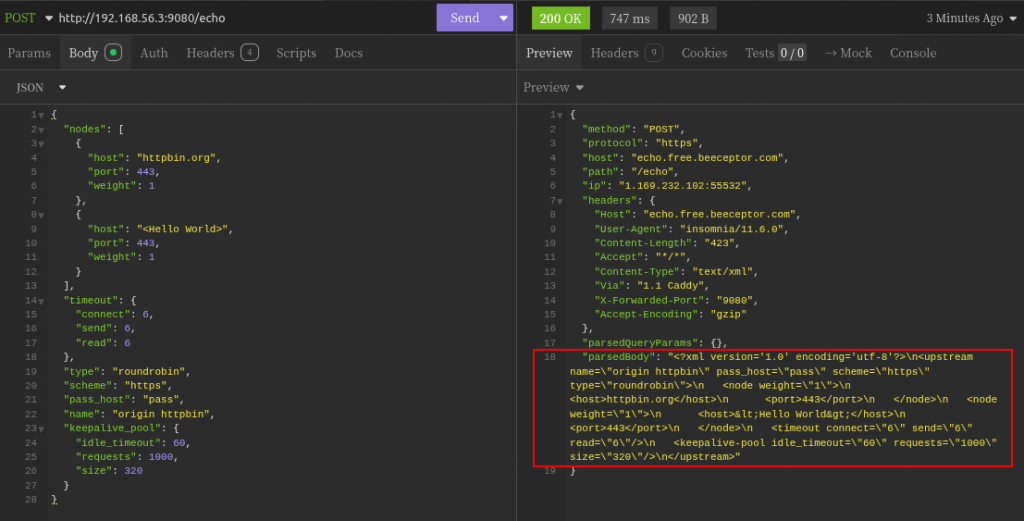
把結果展開來看看:
echo $(curl -s --request POST \
  --url http://127.0.0.1:9080/echo \
  --header 'Content-Type: application/json' \
  --header 'User-Agent: insomnia/11.6.0' \
  --data '{
  "nodes": [
    {
      "host": "httpbin.org",
      "port": 443,
      "weight": 1
    },
    {
      "host": "<Hello World>",
      "port": 443,
      "weight": 1
    }
  ],
  "timeout": {
    "connect": 6,
    "send": 6,
    "read": 6
  },
  "type": "roundrobin",
  "scheme": "https",
  "pass_host": "pass",
  "name": "origin httpbin",
  "keepalive_pool": {
    "idle_timeout": 60,
    "requests": 1000,
    "size": 320
  }
}' | jq .parsedBody)
就會得到:
<?xml version='1.0' encoding='utf-8'?>
<upstream name="origin httpbin" pass_host="pass" scheme="https" type="roundrobin">
<node weight="1">
<host>httpbin.org</host>
<port>443</port>
</node>
<node weight="1">
<host><Hello World></host>
<port>443</port>
</node>
<timeout connect="6" send="6" read="6"/>
<keepalive-pool idle_timeout="60" requests="1000" size="320"/>
</upstream>
這正式期望的轉換結果!
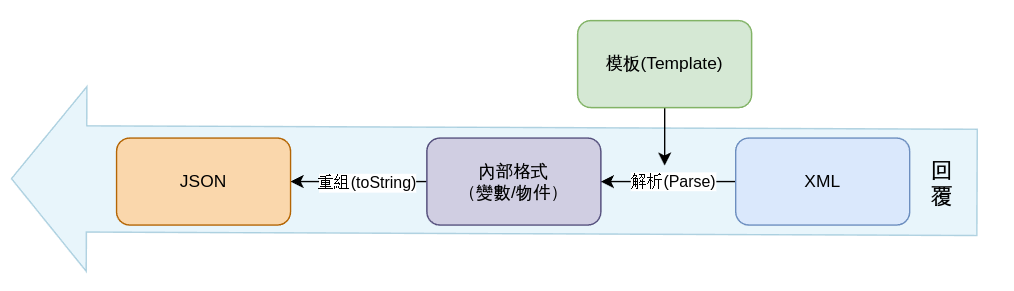
類似的,可以透過提供回覆替換的字串模板,修改回覆內容:
也將
proxy-rewritePlugin,換成response-rewritePlugin,將回覆的Context-Type申明成JSON格式。
{
  "body-transformer": {
    "_meta": {
      "disable": false
    },
    "response": {
      "template": "<Response Template>",
      "input_format": "xml"
    }
  },
  "response-rewrite": {
    "headers": {
      "set": {
        "Content-Type": "application/json"
      }
    }
  }
}
同樣需要找一個會回覆XML的服務來完成這個LAB。可以使用 https://httpbin.org/xml 。其回覆的內容如下:
<?xml version='1.0' encoding='us-ascii'?>

<!--  A SAMPLE set of slides  -->

<slideshow
    title="Sample Slide Show"
    date="Date of publication"
    author="Yours Truly"
    >

    <!-- TITLE SLIDE -->
    <slide type="all">
      <title>Wake up to WonderWidgets!</title>
    </slide>

    <!-- OVERVIEW -->
    <slide type="all">
        <title>Overview</title>
        <item>Why <em>WonderWidgets</em> are great</item>
        <item/>
        <item>Who <em>buys</em> WonderWidgets</item>
    </slide>

</slideshow>
也可以將該內容存下來,提供給http-server作爲回覆來源。
接著設定代理路由。完成後可以檢查當前結果 http://127.0.0.1:9080/xml ,其檢視原始碼應是相同內容 view-source:http://127.0.0.1:9080/xml:
curl --request PUT \
  --url http://127.0.0.1:9180/apisix/admin/routes/xml-server \
  --header 'Content-Type: application/json' \
  --header 'User-Agent: insomnia/11.5.0' \
  --header 'X-API-KEY: SaiTJp7TEa9K39oy7D5A4ouXmdqHvL9a' \
  --data '{
  "uri": "/xml",
  "name": "XML Server",
  "methods": [
    "GET"
  ],
  "upstream": {
    "nodes": [
      {
        "host": "httpbin.org",
        "port": 443,
        "weight": 1
      }
    ],
    "timeout": {
      "connect": 6,
      "send": 6,
      "read": 6
    },
    "type": "roundrobin",
    "hash_on": "vars",
    "scheme": "https",
    "pass_host": "node",
    "keepalive_pool": {
      "idle_timeout": 60,
      "requests": 1000,
      "size": 320
    }
  },
  "status": 1
}'
這次準備JSON格式的替換模板:
{
  "title": "{{slideshow._attr.title}}",
  "date": "{{slideshow._attr.date}}",
  "author": "{{slideshow._attr.author}}",
  "slides": [
    {% for i, slide in  ipairs(slideshow.slide) do %}
    {
        "title": "{{slide.title}}"
    }{% if i < #slideshow.slide then %} , {% end %}
    {% end %}
  ]
}
一樣可以將其換成單行的形式: {\"title\": \"{{slideshow._attr.title}}\",\"date\": \"{{slideshow._attr.date}}\",\"author\": \"{{slideshow._attr.author}}\",\"slides\": [{% for i, slide in ipairs(slideshow.slide) do %}{\"title\": \"{{slide.title}}\"}{% if i < #slideshow.slide then %} , {% end %}{% end %}]}。
或是準備Base64的形式: ewogICJ0aXRsZSI6ICJ7e3NsaWRlc2hvdy5fYXR0ci50aXRsZX19IiwKICAiZGF0ZSI6ICJ7e3NsaWRlc2hvdy5fYXR0ci5kYXRlfX0iLAogICJhdXRob3IiOiAie3tzbGlkZXNob3cuX2F0dHIuYXV0aG9yfX0iLAogICJzbGlkZXMiOiBbCiAgICB7JSBmb3IgaSwgc2xpZGUgaW4gIGlwYWlycyhzbGlkZXNob3cuc2xpZGUpIGRvICV9CiAgICB7CiAgICAgICAgInRpdGxlIjogInt7c2xpZGUudGl0bGV9fSIKICAgIH17JSBpZiBpIDwgI3NsaWRlc2hvdy5zbGlkZSB0aGVuICV9ICwgeyUgZW5kICV9CiAgICB7JSBlbmQgJX0KICBdCn0=
除了
request.template變成response.template外,
也將proxy-rewritePlugin,換成response-rewritePlugin,將回覆的Context-Type申明成JSON格式。
curl --request PATCH \
  --url http://127.0.0.1:9180/apisix/admin/routes/xml-server/plugins \
  --header 'Content-Type: application/json' \
  --header 'User-Agent: insomnia/11.5.0' \
  --header 'X-API-KEY: SaiTJp7TEa9K39oy7D5A4ouXmdqHvL9a' \
  --data '{
	"body-transformer": {
		"_meta": {
			"disable": false
		},
		"response": {
			"template": "ewogICJ0aXRsZSI6ICJ7e3NsaWRlc2hvdy5fYXR0ci50aXRsZX19IiwKICAiZGF0ZSI6ICJ7e3NsaWRlc2hvdy5fYXR0ci5kYXRlfX0iLAogICJhdXRob3IiOiAie3tzbGlkZXNob3cuX2F0dHIuYXV0aG9yfX0iLAogICJzbGlkZXMiOiBbCiAgICB7JSBmb3IgaSwgc2xpZGUgaW4gIGlwYWlycyhzbGlkZXNob3cuc2xpZGUpIGRvICV9CiAgICB7CiAgICAgICAgInRpdGxlIjogInt7c2xpZGUudGl0bGV9fSIKICAgIH17JSBpZiBpIDwgI3NsaWRlc2hvdy5zbGlkZSB0aGVuICV9ICwgeyUgZW5kICV9CiAgICB7JSBlbmQgJX0KICBdCn0=",
			"input_format": "xml"
		}
	},
	"response-rewrite": {
		"headers": {
			"set": {
				"Content-Type": "application/json"
			}
		}
	}
}'
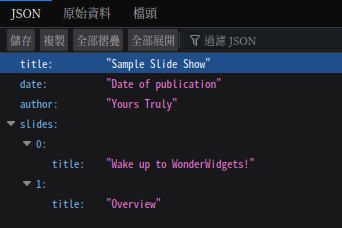
現在再瀏覽一次 http://127.0.0.1:9080/xml 看看,就會得到期望的JSON結果:
{
  "title": "Sample Slide Show",
  "date": "Date of publication",
  "author": "Yours Truly",
  "slides": [
    {
        "title": "Wake up to WonderWidgets!"
    } ,    {
        "title": "Overview"
    }  ]
}
Apache APISIX的body-transformer Plugin提供了一種快速簡便的方式,替換請求/回復內容。僅需要申請替換的來源格式,並提供替換目標的模板即可完成作業。除了單純替換請求或替換回復,還可以組合著一起用:
{
  "body-transformer": {
    "_meta": {
      "disable": false
    },
    "request": {
      "template": "<Request Template>",
      "input_format": "json"
    },
    "response": {
      "template": "<Response Template>",
      "input_format": "xml"
    }
  },
  "proxy-rewrite": {
    "headers": {
      "set": {
        "Content-Type": "text/xml"
      }
    }
  },
  "response-rewrite": {
    "headers": {
      "set": {
        "Content-Type": "application/json"
      }
    }
  }
}
