
在之前的學習中,我們了解了 GCE 的基本概念,針對Host a Web App on Google Cloud Using Compute Engine這部分,昨天的文章也只是輕描淡寫,今天就是完整的跟著指示一步步做。
然後因為是學習筆記,所以原本的英文說明我幾乎都沒刪,就下面增加中文補充,鐵人圖片也有點麻煩,故就放幾張。
開始 •_ゝ• !
分成八個 task:
Task 1: 啟用服務 (Enable API)
Task 2: 建立中央倉庫 (Create Cloud Storage Bucket)
Task 3: 下載程式碼並在本機測試 (Clone & Test Locally)
將網站的原始碼下載到 Cloud Shell 這個開發環境中,並進行初步的設定與測試,確保程式碼本身是健康、可運行的。
Task 5: 從單機升級為高可用伺服器群組 (High Availability)
將手動管理的單一伺服器,升級為由「模具」(Instance Template) 和「生產線」(Managed Instance Group) 組成的自動化集群,並為其加上「自動修復」(Autohealing) 的能力。
Task 6: 建立統一入口與智慧流量分發 (Load Balancing)
安裝一個「 Load Balancer 」,為整個網站建立一個單一的公開 IP 位址,並設定路由規則,將訪客請求精準地分發到對應的前後端伺服器群組。
Task 7: 啟用自動擴展與內容快取加速 (Scaling & Performance)
賦予伺服器群組「自動伸縮」(Autoscaling) 的能力,使其能根據流量自動增減。同時啟用 CDN 內容快取,提升網站載入速度。
Task 8: 執行網站更新並驗證系統韌性 (Update & Verification)
模擬真實世界的維運場景,執行一次完整的硬體和軟體「滾動更新」(Rolling Update)。最後透過一場「演習」,弄壞一台伺服器,來驗證我們建立的自動修復系統確實有效。
為了安全控管 (Security Best Practice): 最小權限原則 、成本管理 (Cost Control) 和 專案清晰度 (Project Clarity) ,要使用才 啟用 Compute Engine 這個服務的 API。
Enable the Compute Engine API by executing the following:
gcloud services enable compute.googleapis.com
gcloud: 這是 Google Cloud 的命令行工具 (Command-Line Tool)。services enable: 這是它的子指令,意思是「啟用某個服務」。compute.googleapis.com: 這是 Compute Engine API 的官方全名。在 Google Cloud 中,每一個服務(像 Compute Engine、Cloud Storage、BigQuery 等)都有一個像網址一樣的獨特名稱。You use a Cloud Storage bucket to house your built code as well as your startup scripts.
在 Google Cloud Storage (GCS) 中建立一個新的儲存空間 (bucket)
From Cloud Shell, execute the following to create a new Cloud Storage bucket:
gsutil mb gs://fancy-store-Project ID
gsutil 的一個子指令,意思就是「建立一個 bucket」。gs:// 是 Cloud Storage 路徑的固定前綴,後面接著自訂的 bucket 名稱。什麼是 Bucket?🪣
可以把 Bucket (儲存桶) 想像成雲端上的一個無限大的資料夾或硬碟。
可以把任何檔案,例如網站的程式碼、圖片、影片、備份檔案等,都丟進這個 bucket 裡。
gsutil和gcloud有什麼不同?
gcloud(The General Tool 🛠️): 這是 Google Cloud 的「萬用瑞士刀」。它可以管理幾乎所有的 Google Cloud 服務,像是 Compute Engine (虛擬主機)、Kubernetes (容器)、VPC (網路) 等。它是整個平台的總管理工具。gsutil(The Specialist Tool 📦): 這是專門用來管理 Cloud Storage 的「專家工具」。所有跟 Cloud Storage 儲存桶 (bucket) 和物件 (object/file) 相關的操作,例如建立/刪除 bucket、上傳/下載檔案、設定權限等,用gsutil會更直接方便。雖然
gcloud也能執行一些 Cloud Storage 的基本操作 (透過gcloud storage指令),但gsutil在功能上更完整、更強大,是與 Cloud Storage 互動的標準工具。
在我們把網站真正部署到 GCE 虛擬主機 (Instance) 之前,要先確保這份程式碼在我們手上是可以正常運作的。
開發流程:先在本地端測試,再部署到伺服器。
This lab uses the existing Fancy Store e-commerce website based on the monolith-to-microservices repository as the basis for your website.
In this task, you clone the source code so you can focus on the aspects of deploying to Compute Engine. Later on in this lab, you perform a small update to the code to demonstrate the simplicity of updating on Compute Engine.
[取得程式碼] Run the following commands to clone the source code and then navigate to the monolith-to-microservices directory:
git clone https://github.com/googlecodelabs/monolith-to-microservices.git
cd ~/monolith-to-microservices
[安裝環境] Run the initial build of the code to allow the application to run locally with the following:
./setup.sh
Once completed, ensure Cloud Shell is running a compatible nodeJS version with the following command:
nvm install --lts
[本地端試運行] Next, run the following to test the application, switch to the microservices directory, and start the web server:
cd microservices
npm start
You should receive the following output.
Preview your application by clicking the web preview icon and selecting Preview on port 8080.
This opens a new window where you can see the frontend of Fancy Store.
Note: Within the Preview option, you should be able to see the Frontend; however, the Products and Orders functions do not work at this point, as those services are not yet exposed.
You can use Gemini Code Assist in an integrated development environment (IDE) such as Cloud Shell to receive guidance on code or solve problems with your code. Before you can start using Gemini Code Assist, you need to enable it.
gcloud services enable cloudaicompanion.googleapis.com
Note: 可透過點按的方式轉換到 Open Editor或 Open Terminal
綁定專案
qwiklabs-gcp-02-79e29e0b77dd.qwiklabs-gcp-02-79e29e0b77dd) displays in the Cloud Code status message in the status bar.開始要佈署我們的伺服器
In the sections that follow, you perform the following actions:
⇒ (用中文簡說也就是)
A startup script is used to instruct the instance what to do each time it is started. This way the instances are automatically configured.
In the Cloud Shell terminal, run the following command to create a file called startup-script.sh:
touch ~/monolith-to-microservices/startup-script.sh
Click Open Editor in the Cloud Shell toolbar to open the Code Editor.
Navigate to the monolith-to-microservices folder.
貼上官方給的 code 到 startup-script.sh file.
嘗試用 Gemini Code Assist 去替換[DEVSHELL_PROJECT_ID]成我們的ProjectID.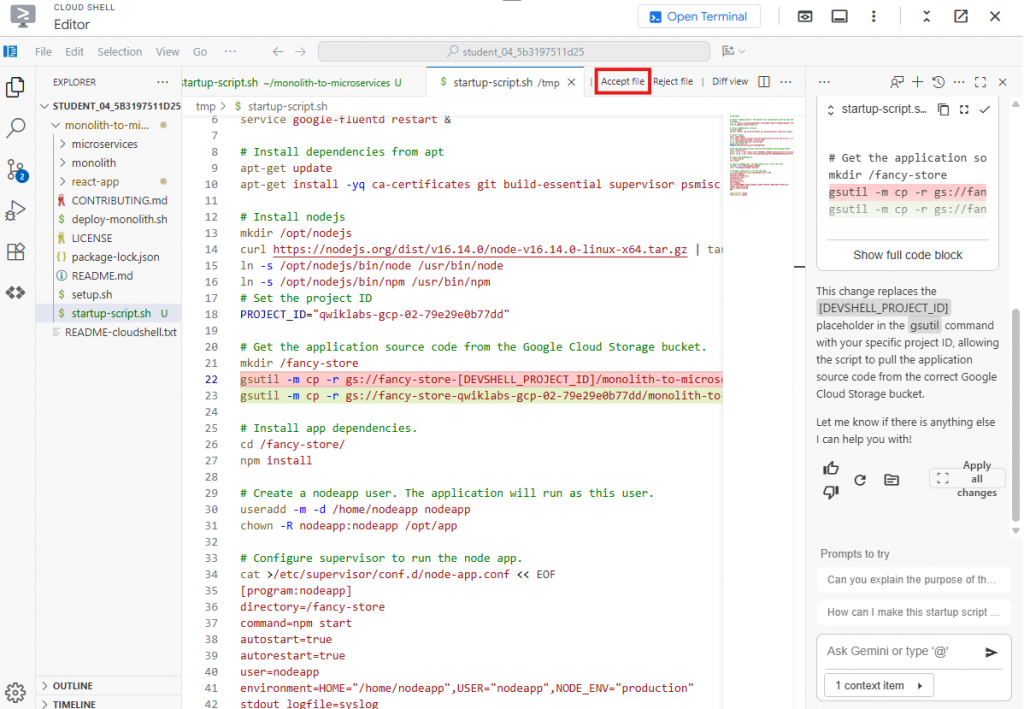
6. Accept Gemini 做的改動
`startup-script.sh` 替換的內容類似如下:

> `gs://fancy-store-qwiklabs-gcp-02-79e29e0b77dd/monolith-to-microservices/microservices/* /fancy-store/`
>
Save , 但先不要退出
先確認 Cloud Shell Code Editor 右下角** "End of Line Sequence"** 是否被設為 "LF", not "CRLF".
LF vs CRLF:
- 這是關於文字檔案「換行符」格式的問題。Linux/Unix 系統使用
LF,而 Windows 系統使用CRLF。- 因為 GCE 虛擬主機是 Linux 系統,所以這份腳本必須存成
LF格式,否則 Linux 系統會看不懂,導致腳本執行失敗。這是一個跨平台開發時常見的小細節。
To help you be more productive while minimizing context switching, Gemini Code Assist provides AI-powered smart actions directly in your code editor. For example, you can use the "Explain this" feature to let Gemini Code Assist give you more information about a particular file, block of code, or function.
In this section, you prompt Gemini Code Assist to provide more information about a startup script for a new team member who is unfamiliar with it.
With the startup-script.sh file open, click the Gemini Code Assist: Smart Actions icon on the toolbar and select Explain this.
Gemini Code Assist opens a chat pane with the prefilled prompt of Explain this. In the inline text box of the Code Assist chat, replace the prefilled prompt with the following, and click Send:
Close the startup-script.sh file.
Return to the Cloud Shell Terminal and run the following to copy the startup-script.sh file into your bucket: 將我們網站所需要的所有東西,都上傳到之前建立的 Cloud Storage bucket 中。
gsutil cp ~/monolith-to-microservices/startup-script.sh gs://fancy-store-qwiklabs-gcp-02-79e29e0b77dd
It is now accessible at: https://storage.googleapis.com/[BUCKET_NAME]/startup-script.sh.
When instances launch, they pull code from the Cloud Storage bucket, so you can store some configuration variables within the .env file of the code.
Note: You could also code this to pull environment variables from elsewhere. However, for demonstration purposes, this is a simple method to handle the configuration. In production, environment variables would likely be stored outside of the code.
monolith-to-microservices) 也上傳到同一個中央倉庫。cd ~
rm -rf monolith-to-microservices/*/node_modules
gsutil -m cp -r monolith-to-microservices gs://fancy-store-qwiklabs-gcp-02-79e29e0b77dd/
概念: 把「組裝說明書」和「傢俱零件」全部都放到「IKEA倉庫」裡
Note: 要先把
node_modules依賴檔先刪除 確保是有效的,之後重新start再recreate
建立網站的「後端」伺服器,它類似一個餐廳的廚房。
The first instance to be deployed is the backend instance, which houses the Orders and Products microservices.
Note: In a production environment, you may want to separate each microservice into its own instance and instance group to allow it to scale independently. For demonstration purposes, both backend microservices (Orders & Products) reside on the same instance and instance group.
建立一台全新的 GCE 虛擬主機,專門用來當作後端伺服器。
gcloud compute instances create backend \
--zone=us-east1-c \
--machine-type=e2-standard-2 \
--tags=backend \
--metadata=startup-script-url=https://storage.googleapis.com/fancy-store-qwiklabs-gcp-02-79e29e0b77dd/startup-script.sh
-tags=backend:我們給這台主機貼上一個「後端」的標籤。這個標籤之後可以用來設定專屬的防火牆規則,例如只允許前端主機跟它溝通。
-metadata=startup-script-url=...:這是最關鍵的一步!我們告訴這台新主機:「安裝說明書放在 Cloud Storage 的這個網址,請在開機後自己去下載並照著執行。」
這實現了我們之前的 IKEA 組裝比喻:顧客 (新的 GCE 主機) 自己去倉庫 (Cloud Storage) 拿說明書 (startup-script.sh),然後把自己組裝成功能齊全的廚房 (後端伺服器)。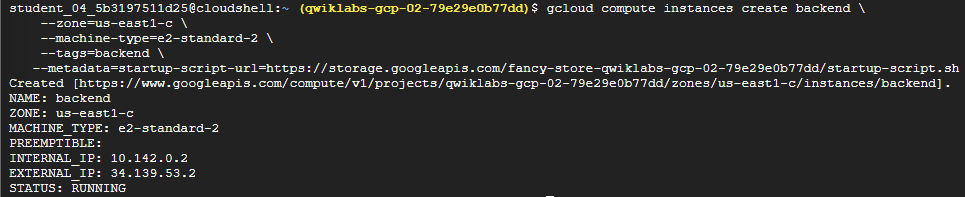
廚房蓋好了,但點餐櫃檯還不知道廚房的地址,就無法送單。 告訴前端程式,後端伺服器的位址在哪裡。
取得廚房地址 (Get Backend IP)
Retrieve the external IP address of the backend with the following command, look under the EXTERNAL_IP tab for the backend instance:
gcloud compute instances list
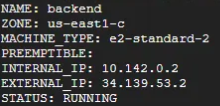
Copy the External IP for the backend.
In the Cloud Shell Explorer, navigate to monolith-to-microservices > react-app.
In the Code Editor, select View > Toggle Hidden Files in order to see the .env file.
更新前端設定檔 (Update .env file)
In the .env file, replace localhost with your [BACKEND_ADDRESS]:
明確告訴前端程式:「以後所有關於訂單 (Orders) 和商品 (Products) 的請求,都要送到這個 IP 地址去。」
Save the file.
重新打包前端程式 (Rebuild React App)
cd ~/monolith-to-microservices/react-app
npm install && npm run-script build # 重新編譯打包前端程式碼
上傳更新後的前端 (Upload to Cloud Storage)
將包含最新設定的前端程式碼,重新上傳到 Cloud Storage 中央倉庫。這樣,當我們下一步要建立前端主機時,它下載到的就會是已經設定好、知道廚房在哪裡的最新版本。
cd ~
rm -rf monolith-to-microservices/*/node_modules
gsutil -m cp -r monolith-to-microservices gs://fancy-store-qwiklabs-gcp-02-79e29e0b77dd/
建立「前端」伺服器,並設定好網路防火牆,讓整個網站正式對外服務。
這就像餐廳終於要開張了,我們需要把「點餐櫃檯」準備好,並打開餐廳的「大門」和「廚房的送餐口」。
gcloud compute instances create frontend \
    --zone=us-east1-c \
    --machine-type=e2-standard-2 \
    --tags=frontend \
    --metadata=startup-script-url=https://storage.googleapis.com/fancy-store-qwiklabs-gcp-02-79e29e0b77dd/startup-script.sh
startup-script.sh)。這份說明書裡包含了前端和後端的程式,所以在這個 Lab 中,為了簡單起見,兩台主機安裝的內容是一樣的。-tags=frontend:我們給這台主機貼上一個「前端」的標籤,用來區別後端主機。現在我們有兩台主機了,但預設情況下,Google Cloud 的防火牆會擋住大部分的網路連線。我們需要建立規則,告訴防火牆該放行哪些流量。
打開前端的大門
gcloud compute firewall-rules create fw-fe \
    --allow tcp:8080 \
    --target-tags=frontend
fw-fe 的規則,允許外界透過 Port 8080 連線到所有貼有 frontend 標籤的主機。這就是打開餐廳的「大門」,讓顧客可以進來點餐。打開後端的送餐口
gcloud compute firewall-rules create fw-be \
    --allow tcp:8081-8082 \
    --target-tags=backend
fw-be 的規則,允許外界透過 Port 8081 和 8082 連線到所有貼有 backend 標籤的主機。這就像打開廚房的「送餐口」,讓前端的請求可以順利送達後端。The website should now be fully functional.
為了檢查 frontend, 查看對外IP
gcloud compute instances list
可能虛擬機會花幾分鐘去開啟,等三分鐘去嘗試:
http://[FRONTEND_ADDRESS]:8080 , [FRONTEND_ADDRESS] 是你剛剛查看的 frontend EXTERNAL_IP .To allow the application to scale, managed instance groups are created and use the frontend and backend instances as Instance Templates.
A managed instance group (MIG) contains identical instances that you can manage as a single entity in a single zone. Managed instance groups maintain high availability of your apps by proactively keeping your instances available, that is, in the RUNNING state. You intend using managed instance groups for your frontend and backend instances to provide autohealing, load balancing, autoscaling, and rolling updates.
主要流程:
frontend 和 backend 主機關機。fancy-fe 和 fancy-be 的執行個體範本 (Instance Template)。backend 主機。To create the instance template, use the existing instances you created previously.
First, run the following to stop both instances:
gcloud compute instances stop frontend --zone=us-east1-c
gcloud compute instances stop backend --zone=us-east1-c
Then, create the instance template from each of the source instances with the following commands:
gcloud compute instance-templates create fancy-fe \
    --source-instance-zone=us-east1-c \
    --source-instance=frontend
gcloud compute instance-templates create fancy-be \
    --source-instance-zone=us-east1-c \
    --source-instance=backend
Run the following to confirm the instance templates were created:
gcloud compute instance-templates list
With the instance templates created, run the following to delete the backend VM to save resource space:
gcloud compute instances delete backend --zone=us-east1-c
fancy-fe 和 fancy-be 模具,分別建立兩個受控執行個體群組 (Managed Instance Group, MIG)。-size 2)。set-named-ports)。frontend 這條生產線,顧客的流量請送到 8080 這個門;backend 生產線,訂單流量請送 8081,商品流量請送 8082。Next, run the following commands to create two managed instance groups, one for the frontend and one for the backend:
gcloud compute instance-groups managed create fancy-fe-mig \
    --zone=us-east1-c \
    --base-instance-name fancy-fe \
    --size 2 \
    --template fancy-fe
gcloud compute instance-groups managed create fancy-be-mig \
    --zone=us-east1-c \
    --base-instance-name fancy-be \
    --size 2 \
    --template fancy-be
These managed instance groups use the instance templates and are configured for two instances each within each group to start. The instances are automatically named based on the base-instance-name specified with random characters appended.
set-named-ports
Run the following to ensure that for your application, the frontend microservice runs on port 8080, and the backend microservice runs on port 8081 for orders, and port 8082 for products:
gcloud compute instance-groups set-named-ports fancy-fe-mig \
    --zone=us-east1-c \
    --named-ports frontend:8080
gcloud compute instance-groups set-named-ports fancy-be-mig \
    --zone=us-east1-c \
    --named-ports orders:8081,products:8082
To improve the availability of the application itself and to verify it is responding, configure an autohealing policy for the managed instance groups.
frontend 的 Port 8080 和 backend 的 Port 8081 進行檢查。An autohealing(自動修復) policy relies on an application-based health check to verify that an app is responding as expected. Checking that an app responds is more precise than simply verifying that an instance is in a RUNNING state, which is the default behavior.
Port 8080) 問:「嘿,還活著嗎?」如果連續敲了 3 次門都沒人回應 (-unhealthy-threshold 3),它就會判定這台伺服器「故障」。整個過程完全自動,確保網站服務永遠都有足夠的健康伺服器在線上,這就是高可用性 (High Availability) 的實現。
create health-checks
Run the following to create a health check that repairs the instance if it returns "unhealthy" 3 consecutive times for the frontend and backend:
gcloud compute health-checks create http fancy-fe-hc \
    --port 8080 \
    --check-interval 30s \
    --healthy-threshold 1 \
    --timeout 10s \
    --unhealthy-threshold 3
gcloud compute health-checks create http fancy-be-hc \
    --port 8081 \
    --request-path=/api/orders \
    --check-interval 30s \
    --healthy-threshold 1 \
    --timeout 10s \
    --unhealthy-threshold 3
Run the following to create a firewall rule that allows the health check probes to connect to the microservices on ports 8080-8081:
gcloud compute firewall-rules create allow-health-check \
    --allow tcp:8080-8081 \
    --source-ranges 130.211.0.0/22,35.191.0.0/16 \
    --network default
Apply the health checks to their respective services with the following commands:
gcloud compute instance-groups managed update fancy-fe-mig \
    --zone=us-east1-c \
    --health-check fancy-fe-hc \
    --initial-delay 300
gcloud compute instance-groups managed update fancy-be-mig \
    --zone=us-east1-c \
    --health-check fancy-be-hc \
    --initial-delay 300
Continue with the lab to allow some time for autohealing to monitor the instances in the group. You intend simulating a failure to test the autohealing at the end of the lab.
為什麼需要這個「 load balancer」?
更多: Overview of Load Balancing.
Google Cloud offers many different types of load balancers. For this lab, you use an HTTP(S) Load Balancer for your traffic. An HTTP load balancer is structured as follows:
Create health checks
that are used to determine which instances are capable of serving traffic for each service:
給「總機」專用的,總機會用這些規則來判斷目前哪些伺服器是健康的、可以接客的。
gcloud compute http-health-checks create fancy-fe-frontend-hc \
  --request-path / \
  --port 8080
gcloud compute http-health-checks create fancy-be-orders-hc \
  --request-path /api/orders \
  --port 8081
gcloud compute http-heagcloud compute http-health-checks create fancy-be-products-hc \
  --request-path /api/products \
  --port 8082
Note: These health checks are for the load balancer and only handle directing traffic from the load balancer; they do not cause the managed instance groups to recreate instances.
和之前 MIG 的「自動修復」健康檢查不同。MIG 的品管員發現伺服器故障會直接把它換掉;而總機的健康檢查發現伺服器沒回應,只會暫時不把新客戶轉接過去。
Create backend services
that are the target for load-balanced traffic; the backend services use the health checks and named ports you created:
建立 fancy-fe-frontend、fancy-be-orders 和 fancy-be-products 三個後端服務,並將對應的 MIG (員工群組) 加入其中
gcloud compute backend-services create fancy-fe-frontend \
  --http-health-checks fancy-fe-frontend-hc \
  --port-name frontend \
  --global
gcloud compute backend-services create fancy-be-orders \
  --http-health-checks fancy-be-orders-hc \
  --port-name orders \
  --global
gcloud compute backend-services create fancy-be-products \
  --http-health-checks fancy-be-products-hc \
  --port-name products \
  --global
Add the load balancer's backend services:
我們在告訴總機系統:「我們公司有三個主要部門:前端部、訂單部和商品部。每個部門有哪些員工(MIG)都在這裡了。」
gcloud compute backend-services add-backend fancy-fe-frontend \
--instance-group-zone=us-east1-c \
--instance-group fancy-fe-mig \
--global
gcloud compute backend-services add-backend fancy-be-orders \
  --instance-group-zone=us-east1-c \
  --instance-group fancy-be-mig \
  --global
gcloud compute backend-services add-backend fancy-be-products \
  --instance-group-zone=us-east1-c \
  --instance-group fancy-be-mig \
  --global
Create a URL map
that defines which URLs are directed to which backend services:
建立一個 URL 映射規則 fancy-map
gcloud compute url-maps create fancy-map \
  --default-service fancy-fe-frontend
Create a path matcher
that allows the /api/orders and /api/products paths to route to their respective services:
gcloud compute url-maps add-path-matcher fancy-map \
   --default-service fancy-fe-frontend \
   --path-matcher-name orders \
   --path-rules "/api/orders=fancy-be-orders,/api/products=fancy-be-products"
-default-service):如果客戶只是來訪、沒有指定要找誰 (例如訪問根目錄 /),一律轉接到「前端部」。-path-matcher):如果客戶的請求路徑是 /api/orders,就轉接到「訂單部」;如果是 /api/products,就轉接到「商品部」。Create the proxy, which ties to the URL map:
建立一個 HTTP 代理 fancy-proxy,並把剛剛的轉接手冊交給它。
總機這個角色,它的唯一工作就是拿著「轉接手冊」(URL Map),並依照手冊規則來處理每一個來電。
gcloud compute target-http-proxies create fancy-proxy \
  --url-map fancy-map
Create a global forwarding rule
that ties a public IP address and port to the proxy:
建立一個全域轉發規則 fancy-http-rule,它會產生一個公開的 IP 位址,並將所有來自 Port 80 的流量都指向「總機」。
gcloud compute forwarding-rules create fancy-http-rule \
  --global \
  --target-http-proxy fancy-proxy \
  --ports 80
Now that you have a new static IP address, update the code on the frontend to point to this new address instead of the ephemeral address used earlier that pointed to the backend instance.
react-app) 中的 .env 設定檔。backend 主機的 IP,換成 Load Balancer 的 IP。In Cloud Shell, run the following to change to the react-app folder that houses the .env file, which holds the configuration:
cd ~/monolith-to-microservices/react-app/
Find the IP address for the Load Balancer by running the following command:
gcloud compute forwarding-rules list --global
Return to the Cloud Shell Editor and edit the .env file again to point to Public IP of Load Balancer. [LB_IP] represents the External IP address of the backend instance determined previously.
Save the file.
Rebuild react-app, which updates the frontend code:
cd ~/monolith-to-microservices/react-app
npm install && npm run-script build
Run the following to copy the application code into your bucket:
cd ~
rm -rf monolith-to-microservices/*/node_modules
gsutil -m cp -r monolith-to-microservices gs://fancy-store-Project ID/
Now that there is new code and a configuration, you want the frontend instances within the managed instance group to pull the new code.
Since your instances pull the code at startup, run the following command to issue a rolling restart:
gcloud compute instance-groups managed rolling-action replace fancy-fe-mig \
    --zone=zone \
    --max-unavailable 100%
我們剛剛把更新過的程式碼(新的通訊錄)上傳到了「中央倉庫」(Cloud Storage),但目前線上正在運行的伺服器,用的還是舊版的程式碼。
這個指令就是向伺服器生產線 (MIG) 下達一個「滾動替換」的命令。
它的意思是:「嘿,MIG!倉庫裡有新版的軟體了。請你把所有舊的前端伺服器都換掉,用模具重新製作一批新的伺服器。」
startup-script.sh)。Wait three minutes after issuing the rolling-action replace command in order to give the instances time to be processed, and then check the status of the managed instance group. Run the following to confirm the service is listed as HEALTHY:
watch -n 2 gcloud compute backend-services get-health fancy-fe-frontend --global
Wait until the two services are listed as HEALTHY.
Note:
If one instance encounters an issue and is UNHEALTHY it should automatically be repaired. Wait for this to happen.
If neither instance enters a HEALTHY state after waiting a little while, something is wrong with the setup of the frontend instances that accessing them on port 8080 doesn't work. Test this by browsing to the instances directly on port 8080.
Once both items appear as HEALTHY on the list, exit the watch command by pressing CTRL+C.
Note:
The application is accessible via http://[LB_IP] where [LB_IP] is the IP_ADDRESS specified for the Load Balancer, which can be found with the following command:
gcloud compute forwarding-rules list --globalYou check the application later in the lab.
整個流程:
當在瀏覽器中打開 Load Balancer 的 IP 時,:
讓伺服器集群能夠根據流量大小自動增加或減少伺服器數量,並啟用內容快取來大幅提升網站的載入速度。
To create the autoscaling policy (autoscaler ), execute the following:
gcloud compute instance-groups managed set-autoscaling \
  fancy-fe-mig \
  --zone=zone \
  --max-num-replicas 2 \
  --target-load-balancing-utilization 0.60
gcloud compute instance-groups managed set-autoscaling \
  fancy-be-mig \
  --zone=zone \
  --max-num-replicas 2 \
  --target-load-balancing-utilization 0.60
Create an autoscaler on the managed instance groups
-target-load-balancing-utilization 0.60)。
-max-num-replicas 2)。(在真實世界,這個數字會設得更高)。Another feature that can help with scaling is to enable a Content Delivery Network service, to provide caching for the frontend.
為 Load Balancer 開啟「快取記憶」功能
啟用「內容加速器」 Content Delivery Network - CDN
gcloud compute backend-services update fancy-fe-frontend \
    --enable-cdn --global
CDN (內容傳遞網路) 的運作方式就像圖書館的櫃檯:
當使用者瀏覽此網站時,他們會從離自己最近的節點獲取內容,大幅降低延遲,讓網站感覺「飛快」。
模擬硬體規格的變更。
執行一次完整的網站更新流程,並親手驗證我們建立的「自動修復」系統真的有效。
frontend instance, which acts as the basis for the instance template. During the update, put a file on the updated version of the instance template's image, then update the instance template, roll out the new template, and then confirm the file exists on the managed instance group instances.e2-standard-2 machine type to e2-small.Modify the machine type of the frontend instance:
從 e2-standard-2 降級為 e2-small
gcloud compute instances set-machine-type frontend \
  --zone=zone \
  --machine-type e2-small
Create the new Instance Template:
用這台修改過的主機,建立一個新的執行個體範本 (Instance Template) fancy-fe-new
gcloud compute instance-templates create fancy-fe-new \
    --region=$REGION \
    --source-instance=frontend \
    --source-instance-zone=zone
Roll out the updated instance template to the Managed Instance Group with the following command:
命令前端的 MIG (伺服器生產線) 開始使用這個新的模具來更新所有伺服器
gcloud compute instance-groups managed rolling-action start-update fancy-fe-mig \
  --zone=zone \
  --version template=fancy-fe-new
Wait 3 minutes, and then run the following to monitor the status of the update:
watch -n 2 gcloud compute instance-groups managed list-instances fancy-fe-mig \
  --zone=zone
This process takes several minutes.
Ensure you have at least one instance in the following condition before proceeding:
Copy the name of one of the machines listed for use in the next command.
Press CTRL+C to exit the watch process.
Run the following to see if the virtual machine is using the new machine type (e2-small), where [VM_NAME] is the newly created instance:
gcloud compute instances describe [VM_NAME] --zone=zone | grep machineType
Expected example output:
machineType:
https://www.googleapis.com/compute/v1/projects/project-name/zones/us-central1-f/machineTypes/e2-small
模擬一次網站內容的更新
整個流程跟我們之前做過的一樣:修改程式碼 → 重新打包 → 上傳到倉庫。
index.js.new),來替換掉目前的網站首頁檔案 (index.js)cd ~/monolith-to-microservices/react-app/src/pages/Home
mv index.js.new index.js
cat ~/monolith-to-microservices/react-app/src/pages/Home/index.js
會有類似這樣: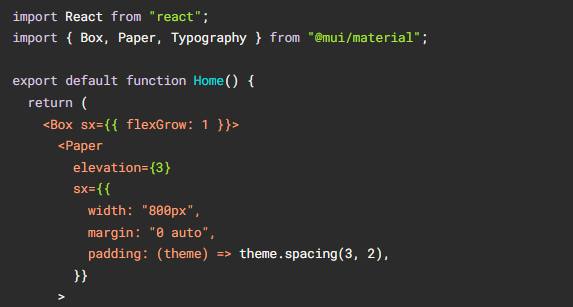
Build the React app and copy it into the monolith public directory:
重新打包前端程式
cd ~/monolith-to-microservices/react-app
npm install && npm run-script build
Re-push this code to the bucket:
將包含新首頁的程式碼,再次上傳到 Cloud Storage 中央倉庫
cd ~
rm -rf monolith-to-microservices/*/node_modules
gsutil -m cp -r monolith-to-microservices gs://fancy-store-Project ID/
rolling-action replace 指令,強制替換所有前端伺服器。
gcloud compute instance-groups managed rolling-action replace fancy-fe-mig \
  --zone=zone \
  --max-unavailable=100%
Note: In this example of a rolling replace, you specifically state that all machines can be replaced immediately through the
--max-unavailableparameter. Without this parameter, the command would keep an instance alive while replacing others. For testing purposes, you specify to replace all immediately for speed. In production, leaving a buffer would allow the website to continue serving the website while updating.
Wait three minutes after issuing the rolling-action replace command in order to give the instances time to be processed, and then check the status of the managed instance group. Run the following to confirm the service is listed as HEALTHY:
watch -n 2 gcloud compute backend-services get-health fancy-fe-frontend --global
Wait a few moments for both services to appear and become HEALTHY.
Once items appear in the list with a HEALTHY status, exit the watch command by pressing CTRL+C.
Browse to the website via http://[LB_IP] where [LB_IP] is the IP_ADDRESS specified for the Load Balancer, which can be found with the following command:
gcloud compute forwarding-rules list --global
The new website changes should now be visible.
模擬災難並驗證自動修復
To find an instance name, execute the following:
gcloud compute instance-groups list-instances fancy-fe-mig --zone=zone
Copy an instance name, then run the following to SSH into the instance, where INSTANCE_NAME is one of the instances from the list:
gcloud compute ssh [INSTANCE_NAME] --zone=zone
Type in "y" to confirm, and press Enter twice to not use a password.
Within the instance, run the following to use supervisorctl to stop the application:
sudo supervisorctl stop nodeapp; sudo killall node
Run the following command to exit the instance:
exit
Monitor the repair operations:
watch -n 2 gcloud compute operations list \
--filter='operationType~compute.instances.repair.*'
This process takes several minutes to complete.
Look for the following example output.
The managed instance group recreated the instance to repair it.


