昨天我們實作了雙向通知,讓顧客與群組都能即時收到訂單更新。今天要回到管理端的世界,打造一個「能查、能看、能篩」的訂單明細頁!
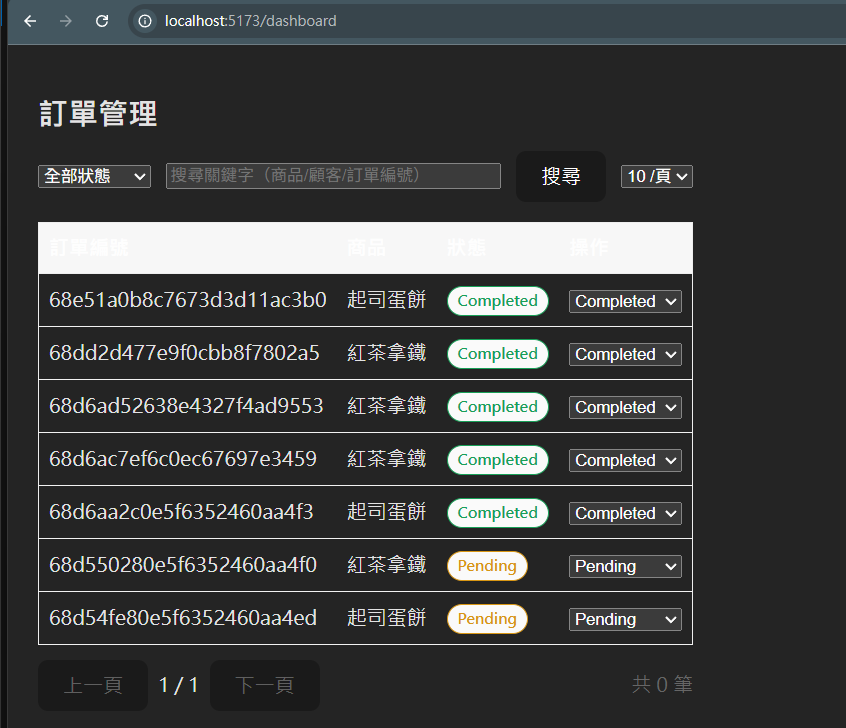
這一篇,我們將實作一個能顯示完整訂單資訊、支援搜尋與篩選的後台 Dashboard,讓店家管理更輕鬆。
建立後端 API:查詢單筆訂單明細。
後台 Dashboard 顯示完整資料(商品、取貨方式、顧客資訊等)。
增加搜尋、篩選、分頁功能,提升使用體驗。
我們在 src/routes/order.js 中新增一個端點:
// GET /orders/:id
router.get('/:id', async (req, res) => {
  try {
    const order = await Order.findById(req.params.id)
      .populate('userId', 'name lineUserId') // 關聯使用者資料
      .lean();

    if (!order) return res.status(404).json({ message: 'Order not found' });

    res.json(order);
  } catch (err) {
    console.error(err);
    res.status(500).json({ message: 'Server Error' });
  }
});
populate('userId')可以將 MongoDB 中的 user 資料一併帶出,例如顧客姓名或 LINE ID,方便管理者識別。
假設我們使用前端框架(如 React / Next.js)打造後台,這裡示範如何在列表頁加入「查看明細」按鈕:
// pages/Dashboard.jsx
import { useEffect, useMemo, useRef, useState } from "react";
import axios from "axios";

const API_BASE = import.meta?.env?.VITE_API_BASE ?? "http://localhost:3000";

export default function Dashboard() {
  const [orders, setOrders] = useState([]);
  const [total, setTotal] = useState(0);

  // UI 狀態
  const [status, setStatus] = useState("");      // "", "Pending", "In Progress", "Completed"
  const [q, setQ] = useState("");                // 關鍵字(商品/顧客/訂單編號,依後端支援)
  const [page, setPage] = useState(1);
  const [limit, setLimit] = useState(10);
  const [loading, setLoading] = useState(false);
  const [errMsg, setErrMsg] = useState("");

  const token = useMemo(() => localStorage.getItem("jwt"), []);
  const totalPages = Math.max(1, Math.ceil(total / limit));
  const controllerRef = useRef(null);

  async function fetchOrders() {
    // 中止上一個請求避免 race condition
    if (controllerRef.current) controllerRef.current.abort();
    const controller = new AbortController();
    controllerRef.current = controller;

    setLoading(true);
    setErrMsg("");

    try {
      const res = await axios.get(`${API_BASE}/order`, {
        headers: { Authorization: `Bearer ${token}` },
        params: { status, q, page, limit },
        signal: controller.signal,
      });
      setOrders(res.data.orders ?? []);
      setTotal(res.data.total ?? 0);
    } catch (err) {
      if (axios.isCancel(err)) return;
      const detail =
        err?.response?.data?.message ||
        err?.message ||
        "載入失敗,請稍後再試";
      setErrMsg(detail);
    } finally {
      setLoading(false);
    }
  }

  useEffect(() => {
    fetchOrders();
    return () => controllerRef.current?.abort();
    // 依賴查詢條件
  }, [status, q, page, limit]);

  // 樂觀更新:先改 UI,失敗回滾
  async function updateStatus(id, newStatus) {
    const prev = orders;
    const next = orders.map((o) =>
      o._id === id ? { ...o, status: newStatus, _optimistic: true } : o
    );
    setOrders(next);

    try {
      await axios.patch(
        `${API_BASE}/order/${id}/status`,
        { status: newStatus },
        { headers: { Authorization: `Bearer ${token}` } }
      );
      // 成功後移除 _optimistic 標記(重新 fetch 也可)
      setOrders((cur) =>
        cur.map((o) =>
          o._id === id ? { ...o, _optimistic: false } : o
        )
      );
    } catch (err) {
      setOrders(prev); // 回滾
      const msg =
        err?.response?.data?.message || "更新失敗,請稍後再試";
      alert(msg);
    }
  }

  function onSearchSubmit(e) {
    e.preventDefault();
    setPage(1);
    fetchOrders();
  }

  return (
    <div style={{ padding: 24, maxWidth: 1080, margin: "0 auto" }}>
      <h1 style={{ fontSize: 24, fontWeight: 700, marginBottom: 16 }}>
        訂單管理
      </h1>

      {/* 篩選列 */}
      <form
        onSubmit={onSearchSubmit}
        style={{ display: "flex", gap: 12, alignItems: "center", marginBottom: 16 }}
      >
        <select
          value={status}
          onChange={(e) => {
            setStatus(e.target.value);
            setPage(1);
          }}
        >
          <option value="">全部狀態</option>
          <option value="Pending">Pending</option>
          <option value="In Progress">In Progress</option>
          <option value="Completed">Completed</option>
        </select>

        <input
          type="text"
          placeholder="搜尋關鍵字(商品/顧客/訂單編號)"
          value={q}
          onChange={(e) => setQ(e.target.value)}
          style={{ flex: 1 }}
        />

        <button type="submit">搜尋</button>

        <select
          value={limit}
          onChange={(e) => {
            setLimit(Number(e.target.value));
            setPage(1);
          }}
        >
          <option value={10}>10 /頁</option>
          <option value={20}>20 /頁</option>
          <option value={50}>50 /頁</option>
        </select>
      </form>

      {/* Loading / Error */}
      {loading && <div>載入中…</div>}
      {!loading && errMsg && (
        <div style={{ color: "crimson", marginBottom: 12 }}>{errMsg}</div>
      )}

      {/* 列表 */}
      {!loading && !errMsg && (
        <>
          <table
            style={{
              width: "100%",
              borderCollapse: "collapse",
              border: "1px solid #eee",
            }}
          >
            <thead style={{ background: "#f7f7f7" }}>
              <tr>
                <th style={th}>訂單編號</th>
                <th style={th}>商品</th>
                <th style={th}>狀態</th>
                <th style={th}>操作</th>
              </tr>
            </thead>
            <tbody>
              {orders.length === 0 && (
                <tr>
                  <td colSpan={4} style={{ textAlign: "center", padding: 16 }}>
                    目前沒有符合條件的訂單
                  </td>
                </tr>
              )}
              {orders.map((o) => (
                <tr key={o._id}>
                  <td style={td} title={o._id}>
                    {o._id}
                  </td>
                  <td style={td}>
                    {Array.isArray(o.items)
                      ? o.items.map((i) => i.productName).join(", ")
                      : "-"}
                  </td>
                  <td style={td}>
                    <StatusBadge status={o.status} optimistic={o._optimistic} />
                  </td>
                  <td style={td}>
                    <select
                      value={o.status}
                      onChange={(e) => updateStatus(o._id, e.target.value)}
                    >
                      <option value="Pending">Pending</option>
                      <option value="In Progress">In Progress</option>
                      <option value="Completed">Completed</option>
                    </select>
                  </td>
                </tr>
              ))}
            </tbody>
          </table>

          {/* 分頁 */}
          <div style={{ display: "flex", gap: 8, marginTop: 12, alignItems: "center" }}>
            <button disabled={page <= 1} onClick={() => setPage((p) => p - 1)}>
              上一頁
            </button>
            <span>
              {page} / {totalPages}
            </span>
            <button
              disabled={page >= totalPages}
              onClick={() => setPage((p) => p + 1)}
            >
              下一頁
            </button>
            <span style={{ marginLeft: "auto", color: "#666" }}>
              共 {total} 筆
            </span>
          </div>
        </>
      )}
    </div>
  );
}

function StatusBadge({ status, optimistic }) {
  const color =
    status === "Completed"
      ? "#18a058"
      : status === "In Progress"
      ? "#2f54eb"
      : "#d89614";
  const style = {
    display: "inline-block",
    padding: "2px 8px",
    borderRadius: 999,
    background: "#fafafa",
    border: `1px solid ${color}`,
    color,
    fontSize: 12,
    fontWeight: 600,
    opacity: optimistic ? 0.6 : 1,
  };
  return <span style={style}>{status}{optimistic ? "(更新中)" : ""}</span>;
}

const th = { textAlign: "left", padding: 8, borderBottom: "1px solid #eee" };
const td = { padding: 8, borderBottom: "1px solid #f2f2f2" };
// GET /orders?status=Completed&page=1&limit=10
const escapeRegExp = (s = "") => s.replace(/[.*+?^${}()|[\]\\]/g, "\\$&");

router.get("/", authAdmin, async (req, res) => {
  try {
    const redis = await ensureConnected();

	// 1) 參數與防呆
    const {
      status = "", // 'Pending' | 'In Progress' | 'Completed' | ''
      q = "", // 關鍵字:比對 items.productName 或訂單 id
      pickup = "", // '自取' | '外送' | '宅配' | ''
      page: pageRaw = "1",
      limit: limitRaw = "10",
    } = req.query;

    const page = Math.max(1, parseInt(pageRaw, 10) || 1);
    const limit = Math.min(100, Math.max(1, parseInt(limitRaw, 10) || 10));
    const skip = (page - 1) * limit;

    // 2) 組 filter(依 order schema)
    const filter = {};
    if (status) filter.status = status;
    if (pickup) filter.pickup = pickup;
    if (q) {
      const rx = new RegExp(escapeRegExp(q), "i");
      // q 可能是 24 位 ObjectId:讓使用者可以直接貼訂單編號
      const isObjectId = /^[0-9a-fA-F]{24}$/.test(q);
      const byId = isObjectId ? { _id: q } : null;
      // 商品在 items 陣列的子文件,欄位是 items.productName
      // Mongo 可直接用「items.productName」+ regex,不一定要 $elemMatch
      const byProduct = { "items.productName": { $regex: rx } };
      filter.$or = [byId, byProduct].filter(Boolean);
    }
    // 3) 動態快取 Key(帶入條件,避免串到別人的結果)
    const KEY =
      "orders:list:v3:" + JSON.stringify({ status, pickup, q, page, limit });

    // 4) 先讀快取
    const cached = await redis.get(KEY);
    if (cached) {
      const data = JSON.parse(cached);
      return res.json({ success: true, source: "cache", ...data });
    }

    // 5) 查詢 + 計數(populate 只帶需要欄位)
    const [orders, total] = await Promise.all([
      Order.find(filter)
        .sort({ createdAt: -1 })
        .skip(skip)
        .limit(limit)
        .populate("userId", "name lineUserId") // 只帶名稱與 lineUserId
        .select({
          userId: 1,
          items: 1, // items: [{ productName, quantity, price }]
          status: 1,
          pickup: 1,
          createdAt: 1,
          updatedAt: 1,
        })
        .lean(),
      Order.countDocuments(filter),
    ]);

    const payload = { orders, total, page, limit };

    // 6) 寫入快取(短 TTL,後台不宜快取太久)
    await redis.set(KEY, JSON.stringify(payload), { EX: 30 });

    return res.json({ success: true, source: "db", ...payload });
  } catch (err) {
    console.error("[GET /order] error:", err);
    return res.status(500).json({ success: false, message: "Server Error" });
  }
});
<div className="flex mb-4">
  <select onChange={(e) => setStatus(e.target.value)}>
    <option value="">全部狀態</option>
    <option value="Pending">Pending</option>
    <option value="In Progress">In Progress</option>
    <option value="Completed">Completed</option>
  </select>
  <button onClick={loadOrders} className="ml-2">搜尋</button>
</div>
這樣就能快速切換不同狀態的訂單,方便管理者追蹤進度。
Loading 狀態:用 spinner 或 skeleton 告訴使用者資料載入中。
空狀態提示:當搜尋不到資料時顯示「目前沒有符合條件的訂單」。
狀態顏色標籤:Completed = 綠色、Pending = 黃色、Failed = 紅色。
固定表頭 + 滾動表格:提升可讀性。
學會如何使用 populate() 將訂單與使用者關聯查詢。
完成可篩選、分頁、查詢的後台 Dashboard。
從開發者角度,理解「資料展示」與「操作便利性」的平衡。
明天(Day 27)我們將進入金流整合第一階段,介紹台灣常見的金流 API(LINE Pay、藍新、綠界),並帶你實際跑通沙箱付款流程!

