在Nginx中,可以像下面這樣設定多個server,使得不同server使用不同端口代理到不同服務:
upstream backend {
   server 192.168.56.1:8081;
}

server {
    listen       9081;
    listen  [::]:9081;

    location / {
        proxy_pass  http://backend;
    }
}

upstream otherbackend {
   server 192.168.56.1:9091;
}

server {
    listen       9082;  # 使用不同端口
    listen  [::]:9082;  # 使用不同端口

    location / {
        proxy_pass  https://otherbackend;
    }
}
可不可以用一個Apache APISIX運行實例,達到同樣的結果呢?首先,可以先讓APISIX監聽多個端口,調整apisix_config/config.yaml:
apisix:
  node_listen:               # APISIX listening port
    - port: 9080
    - port: 9081             # 增加APISIX的監聽端口
透過上面設定,APISIX會監聽多個端口9080和9081的請求。但等等,同樣需要在docker-compose.yaml轉發相關端口:
services:
  apisix:
    container_name: apisix
    image: "apache/apisix:3.2.2-debian"
    volumes:
      - ./apisix_config/config.yaml:/usr/local/apisix/conf/config.yaml:ro
    ports:
      - 9080:9080 # HTTP
      - 9081:9081 # 增加的HTTP轉發端口
接著該怎麼設定路由,讓APISIX知道該使用哪個呢?以代理「新竹百貨公司」和「httpbin」為標的,很顯然僅僅是設定路由是不足夠的。
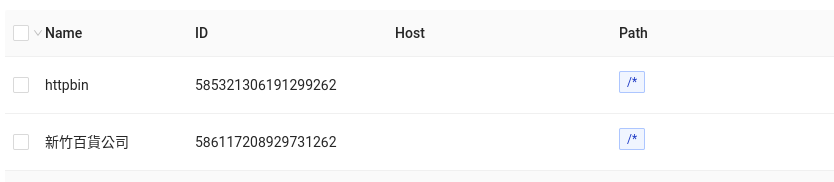
如果僅僅是設定路由,就會是先匹配到哪個就使用哪個路由。得在優先被匹配的路由上多加一點匹配規則,使其不完全匹配時會跳往下一個路由嘗試。以我建立起得Lab例子來說,優先匹配了httpbin服務,因此會在該路由再添加一些路由匹配規則:

| 設定 | 內容 | 說明 |
|---|---|---|
| Parameter Position | Built-in Parameter | |
| Parameter Name | server_port | 僅當匹配伺服器服務使用端口為9081時,使用該路由 |
| Operational Character | Equal(==) | |
| Parameter Value | 9081 |

如果把路由使用JSON表示的話,會是下面結果。特別留意vars屬性部分,這就是這次添加的匹配規則:
{
  "uri": "/*",
  "name": "httpbin",
  "methods": [
    "GET",
    "POST",
    "PUT",
    "DELETE",
    "PATCH",
    "HEAD",
    "OPTIONS",
    "CONNECT",
    "TRACE",
    "PURGE"
  ],
  "vars": [
    [
      "server_port",
      "==",
      "9081"
    ]
  ],
  "upstream_id": "584592689048060606",
  "status": 1
}
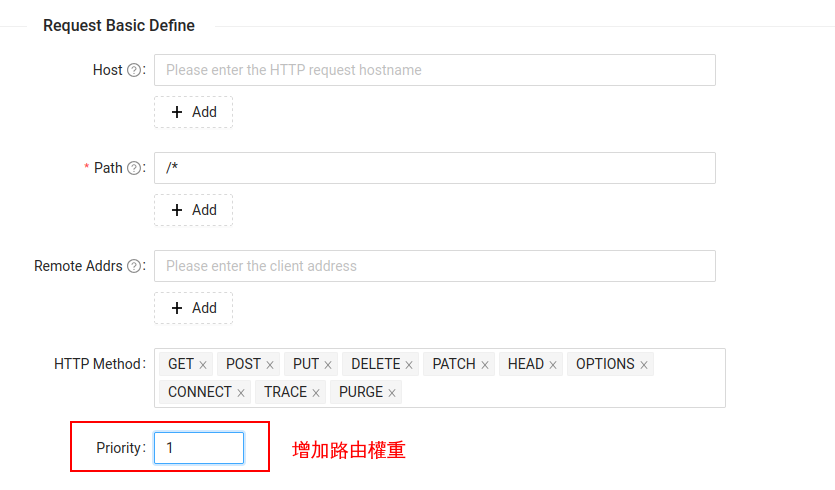
不過總是這樣靠運氣決定路由執行匹配順序並不是個好方法。更好的做法,是在較多匹配規則的路由上,增加其權重,使得APISIX會優先嘗試該路由,不完全匹配時才嘗試下一個。
在vars中設定的server_port變數,其實也是Nginx的變數,代表的是接受請求的伺服器端口。
APISIX也可以使用其他NGINX 變數,舉例幾個我覺得比較重要變數:
http_: 請求的Headersent_http: 轉發給上游的Headerupstream_http_: 上游回覆的Headerupstream_cookie_: 上游設置的Set-Cookie
cookie_: 傳遞的Cookiearg_: 請求參數此外,APISIX也有一些自身添加的變數。同樣幾個重要的APISIX 變數舉例如下:
route_id: 匹配使用的路由IDroute_name: 匹配使用的路由名稱balancer_ip: 上游節點IPbalancer_port: 上游節點服務端口這個Lab中,會將這些變數結果放入回應Header裡面。這部分需要透過response-rewrite Plugin實現:
  "plugins": {
    "response-rewrite": {
      "_meta": {
        "disable": false
      },
      "headers": {
        "add": [
          "APISIX-Route-ID: $route_id",
          "APISIX-Route-Name: $route_name",
          "APISIX-Target: ${balancer_ip} ${balancer_port}",
          "X-Host: $http_host",
          "X-Rep-Header-freeform: $upstream_http_freeform",
          "X-Arg-freeform: $arg_freeform",
          "X-Cookie: $cookie_freeform",
          "X-Send-http-freeform: $sent_http_freeform",
          "X-Upstream_Cookie: $upstream_cookie_freeform"
        ]
      }
    }
  }
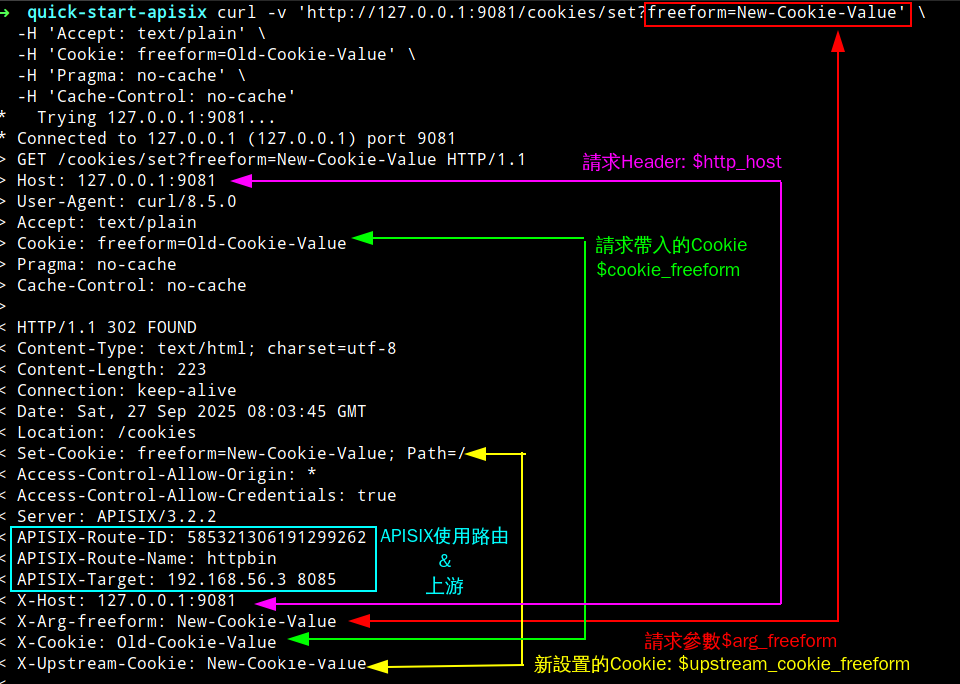
將response-rewrite Plugin套用到代理httpbin的路由後,開啓瀏覽器找到設定Cookie的端點,發送請求建立Cookie。
curl -v 'http://127.0.0.1:9081/cookies/set?freeform=New-Cookie-Value' \
  -H 'Accept: text/plain' \
  -H 'Cookie: freeform=Old-Cookie-Value' \
  -H 'Pragma: no-cache' \
  -H 'freeform: Header-Value' \
  -H 'Cache-Control: no-cache'
請求HEADER
> GET /cookies/set?freeform=New-Cookie-Value HTTP/1.1
> Host: 127.0.0.1:9081
> User-Agent: curl/8.5.0
> Accept: text/plain
> Cookie: freeform=Old-Cookie-Value
> Pragma: no-cache
> Cache-Control: no-cache
回覆HEADER
< HTTP/1.1 302 FOUND
< Content-Type: text/html; charset=utf-8
< Content-Length: 223
< Connection: keep-alive
< Date: Sat, 27 Sep 2025 08:03:45 GMT
< Location: /cookies
< Set-Cookie: freeform=New-Cookie-Value; Path=/
< Access-Control-Allow-Origin: *
< Access-Control-Allow-Credentials: true
< Server: APISIX/3.2.2
< APISIX-Route-ID: 585321306191299262
< APISIX-Route-Name: httpbin
< APISIX-Target: 192.168.56.3 8085
< X-Host: 127.0.0.1:9081
< X-Arg-freeform: New-Cookie-Value
< X-Cookie: Old-Cookie-Value
< X-Upstream-Cookie: New-Cookie-Value
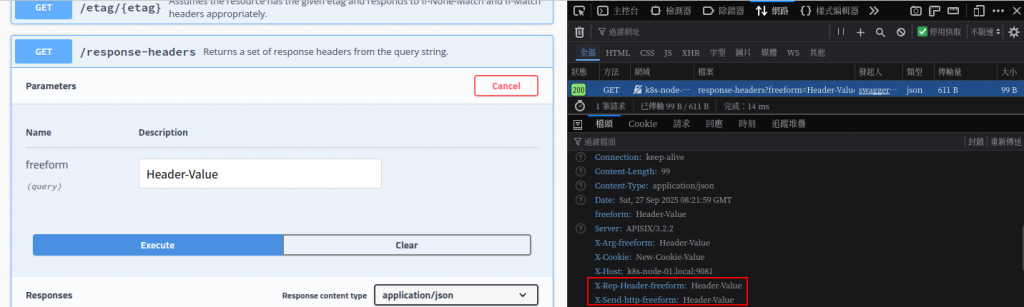
$route_id、$route_name、$balancer_ip、$balancer_port、$arg_freeform、$cookie_freeform、$upstream_cookie_freeform變數已經被放到相對應的Header位置。以同樣方式可以去檢驗$upstream_http_freeform和$sent_http_freeform:
curl -v 'http://127.0.0.1:9081/response-headers?freeform=Header-Value' \
  -H 'Accept: application/json' \
  -H 'Cookie: freeform=New-Cookie-Value'