AOP 的本質 — 改變程式碼的流程
以 Web Server 開發場景為例,我們經常會需要在很多 end-point API 的方法執行前先執行權限驗證,或者是在這些 end-point 執行 transaction 失敗時可以 rollback。這些在程式碼中會重複出現,它們是重要但是不屬於我們核心業務的操作,如果要重複複製貼上到專案中的各處會造成難以維護的窘境。因此 AOP 試圖讓這些常被複用的邏輯獨立出來,用特殊的機制包裝起來,讓我們的業務邏輯不需要去看到任何相關的程式碼。
這件事本質上聽起來跟呼叫函式沒有太大的區別,然而 AOP 本質上是屬於一種 Meta Programming 。具體來說,實現 AOP 的工具處理的是程式碼本身(或 bytecode本身) 或是 class (或 object ) 的資訊,是用來改變程式碼的流程或織入( weaving ) 新的程式碼,而非只是單純地「執行一段程式」。
---- 來談談 AOP (Aspect-Oriented Programming) 的精神與各種主流實現模式的差異。maxchiu

在「資料格式轉換」一章使用proxy-rewrite修改請求頭、data-transform變更請求/回覆內容,以及response-rewrite調整回覆頭。「身份驗證守門人」一章的驗證插件,同樣接近在proxy-rewrite位置,阻擋未授權請求往上游、同樣「限速/斷路」一章也阻擋請求前進。
Apache APISIX在整個HTTP請求回覆的過程中,提供了一些插件,能夠變更運行邏輯。除此之外,有沒有更加靈活的調整方式?是稱作切面導向程式開發(AOP),還是使用中介層設計(Middlewere),又或者是責任鏈(Chain of Responsibility)。APISIX確實有更加靈活的調整方式,這章來說說serverless--使用Lua這個圖靈完備程式語言,調整處理過程。
serverless-pre-function和serverless-post-function插件可以直接使用Lua程式語言的插件有兩個--serverless-pre-function和serverless-post-function。同樣在apisix_config/config.yaml和apisix_dashbaord_config/config.yaml的plugin區段啓用相關插件:
plugins:
  - serverless-pre-function   # priority: 10000
  - serverless-post-function  # priority: -2000
兩個最大的差異在執行權重(順序)的不同。一個在多處插件執行之前,另一個在多數插件結束之後。
此外,還可以針對執行的階段進行設定。階段流程主要有:
rewrite→access→before_proxy→header_filter→body_filter→log
不同階段有不同的上下文可以使用:
各個階段上下文參數
插件在不同階段(如 rewrite、access、header_filter、body_filter 等)執行時,上下文參數 conf 和 ctx 的基本結構是一致的,但它們的可用數據和行為會因階段的不同而有所差異。以下是各階段的上下文參數詳解:
1. 上下文參數概覽
- conf:插件的配置參數,通常由使用者在路由或全域插件配置中定義。
- ctx:插件的運行時上下文,用於在不同執行階段之間傳遞資料和共享狀態。
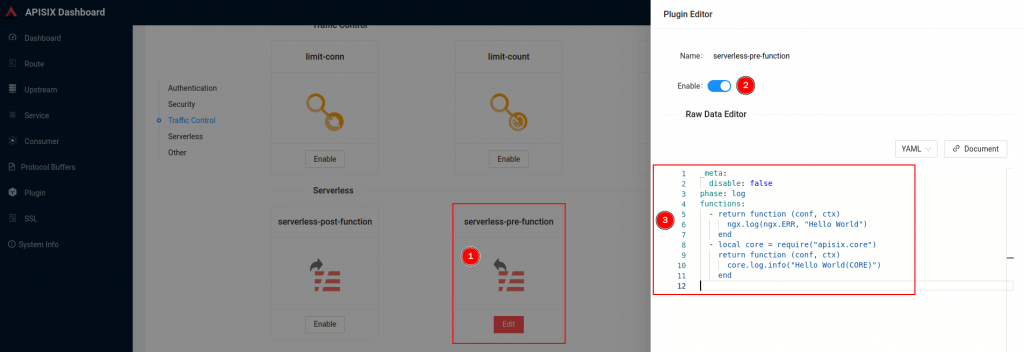
啓用serverless-pre-function或serverless-post-function插件。屬性functions接受多個Lua函數物件組成的陣列:
_meta:
  disable: false
phase: log
functions:
  - return function (conf, ctx)
      ngx.log(ngx.ERR, "Hello World")
    end
  - local core = require("apisix.core")
    return function (conf, ctx)
      core.log.info("Hello World(CORE)")
    end
舉例來說,以上設定了兩段Lua的匿名函數。第一個使用ngx.log()進行記錄,可以使用的Level包含:
ngx.STDERR
ngx.EMERG
ngx.ALERT
ngx.CRIT
ngx.ERR
ngx.WARN
ngx.NOTICE
ngx.INFO
ngx.DEBUG
(參考: https://github.com/openresty/lua-nginx-module#nginx-log-level-constants)
第二個是由apisix.core包裝過的方法,使用上差不多。
local log_levels = {
    stderr = ngx.STDERR,
    emerg  = ngx.EMERG,
    alert  = ngx.ALERT,
    crit   = ngx.CRIT,
    error  = ngx.ERR,
    warn   = ngx.WARN,
    notice = ngx.NOTICE,
    info   = ngx.INFO,
    debug  = ngx.DEBUG,
}
(參考: https://www.jianshu.com/p/cf1b4a3724db)
範例中會使用ERR等級,是因爲使用INFO可能會因爲啓用APISIX時設定打印記錄等級影響,可能看不出效果。在發送過一次請求以後,應該會在後臺記錄上看到:
apisix  | 2025/09/29 15:33:58 [error] 49#49: *255031 [lua] [string "return function (conf, ctx) ngx.log(ngx.ERR, ..."]:1: func(): Hello World while logging request, client: 192.168.56.1, server: _, request: "GET / HTTP/1.1", upstream: "http://192.168.56.3:8081/", host: "k8s-node-01.local:9080"
apisix  | 2025/09/29 15:33:58 [error] 49#49: *255031 [lua] [string "local core = require("apisix.core") return fu..."]:1: func(): Hello World(CORE) while logging request, client: 192.168.56.1, server: _, request: "GET / HTTP/1.1", upstream: "http://192.168.56.3:8081/", host: "k8s-node-01.local:9080"

或是也可以不管如何就直接透過ngx.say()回覆「Hello World」。
_meta:
  disable: false
phase: rewrite
functions:
  - return function (conf,ctx)
      ngx.say("Hello Wrold")
    end
也可以在轉發到上游節點前(access),檢查請求頭內容:如果包含X-VIP-KEY: bob-key的話就放行;否則,提前回傳401狀態。
可以注意到在「變數」一章的http_vip_key,可以透過ctx.var.http_x_vip_key存取外,也可以透過core.request.header(ctx, "X-VIP-KEY")方法取得。
_meta:
  disable: false
phase: access
functions:
  - local core = require('apisix.core')
    return function (conf,ctx)
      local x_vip_key = core.request.header(ctx, "X-VIP-KEY")
      core.log.error(string.format("var is %s", x_vip_key))
      core.log.error(string.format("in ctx is %s", ctx.var.http_x_vip_key))
      if ctx.var.http_x_vip_key ~= "bob-key" then
        core.response.set_header('Content-Type', 'text/html')
        local msg = [[<h1>Unauthorized</h1>]]
        core.response.exit(401, msg)
      end
    end
同樣的,也可以修改請求內容。或是在取得回覆內容後(phase: body_filter),改寫回覆內容。Lua是圖靈完備的語言,透過它,可以很靈活的變換處理邏輯。
除在serverless的Lua外,Apache APISIX也還有其他方式可以開發插件,包含更可復用的Lua插件開發、其他語言的互動(External Plugin)或是WASM插件。就算不熟悉Lua,也有可能使用其他程式語言為APISIX添加新功能。