首先我們先上結果: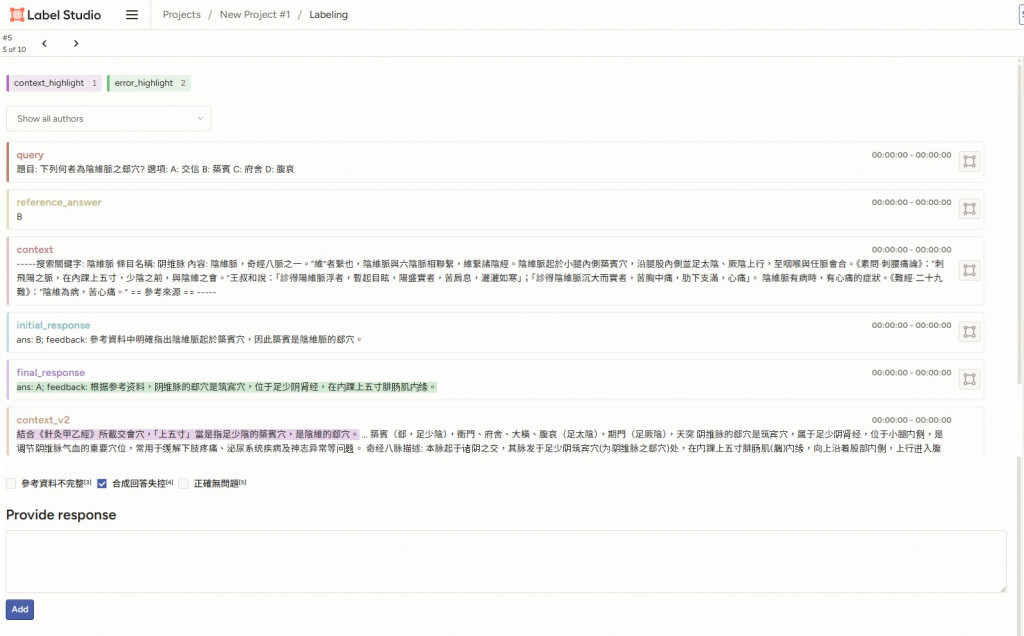
這張圖告訴我們:
從上圖的結果來看,我們至少看到:
這是怎麼做的呢? (應該)比你想像中的簡單非常多
首先是環境的部分:
conda create -n label-studio python==3.12
conda activate label-studio
pip install label-studio
label-studio start
然後你會可以在 http://localhost:8080 打開登入頁面了
預設你的資料會被存在本地的 sqlite
~/.local/share/label-studio
export label_studio.sqlite3 media test_data
關於其他環境變數的設置,比如改預設 sqlite 的資料夾(LABEL_STUDIO_BASE_DATA_DIR):
label-studio start --data-dir ./mcq_db
也可以把 sqlite 換成 postgresql,供多人使用
能夠啟動我們的專案之後,對於 label-studio(或者其他任何的標註工具),通常我們就是關心三件事:
我們就大致概覽一下吧
<View>
  <ParagraphLabels name="entity_slot" toName="dialogue">
    <Label value="context_highlight" />
    <Label value="error_highlight" />
  </ParagraphLabels>
  <Paragraphs name="dialogue" value="$RagResponse" layout="dialogue" />
    <Choices name="intent" toName="dialogue"
         choice="single" showInLine="true">
        <Choice value="參考資料不完整"/>
        <Choice value="合成回答失控"/>
        <Choice value="正確無問題"/>
    </Choices>
  <Header value="Provide response"/>
  <TextArea name="response" toName="response" rows="4" editable="true" maxSubmissions="1"/>
</View>


 iThome鐵人賽