延續 Day 28 會員註冊的流程,在實際的會員註冊場景中,電子信箱驗證是確保用戶身份真實性的重要環節。本篇將基於昨天的註冊流程,新增兩個核心 API:發送驗證信與驗證驗證碼,讓會員註冊功能更加完整且安全。
此外,今天也會介紹 NestJS Swagger 的實戰應用。透過裝飾器自動生成 API 文件,不僅能提升開發效率,更能讓前後端協作更加順暢,降低溝通成本。
我們使用 nodemailer 搭配 Google SMTP 服務來發送驗證信件。
Gmail 免費版發信限制:每天最多可發送給 500 位收件者
在開始實作之前,需要先完成以下 Google 帳號設定::
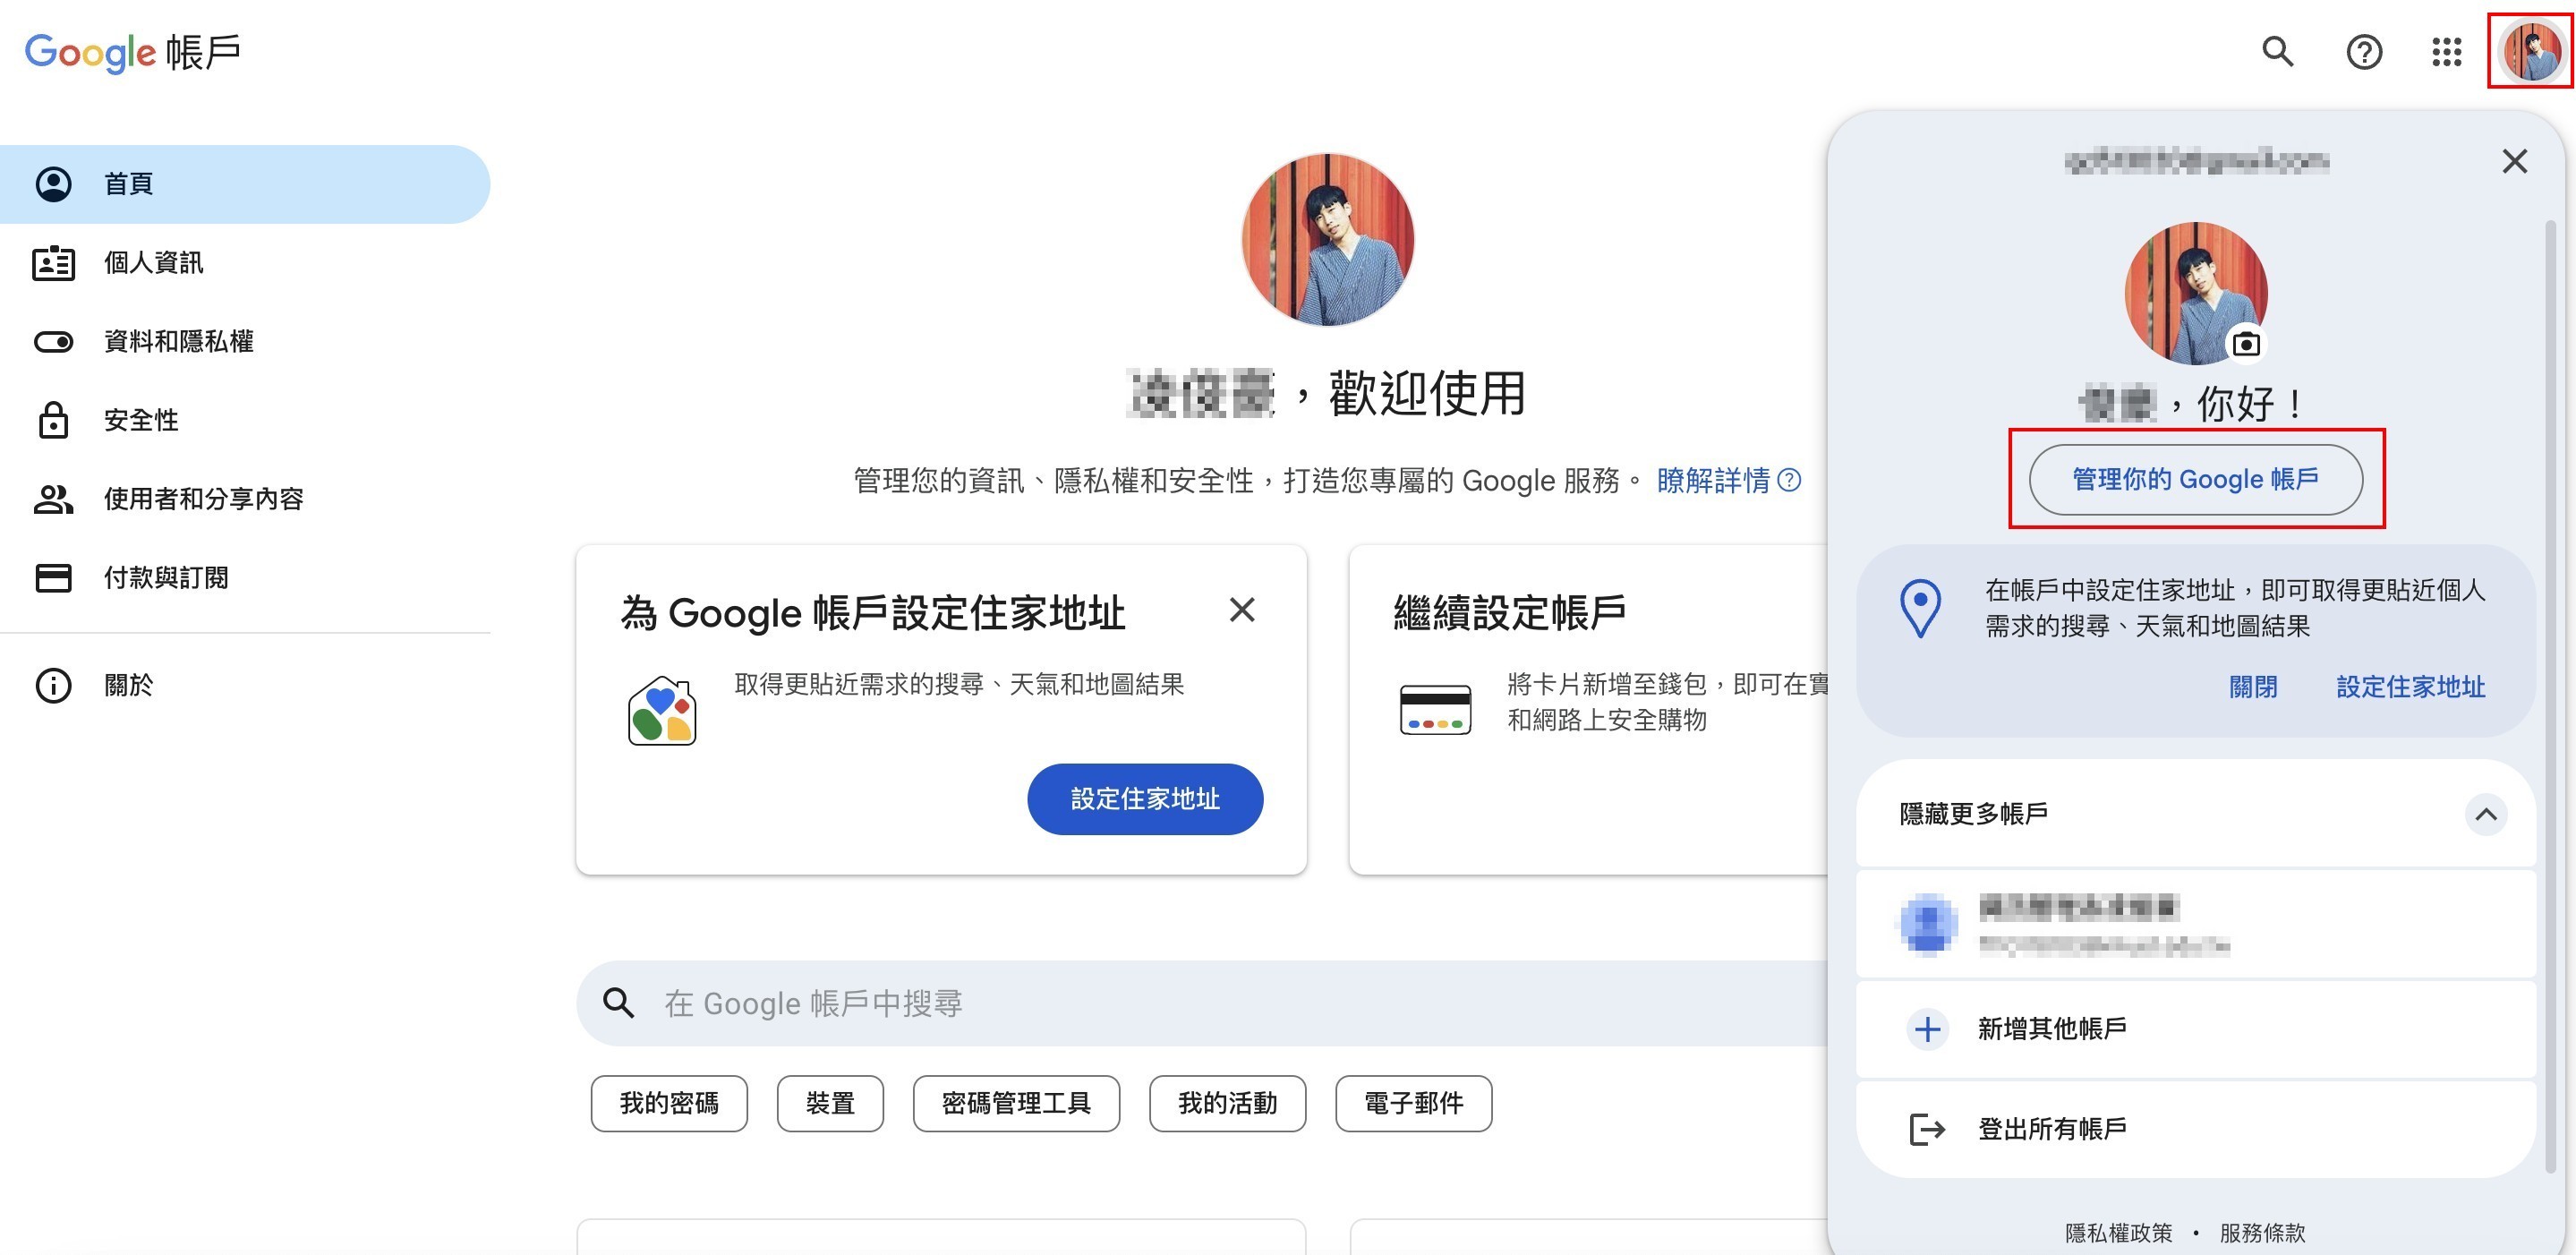
Step 1:進入 Google 帳號設定
點選右上角的個人頭像,選擇「管理你的 Google 帳戶」
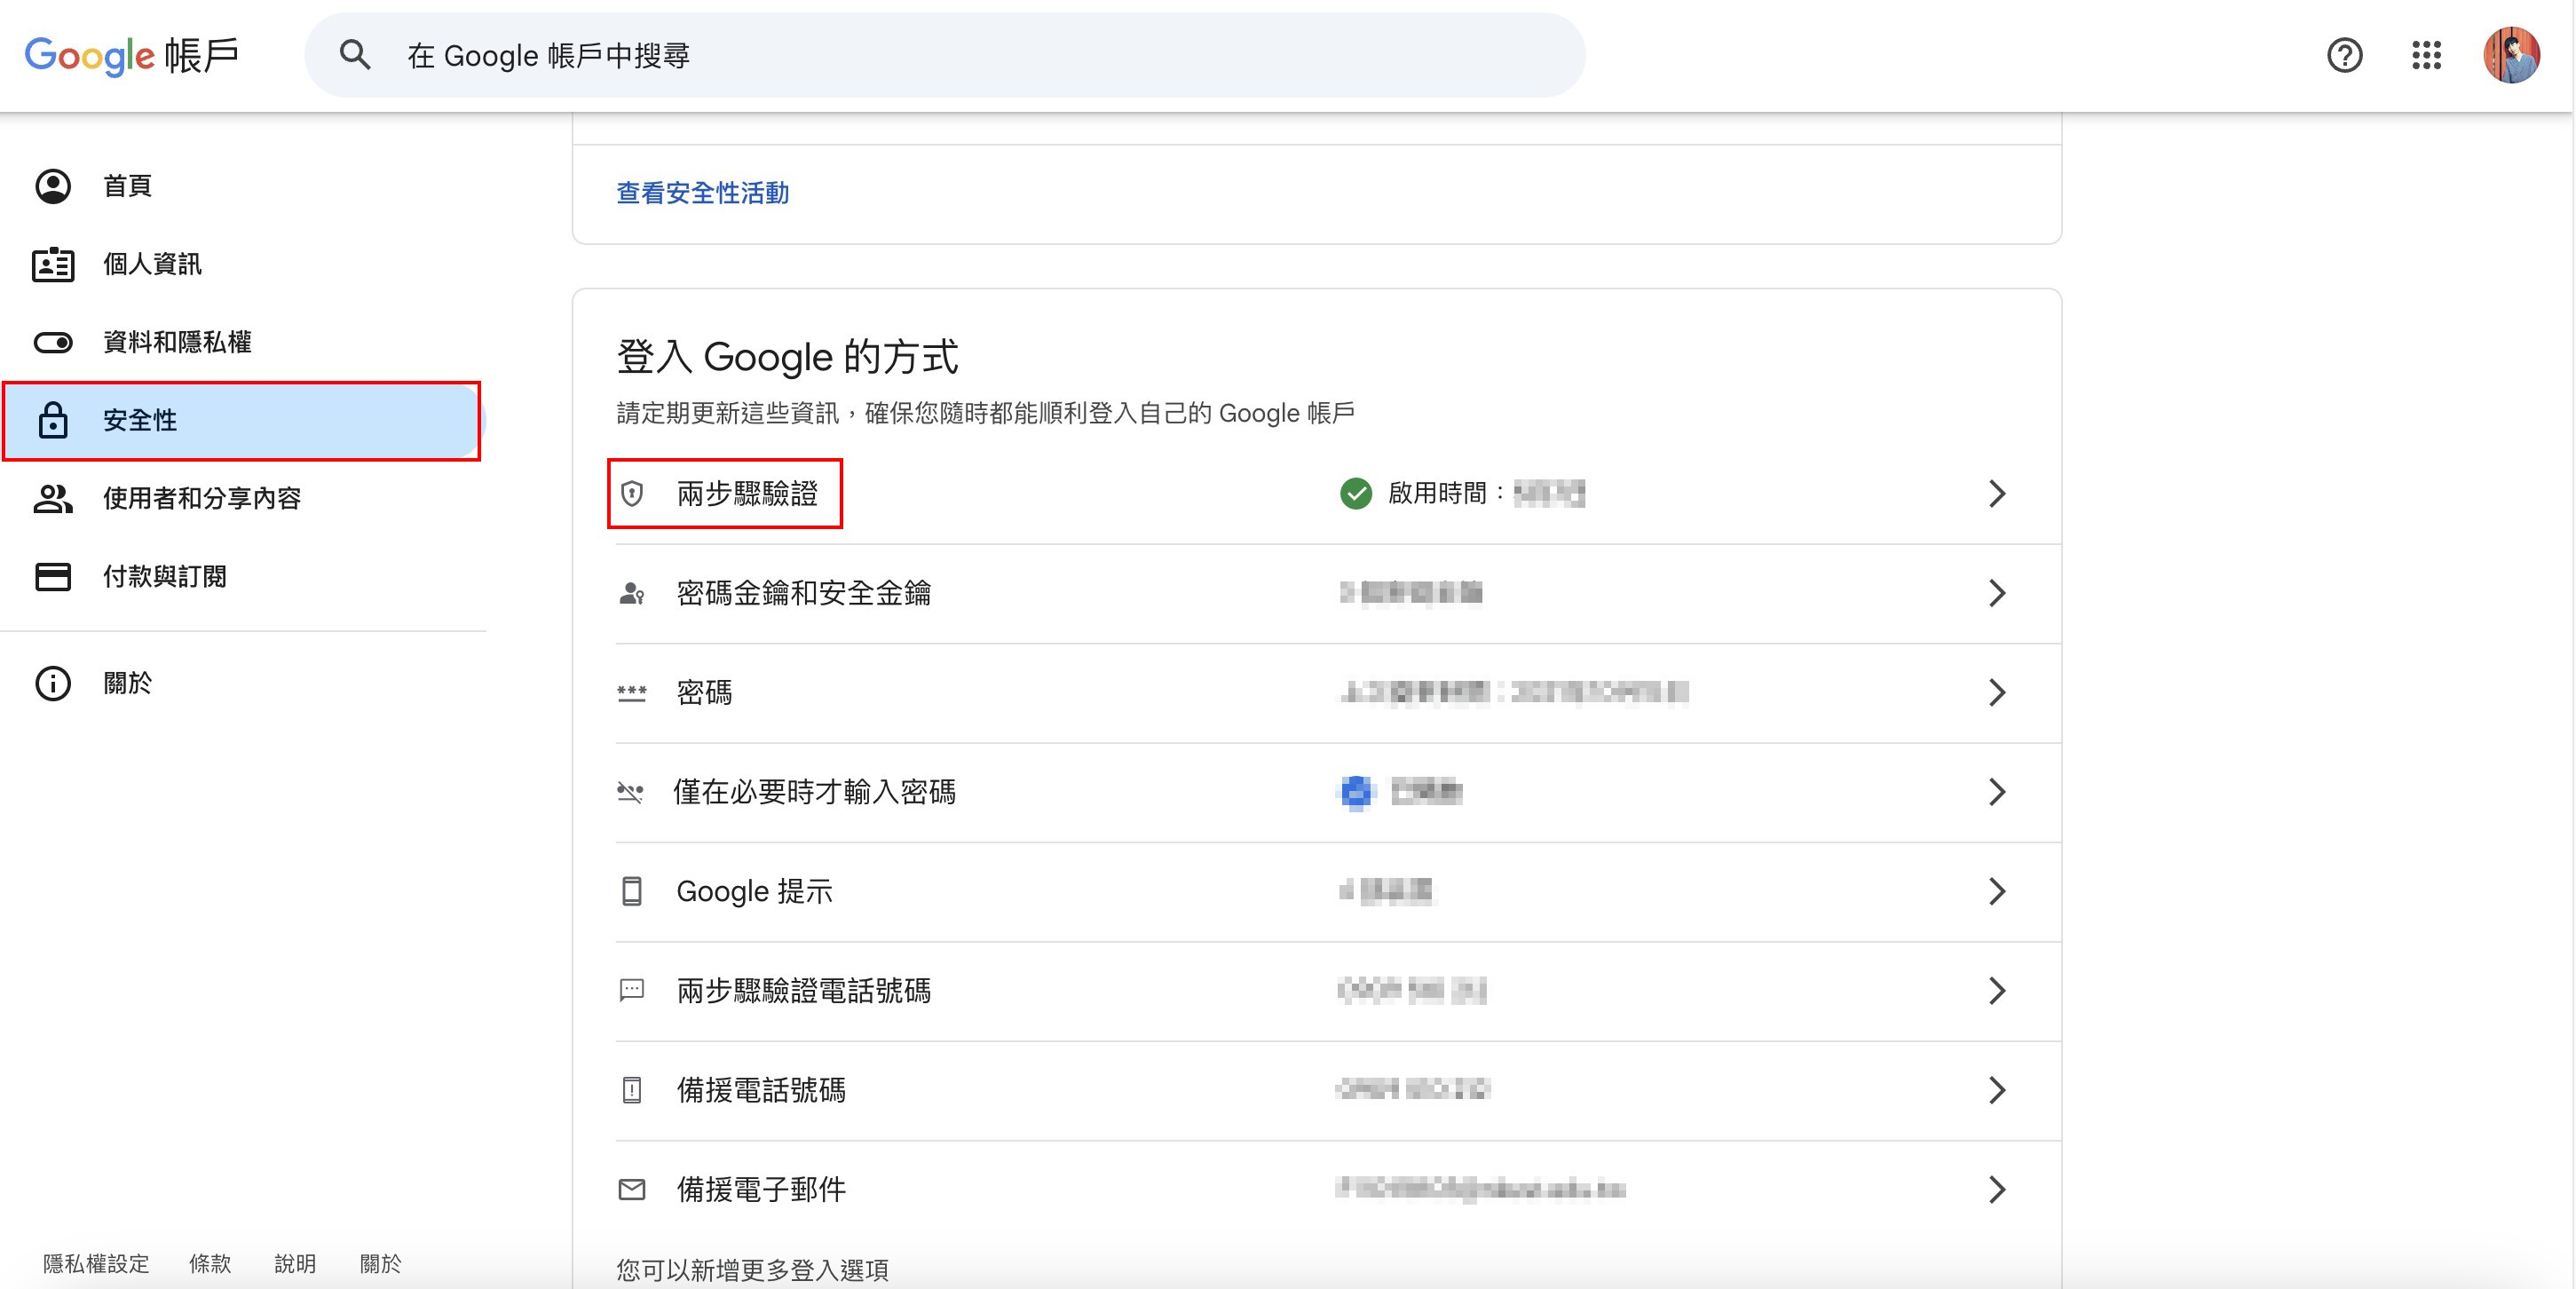
Step 2:確認兩步驟驗證狀態
前往「安全性」頁面,確認「兩步驟驗證」已啟用。若尚未啟用,請先完成兩步驟驗證設定,才能建立應用程式密碼。
Step 3:建立應用程式密碼
在搜尋框輸入「應用程式密碼」可快速找到設定頁面
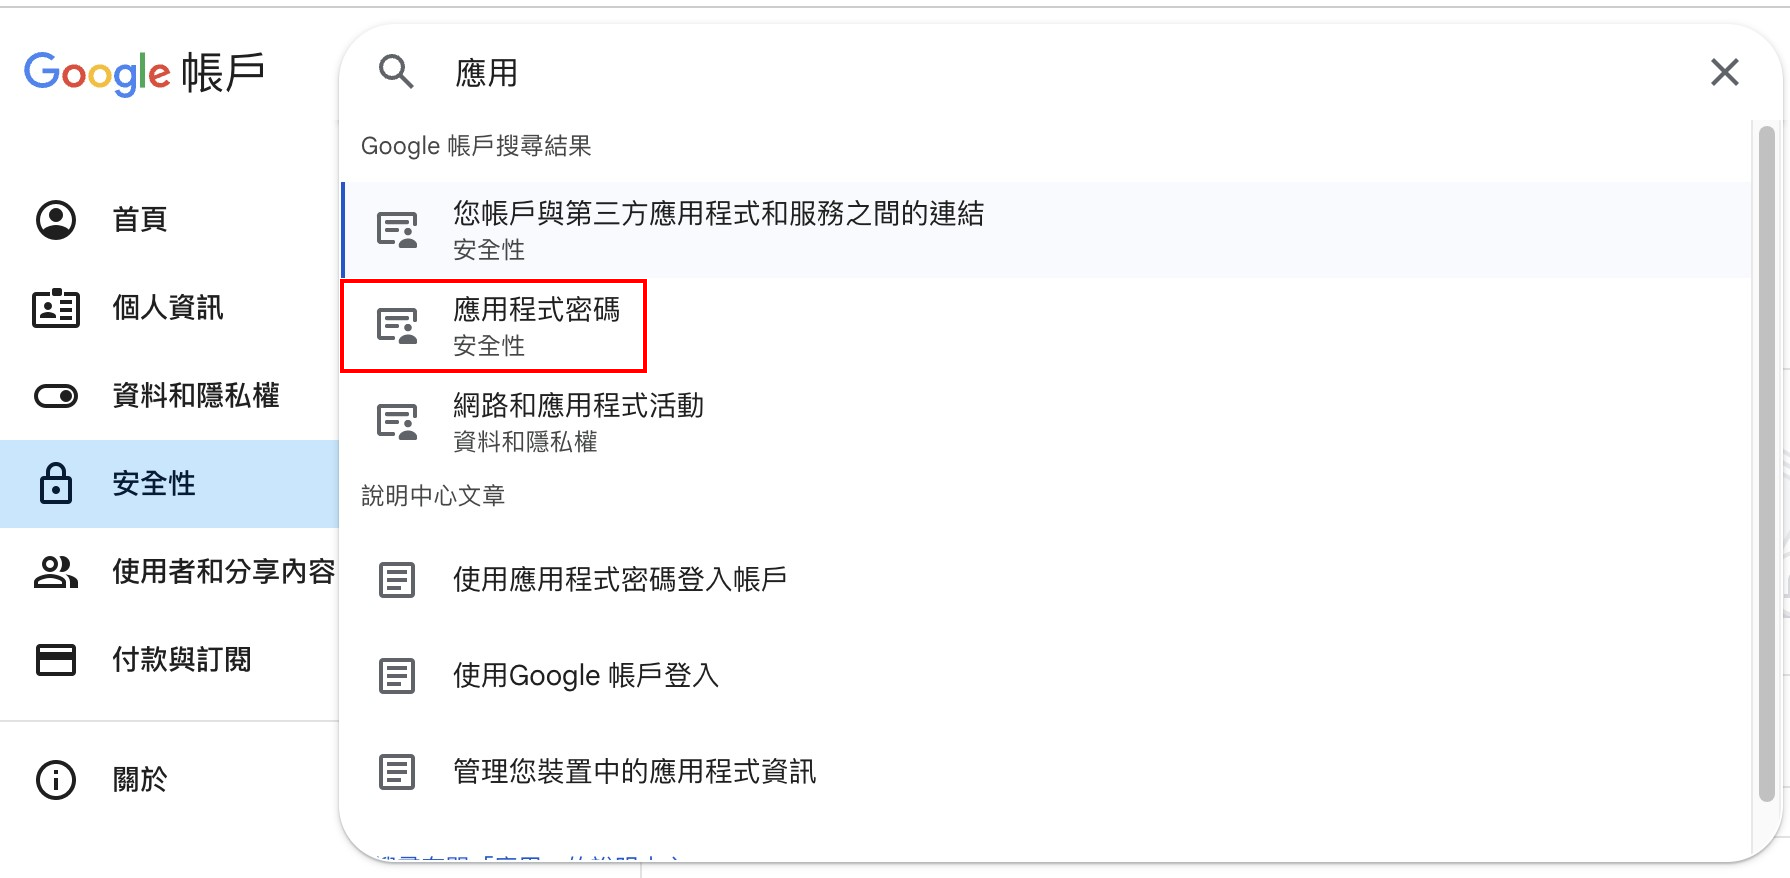
建立完成後會顯示一組 16 碼密碼,請立即複製保存。應用程式密碼只會顯示一次,無法再次查看。若遺失請刪除後重新建立。
核心功能
這兩個方法將作為可重用的服務,讓其他模組(如會員註冊模組)能夠整合信箱驗證功能。
mail/mail.service.ts
// 略
@Injectable()
export class MailService {
  // 略
  private createTransporter() {
    // 使用 Gmail SMTP 設定
    this.transporter = nodemailer.createTransport({
      service: 'gmail',
      auth: {
        user: this.EMAIL_USER,
        pass: this.EMAIL_PASSWORD,
      },
    });
  }

  /**
   * 發送驗證信
   */
  async sendVerificationEmail(
    to: string,
    verificationCode: string,
    userName: string,
  ): Promise<void> {
    try {
      const mailOptions = {
        from: this.EMAIL_USER,
        to,
        subject: '帳號驗證 - LINE Bot 應用程式',
        html: this.getVerificationEmailTemplate(verificationCode, userName),
      };

      const result = await this.transporter.sendMail(mailOptions);
      this.logger.info(`驗證信發送成功: ${result.messageId}`);
    } catch (error) {
      this.logger.error(`發送驗證信失敗: ${error.message}`);
      throw new Error('發送驗證信失敗');
    }
  }

  /**
   * 生成驗證信的 HTML 模板
   */
  private getVerificationEmailTemplate(
    verificationCode: string,
    userName: string,
  ): string {
    return `
      <!DOCTYPE html>
      <html>
          <body>
            <div class="container">
              <div class="header">
                <h1>帳號驗證</h1>
              </div>
              <div class="content">
                <h2>親愛的 ${userName},</h2>
                <p>感謝您註冊我們的 LINE Bot 應用程式!</p>
                <p>請使用以下驗證碼完成您的帳號驗證:</p>
                <div class="verification-code">
                  ${verificationCode}
                </div>
                <p>此驗證碼將在 <strong>10 分鐘</strong> 後失效。</p>
                <p>如果您沒有註冊此帳號,請忽略此信件。</p>
              </div>
              <div class="footer">
                <p>此信件由系統自動發送,請勿回覆。</p>
              </div>
            </div>
          </body>
      </html>
    `;
  }

  /**
   * 生成 6 位數驗證碼
   */
  generateVerificationCode(): string {
    return Math.floor(100000 + Math.random() * 900000).toString();
  }
}
以下展示 LIFF 前端發送驗證碼時呼叫的後端服務。當用戶在前端註冊表單通過 vee-validate 驗證後,系統會執行以下流程:
用戶必須在有效期限內,輸入信箱中收到的驗證碼,才能完成註冊流程。若驗證碼過期,則需重新發送。
  async sendVerificationEmail(
    sendVerificationEmailDto: SendVerificationEmailDto,
  ): Promise<{ message: string }> {
    const { idToken, email, userName } = sendVerificationEmailDto;
    const supabase = this.supabaseService.db;

    try {
      // 驗證 LINE ID Token 並獲取 LINE User ID
      const verifyResult = await this.lineLoginService.verifyIDToken(idToken);
      const lineUserId = verifyResult.sub;

      this.logger.info(`LINE Token 驗證成功,使用者 ID: ${lineUserId}`);

      // 生成驗證碼
      const verificationCode = this.mailService.generateVerificationCode();

      // 設定過期時間(15分鐘後過期)
      const expiresAt = new Date();
      expiresAt.setMinutes(expiresAt.getMinutes() + 15);

      // 將驗證碼存入資料庫,使用 LINE User ID
      const { error: insertError } = await supabase
        .from('verification_codes')
        .insert([
          {
            user_id: lineUserId,
            code: verificationCode,
            expires_at: expiresAt.toISOString(),
            is_used: false,
          },
        ]);

      if (insertError) {
        this.logger.error(`儲存驗證碼失敗: ${insertError.message}`);
        throw new Error(`儲存驗證碼失敗: ${insertError.message}`);
      }

      // 發送驗證信
      await this.mailService.sendVerificationEmail(
        email,
        verificationCode,
        userName,
      );

      this.logger.info(
        `驗證信已發送至: ${email}, 驗證碼已儲存至資料庫,LINE User ID: ${lineUserId}`,
      );

      return {
        message: '驗證信已發送成功',
      };
    } catch (error) {
      this.logger.error(`發送驗證信失敗: ${error.message}`);
      throw new Error(`發送驗證信失敗: ${error.message}`);
    }
  }
成果展示(註冊流程 - 發送驗證碼信件)
用戶在註冊時會收到包含 6 位數驗證碼的驗證信,必須在 10 分鐘有效期限內輸入正確的驗證碼,才能完成註冊流程,完整的註冊流程操作可參考 Day 28 的流程示範影片。
Swagger 採用 OpenAPI 3.0 規範,可以在撰寫 NestJS 程式碼的同時,透過裝飾器(Decorator)和 JSDoc 註解來自動生成 API 文件。這種方式不僅能減少文件維護成本,還能確保文件與程式碼同步更新。
上圖標示了 Swagger UI 各項目與 main.ts 設定的對應關係,可搭配下方程式碼對照理解各參數的作用
main.ts
async function bootstrap() {
  // 略
  const config = new DocumentBuilder()
    .setTitle('2025 LINE Bot API 文件') // 文件標題
    .setDescription(
      '使用 NestJS 框架開發,整合 LINE LIFF 與信箱驗證功能的後端服務',
    ) // 文件描述
    .setVersion('1.0') // 版號
    .setContact('Antonio', '', 'test123@gmail.com') // 聯絡資訊
    .addServer('https://nestjs-linebot-ironman.onrender.com', '生產環境') // 生產環境測試端點
    .addServer('https://api.example.com', '測試環境') // 測試環境測試端點
    .addTag('heartbeat', '心跳檢測') // 新增分類的 tag Name 及 descriptions
    .addTag('users', '用戶資訊') // 新增分類的 tag Name 及 description
    .build();

  const document = SwaggerModule.createDocument(app, config, {
    // 關閉預設 Tag,預設會把所有掃到的 API Route 都加入 App 的 default tag 內
    autoTagControllers: false,
  });

  const options = {
    jsonDocumentUrl: 'swagger/json', // 啟用 swagger json 讀取 url
    swaggerOptions: {
      defaultModelsExpandDepth: 1, // 禁用 Models 展開
    },
  };
  SwaggerModule.setup('api', app, document, options); // api 是 swagger UI使用路由

  await app.listen(process.env.PORT ?? 3000);
}
bootstrap();
完成設定後,重新啟動應用程式,即可透過瀏覽器訪問 Swagger UI 介面。
以本地開發環境為例,開啟瀏覽器並前往:http://localhost:3000/api
上圖標示了 Swagger UI 各項目與 /heartbeat.controller.ts 設定的對應關係,可搭配下方程式碼對照理解各參數的作用
heartbeat.controller/heartbeat.controller.ts
// 略
@ApiTags('heartbeat')
@Controller('heartbeat')
export class HeartbeatController {
  @ApiOperation({
    summary: 'UptimeRobot 心跳檢查',
    description: '用於健康檢查,返回 HTTP 200 狀態碼表示服務正常運行',
  })
  @ApiResponse({
    status: 200,
    description: '服務正常運行',
  })
  @Head('')
  heartbeat(): string {
    return 'OK';
  }
}
前置需求:需先安裝
@nestjs/swagger套件
透過在 DTO 類別中使用 JSDoc 註解,Swagger 會自動解析並生成對應的 API 文件。這讓參數說明與範例值能直接顯示在 Swagger UI 中,方便前端開發人員理解與測試。
@nestjs/swagger 的整合優勢:
Swagger UI API 端點呈現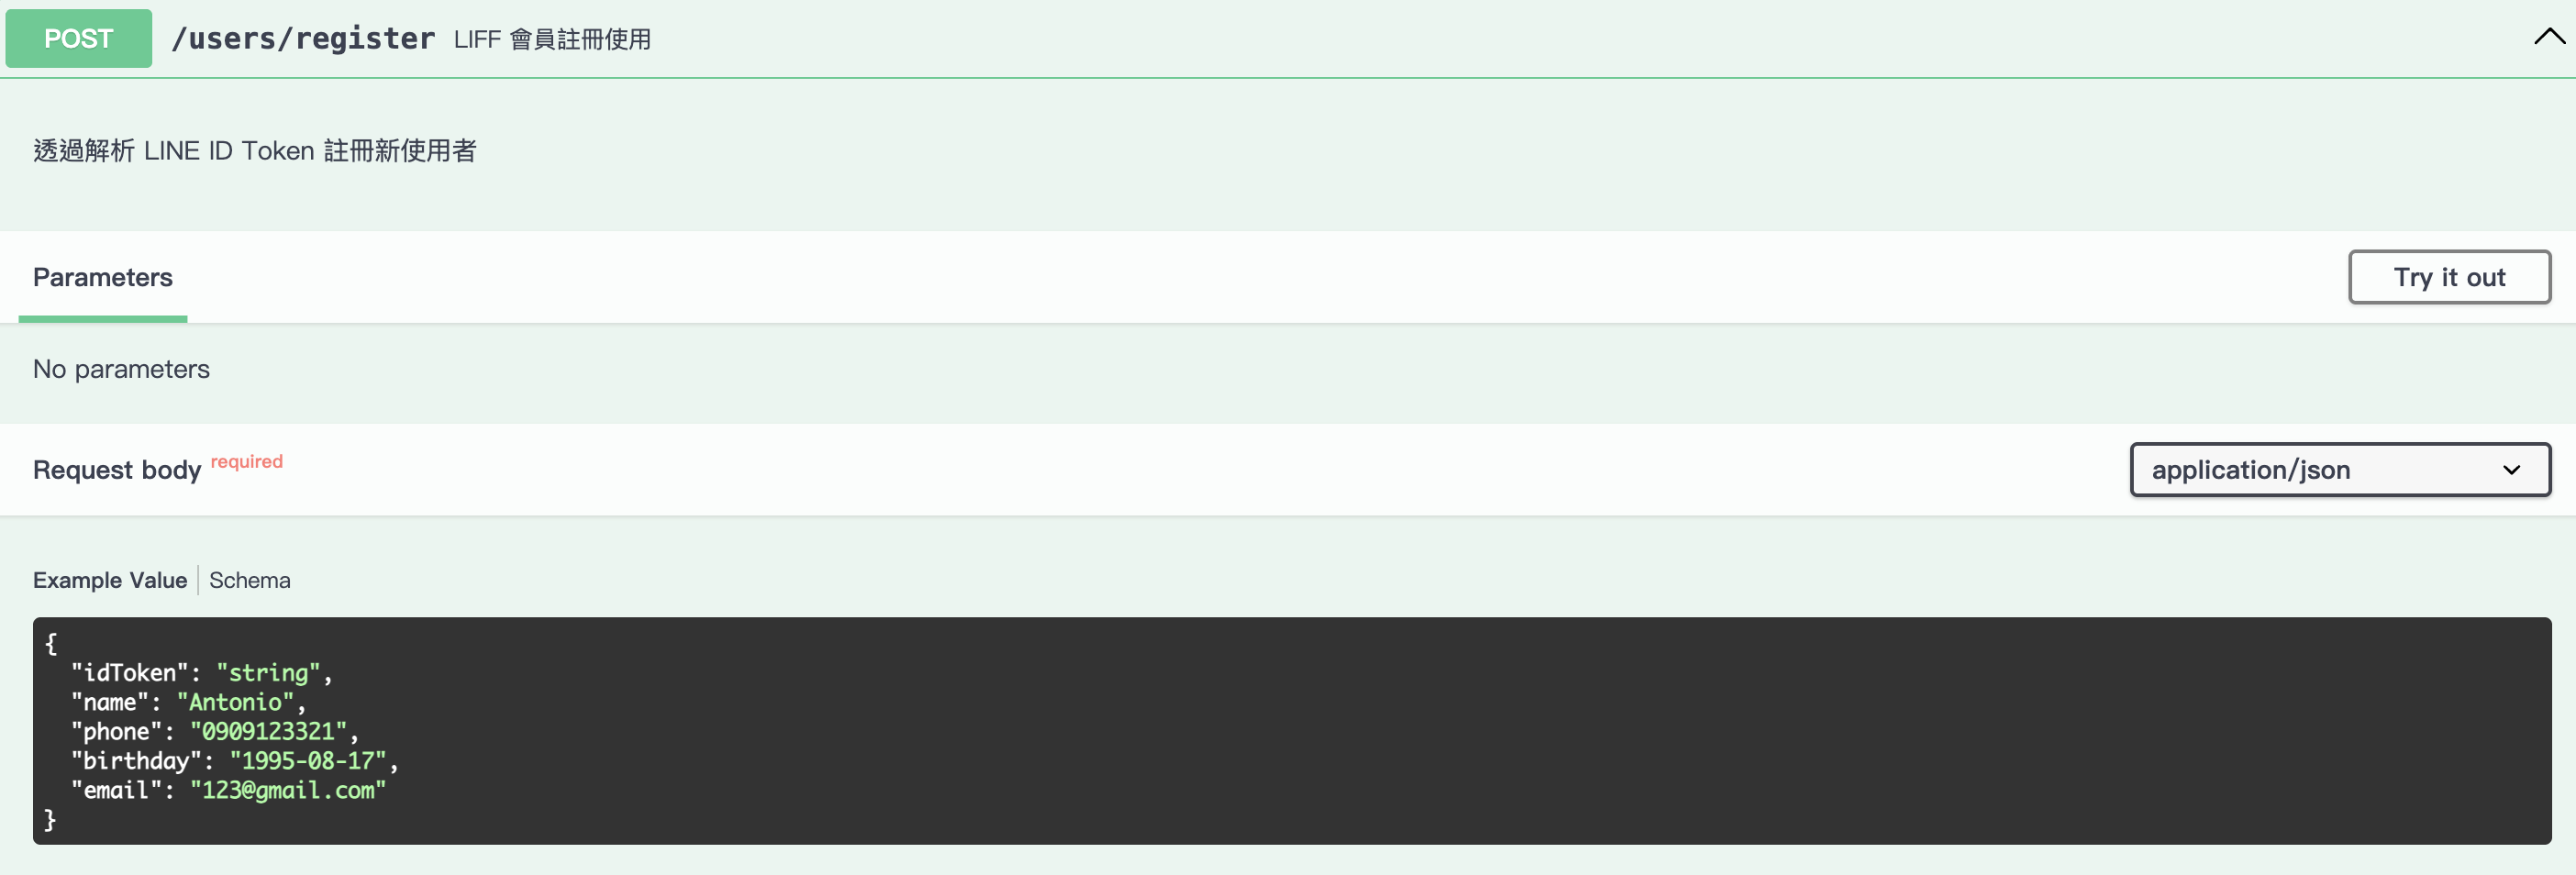
Swagger UI Schema 定義呈現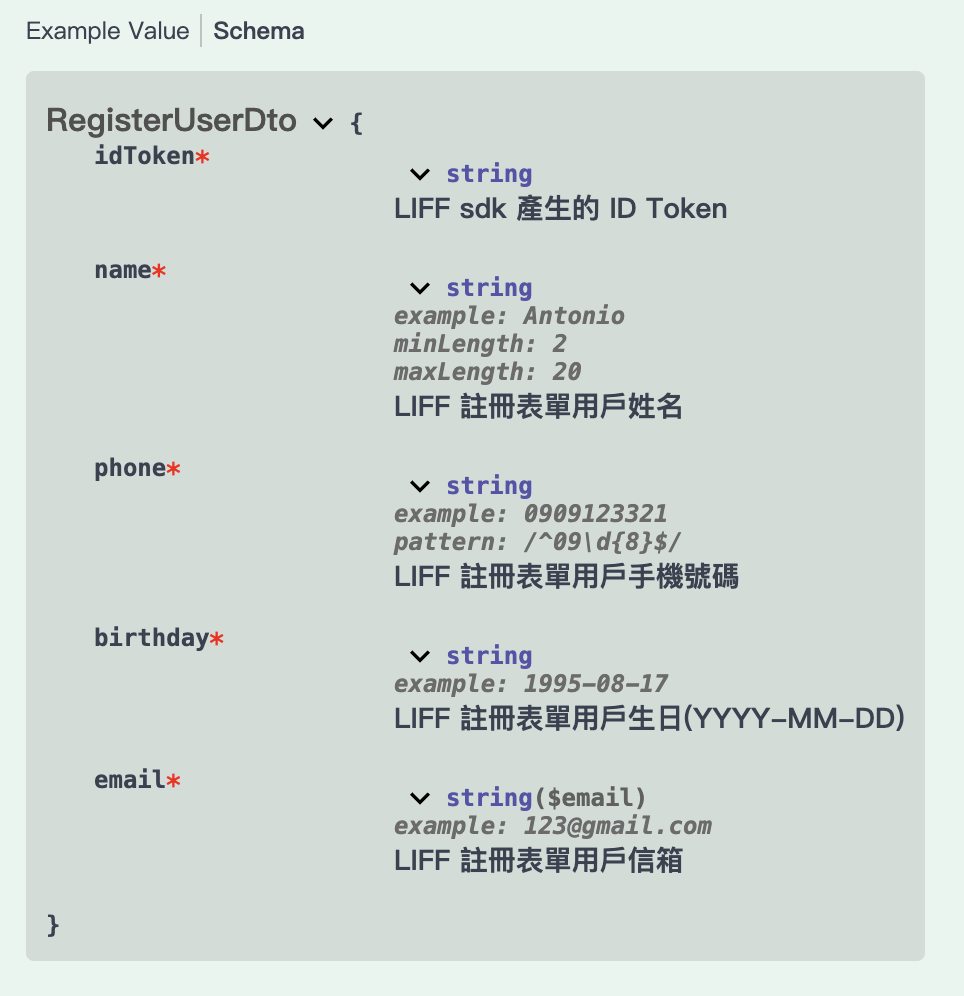
上圖標示了 Swagger UI 各項目與 RegisterUserDto 設定的對應關係,可搭配下方程式碼對照理解各參數的作用
以 LIFF 會員註冊 API 的 DTO 設定為例:
user/dto/register-user.dto.ts
// 略
export class RegisterUserDto {
  /**
   * LIFF sdk 產生的 ID Token
   */
  @IsString()
  @IsNotEmpty({ message: 'LINE ID Token 為必填項目' })
  idToken: string;

  /**
   * LIFF 註冊表單用戶姓名
   * @example "Antonio"
   */
  @IsString()
  @IsNotEmpty({ message: '姓名為必填項目' })
  @MinLength(2, { message: '姓名至少需要 2 個字元' })
  @MaxLength(20, { message: '姓名不能超過 20 個字元' })
  name: string;

  /**
   * LIFF 註冊表單用戶手機號碼
   * @example "0909123321"
   */
  @IsString()
  @IsNotEmpty({ message: '電話為必填項目' })
  @Matches(/^09\d{8}$/, {
    message: '請輸入正確的台灣手機號碼格式 (09xxxxxxxx)',
  })
  phone: string;

  /**
   * LIFF 註冊表單用戶生日(YYYY-MM-DD)
   * @example "1995-08-17"
   */
  @IsString()
  @IsNotEmpty({ message: '生日為必填項目' })
  birthday: string;

  /**
   * LIFF 註冊表單用戶信箱
   * @example "123@gmail.com"
   */
  @IsEmail({}, { message: '請輸入正確的電子信箱格式' })
  @IsNotEmpty({ message: '電子信箱為必填項目' })
  email: string;
}
其他未在文中詳述的部分,我整理在個人的學習筆記中,有興趣的讀者可以參考。
今天我們完成了 LIFF 註冊表單的信箱驗證碼流程,並藉由這個功能實際演示了如何在 NestJS 專案中整合 Swagger 文件。
關於 API 文件這件事我個人非常堅持,良好的文件維護習慣能大幅降低團隊協作與交接的成本。雖然撰寫文件需要額外投入時間,但若能善用工具(如 Swagger 裝飾器搭配 JSDoc)在開發過程中同步產出文件,不僅能提升開發效率,更能為未來的維護者省下大量理解程式碼的時間。