在 AI 協調(orchestration)的世界中,人們很容易傾向在工作流程的每個步驟都使用大型語言模型(LLM)。然而,隨著應用程式規模的擴大,「LLM 優先」的方法可能會引入不必要的延遲、成本和不可預測性。Google Agent 開發工具包(ADK)提供了一個強大的替代方案:BaseAgent。
本文探討如何建立一個自定義的程式化 Agent——特別是 Email Agent——它能處理具決定性(deterministic)的任務,同時仍能無縫參與 AI 驅動的生態系統。
此 Agent 是 100% 具決定性的,並依賴外部 API 來格式化文字和發送電子郵件。
它使用 marked 函式庫將 Markdown 字串轉換為 HTML,並使用 nodemailer 函式庫將郵件發送到 SMTP 伺服器。
相反地,如果我建立一個 LlmAgent,其指令、工具和結構化輸出將會引入 LLM 延遲、輸入和輸出 Token 成本。
使用自定義 Agent 而非 LLM 包裝的提示詞(prompt)具有幾個關鍵優勢:
| Agent 類型 | Llm Agent | 自定義 Agent |
|---|---|---|
| 延遲 | 耗時較長(生成延遲) | 低延遲(直接執行) |
| 成本 | 需支付消耗的 Token 費用 | 零成本 |
| 決定性 | 具機率性,且當 Agent 未遵循指令或指令不明確時會產生幻覺 | 100% 具決定性,且不需要 AI 能力 |
| 可測試性 | 當模型產生幻覺時會出現錯誤結果 | 測試結果是可預測的 |
| 整合 | 將職責委派給工具 | 在類別中直接呼叫函式庫 |
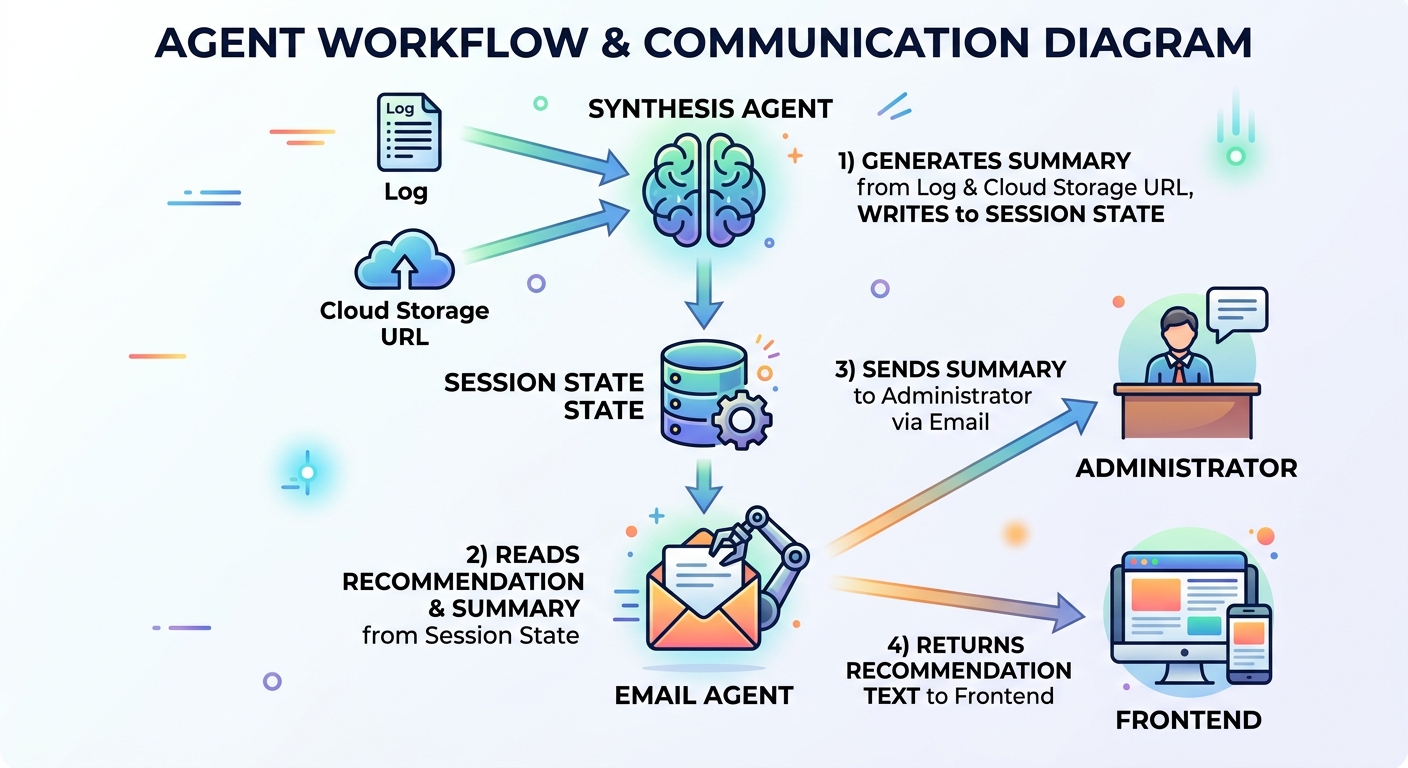
EmailAgent 是決策樹(Decision Tree)多 Agent 系統中的最後一個子 Agent。決策樹 Agent 評估將 Agent 架構應用於專案的可行性。它從專案描述開始,確定是否應使用 Agent 架構,生成建議,將建議回傳給客戶端,並作為副作用向管理員發送電子郵件。
EmailAgent 從工作階段狀態(session state)中擷取建議和摘要,將建議文字回傳給前端,並將兩者發送到管理員的電子郵件地址。
該 Agent 不需要 LLM 或工具調用;因此,使用 LlmAgent 是大材小用。我的解決方案是使用自定義 Agent 來處理電子郵件,以節省時間和成本。
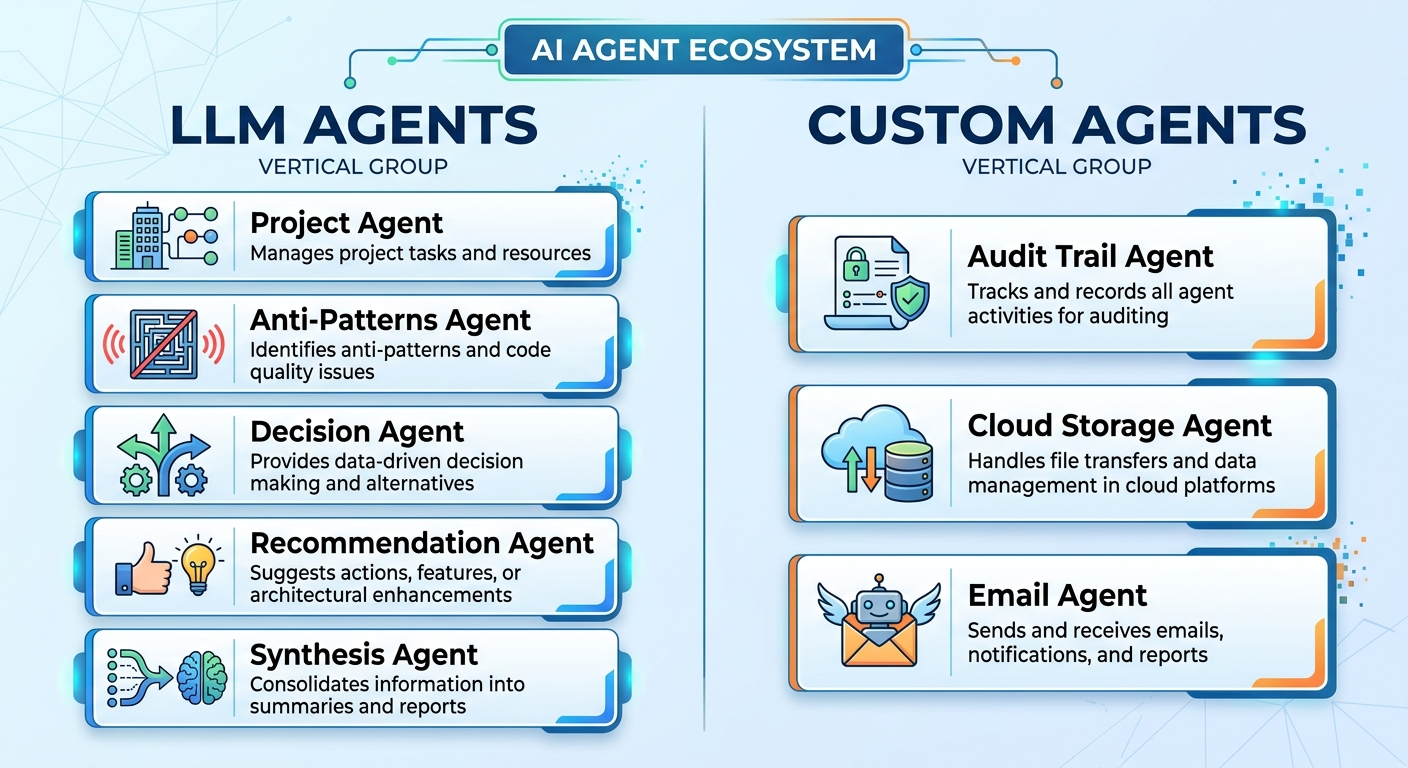
專案、反模式、決策、建議和綜合 Agent 都是 LLM Agent。這些 Agent 需要 Gemini 進行推理並生成文字回應。
稽核軌跡(Audit Trail)、雲端儲存和 Email Agent 則與外部 API 或資源整合,觸發具決定性的動作。
注意:由於地區可用性,我使用了 Vertex AI 中的 Gemini 進行驗證。Gemini 目前在香港被封鎖,因此我改用 Vertex AI 中的 Gemini。
npm i --save-exact @google/adk
npm i --save-dev --save-exact @google/adk-devtools
npm i --save-exact nodemailer
npm i --save-dev --save-exact @types/nodemailer rimraf
npm i --save-exact marked
npm i --save-exact zod
我安裝了構建 ADK Agent、將 Markdown 字串轉換為 HTML 以及在本地測試中向 MailHog 發送電子郵件所需的依賴項目。
固定依賴項目的版本可確保企業級應用程式在開發和正式環境中的版本一致。
將 .env.example 複製到 .env 並填入憑證:
GEMINI_MODEL_NAME="gemini-3-flash-preview"
GOOGLE_CLOUD_PROJECT="<Google Cloud Project ID>"
GOOGLE_CLOUD_LOCATION="global"
GOOGLE_GENAI_USE_VERTEXAI=TRUE

# SMTP 設定 (MailHog)
SMTP_HOST="localhost"
SMTP_PORT=1025
SMTP_USER=""
SMTP_PASS=""
SMTP_FROM="no-reply@test.local"
ADMIN_EMAIL="admin@test.local"
SMTP_HOST、SMTP_PORT、SMTP_USER、SMTP_PASS 是在本機電子郵件測試中設定 MailHog 所必需的。
SMTP_FROM 是發件人電子郵件地址,在本機測試中可以是任何字串。
ADMIN_EMAIL 是接收 EmailAgent 發送之郵件的管理員電子郵件地址。在我的案例中,這是一個環境變數,因為它是唯一的收件者。如果另一個情境需要向客戶發送電子郵件,則應移除此環境變數。
我從 Docker Hub 取得了最新版本的 MailHog Docker 映像檔,並在本機啟動它以接收測試電子郵件並顯示在 Web UI 中。docker-compose.yml 檔案包含設定配置。
services:
  mailhog:
    image: mailhog/mailhog
    container_name: mailhog
    ports:
      - "1025:1025" # SMTP 埠號
      - "8025:8025" # HTTP (Web UI) 埠號
    restart: always
    networks:
      - decision-tree-agent-network

networks:
  decision-tree-agent-network:
SMTP 埠號為 1025,Web UI 埠號的 URL 為 http://localhost:8025。
docker compose up -d
在 Docker 中啟動 MailHog。
process.loadEnvFile();

const model = process.env.GEMINI_MODEL_NAME || '';
if (!model) {
  throw new Error('GEMINI_MODEL_NAME is not set');
}
model 變數指定了 gemini-3-flash-preview 模型。如果 model 未定義,則會拋出錯誤。
此範例使用 Node 20+,因此提供了 process.loadEnvFile() 來從環境檔案載入變數。否則,開發者應考慮使用 dotenv 來載入環境變數。
export const RECOMMENDATION_KEY = 'recommendation';
export const MERGED_RESULTS_KEY = 'mergedResults';
export const PROJECT_DESCRIPTION_KEY = 'project_description';
import { FunctionTool, LlmAgent, SequentialAgent } from '@google/adk';
import { z } from 'zod';
import { initWorkflowAgent } from './init.js';
import {
  MERGED_RESULTS_KEY,
  PROJECT_DESCRIPTION_KEY,
  VALIDATION_ATTEMPTS_KEY,
} from './sub-agents/output-keys.js';

const prepareEvaluationTool = new FunctionTool({
  name: 'prepare_evaluation',
  parameters: z.object({
    description: z.string()
  }),
  execute: async ({ description }, context) => {
    if (!context || !context.state) {
      return { status: 'ERROR', message: 'No session state found.' };
    }

    const state = context.state;

    // 清除所有先前的評估資料
    state.set(MERGED_RESULTS_KEY, null);
    state.set(VALIDATION_ATTEMPTS_KEY, 0);

    // 設定新的描述
    state.set(PROJECT_DESCRIPTION_KEY, description);

    return { status: 'SUCCESS', message: 'State reset and description updated.' };
  },
});

export const SequentialEvaluationAgent = new SequentialAgent({
  name: 'SequentialEvaluationAgent',
  subAgents: initWorkflowAgent(model),
});
prepareEvaluationTool 是一個工具,用於在 Agent 開始專案評估之前重設工作階段狀態中的變數。
SequentialEvaluationAgent 是一個由子 Agent 組成的順序 Agent(sequential agent)。
export function initWorkflowAgent(model: string) {
  return [
    createMergerAgent(model),
    createEmailAgent(),
  ];
}
initWorkflowAgent 呼叫 createMergerAgent 和 createEmailAgent 工廠函式,以回傳合併 Agent(merger agent)和電子郵件 Agent。合併 Agent 是一個 LlmAgent,因為它需要 Gemini 生成摘要,而電子郵件 Agent 是一個不需要 Gemini 的自定義 Agent。
export const rootAgent = new LlmAgent({
  name: 'ProjectEvaluationAgent',
  model,
  instruction: `... instruction...`,
  tools: [prepareEvaluationTool],
  subAgents: [SequentialEvaluationAgent],
});
rootAgent 是一個協調者,負責將專案描述路由到 SequentialEvaluationAgent 進行評估。
export type SmtpConfig = {
  host: string;
  port: number;
  user?: string;
  pass?: string;
  from: string;
  email: string;
};
export function createEmailAgent(): BaseAgent {
  const email = process.env.ADMIN_EMAIL || 'admin@test.local';
  const host = process.env.SMTP_HOST || 'localhost';
  const port = parseInt(process.env.SMTP_PORT || '1025');
  const user = process.env.SMTP_USER || '';
  const pass = process.env.SMTP_PASS || '';
  const from = process.env.SMTP_FROM || 'no-reply@test.local';

  const smtpConfig: SmtpConfig = {
    host,
    port,
    user,
    pass,
    from,
    email,
  };

  return new EmailAgent(smtpConfig);
}
createEmailAgent 函式從環境變數中擷取主機、埠號、使用者、密碼、寄件者電子郵件和管理員電子郵件,以建構 SmtpConfig 執行個體。
將 SmtpConfig 物件傳遞給 EmailAgent 類別的建構函式以建構自定義 Agent。最後,該函式回傳電子郵件 Agent,成為 SequentialEvaluationAgent 的最後一個子 Agent。
讓我們看看 EmailAgent 的核心結構。
EmailAgent 有一個唯讀的 SmtpConfig 執行個體成員,並在建構函式中進行初始化。建構函式呼叫 super 來初始化其名稱和描述。
class EmailAgent extends BaseAgent {
  readonly smtpConfig: SmtpConfig;

  constructor(smtpConfig: SmtpConfig) {
    super({
      name: 'EmailAgent',
      description: 'Send a recommendation and summary email to the administrator.',
    });

    this.smtpConfig = smtpConfig;
  }
}
import { z } from 'zod';

export const recommendationSchema = z.object({
  text: z.string(),
});

export type Recommendation = z.infer<typeof recommendationSchema>;

export const mergerSchema = z.object({
  summary: z.string(),
});

export type Merger = z.infer<typeof mergerSchema>;
text 屬性儲存 Recommendation 類型的建議。同樣地,Merger 類型的 summary 屬性儲存摘要。
export function getEvaluationContext(context: ReadonlyContext | undefined) {
  if (!context || !context.state) {
    return {
      recommendation: null,
    };
  }

  const state = context.state;
  return {
    recommendation: state.get<Recommendation>(RECOMMENDATION_KEY) ?? null,
  };
}

export function getMergerContext(context: ReadonlyContext | undefined) {
  if (!context || !context.state) {
    return {
      merger: null,
    };
  }

  const state = context.state;
  return {
    merger: state.get<Merger>(MERGED_RESULTS_KEY) ?? null,
  };
}
getEvaluationContext 和 getMergerContext 是從工作階段狀態獲取建議和摘要的輔助函式。
EmailAgent 繼承自 BaseAgent,所有子類別都必須實作兩個抽象方法:runAsyncImpl 和 runLiveImpl。
  protected async *runAsyncImpl(context: InvocationContext): AsyncGenerator<Event, void, void> {
    for await (const event of this.runLiveImpl(context)) {
      yield event;
    }
  }
藉由包裝 runLiveImpl 來實作 runAsyncImpl。它呼叫 for-await 迴圈來反覆執行 this.runLiveImpl(context) 並產生(yield)每個事件。
protected async *runLiveImpl(context: InvocationContext): AsyncGenerator<Event, void, void> {
    const readonlyCtx = new ReadonlyContext(context);
    const { merger } = getMergerContext(readonlyCtx);
    const { recommendation } = getEvaluationContext(readonlyCtx);
    const recommendationText = recommendation?.text || 'No recommendation available.';

    const emit = (status: 'success' | 'error', author: string) =>
      createEmailStatusEvent({
        author,
        context,
        status,
        recommendationText,
      });

    if (!merger) {
      yield emit('error', this.name);
      return;
    }

    try {
      const emailContent = `${recommendation?.text || ''}\n\n## Summary\n\n${merger.summary}`;
      await sendEmail(this.smtpConfig, 'Project Evaluation Results', emailContent);
      yield emit('success', this.name);
    } catch (e) {
      console.error(e);
      yield emit('error', this.name);
    }
  }
runLiveImpl 方法處理三種情況:未定義的 merger、成功的電子郵件發送以及電子郵件發送失敗。當電子郵件發送成功時,內部的 emit 箭頭函式會產生一個成功事件。否則,catch 區塊會記錄錯誤並產生一個錯誤事件。
import { marked } from 'marked';
import nodemailer from 'nodemailer';

export async function sendEmail(smtpConfig: SmtpConfig, subject: string, text: string) {
  const { host, port, user, pass, from, email: to } = smtpConfig;
  const transporter = nodemailer.createTransport({
    host,
    port,
    auth: user && pass ? { user, pass } : undefined,
    secure: false,
  });

  const html = await marked.parse(text);
  const mailOptions = {
    from,
    to,
    subject,
    text,
    html,
  };
  return transporter.sendMail(mailOptions);
}
sendEmail 函式使用 nodemailer 透過 SMTP 主機、埠號、使用者和密碼建立傳送器(transporter)。marked 函式庫解析 Markdown 文字並將其轉換為 HTML。傳送器有一個 sendMail 方法,接受郵件選項以文字和 HTML 格式將電子郵件發送到 to 電子郵件地址。
接著,實作 createEmailStatusEvent 以回傳電子郵件狀態事件。
export type EmailStatusOptions = {
  author: string;
  context: InvocationContext;
  status: 'success' | 'error';
  recommendationText: string;
};

export function createEmailStatusEvent(options: EmailStatusOptions): Event {
  return createEvent({
    invocationId: options.context.invocationId,
    author: options.author,
    branch: options.context.branch || '',
    content: {
      role: 'model',
      parts: [
        {
          text: JSON.stringify({
            status: options.status,
            recommendationText: options.recommendationText,
            sessionId: options.context.session.id,
            invocationId: options.context.invocationId,
          }),
        },
      ],
    },
  });
}
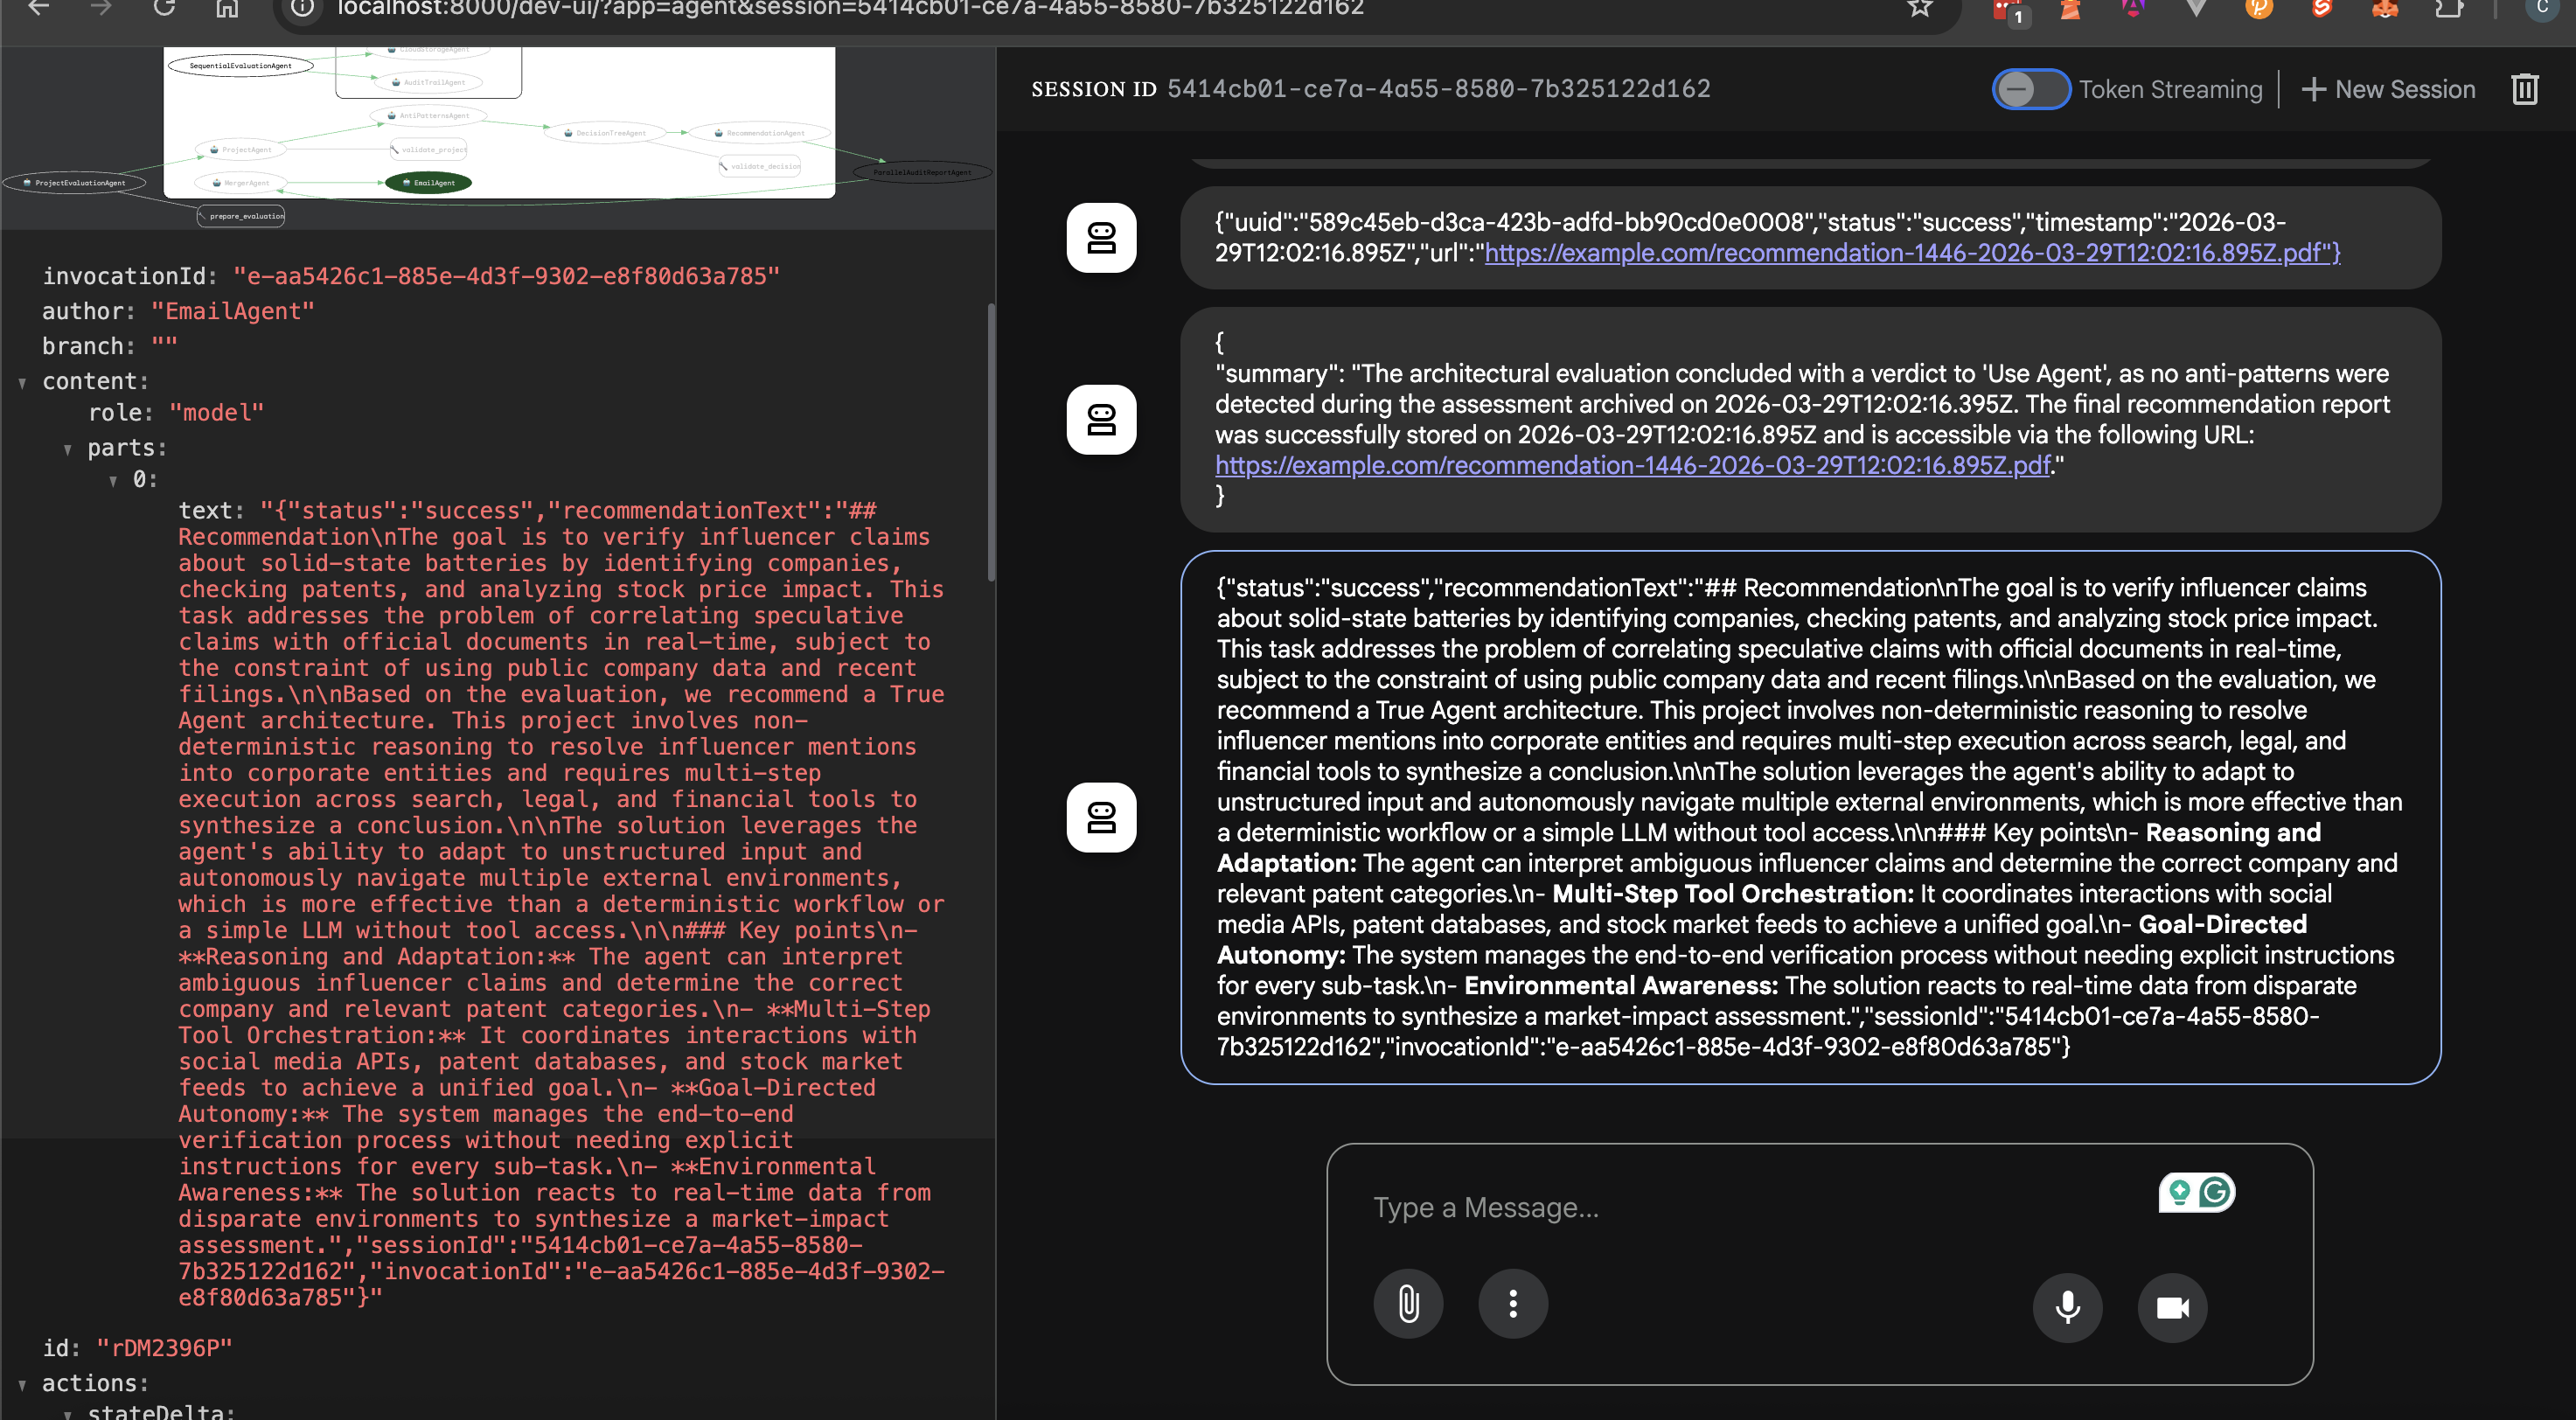
EmailStatusOptions 提供執行 ID(invocation ID)、分支、作者(Agent 名稱)、狀態和建議文字。
createEmailStatusEvent 函式重用 createEvent 函式來回傳執行 ID、分支、作者以及一個包含狀態、工作階段 ID、執行 ID 和建議文字的 JSON 字串化物件。
客戶端可以檢查狀態來決定是否顯示建議文字。
建議將工作階段 ID 和執行 ID 同時回傳給客戶端。客戶端可以重用工作階段 ID 在對話流程中呼叫 Agent,以尋求其他專案描述的評估。執行 ID 則允許查詢像 Datadog 這樣的錯誤追蹤服務,以識別伺服器狀態。
將指令碼新增到 package.json 以建置並啟動 ADK Web 介面。
  "scripts": {
    "prebuild": "rimraf dist",
    "build": "npx tsc --project tsconfig.json",
    "web": "npm run build && npx @google/adk-devtools web --host 127.0.0.1 dist/agent.js"
  },
npm run web 以啟動 API 伺服器。http://localhost:8000。One of my favorite tech influencers just tweeted about a 'breakthrough in solid-state batteries.' Find which public company they might be referring to, check that company’s recent patent filings to see if it’s true, and then check their stock price to see if the market has already 'priced it in'.
http://localhost:8025 以開啟 MailHog Web UI。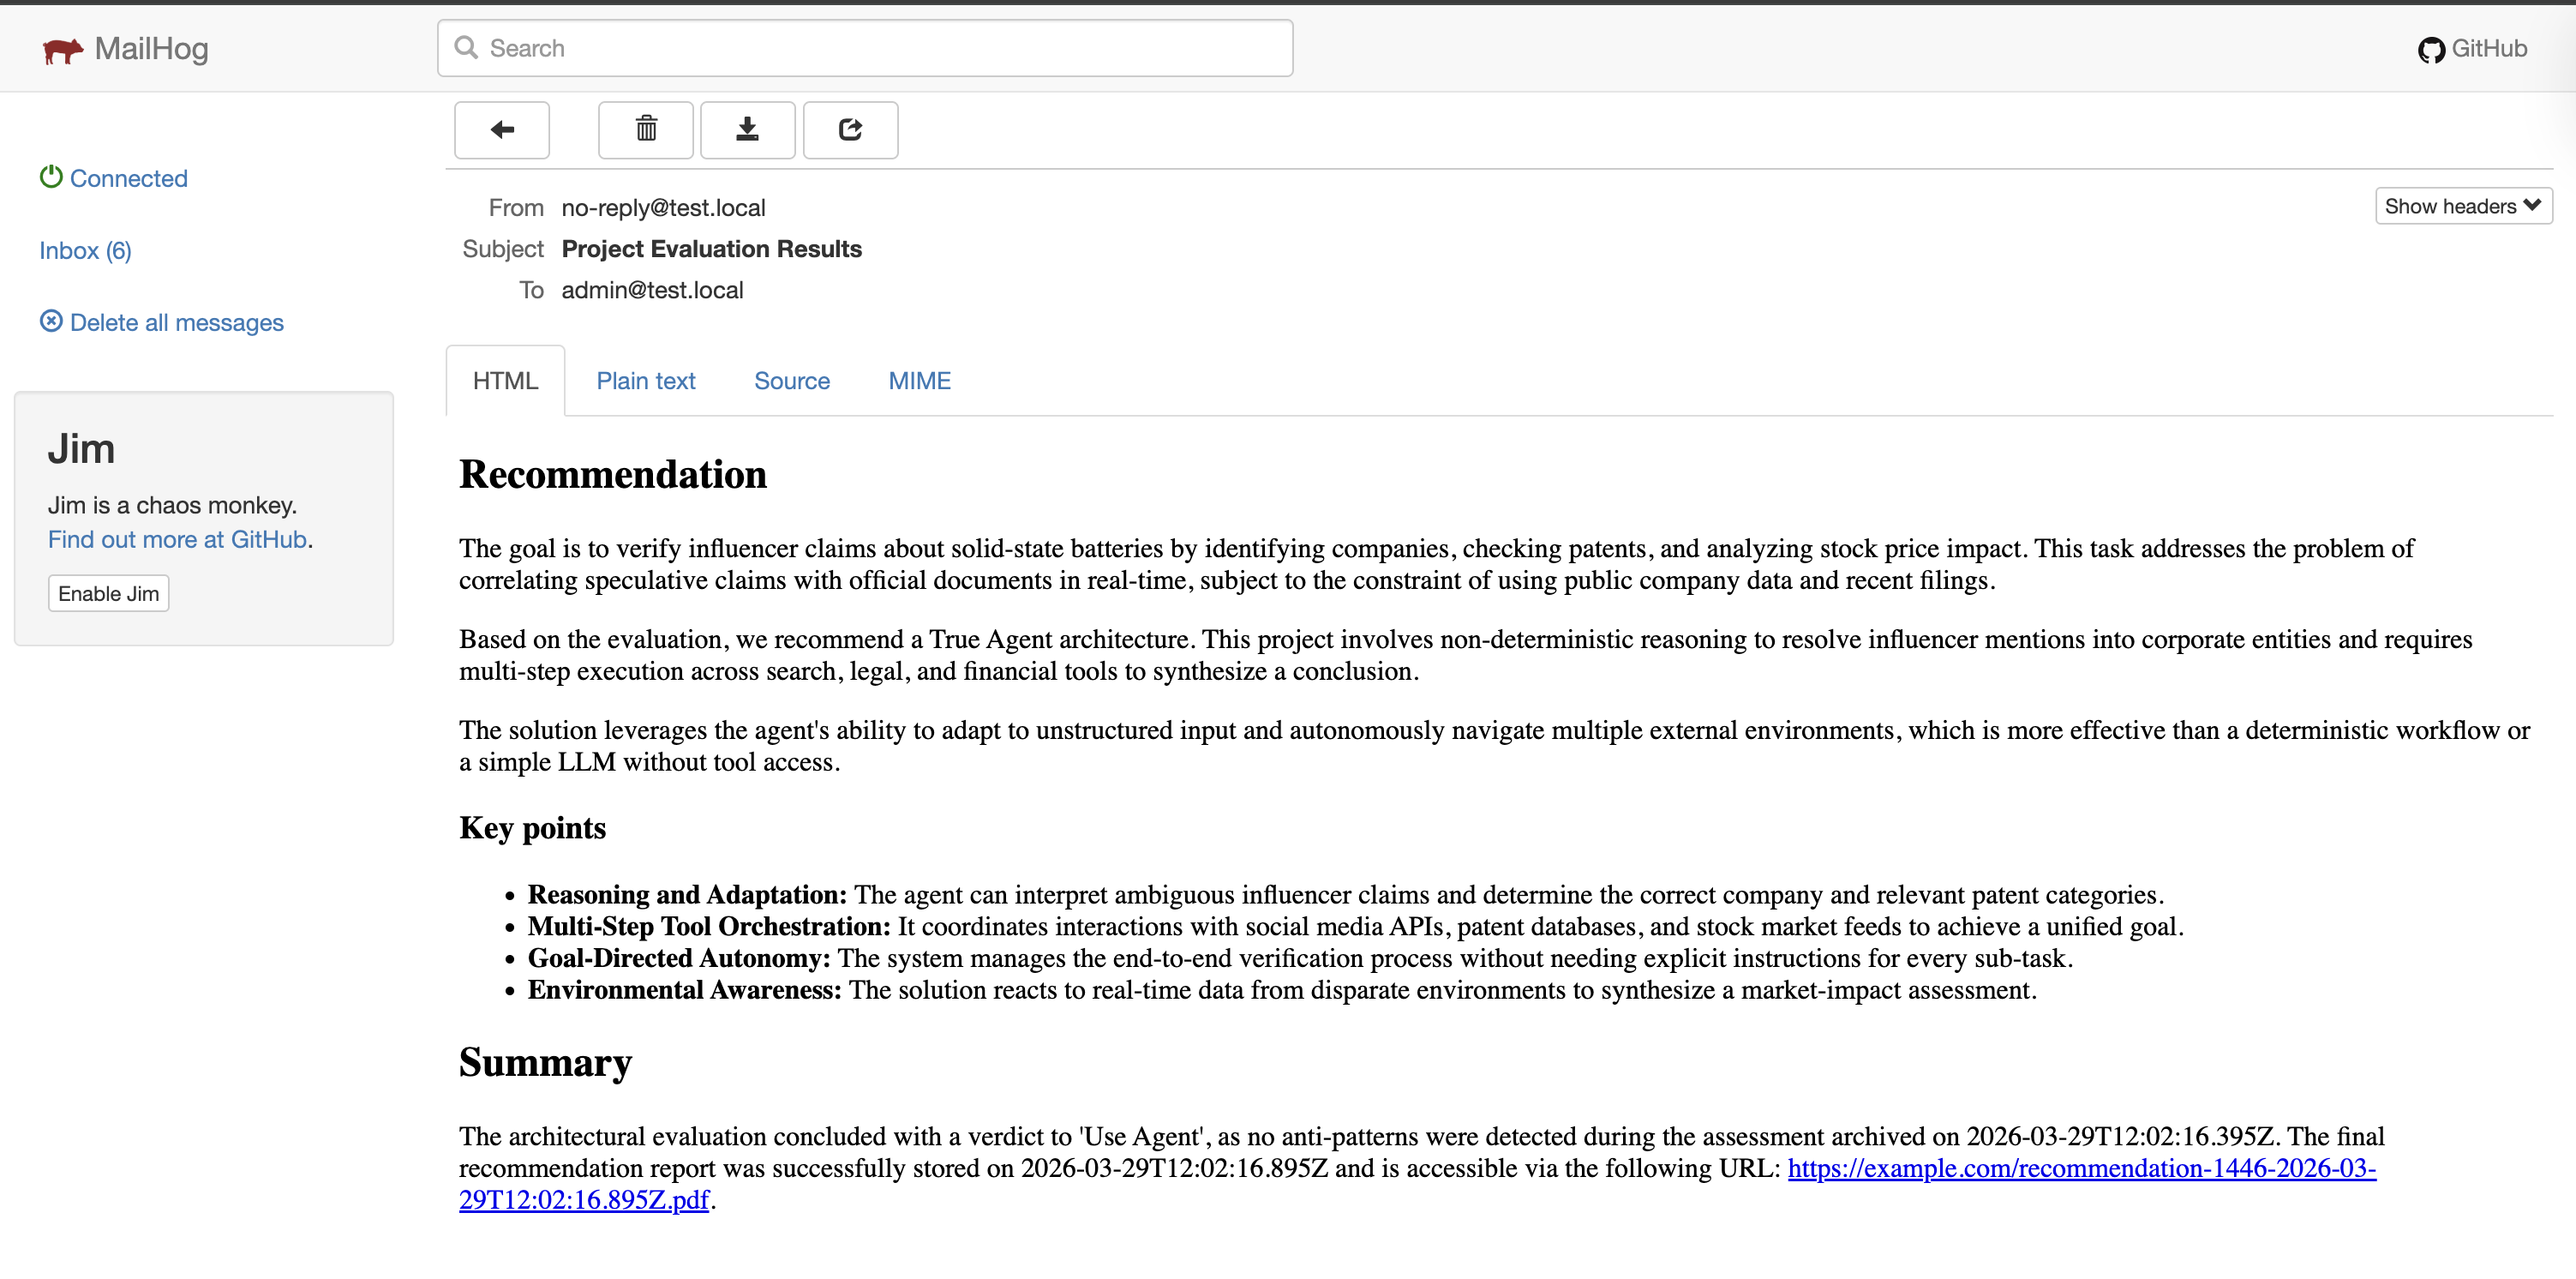
自定義 Agent 是 ADK 應用程式的重要組成部分。雖然 ADK 提供了順序、並行、迴圈和 LLM Agent,但這些 Agent 在某些情況下可能無法滿足需求。BaseAgent 是通用的 Agent 類別,使開發者能夠編寫自己的邏輯並設計自己的 Agent 工作流程。
重點在於:對於不需要機率推理、工具調用或回應生成的任務,請避免使用基於 LLM 的 Agent。
 Connie
