
摘要
簡單介紹 FHIR、TW Core,並做出一個可以上傳 Bundle JSON、解析 FHIR R4 Resource,且只接受 Bundle 的 parsing layer。
FHIR 是 HL7 推出的醫療資料交換標準,全名是 Fast Healthcare Interoperability Resources。它把醫療資料拆成 Patient、Observation、DiagnosticReport、Bundle 等 Resource。
FHIR 的緣起,是為了解決醫療系統之間資料格式不一致、交換成本高的問題。
Bundle 也不只是普通容器。FHIR 會用 Bundle.type 表示不同交換語意,例如 document、transaction、message、collection。Day 1 的範例先用 collection,後續做交換品質規則時,會依照 Bundle.type 決定要檢查哪些規則。
TW Core 則是台灣情境下的 FHIR Implementation Guide,透過 Profile 約束 base FHIR Resource,例如欄位基數、Must Support、代碼系統與 terminology binding。
如果你沒有接觸過醫療資訊,先記住一件事就好:Bundle 是一種 FHIR Resource,常用來打包多個醫療 Resource 一起交換。
這個 30 天計畫的起點,是一個實務上很常見的問題:
醫療資料通過 JSON、FHIR 或 TW Core 驗證,就真的代表可以交換嗎?
不一定。
一份檢驗資料可能是合法 JSON,也可能可以被 FHIR parser 解析,甚至符合某個 Profile;但跨機構交換時,仍可能出問題:
DiagnosticReport 參照的 Observation 不在同一份 Bundle 裡。例如 A 醫院送出一份檢驗報告,FHIR Validator 沒有擋下來,但 B 醫院匯入時找不到 DiagnosticReport.result 指向的 Observation,檢驗結果就無法被正確呈現。這不是 JSON syntax 問題,也不只是單一 Resource 是否符合規格,而是交換資料之間的完整性問題。
所以這個系列不是要重新發明 FHIR Validator,而是想做一個輕量的 資料品質閘門:先用既有工具完成 JSON、FHIR R4、TW Core Profile 驗證,再把跨 Resource 關聯、合作方契約規則與版本差異整理成可測試、可展示、可重現的流程。
本專案第一天先處理 FHIR R4 parsing layer:確認輸入能不能被 HAPI FHIR 讀成 FHIR R4 Resource,並在應用層確認目前只接受 Bundle。這不是完整 validation。Parser 回答「資料能不能被讀懂」,validator 才回答「資料是否符合 FHIR 規則或指定 Profile」。
先做 parsing layer,是為了確認 Spring Boot、上傳入口與 HAPI FHIR parser 可以穩定運作,再往 TW Core、OperationOutcome 與交換契約規則擴充。
整個系列後面會長成三層:
Parser:資料能不能被讀懂
        ↓
Validator:資料是否符合 FHIR / TW Core Profile
        ↓
Quality Gate:資料是否符合交換情境與合作方契約
換句話說,今天故意沒有做完整 Validation,因為真正醫療交換最難的是把錯誤分清楚:
Parser Error:JSON 壞掉、FHIR resource 讀不起來
        ↓
FHIR Rule Error:違反 FHIR base rule
        ↓
Profile Error:不符合 TW Core Profile
        ↓
Business Contract Error:不符合交換情境或合作方契約
建立 Spring Boot 專案
        ↓
加入 HAPI FHIR R4 套件
        ↓
建立上傳或貼上 JSON 頁面
        ↓
POST 到 /parse
        ↓
檢查 JSON 是否可解析
        ↓
JSON 合法?
  ├─ 否 → 回傳 JSON parse FAILED → 顯示解析結果
  └─ 是
        ↓
用 HAPI FHIR R4 parser 解析
        ↓
是 Bundle?
  ├─ 否 → Resource Type Gate FAILED → 顯示解析結果
  └─ 是
        ↓
計算 Bundle entry 數量
        ↓
顯示解析結果
今天的最小架構如下 (不包含 TW Core Profile validation):
             Browser
                |
          Multipart JSON
                |
        Spring Controller
                |
       BundleParseService
          /          \
 Jackson Parser   HAPI Parser
          \          /
       ValidationResult
                |
          Thymeleaf UI
這裡同時使用 Jackson 與 HAPI FHIR parser,是為了把錯誤層次切清楚。Jackson 不是取代 HAPI FHIR parser,而是先區分 JSON syntax error 與 FHIR resource parsing error。
| 層級 | 負責 |
|---|---|
| Jackson | JSON grammar 是否正確 |
| HAPI Parser | JSON 是否能對應成 FHIR R4 Resource |
| Resource Type Gate | 應用層是否接受這個 Resource type;Day 1 只接受 Bundle |
| Validator | 是否符合 FHIR base rule 或 TW Core Profile,Day 1 尚未實作 |
| Quality Gate | 是否符合 Reference、LOINC、UCUM、合作方契約等交換規則,後續實作 |
專案目錄:
src/main/java/com/twlab/qualitygate
├─ config
│  └─ FhirConfig.java
├─ validation
│  ├─ BundleParseService.java
│  ├─ ParseStatus.java
│  └─ ValidationResult.java
└─ web
   └─ ParseController.java

src/main/resources/templates
└─ index.html
http://localhost:8080 有回應。用 Maven wrapper 啟動,讓其他人不用先安裝 Maven:
./mvnw spring-boot:run
pom.xml 套件:
<properties>
  <hapi-fhir.version>8.10.1</hapi-fhir.version>
  <java.version>17</java.version>
</properties>

<dependencies>
  <dependency>
    <groupId>ca.uhn.hapi.fhir</groupId>
    <artifactId>hapi-fhir-base</artifactId>
    <version>${hapi-fhir.version}</version>
  </dependency>
  <dependency>
    <groupId>ca.uhn.hapi.fhir</groupId>
    <artifactId>hapi-fhir-structures-r4</artifactId>
    <version>${hapi-fhir.version}</version>
  </dependency>
  <dependency>
    <groupId>org.springframework.boot</groupId>
    <artifactId>spring-boot-starter-web</artifactId>
  </dependency>
  <dependency>
    <groupId>org.springframework.boot</groupId>
    <artifactId>spring-boot-starter-thymeleaf</artifactId>
  </dependency>
</dependencies>
spring-boot-starter-web:提供 Controller、表單 POST 與內嵌 Tomcat,讓專案可以開 HTTP 服務、接收表單與檔案。spring-boot-starter-thymeleaf:先用 server-side template 做最小 HTML 頁面。hapi-fhir-base:HAPI FHIR 核心 API。hapi-fhir-structures-r4:HAPI FHIR 的 FHIR R4 Resource model,例如 Bundle、Patient。<form method="post" action="/parse" enctype="multipart/form-data">
<label for="bundleFile">上傳 Bundle JSON</label>
<input id="bundleFile" name="bundleFile" type="file" accept=".json,application/json">
<label for="bundleJson">或直接貼上 JSON</label>
<textarea id="bundleJson" name="bundleJson" spellcheck="false"></textarea>
<button type="submit">Parse Bundle</button>
</form>
後端同時接收 bundleFile 與 bundleJson。如果兩者都有值,優先使用上傳檔案。
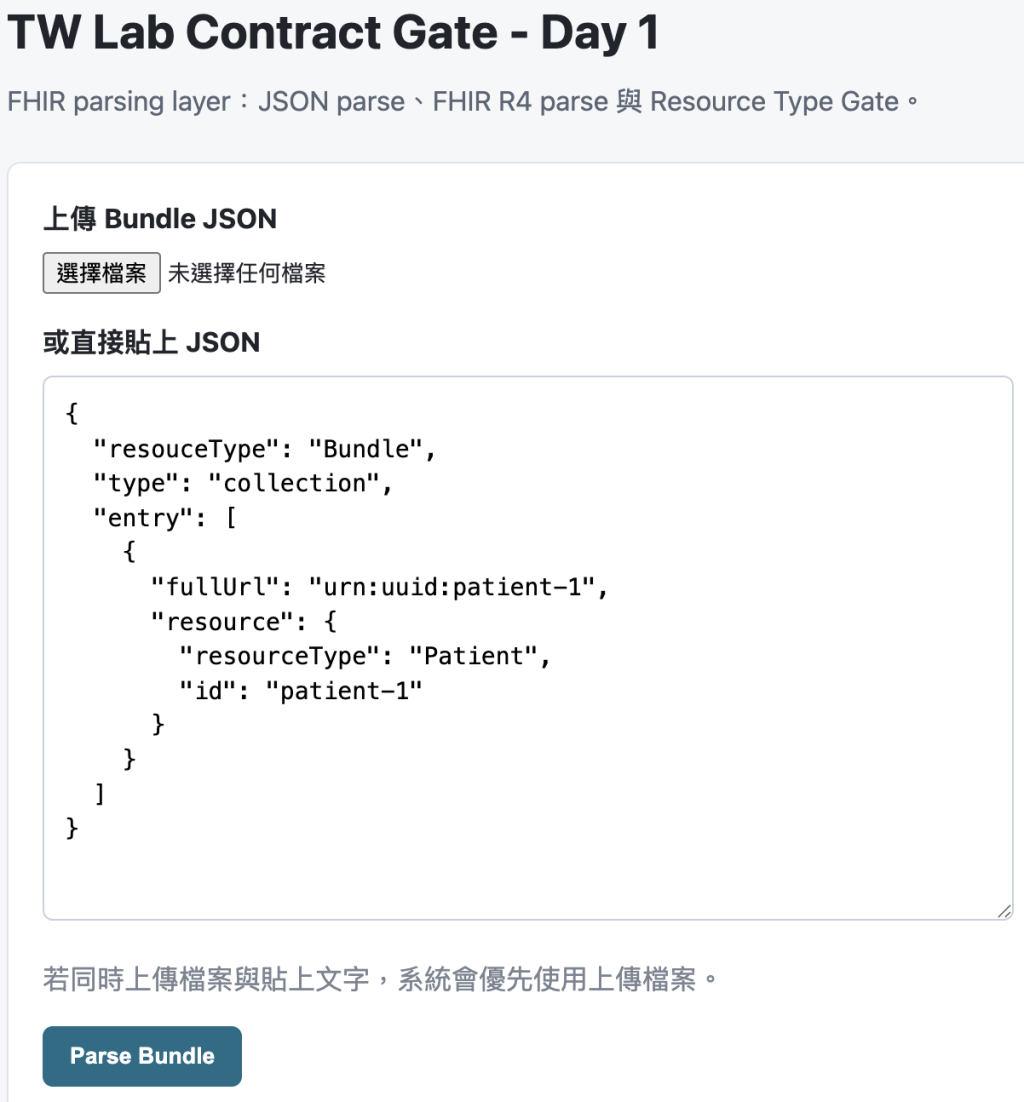
先用這份最小 Bundle 測成功案例:
{
  "resourceType": "Bundle",
  "type": "collection",
  "entry": [
    {
      "fullUrl": "urn:uuid:patient-1",
      "resource": {
        "resourceType": "Patient",
        "id": "patient-1"
      }
    }
  ]
}
Controller 提供首頁 / 與解析 /parse。文章只貼核心 POST 方法,完整 class 與 helper method 放在 GitHub。
@PostMapping({"/parse", "/validate"})
public String parse(
    @RequestParam(name = "bundleJson", required = false) String bundleJson,
    @RequestParam(name = "bundleFile", required = false) MultipartFile bundleFile,
    Model model
) {
  try {
    String input;
    input = readInput(bundleJson, bundleFile);
    model.addAttribute("bundleJson", input);
    model.addAttribute("result", bundleParseService.parse(input));
  } catch (IOException ex) {
    model.addAttribute("bundleJson", "");
    model.addAttribute("result", fileReadFailed(ex));
  }

  return "index";
}
讀取輸入另外拆成 readInput(),讓 parse() 保持短一點。這裡不把 IOException 轉成空字串,避免「檔案讀取失敗」和「使用者沒有輸入」混在一起;完整程式放在 GitHub。
真正的解析邏輯放在 Service,後面加入 TW Core validation、Reference validation 或自動化測試時,就不用改 Web 層。第一層先用 Jackson 確認 JSON 可解析;第二層再交給 HAPI FHIR R4 parser:
@Bean
public FhirContext fhirContext() {
  return FhirContext.forR4Cached();
}
public ValidationResult parse(String bundleJson) {
  JsonNode root;
  try {
    root = objectMapper.readTree(bundleJson);
  } catch (JsonProcessingException ex) {
    return new ValidationResult(
        ParseStatus.FAILED,
        ParseStatus.FAILED,
        ParseStatus.FAILED,
        null,
        null,
        "JSON parse failed: " + ex.getOriginalMessage()
    );
  }

  try {
    IBaseResource resource = fhirContext.newJsonParser().parseResource(bundleJson);
    if (!(resource instanceof Bundle bundle)) {
      return new ValidationResult(
          ParseStatus.PASSED,
          ParseStatus.PASSED,
          ParseStatus.FAILED,
          null,
          root.path("resourceType").asText("UNKNOWN"),
          "FHIR R4 parse succeeded, but resourceType is not Bundle."
      );
    }

    return new ValidationResult(
        ParseStatus.PASSED,
        ParseStatus.PASSED,
        ParseStatus.PASSED,
        bundle.getEntry().size(),
        "Bundle",
        null
    );
  } catch (DataFormatException | IllegalArgumentException ex) {
    return new ValidationResult(
        ParseStatus.PASSED,
        ParseStatus.FAILED,
        ParseStatus.FAILED,
        null,
        root.path("resourceType").asText("UNKNOWN"),
        "FHIR R4 parse failed: " + ex.getMessage()
    );
  }
}
這裡把 FhirContext 註冊成 Spring Bean,而不是在 Service 裡自己 new。FhirContext 建立時會準備 FHIR metadata 與 parser 設定,初始化成本高;它是 thread-safe,可以交給 Spring 當 singleton 管理。實際解析時再用 fhirContext.newJsonParser() 建立 parser。
ValidationResult 是解析流程的結果 DTO,用來隔離 parser 與 UI。用固定欄位包住 JSON 狀態、FHIR R4 狀態、Resource 數量與錯誤訊息,比回傳 Map 或純字串更容易擴充。
public record ValidationResult(
    ParseStatus jsonStatus,
    ParseStatus fhirR4Status,
    ParseStatus resourceTypeStatus,
    Integer resourceCount,
    String resourceType,
    String errorMessage
) {}
畫面顯示這幾個欄位:
PASSED 或 FAILED
PASSED 或 FAILED
PASSED 或 FAILED
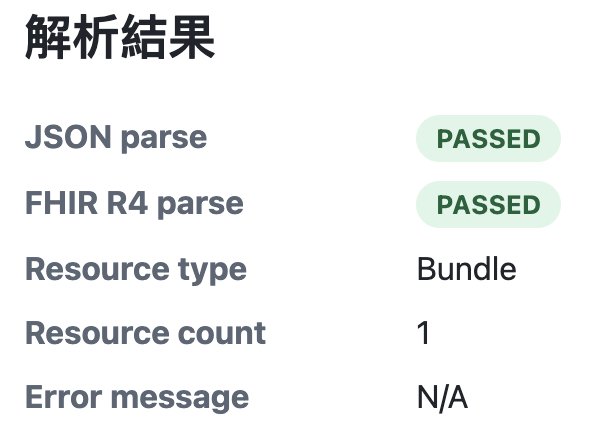
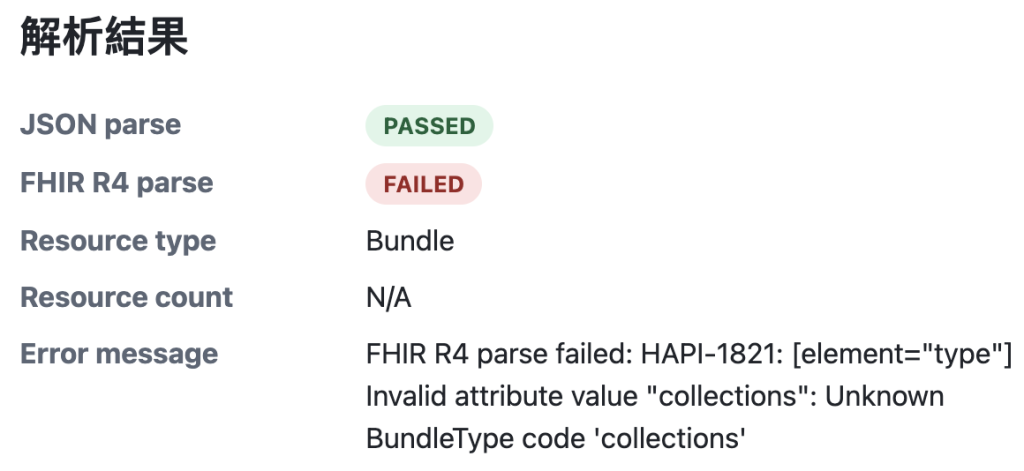
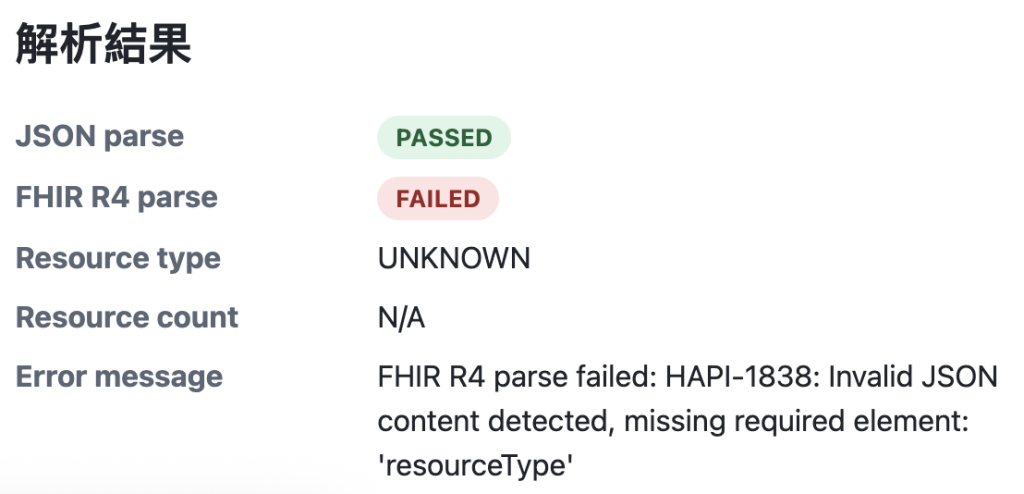
Day 1 最重要的不是「全部 PASS」,而是看出同一份資料在不同層級會得到不同結果:
| 情境 | Parser | Validator | Quality Gate |
|---|---|---|---|
| JSON 語法錯誤 | FAIL | - | - |
Patient Resource |
PASS | NOT_EVALUATED | FAIL:本入口只收 Bundle |
| Broken Reference Bundle | PASS | NOT_EVALUATED | Day 1 尚未檢查,後續應 FAIL |
| Profile 欄位不符合 TW Core | PASS | 後續應 FAIL | - |
| LOINC / UCUM 不符合合作契約 | PASS | 可能 PASS | 後續應 FAIL |
實際跑起來時,用這幾種資料確認 parser layer 的邊界:
| 測試資料 | JSON | FHIR Parser | Resource Type Gate |
|---|---|---|---|
| 正常 Bundle | PASS | PASS | PASS |
| JSON 壞掉 | FAIL | - | - |
| Patient Resource | PASS | PASS | FAIL |
| 普通 JSON | PASS | FAIL | - |
| Broken Reference Bundle | PASS | PASS | PASS |
下面這份資料可以被 parser 讀懂,但交換時其實有問題。它是一個簡化過的檢驗報告 Bundle,包含 Patient、Specimen 與 DiagnosticReport;其中 DiagnosticReport.result 指向的 Observation/obs-missing 不在同一份 Bundle 裡:
{
  "resourceType": "Bundle",
  "type": "collection",
  "entry": [
    {
      "fullUrl": "urn:uuid:patient-1",
      "resource": {
        "resourceType": "Patient",
        "id": "patient-1"
      }
    },
    {
      "fullUrl": "urn:uuid:specimen-1",
      "resource": {
        "resourceType": "Specimen",
        "id": "specimen-1",
        "subject": {
          "reference": "Patient/patient-1"
        }
      }
    },
    {
      "resource": {
        "resourceType": "DiagnosticReport",
        "id": "report-1",
        "subject": {
          "reference": "Patient/patient-1"
        },
        "specimen": [
          {
            "reference": "Specimen/specimen-1"
          }
        ],
        "result": [
          {
            "reference": "Observation/obs-missing"
          }
        ]
      }
    }
  ]
}
Day 1 的結果:
JSON parse: PASS
FHIR Parser: PASS
Resource Type Gate: PASS
Reference Gate: NOT_EVALUATED
等做到 Reference rule 時,同一份資料才應該變成 Reference Gate FAILED,因為 Observation/obs-missing 找不到對應的 Resource。
成功案例的文字結果:
JSON parse: PASSED
FHIR R4 parse: PASSED
Resource type: Bundle
Resource count: 1
Error message: N/A
也可以用 curl 快速測:
curl -X POST http://localhost:8080/parse \
  --data-urlencode 'bundleJson={"resourceType":"Bundle","type":"collection","entry":[]}'
Day 1 雖然只做 parser 入口,但仍先用單元測試固定目前行為:
src/test/java/com/twlab/qualitygate/validation
└─ BundleParseServiceTests.java
測試重點:
parsesBundleJson():合法 Bundle 會回傳 JSON parse PASSED、FHIR R4 parse PASSED。reportsInvalidJsonWithoutThrowing():非法 JSON 不會造成系統 500,而是回傳失敗結果。reportsNonBundleFhirResource():Patient 可以被 FHIR parser 讀懂,但會被 Resource Type Gate 擋下。reportsPlainJsonAsFhirFailure():一般 JSON 語法合法,但無法對應成 FHIR Resource。指令:
./mvnw test
測試結果:
PASS valid Bundle
PASS invalid JSON
PASS Patient Resource
PASS broken reference Bundle parser pass
這些測試不是為了證明 Day 1 已經完成 validation,而是先固定 parser layer 的邊界。下一步導入 OperationOutcome 或 TW Core validator 時,才知道哪些行為是新增規則造成的。
resourceType 是否為 Bundle。entry。Day 1 尚未處理:
後續如果長成完整 Quality Gate,模組大概會像這樣:
quality-gate
├─ parser
├─ validator
├─ terminology
├─ reference-checker
├─ contract-rule
└─ report
Repository:twcore-data-quality-gate


把「合法 JSON 也不代表能交換」講得很有感,尤其 DiagnosticReport.result 指到的 Observation 不在同一份 Bundle 裡,這種 parser 看不出來、但實際匯入會卡住的落差,真的很貼近醫療資料現場。你把 JSON、FHIR R4、Resource Type Gate 分層切開,再用 Jackson 跟 HAPI FHIR 先把錯誤層次分清楚,讀起來會覺得整個品質閘門的骨架已經站穩了。我手邊有多的 Lovable 額度想送給有緣人,有興趣可從連結看看我的系列。https://ithelp.ithome.com.tw/articles/10401174


 iThome鐵人賽
 看影片追技術