

昨天使用 RadioButton、CheckBox 與 TextInputEditText 完成表單和 BMI 計算練習。今天要專注處理 BMI App 的使用者介面,學習如何透過 Android Studio Layout Editor 配置 TextInputLayout、設定 Constraint、加入輸入提示,並在 BMI 結果旁顯示體位圖片。參考資料:Android Developers-TextInputLayout
今天會完成:
TextInputLayout 與 TextInputEditText 的關係。inputType 顯示適合的鍵盤。ConstraintLayout 建立響應式版面。LinearLayout 整理表單。LinearLayout 排列兩個按鈕。TextView 顯示 BMI 計算結果。drawablePadding 調整圖片與文字間距。strings.xml。參考資料:Android Developers-ConstraintLayout|Android Developers-TextView
今天預計完成的 BMI 畫面包含:
BMI data 標題。Cancel 清除按鈕。BMI 計算按鈕。以下是使用 Android Studio Layout Editor 完成的畫面。
.jpg)
▲ 畫面中央是 App 預覽,左側為元件樹,右側則顯示目前選取元件的屬性。下方 Build Output 顯示 BUILD SUCCESSFUL,代表目前專案可以成功建置。參考資料:Android Developers-Layout Editor
開啟以下檔案:
app
└── src
    └── main
        └── res
            └── layout
                └── activity_main.xml
切換到 Design 或 Split 模式後,可以從左側 Palette 的 Text 分類,找到 TextInputLayout,再拖曳到畫面中。參考資料:Android Developers-Build a UI with Layout Editor
.jpg)
▲ 參考畫面加入兩個 TextInputLayout,並將 layout_width 設為 match_parent、layout_height 設為 wrap_content。參考資料:Android Developers-TextInputLayout
Android XML 中常見的尺寸設定如下。參考資料:Android Developers-Responsive layouts
| 設定值 | 意義 |
|---|---|
wrap_content |
元件大小剛好容納內容 |
match_parent |
盡量填滿父容器 |
0dp |
在 ConstraintLayout 中代表 Match Constraints |
120dp |
使用固定的 dp 尺寸 |
參考畫面的 TextInputLayout 放在垂直 LinearLayout 中,因此可以設定:
android:layout_width="match_parent"
android:layout_height="wrap_content"
match_parent 讓輸入欄位寬度填滿父容器,wrap_content 則讓高度依內容決定。參考資料:Android Developers-ViewGroup.LayoutParams
如果元件直接放在 ConstraintLayout 中,官方建議透過左右 Constraint 搭配 0dp 填滿可用空間,而不是使用 match_parent。參考資料:Android Developers-ConstraintLayout sizing
android:layout_width="0dp"
app:layout_constraintStart_toStartOf="parent"
app:layout_constraintEnd_toEndOf="parent"
TextInputLayout 是輸入欄位的外層容器,負責外框、浮動標籤、提示、錯誤訊息與輔助文字;真正接收使用者輸入的是放在裡面的 TextInputEditText。參考資料:Android Developers-TextInputLayout API
基本結構如下:
<com.google.android.material.textfield.TextInputLayout
    android:layout_width="match_parent"
    android:layout_height="wrap_content"
    android:hint="姓名">

    <com.google.android.material.textfield.TextInputEditText
        android:layout_width="match_parent"
        android:layout_height="wrap_content"
        android:inputType="textPersonName" />

</com.google.android.material.textfield.TextInputLayout>
TextInputEditText 應放在 TextInputLayout 中使用,這樣才能讓 Material 輸入框正確管理浮動標籤與無障礙資訊。參考資料:Android Developers-TextInputEditText
Android 官方建議將 android:hint 設定在外層的 TextInputLayout,不要同時在 TextInputLayout 和 TextInputEditText 設定不同提示。參考資料:Android Developers-TextInputLayout hint
建議寫法:
<com.google.android.material.textfield.TextInputLayout
    android:layout_width="match_parent"
    android:layout_height="wrap_content"
    android:hint="@string/input_name">

    <com.google.android.material.textfield.TextInputEditText
        android:id="@+id/textInput_Name"
        android:layout_width="match_parent"
        android:layout_height="wrap_content"
        android:inputType="textPersonName" />

</com.google.android.material.textfield.TextInputLayout>
當輸入欄位尚未取得焦點而且沒有內容時,Hint 會顯示在欄位內;點擊輸入欄位或輸入內容後,Hint 會移動到外框上方,成為浮動標籤。參考資料:Material Design-Text fields
今天的表單可以使用以下階層:
ConstraintLayout
├── TextView:BMI data
├── LinearLayout:表單輸入區
│   ├── TextView:Name
│   ├── TextInputLayout:姓名
│   │   └── TextInputEditText
│   ├── TextInputLayout:身高
│   │   └── TextInputEditText
│   └── TextInputLayout:體重
│       └── TextInputEditText
├── LinearLayout:按鈕區
│   ├── Button:Cancel
│   └── Button:BMI
└── TextView:BMI 結果
使用垂直 LinearLayout 可以依序排列姓名、身高和體重欄位;兩個按鈕則使用水平 LinearLayout 排列。參考資料:Android Developers-LinearLayout
以下 XML 依照參考畫面重新整理,保留畫面中的元件 ID,並補上完整 Constraint、Material 輸入框、數字鍵盤、錯誤空間及結果顯示區域。參考資料:Android Developers-XML layouts
<?xml version="1.0" encoding="utf-8"?>
<androidx.constraintlayout.widget.ConstraintLayout
xmlns:android="http://schemas.android.com/apk/res/android"
xmlns:app="http://schemas.android.com/apk/res-auto"
xmlns:tools="http://schemas.android.com/tools"
android:id="@+id/main"
android:layout_width="match_parent"
android:layout_height="match_parent"
android:paddingStart="24dp"
android:paddingTop="24dp"
android:paddingEnd="24dp"
android:paddingBottom="24dp"
tools:context=".MainActivity">
<!--
BMI App 的主標題。
使用 0dp 搭配左右 Constraint,
讓寬度依照父容器的可用空間決定。
-->
<TextView
android:id="@+id/textView_BMItitle"
android:layout_width="0dp"
android:layout_height="wrap_content"
android:gravity="center"
android:text="@string/bmi_title"
android:textColor="@color/bmi_title_color"
android:textSize="28sp"
android:textStyle="bold"
app:layout_constraintEnd_toEndOf="parent"
app:layout_constraintStart_toStartOf="parent"
app:layout_constraintTop_toTopOf="parent" />
<!--
BMI 輸入表單。
使用垂直 LinearLayout,
依序排列姓名、身高及體重輸入欄位。
-->
<LinearLayout
android:id="@+id/linearLayout_BMIForm"
android:layout_width="0dp"
android:layout_height="wrap_content"
android:layout_marginTop="24dp"
android:orientation="vertical"
app:layout_constraintEnd_toEndOf="parent"
app:layout_constraintStart_toStartOf="parent"
app:layout_constraintTop_toBottomOf="@id/textView_BMItitle">
<!-- 姓名欄位上方的說明文字。 -->
<TextView
android:id="@+id/textView_Name"
android:layout_width="match_parent"
android:layout_height="wrap_content"
android:layout_marginBottom="6dp"
android:text="@string/name_label"
android:textColor="@color/bmi_label_color"
android:textSize="18sp"
android:textStyle="bold" />
<!--
姓名輸入框的外層 TextInputLayout。
Hint 設定在 TextInputLayout,
輸入時會變成浮動標籤。
-->
<com.google.android.material.textfield.TextInputLayout
android:id="@+id/textInputLayout_Name"
style="@style/Widget.Material3.TextInputLayout.OutlinedBox"
android:layout_width="match_parent"
android:layout_height="wrap_content"
android:hint="@string/input_name"
app:boxStrokeWidth="1dp"
app:boxStrokeWidthFocused="2dp">
<!-- 真正接收姓名文字的輸入元件。 -->
<com.google.android.material.textfield.TextInputEditText
android:id="@+id/textInput_Name"
android:layout_width="match_parent"
android:layout_height="wrap_content"
android:imeOptions="actionNext"
android:inputType="textPersonName"
android:maxLines="1"
android:minHeight="56dp" />
</com.google.android.material.textfield.TextInputLayout>
<!--
身高輸入框。
數值可能包含小數,因此使用 numberDecimal。
suffixText 會在欄位尾端顯示 cm。
-->
<com.google.android.material.textfield.TextInputLayout
android:id="@+id/textInputLayout_Height"
style="@style/Widget.Material3.TextInputLayout.OutlinedBox"
android:layout_width="match_parent"
android:layout_height="wrap_content"
android:layout_marginTop="16dp"
android:hint="@string/height_hint"
app:helperText="@string/height_helper"
app:suffixText="@string/height_unit">
<!-- 真正接收身高數字的輸入元件。 -->
<com.google.android.material.textfield.TextInputEditText
android:id="@+id/textInput_Height"
android:layout_width="match_parent"
android:layout_height="wrap_content"
android:digits="0123456789."
android:imeOptions="actionNext"
android:inputType="numberDecimal"
android:maxLines="1"
android:minHeight="56dp" />
</com.google.android.material.textfield.TextInputLayout>
<!--
體重輸入框。
suffixText 顯示 kg,
helperText 說明輸入單位。
-->
<com.google.android.material.textfield.TextInputLayout
android:id="@+id/textInputLayout_Weight"
style="@style/Widget.Material3.TextInputLayout.OutlinedBox"
android:layout_width="match_parent"
android:layout_height="wrap_content"
android:layout_marginTop="16dp"
android:hint="@string/weight_hint"
app:helperText="@string/weight_helper"
app:suffixText="@string/weight_unit">
<!-- 真正接收體重數字的輸入元件。 -->
<com.google.android.material.textfield.TextInputEditText
android:id="@+id/textInput_Weight"
android:layout_width="match_parent"
android:layout_height="wrap_content"
android:digits="0123456789."
android:imeOptions="actionDone"
android:inputType="numberDecimal"
android:maxLines="1"
android:minHeight="56dp" />
</com.google.android.material.textfield.TextInputLayout>
</LinearLayout>
<!--
兩個功能按鈕的水平容器。
使用 layout_weight 平均分配寬度。
-->
<LinearLayout
android:id="@+id/linearLayout_Buttons"
android:layout_width="0dp"
android:layout_height="wrap_content"
android:layout_marginTop="20dp"
android:gravity="center"
android:orientation="horizontal"
android:weightSum="2"
app:layout_constraintEnd_toEndOf="parent"
app:layout_constraintStart_toStartOf="parent"
app:layout_constraintTop_toBottomOf="@id/linearLayout_BMIForm">
<!-- 清除所有輸入資料。 -->
<com.google.android.material.button.MaterialButton
android:id="@+id/button_Cancel"
style="@style/Widget.Material3.Button.OutlinedButton"
android:layout_width="0dp"
android:layout_height="wrap_content"
android:layout_marginEnd="12dp"
android:layout_weight="1"
android:minHeight="48dp"
android:text="@string/cancel" />
<!-- 執行 BMI 計算。 -->
<com.google.android.material.button.MaterialButton
android:id="@+id/button_BMI"
android:layout_width="0dp"
android:layout_height="wrap_content"
android:layout_marginStart="12dp"
android:layout_weight="1"
android:minHeight="48dp"
android:text="@string/calculate_bmi" />
</LinearLayout>
<!--
顯示姓名、BMI 數值與體位結果。
drawableStart 可以在文字起始位置顯示圖片;
drawablePadding 則設定圖片與文字之間的距離。
-->
<TextView
android:id="@+id/textView_BMI"
android:layout_width="0dp"
android:layout_height="160dp"
android:layout_marginTop="20dp"
android:background="@drawable/bg_bmi_result"
android:drawablePadding="10dp"
android:gravity="center_vertical"
android:padding="16dp"
android:text="@string/bmi_result_placeholder"
android:textColor="@color/bmi_result_text_color"
android:textSize="18sp"
app:layout_constraintEnd_toEndOf="parent"
app:layout_constraintStart_toStartOf="parent"
app:layout_constraintTop_toBottomOf="@id/linearLayout_Buttons"
tools:drawableStart="@drawable/fat_4"
tools:text="Name: Alex BMI: 22.86 BMI 結果:正常" />
</androidx.constraintlayout.widget.ConstraintLayout>
身高和體重都可能包含小數,例如:
身高:168.5 公分
體重:79.2 公斤
因此 XML 使用:
android:inputType="numberDecimal"
這會要求輸入法顯示適合輸入小數的數字鍵盤。inputType 主要用來提示輸入法應提供哪種鍵盤與輸入行為,但程式仍要驗證輸入內容。參考資料:Android Developers-Specify input method type
另外加入:
android:digits="0123456789."
可以限制欄位接受的字元,但它仍不能保證輸入一定是合法小數,例如使用者可能輸入兩個小數點,所以 Kotlin 端仍應使用 toDoubleOrNull() 檢查。參考資料:Android Developers-TextView digits
身高與體重欄位可以在 TextInputLayout 設定單位:
app:suffixText="cm"
以及:
app:suffixText="kg"
suffixText 只是顯示在輸入框尾端的輔助文字,不會成為 TextInputEditText.text 的內容,因此 Kotlin 讀取到的仍是純數值,例如 168 或 79.2。參考資料:Android Developers-TextInputLayout suffix text
參考畫面在身高欄位下方顯示 cm,體重欄位下方顯示 kg。這類提示可以使用 helperText。參考資料:Android Developers-TextInputLayout helper text
app:helperText="請輸入公分,例如 168"
app:helperText="請輸入公斤,例如 79.2"
helperText 適合顯示正常狀態下的格式說明;如果輸入錯誤,則可以使用 error 顯示錯誤訊息。參考資料:Android Developers-TextInputLayout setError
固定文字不應直接寫死在 Layout XML 或 Kotlin 中,建議統一放入 res/values/strings.xml,方便日後修改與多語系處理。參考資料:Android Developers-String resources
<?xml version="1.0" encoding="utf-8"?>

<resources>

    <!-- App 名稱。 -->
    <string name="app_name">BMI Calculator</string>

    <!-- 畫面主標題。 -->
    <string name="bmi_title">BMI data</string>

    <!-- 姓名欄位。 -->
    <string name="name_label">Name:</string>
    <string name="input_name">Input name</string>

    <!-- 身高欄位。 -->
    <string name="height_hint">Height</string>
    <string name="height_unit">cm</string>
    <string name="height_helper">請輸入公分,例如 168</string>

    <!-- 體重欄位。 -->
    <string name="weight_hint">Weight</string>
    <string name="weight_unit">kg</string>
    <string name="weight_helper">請輸入公斤,例如 79.2</string>

    <!-- 功能按鈕。 -->
    <string name="cancel">Cancel</string>
    <string name="calculate_bmi">BMI</string>

    <!-- BMI 結果。 -->
    <string name="bmi_result_placeholder">請輸入資料並按下 BMI</string>

    <!-- 輸入錯誤訊息。 -->
    <string name="error_name_required">請輸入姓名</string>
    <string name="error_height_required">請輸入身高</string>
    <string name="error_weight_required">請輸入體重</string>
    <string name="error_height_invalid">身高格式錯誤</string>
    <string name="error_weight_invalid">體重格式錯誤</string>

    <!-- BMI 體位分類。 -->
    <string name="bmi_underweight">過輕</string>
    <string name="bmi_normal">正常</string>
    <string name="bmi_overweight">過重</string>
    <string name="bmi_obese">肥胖</string>

</resources>
以下顏色對應參考畫面中的藍色標題、綠色輸入提示、紫色按鈕與淺色結果背景。參考資料:Android Developers-Color resources
<?xml version="1.0" encoding="utf-8"?>

<resources>

    <!-- BMI 主標題顏色。 -->
    <color name="bmi_title_color">#3949AB</color>

    <!-- 表單標籤顏色。 -->
    <color name="bmi_label_color">#039BE5</color>

    <!-- 結果文字顏色。 -->
    <color name="bmi_result_text_color">#263238</color>

    <!-- 結果區域背景顏色。 -->
    <color name="bmi_result_background">#F7F5FC</color>

    <!-- 結果區域邊框顏色。 -->
    <color name="bmi_result_stroke">#D1C4E9</color>

</resources>
在以下位置建立:
app/src/main/res/drawable/bg_bmi_result.xml
完整內容如下。參考資料:Android Developers-Shape drawable
<?xml version="1.0" encoding="utf-8"?>

<shape
    xmlns:android="http://schemas.android.com/apk/res/android"
    android:shape="rectangle">

    <!-- 結果區域的淺色背景。 -->
    <solid
        android:color="@color/bmi_result_background" />

    <!-- 圓角大小。 -->
    <corners
        android:radius="16dp" />

    <!-- 淡紫色外框。 -->
    <stroke
        android:width="1dp"
        android:color="@color/bmi_result_stroke" />

    <!-- Shape 內部留白。 -->
    <padding
        android:left="12dp"
        android:top="12dp"
        android:right="12dp"
        android:bottom="12dp" />

</shape>
TextView 可以在文字的左、上、右、下方加入 Drawable,這些圖片稱為 Compound Drawables。參考資料:Android Developers-TextView compound drawables
XML 可使用:
android:drawableStart="@drawable/fat_4"
drawableStart 代表文字閱讀方向的起始位置。在繁體中文與英文的由左至右介面中,它通常顯示在文字左側;相較於 drawableLeft,使用 drawableStart 更能支援不同文字方向。參考資料:Android Developers-Support different languages
其他方向還包括:
android:drawableTop="@drawable/fat_4"
android:drawableEnd="@drawable/fat_4"
android:drawableBottom="@drawable/fat_4"
參考資料:Android Developers-TextView XML attributes
參考畫面右側 Attributes 搜尋 draw,並將 drawablePadding 設為 10dp。
drawablePadding 用來設定圖片和文字之間的距離。若沒有設定,圖片與文字可能靠得太近;設定 10dp 後,畫面會有較自然的留白。參考資料:Android Developers-android:drawablePadding
android:drawablePadding="10dp"
drawablePadding 只有在 TextView 已設定 Compound Drawable 時才會產生明顯效果。它不是設定圖片與 TextView 外框的間距;外框間距應使用 padding。參考資料:Android Developers-TextView
如果希望圖片只出現在 Android Studio 預覽中,可以使用:
tools:drawableStart="@drawable/fat_4"
如果希望 App 實際執行時也顯示圖片,則使用:
android:drawableStart="@drawable/fat_4"
tools: 命名空間的屬性只提供設計與預覽工具使用,不會被打包成實際執行效果。這很適合先預覽 BMI 結果區域,實際圖片再交由 Kotlin 依照 BMI 動態決定。參考資料:Android Developers-Tools attributes reference
以下 Kotlin 程式會讀取三個輸入欄位、驗證資料、計算 BMI,再更新結果文字與圖片。新增或修改的部分已加入完整註解。參考資料:Android Developers-Handle user input
package com.example.widget_8

import android.graphics.drawable.Drawable
import android.os.Bundle
import android.widget.Button
import android.widget.TextView
import androidx.activity.enableEdgeToEdge
import androidx.appcompat.app.AppCompatActivity
import androidx.core.content.ContextCompat
import androidx.core.view.ViewCompat
import androidx.core.view.WindowInsetsCompat
import com.google.android.material.textfield.TextInputEditText
import com.google.android.material.textfield.TextInputLayout

class MainActivity : AppCompatActivity() {

    // 姓名輸入框外層容器,用於顯示錯誤訊息。
    private lateinit var textInputLayoutName:
        TextInputLayout

    // 身高輸入框外層容器,用於顯示錯誤訊息。
    private lateinit var textInputLayoutHeight:
        TextInputLayout

    // 體重輸入框外層容器,用於顯示錯誤訊息。
    private lateinit var textInputLayoutWeight:
        TextInputLayout

    // 真正接收姓名輸入內容的元件。
    private lateinit var textInputName:
        TextInputEditText

    // 真正接收身高輸入內容的元件。
    private lateinit var textInputHeight:
        TextInputEditText

    // 真正接收體重輸入內容的元件。
    private lateinit var textInputWeight:
        TextInputEditText

    // 清除輸入內容的按鈕。
    private lateinit var buttonCancel:
        Button

    // 執行 BMI 計算的按鈕。
    private lateinit var buttonBMI:
        Button

    // 顯示姓名、BMI 數值與體位結果。
    private lateinit var textViewBMI:
        TextView

    override fun onCreate(
        savedInstanceState: Bundle?
    ) {
        super.onCreate(savedInstanceState)

        // 啟用 Edge-to-Edge 顯示模式。
        enableEdgeToEdge()

        // 載入 activity_main.xml。
        setContentView(R.layout.activity_main)

        // 處理狀態列與導覽列的範圍,
        // 避免內容被系統列遮住。
        ViewCompat.setOnApplyWindowInsetsListener(
            findViewById(R.id.main)
        ) { view, insets ->

            val systemBars =
                insets.getInsets(
                    WindowInsetsCompat.Type.systemBars()
                )

            view.setPadding(
                systemBars.left,
                systemBars.top,
                systemBars.right,
                systemBars.bottom
            )

            insets
        }

        // 取得 XML 中的所有畫面元件。
        initViews()

        // 設定按鈕點擊事件。
        setupClickListeners()
    }

    /**
     * 使用 findViewById() 取得 XML 元件。
     */
    private fun initViews() {

        textInputLayoutName =
            findViewById(
                R.id.textInputLayout_Name
            )

        textInputLayoutHeight =
            findViewById(
                R.id.textInputLayout_Height
            )

        textInputLayoutWeight =
            findViewById(
                R.id.textInputLayout_Weight
            )

        textInputName =
            findViewById(
                R.id.textInput_Name
            )

        textInputHeight =
            findViewById(
                R.id.textInput_Height
            )

        textInputWeight =
            findViewById(
                R.id.textInput_Weight
            )

        buttonCancel =
            findViewById(
                R.id.button_Cancel
            )

        buttonBMI =
            findViewById(
                R.id.button_BMI
            )

        textViewBMI =
            findViewById(
                R.id.textView_BMI
            )
    }

    /**
     * 設定清除與 BMI 計算按鈕。
     */
    private fun setupClickListeners() {

        buttonCancel.setOnClickListener {

            // 清空三個輸入欄位。
            textInputName.text?.clear()
            textInputHeight.text?.clear()
            textInputWeight.text?.clear()

            // 清除 TextInputLayout 錯誤訊息。
            clearInputErrors()

            // 清空 BMI 結果。
            textViewBMI.text = ""

            // 清除 TextView 左側的結果圖片。
            textViewBMI.setCompoundDrawables(
                null,
                null,
                null,
                null
            )

            // 將輸入焦點移回姓名欄位。
            textInputName.requestFocus()
        }

        buttonBMI.setOnClickListener {

            // 每次計算前先清除上一輪的錯誤。
            clearInputErrors()

            // 讀取並清理使用者輸入。
            val name =
                textInputName.text
                    ?.toString()
                    ?.trim()
                    .orEmpty()

            val heightText =
                textInputHeight.text
                    ?.toString()
                    ?.trim()
                    .orEmpty()

            val weightText =
                textInputWeight.text
                    ?.toString()
                    ?.trim()
                    .orEmpty()

            // 檢查姓名。
            if (name.isEmpty()) {

                textInputLayoutName.error =
                    getString(
                        R.string.error_name_required
                    )

                textInputName.requestFocus()

                return@setOnClickListener
            }

            // 將身高安全轉換成 Double。
            val height =
                heightText.toDoubleOrNull()

            // 檢查身高是否有效。
            if (height == null || height <= 0) {

                textInputLayoutHeight.error =
                    getString(
                        R.string.error_height_invalid
                    )

                textInputHeight.requestFocus()

                return@setOnClickListener
            }

            // 將體重安全轉換成 Double。
            val weight =
                weightText.toDoubleOrNull()

            // 檢查體重是否有效。
            if (weight == null || weight <= 0) {

                textInputLayoutWeight.error =
                    getString(
                        R.string.error_weight_invalid
                    )

                textInputWeight.requestFocus()

                return@setOnClickListener
            }

            // 將公分轉換成公尺。
            val heightInMeters =
                height / 100.0

            // BMI=體重÷身高平方。
            val bmi =
                weight /
                    (
                        heightInMeters *
                        heightInMeters
                    )

            // 判斷 BMI 體位分類。
            val category =
                getBMICategory(bmi)

            // 顯示完整計算結果。
            textViewBMI.text =
                """
                Name:$name
                Height:$height cm
                Weight:$weight kg
                BMI:${String.format("%.2f", bmi)}
                BMI 結果:$category
                """.trimIndent()

            // 更新結果圖片。
            updateResultDrawable(bmi)
        }
    }

    /**
     * 清除三個 TextInputLayout 的錯誤訊息。
     */
    private fun clearInputErrors() {

        textInputLayoutName.error = null
        textInputLayoutHeight.error = null
        textInputLayoutWeight.error = null
    }

    /**
     * 依照台灣成人 BMI 標準判斷體位。
     */
    private fun getBMICategory(
        bmi: Double
    ): String {

        return when {
            bmi < 18.5 ->
                getString(
                    R.string.bmi_underweight
                )

            bmi < 24.0 ->
                getString(
                    R.string.bmi_normal
                )

            bmi < 27.0 ->
                getString(
                    R.string.bmi_overweight
                )

            else ->
                getString(
                    R.string.bmi_obese
                )
        }
    }

    /**
     * 根據 BMI 選擇對應圖片,
     * 再顯示到結果 TextView 的起始位置。
     */
    private fun updateResultDrawable(
        bmi: Double
    ) {

        // 根據 BMI 分類決定 Drawable 資源。
        val imageResource =
            when {
                bmi < 18.5 ->
                    R.drawable.fat_3

                bmi < 24.0 ->
                    R.drawable.fat_4

                bmi < 27.0 ->
                    R.drawable.fat_2

                else ->
                    R.drawable.fat_1
            }

        // 安全取得 Drawable。
        val drawable: Drawable? =
            ContextCompat.getDrawable(
                this,
                imageResource
            )

        // 將 110dp 轉換成實際像素。
        val imageSize =
            (
                110 *
                    resources
                        .displayMetrics
                        .density
            ).toInt()

        // 設定圖片顯示範圍。
        drawable?.setBounds(
            0,
            0,
            imageSize,
            imageSize
        )

        // 將圖片放在文字起始位置。
        // 使用 Relative 版本可以支援不同文字方向。
        textViewBMI
            .setCompoundDrawablesRelative(
                drawable,
                null,
                null,
                null
            )

        // 動態設定圖片和文字之間的 10dp 間距。
        textViewBMI.compoundDrawablePadding =
            (
                10 *
                    resources
                        .displayMetrics
                        .density
            ).toInt()
    }
}
使用 Toast 可以顯示短暫訊息,但表單錯誤更適合直接顯示在輸入欄位旁。TextInputLayout.error 會在欄位下方顯示錯誤內容。參考資料:Android Developers-TextInputLayout error
textInputLayoutHeight.error =
    "身高格式錯誤"
清除錯誤:
textInputLayoutHeight.error = null
這樣使用者可以立即知道是哪個欄位有問題,不必記住短暫消失的 Toast 訊息。參考資料:Material Design-Text field error messages
假設輸入:
Name:Alex
Height:168 cm
Weight:79.2 kg
身高先換算成公尺:
168 ÷ 100 = 1.68 公尺
BMI 計算:
BMI = 79.2 ÷(1.68 × 1.68)
    = 79.2 ÷ 2.8224
    ≈ 28.06
依照台灣成人體位標準,BMI 大於等於 27 屬於肥胖範圍。BMI 只能作為成人健康體位的初步參考,不能單獨作為疾病診斷。參考資料:衛生福利部國民健康署-成人健康體位標準
如果它放在垂直 LinearLayout 中,可以設定:
android:layout_width="match_parent"
如果直接放在 ConstraintLayout 中,則建議設定:
android:layout_width="0dp"
app:layout_constraintStart_toStartOf="parent"
app:layout_constraintEnd_toEndOf="parent"
參考資料:Android Developers-ConstraintLayout
直接放在 ConstraintLayout 中的元件必須設定水平與垂直 Constraint。如果只有在 Layout Editor 裡拖曳位置,卻沒有建立 Constraint,執行時元件可能回到左上角。參考資料:Android Developers-Position a view
確認結構是:
TextInputLayout
└── TextInputEditText
並且將 Hint 設定在 TextInputLayout。如果單獨使用一般 EditText,就不會得到完整的 Material 浮動標籤行為。參考資料:Android Developers-TextInputLayout
請依序檢查:
res/drawable。R.drawable.fat_1 是否能正確解析。setCompoundDrawablesRelative() 是否已被呼叫。TextView 是否具有足夠的高度。參考資料:Android Developers-Drawable resources
XML 設定:
android:drawablePadding="10dp"
或在 Kotlin 中設定:
textViewBMI.compoundDrawablePadding =
    (
        10 *
            resources.displayMetrics.density
    ).toInt()
Kotlin API 接收的是像素,所以必須先將 dp 轉成像素。參考資料:Android Developers-setCompoundDrawablePadding
今天從 Android Studio Layout Editor 開始,完成 BMI App 的表單與結果版面:
ConstraintLayout 建立主要畫面。0dp 表示 Match Constraints。LinearLayout 整理輸入欄位。LinearLayout 排列功能按鈕。TextInputLayout 建立 Material 輸入框。TextInputEditText 接收實際輸入。TextInputLayout。inputType="numberDecimal" 輸入小數。suffixText 顯示 cm 與 kg。helperText 提醒輸入格式。TextInputLayout.error 顯示欄位錯誤。drawablePadding 調整圖片與文字間距。tools: 屬性建立只供預覽的內容。strings.xml。參考資料:Android Developers-Build a responsive UI|Android Developers-TextInputLayout
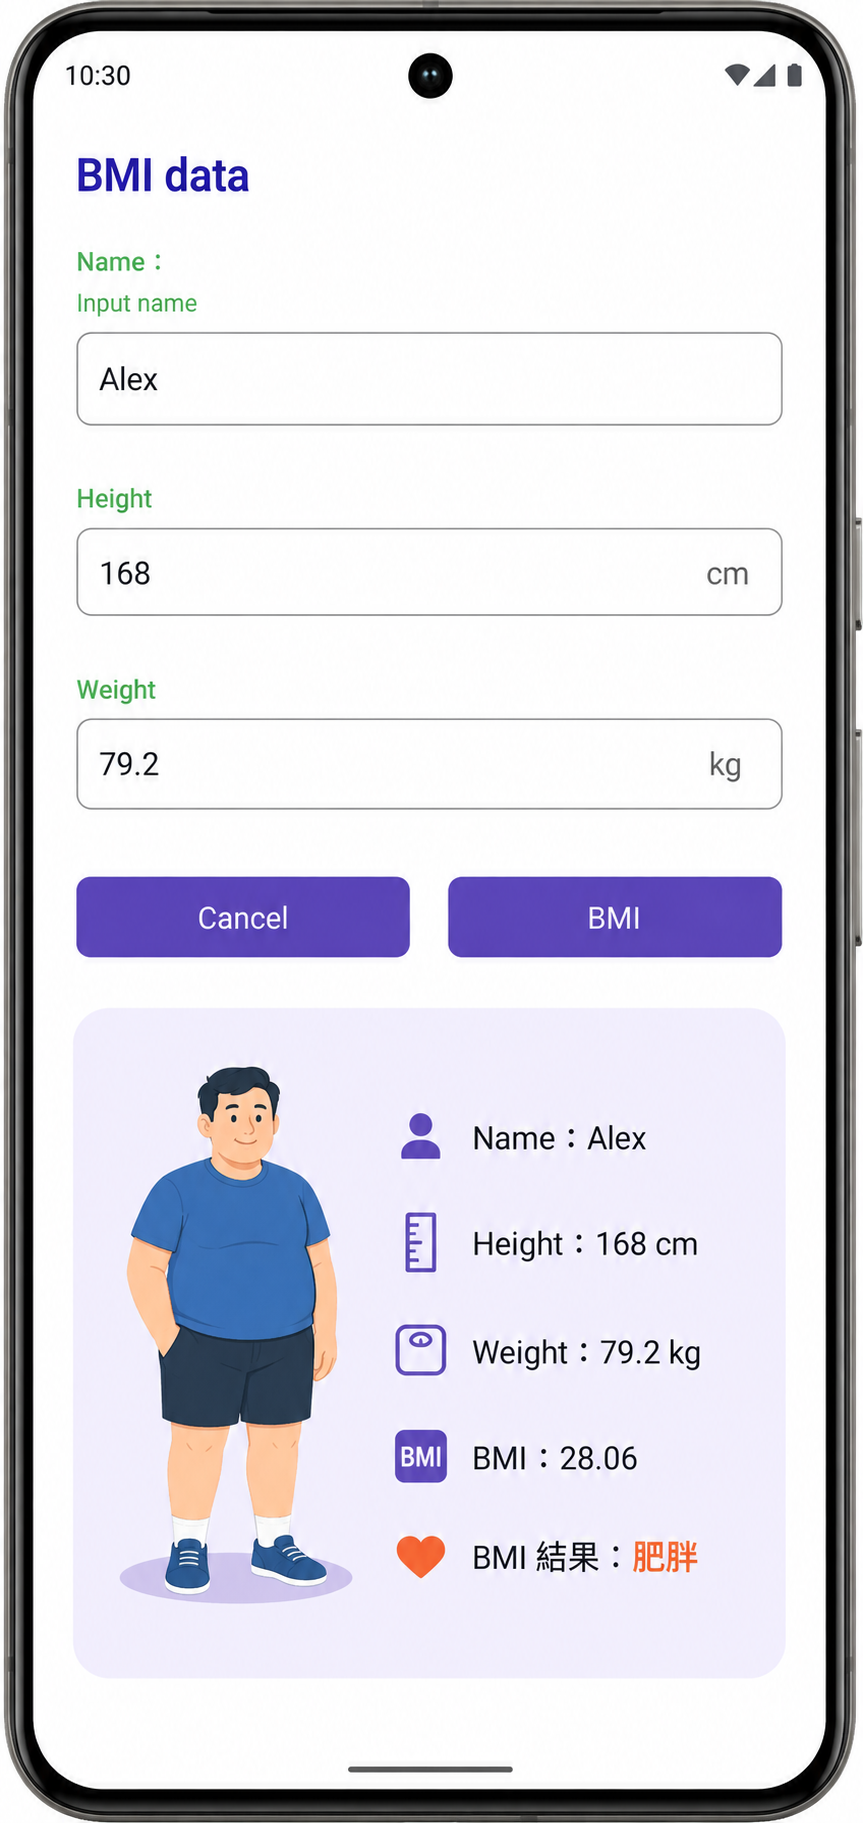
今天不只是把元件放上畫面,而是進一步理解每個元件在版面中的責任:ConstraintLayout 控制主要位置、LinearLayout 管理連續排列、TextInputLayout 負責輸入框外觀與錯誤訊息、TextInputEditText 負責接收資料,而 TextView 則同時顯示 BMI 文字和體位圖片。參考資料:Android Developers-Views layouts
完成 Day 16 後,BMI App 已具備較完整的表單結構、輸入驗證與結果顯示。下一篇可以繼續學習 Spinner 下拉選單與 Switch 開關元件,讓使用者選擇運動頻率、單位或其他健康資料。參考資料:Android Developers-UI components


 iThome鐵人賽
 看影片追技術