

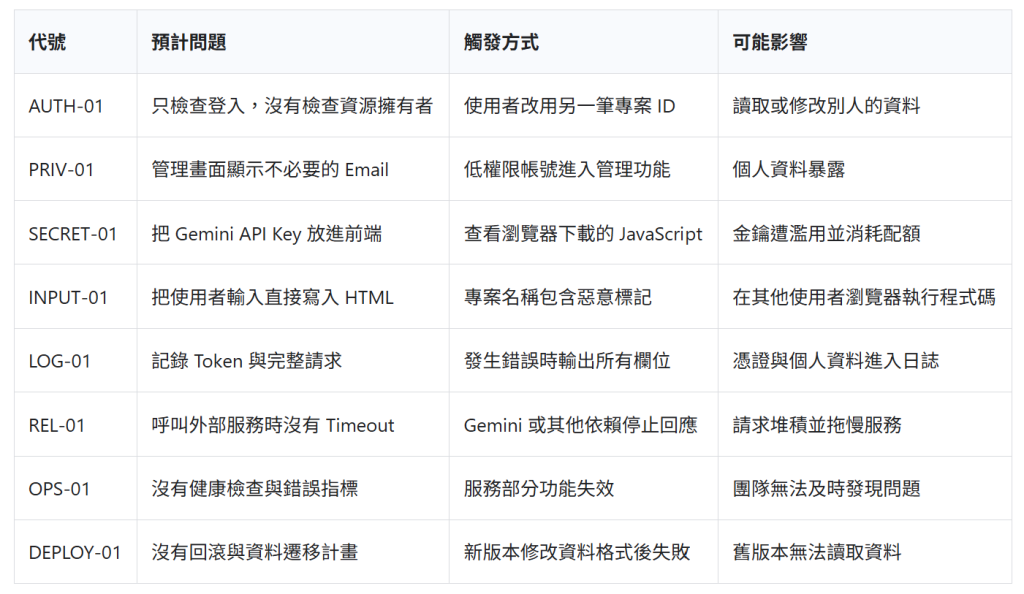
昨天,我們規劃了 Vibe Guard 的架構與測試題目。今天要把第一版產品跑起來。
這一版提供三項功能:
直接連接正式環境會增加三項風險。測試資料可能污染正式資料庫,錯誤規則可能公開資料,重複測試也可能產生費用。
Emulator 把這些操作留在本機。我們可以刪除資料、修改規則並重新啟動,不會影響真實使用者。
Emulator 不是正式環境。它適合開發與測試,但不能證明部署後的 IAM、網路、配額與雲端設定完全正確。
專案已放在:/media/mickey/777/ithome/demo-app
進入專案並安裝相依套件:
cd /media/mickey/777/ithome/demo-app
npm install
專案使用 Firebase Web SDK、Firebase CLI 與 Vite。Firebase Emulator 的 Firestore 元件需要 Java。本機目前已有 Node.js 24、npm 11 與 Java 21。
npm run build
Vite 會把網站輸出到 dist。Firebase Hosting Emulator 接著會提供這個目錄。
實際驗證結果:專案已成功建置。Vite 轉換 21 個模組,並產生 HTML、CSS 與 JavaScript 檔案。
npm run emulators
第一次啟動時,Firebase CLI 會下載 Firestore Emulator 與 Emulator UI。看到 All emulators ready 後,再開啟以下網址: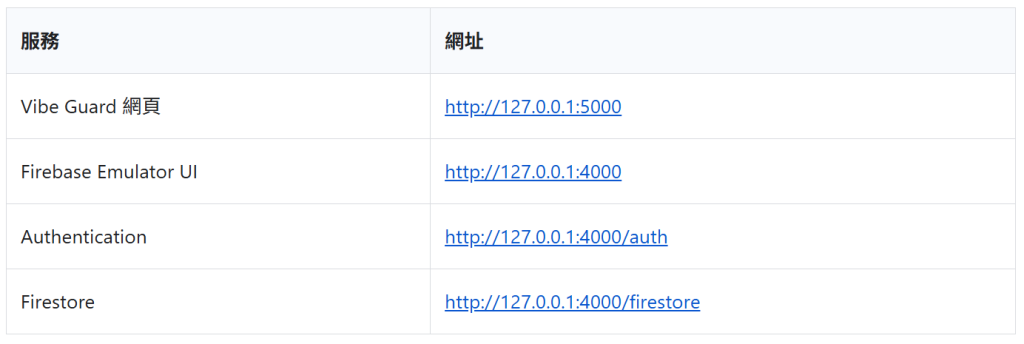
user1@example.test。建立完成後,Authentication Emulator 會保存這個帳號。瀏覽器也會取得登入狀態。
登入後,輸入專案名稱與上線目標。例如:
前端會寫入以下資料:
{
  name: "Vibe Shop",
  launchGoal: "讓使用者建立訂單並查看自己的購買紀錄",
  ownerId: "<目前登入者的 UID>",
  createdAt: "<server timestamp>"
}
ownerId 會成為授權判斷的依據。
系統不能相信瀏覽器自行提供的身分,因此 Firestore 還要使用 Security Rules 檢查登入者 UID。
安全基線使用以下規則:
match /projects/{projectId} {
  allow create: if request.auth != null
    && request.resource.data.ownerId == request.auth.uid;

  allow read, delete: if request.auth != null
    && resource.data.ownerId == request.auth.uid;

  allow update: if request.auth != null
    && resource.data.ownerId == request.auth.uid
    && request.resource.data.ownerId == resource.data.ownerId;
}
建立資料時,規則比較新文件的 ownerId 與登入者 UID。
讀取或刪除時,規則比較既有文件的擁有者。
更新時,規則除了確認既有文件的擁有者,也禁止改寫 ownerId。
以下寫法則有一個明顯問題:
allow read, write: if request.auth != null;
這條規則只檢查使用者是否登入。任何登入者都可能讀寫其他人的資料。
Day 5 會刻意加入這個問題,再嘗試重現越權存取。
Firebase Web App 的 API Key 用來識別專案與計算配額,不負責授權 Firestore 資料。
Firebase 官方文件允許把這類設定放在 Web App 中,但仍建議限制金鑰可呼叫的 API。真正限制資料存取的是 Authentication、Security Rules 與其他保護措施。
這不代表所有 Google API Key 都能放在前端。
可以呼叫 Gemini Generative Language API 的金鑰不應加入 Firebase Web 設定,也不應打包進瀏覽器 JavaScript。
我們目前使用 demo-api-key,因為所有請求只送到本機 Emulator。
我們已經建立一個可重現的安全基線:
明天,我們會刻意破壞這個基線。我們將放寬授權規則、加入不安全的輸出方式,並建立可以重現的 Production 問題。


 iThome鐵人賽
 看影片追技術