

因為 React 是一個單頁應用程式 (SPA),我們需要透過「路由 (Router)」來讓網址列產生變化,並切換顯示不同的組件。今天我們將使用最新版的 react-router-dom 來建立登入頁面與內部功能頁面,並加上簡單的權限卡控 (ProtectedRoute)。
為什麼在 React 中我們不能直接寫 <a href="/login.html"> 來換頁,而非得裝一個 Router 套件不可?
index.html。當我們在 React Router 裡點擊換頁時,其實只是網址列的字變了,React 會「瞬間抽換」畫面中間的 DOM 節點。沒有白畫面、沒有重新載入,給予使用者猶如在用原生 App 般滑順的體驗!在 src/App.tsx 中,我們定義了系統的網頁動線:
import { BrowserRouter, Routes, Route, Navigate } from 'react-router-dom';
import LoginPage from './pages/LoginPage';
import HoldingsPage from './pages/HoldingsPage';
import ProtectedRoute from './components/common/ProtectedRoute';

const App: React.FC = () => {
  return (
    <BrowserRouter>
      <Routes>
        {/* 公開的登入頁面 */}
        <Route path="/login" element={<LoginPage />} />

        {/* 受保護的內部系統 */}
        <Route path="/" element={
          <ProtectedRoute>
             {/* 內部頁面的共用 Layout (如 Header、側邊欄) 可包在這 */}
            <HoldingsPage />
          </ProtectedRoute>
        } />

        {/* 找不到路由時,預設導回首頁 */}
        <Route path="*" element={<Navigate to="/" replace />} />
      </Routes>
    </BrowserRouter>
  );
};
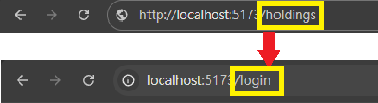
網址列輸入
/holdings但因為沒登入,而被ProtectedRoute自動阻擋並踢回/login的連續動作畫面。
網站的「地圖與動線」畫好了!接下來我們就要開始實作各個頁面的真實長相。明天先從第一關「登入頁面」的切版開始!


 iThome鐵人賽
 看影片追技術