

在 Day 4 我們將 Google Stitch 的設計稿成功轉譯為 React.js 前端架構後,今天我們要深入進行 UI 畫面打磨與微互動元件體驗優化 (Micro-interactions & UI Polish),讓整體模擬面試艙的視覺質感與操作體驗更具專業沉浸感。
為了給使用者帶來流暢且具備沉浸感的模擬面試體驗,我們在 React 前端進行了以下四大維度的細節打磨:
視覺層次與 Color Design System:
#4f46e5) 作為核心品牌主色,搭配 Emerald (#10b981) 成功狀態與 Rose (#f43f5e) 盲點警告色。shadow-sm / shadow-xs) 與圓角 (rounded-xl / rounded-2xl),提升畫面精緻度。動態波形與聲音視覺反饋 (WaveformBar.jsx):
即時聽寫與打字機流暢動畫:
animate-mvBlink) 與動態脈衝麥克風按鈕 (animate-mvPulse)。響應式佈局 (Responsive Layout & Mobile Support):
Shell.jsx 在行動裝置下自動收合為流暢 Icon 佈局,維持高可用性。src/components/WaveformBar.jsx)import React, { useEffect, useState } from 'react';
export default function WaveformBar({ isSpeaking = true }) {
const [heights, setHeights] = useState([40, 75, 55, 90, 60, 80, 45, 95, 70, 50, 85, 65, 90, 40, 70, 50]);
useEffect(() => {
if (!isSpeaking) return;
const interval = setInterval(() => {
setHeights(
Array.from({ length: 16 }, () => Math.floor(Math.random() * 75) + 20)
);
}, 150);
return () => clearInterval(interval);
}, [isSpeaking]);
return (
<div class="flex items-end gap-1.5 h-12 w-48 justify-center">
{heights.map((h, idx) => (
<div
key={idx}
style={{ height: isSpeaking ? `${h}%` : '15%' }}
class="w-1.5 bg-indigo-500 rounded-full transition-all duration-150"
/>
))}
</div>
);
}
src/index.css)/* 麥克風錄音動態脈衝效果 */
@keyframes mvPulse {
0% {
box-shadow: 0 0 0 0 rgba(79, 70, 229, 0.4);
}
70% {
box-shadow: 0 0 0 16px rgba(79, 70, 229, 0);
}
100% {
box-shadow: 0 0 0 0 rgba(79, 70, 229, 0);
}
}
.animate-mvPulse {
animation: mvPulse 2s infinite cubic-bezier(0.66, 0, 0, 1);
}
/* 備審檔案拖曳區掃描條動畫 */
@keyframes scanVertical {
0% { top: 0; opacity: 0; }
10% { opacity: 1; }
90% { opacity: 1; }
100% { top: 100%; opacity: 0; }
}
.mvScan {
position: absolute;
left: 0;
width: 100%;
height: 2px;
background: linear-gradient(to right, transparent, #10b981, transparent);
box-shadow: 0 0 12px 2px rgba(16, 185, 129, 0.5);
animation: scanVertical 2.5s infinite cubic-bezier(0.4, 0, 0.2, 1);
z-index: 10;
}
在與 Google Antigravity AI 對話溝通時,我們提出了以下關鍵 Prompt 進行 UI 參數與出題難度重構:
> "幫我修改:
> 1. 目標學系要可以被輸入。
> 2. 選單設定要可以包含「學群」與「學校」,其中『學群』使用下拉選單,『學校』使用文字輸入。
> 3. 越高等、越前面的頂尖名校(如台大、成大、清大、交大等),後端 AI 設計時要給予比較困難的『技術專業型問題』與『長篇申論型大題』。"
src/pages/SetupPage.jsx:
🔥 頂尖前段名校模式 Amber 提醒看板。src/api/mockApi.js:
mockDepartmentGroups(包含資訊電機學群、醫藥衛生學群、工程學群等 10 大學群)。checkSchoolTier(schoolName) 函式,自動過濾頂尖前段大學關鍵字並開啓難度加成。src/pages/InterviewPage.jsx & ReportPage.jsx & HistoryPage.jsx:
目標學校 · 目標學群 · 目標學系 完整履歷標籤。經由 Antigravity 自動化重構與測試,成果截圖如下:
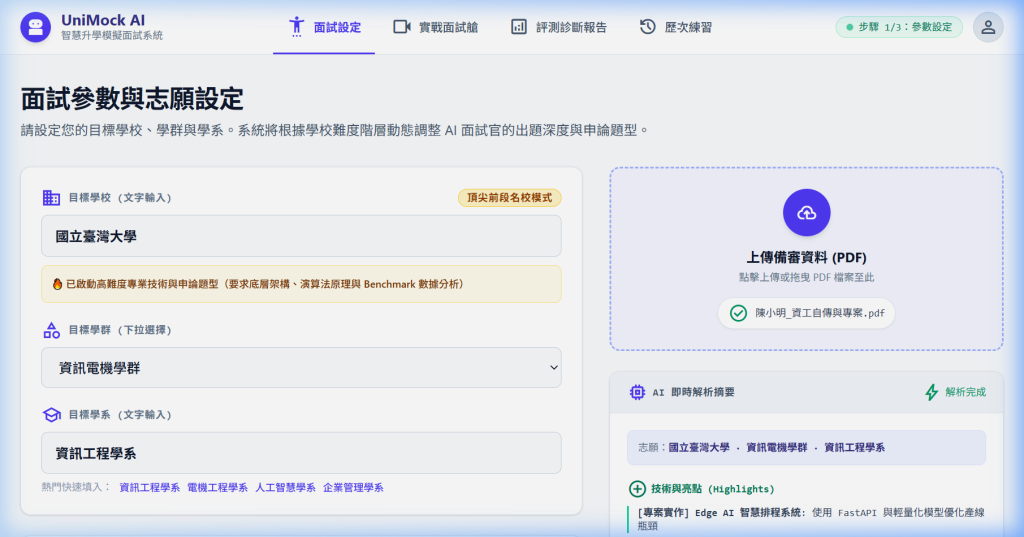
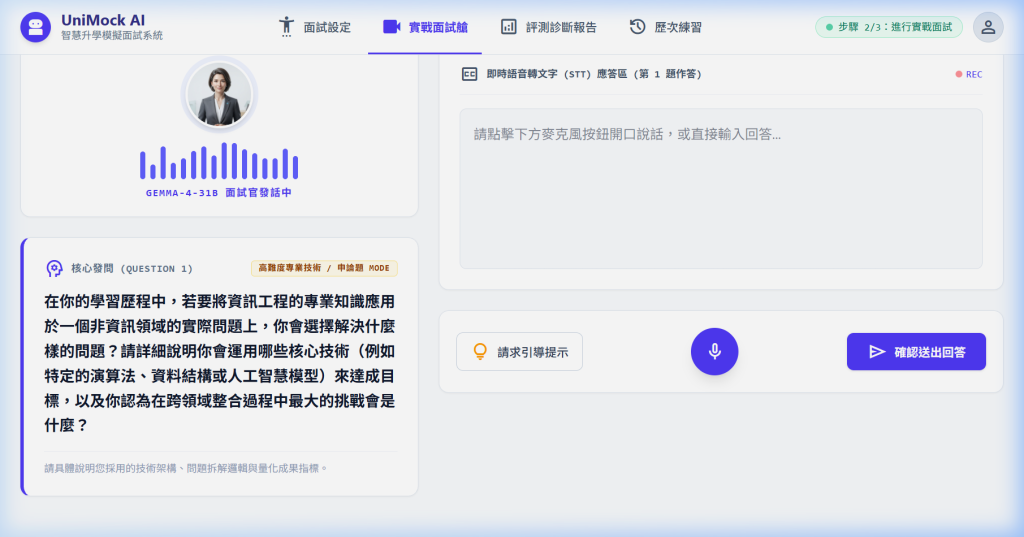
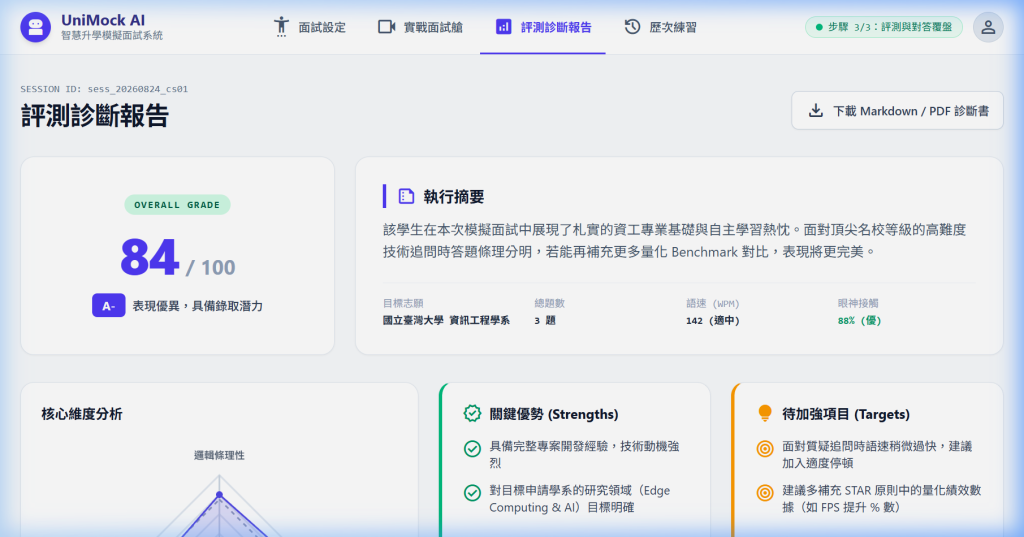
今天我們完成全套 UI 畫面打磨與微互動元件體驗優化,第一階段「專案啟航與 UI 原型」完美收官!
明天 【Day 6】,我們將邁入第二階段:開始建置面試題庫清理與向量 Embedding 資料庫!


 iThome鐵人賽
 看影片追技術