

在第一部分中,我們展示了如何使推薦和標籤列表符合 a11y 規範。在第二部分中,我們展示了 AudioTagsComponent 的程式碼重構,以及在新的 VoiceSelectorComponent 中重新實作 a11y。
我在 AudioTagsComponent 中實作了 Angular Aria,它通過了單元測試和手動測試。然而,該元件具有許多訊號(signal),且 HTML 範本檔案稍微超過 100 行。起初,我懷疑該元件是一個淺模組(shallow module)並需要進行深化。因此,我提示了 codebase-design 技能來審查該元件。
/codebase-design audio-tags.component.ts for any deepening opportunity
Gemini 回覆指出 AudioTagsComponent 是一個深模組(deep module),但該類別具有許多呈現狀態(presentational state)。調查顯示,語音選取邏輯與語音標籤訊號表單是互相獨立的。因此,Gemini 建議將語音選取邏輯移動到新的 VoiceSelectorComponent 中。
這啟動了 AudioTagsComponent 的程式碼重構。
在決定重構 AudioTagsComponent 之後,我提示 Gemini 根據對話內容更新 ADR。
Please revise the <ADR of Angular Aria> based on our conversation
我們執行了 ng new c 來建置新的 VoiceSelectorComponent 骨架:
ng g c feature/dashboard/components/voiceSelector --flat
首先,我們將常數和介面移動到 voice-selector 資料夾。
export interface VoiceItem {
  name: string;
  description: string;
}
export const VOICE_OPTIONS: VoiceItem[] = [
  { name: 'Zephyr', description: 'Bright' },
  ... other voice names ...
  { name: 'Sulafat', description: 'Warm' },
];

export const SORTED_VOICE_OPTIONS = [...VOICE_OPTIONS]
  .sort((a, b) => a.name.localeCompare(b.name))
  .map((option) => ({
    name: option.name,
    label: `${option.name} - ${option.description}`,
  }));

export const SORTED_VOICE_MAP = new Map<string, string>(
  SORTED_VOICE_OPTIONS.map((option) => [option.name, option.label]),
);
然後,我將訊號(signal)和方法從 AudioTagsComponent 移動到 VoiceSelectorComponent。
export const DEFAULT_VOICE = 'Kore';

function getVoiceValue(newValues: string[]) {
  const candidate = newValues?.[0];
  return candidate && SORTED_VOICE_MAP.has(candidate) ? candidate : DEFAULT_VOICE;
}

@Component({
  selector: 'app-voice-selector',
  templateUrl: './voice-selector.component.html',
  styleUrl: './voice-selector.component.css',
  imports: [Combobox, ComboboxPopup, ComboboxWidget, Listbox, Option, OverlayModule],
})
export class VoiceSelectorComponent {
  listbox = viewChild(Listbox);

  valueChange = output<string>();

  sortedVoiceOptions = SORTED_VOICE_OPTIONS;

  selectedValues = signal([DEFAULT_VOICE]);

  popupExpanded = signal(false);

  displayLabel = computed(() => {
    const value = getVoiceValue(this.selectedValues());
    return SORTED_VOICE_MAP.get(value) || SORTED_VOICE_MAP.get(DEFAULT_VOICE);
  });

  constructor() {
    afterRenderEffect(() => this.listbox()?.scrollActiveItemIntoView());
  }

  onCommit() {
    this.popupExpanded.set(false);
  }

  onValueChange(newValues: string[]) {
    this.selectedValues.set(newValues);
    this.valueChange.emit(getVoiceValue(newValues));
  }
}
VoiceSelectorComponent 將 Combobox、ComboboxPopup、ComboboxWidget、Listbox、Option 以及 OverlayModule 匯入到 Component 裝飾器的 imports 陣列中。
計算訊號(computed signal)displayLabel 會在下拉組合方塊(combobox)中顯示所選的語音標籤,格式為 <語音名稱> - <語音情感>。
onValueChange 方法接受語音名稱列表,擷取第一個值,並透過自訂的 valueChange 輸出將該值發送至父元件 AudioTagsComponent。
<div class="form-field-group-full">
  <label for="voiceOption" class="form-field-label">AI Voice Model</label>
  <div
    id="voiceOption"
    ngCombobox
    #comboboxRef="ngCombobox"
    [(expanded)]="popupExpanded"
    [preserveContent]="true"
    class="form-field-select voice-trigger"
  >
    <div class="voice-trigger-left">
      <span class="voice-trigger-text">{{ displayLabel() }}</span>
      <span class="voice-arrow material-symbols-outlined" translate="no" aria-hidden="true"> arrow_drop_down </span>
    </div>

    <ng-template
      [cdkConnectedOverlay]="{ origin: comboboxRef.element, usePopover: 'inline', matchWidth: true }"
      [cdkConnectedOverlayOpen]="popupExpanded()"
    >
      <ng-template ngComboboxPopup [combobox]="comboboxRef">
        <div class="voice-popup-container">
          <div
            #listbox="ngListbox"
            ngListbox
            ngComboboxWidget
            [tabindex]="-1"
            focusMode="activedescendant"
            selectionMode="explicit"
            [value]="selectedValues()"
            (valueChange)="onValueChange($event)"
            [activeDescendant]="listbox.activeDescendant()"
            (click)="onCommit()"
            (keydown.enter)="onCommit()"
            (keydown.space)="onCommit()"
          >
            @for (option of sortedVoiceOptions; track option.name) {
              <div ngOption [value]="option.name" [label]="option.label">
                <span class="voice-icon material-symbols-outlined" translate="no" aria-hidden="true"> mic </span>
                <span class="voice-option-text">{{ option.label }}</span>
                <span class="voice-icon option-check material-symbols-outlined" translate="no" aria-hidden="true">
                  check
                </span>
              </div>
            }
          </div>
        </div>
      </ng-template>
    </ng-template>
  </div>
</div>
HTML 範本建置了帶有列表方塊(list box)的下拉組合方塊。@for 迴圈會迭代 sortedVoiceOptions 列表,將語音標籤分配給 label 輸入,並將語音名稱分配給 value 輸入。每個列表方塊項目都包含一個麥克風圖示、語音標籤和打勾圖示。這些圖示具有 material-symbols-outlined CSS 類別,該類別必須定義在全域的 styles.css 中以便重複使用。如果缺少此類別,圖示文字將會以非預期的方式顯示。
npm i --save-exact @fontsource/material-symbols-outlined@5.3.4
安裝依賴項目並將字型檔(font face)匯入至 styles.css 中。
@import '@fontsource/material-symbols-outlined/400.css';

.material-symbols-outlined {
  font-family: 'Material Symbols Outlined', sans-serif;
  font-weight: normal;
  font-style: normal;
  font-size: 24px;
  line-height: 1;
  letter-spacing: normal;
  text-transform: none;
  display: inline-block;
  white-space: nowrap;
  word-wrap: normal;
  direction: ltr;
  -webkit-font-smoothing: antialiased;
  -moz-osx-font-smoothing: grayscale;
  text-rendering: optimizeLegibility;
  font-feature-settings: 'liga';
}
VoiceSelectorComponent 應該能成功轉譯(render)圖示。實作已完成,我們可以將此元件匯入至 AudioTagsComponent 中。
export const DEFAULT_VOICE = 'Kore';

@Component({
  selector: 'app-audio-tags',
  imports: [FormField, VoiceSelectorComponent],
  templateUrl: './audio-tags.component.html',
  styleUrl: './audio-tags.component.css',
})
export class AudioTagsComponent {
  #audioPromptModel = signal<AudioPromptData>({
    scene: 'A news anchor reading the news in a busy newsroom',
    emotion: 'professional, slightly serious',
    pace: 'moderate, clear enunciation',
    voiceOption: DEFAULT_VOICE,
  });

  audioPromptForm = form(this.#audioPromptModel);

  audioPromptModel = this.#audioPromptModel.asReadonly();

  onValueChange(newValue: string) {
    this.#audioPromptModel.update((model) => ({
      ...model,
      voiceOption: newValue,
    }));
  }
}
當 VoiceSelectorComponent 發送語音名稱時,onValueChange 方法會更新模型的 voiceOption 屬性。在程式碼重構前後,其行為應保持一致。
<div class="audio-customize-container">
    <!-- Other form fields -->

    <!-- Voice Option -->
    <app-voice-selector (valueChange)="onValueChange($event)" />
  </div>
</div>
舊的 HTML 程式碼被替換為 <app-voice-selector /> 元素,使得檔案更加乾淨且易於閱讀。valueChange 自訂事件會將選取的語音傳遞給元件的 onValueChange 方法。
AudioTagsComponent 已成功重構。我們重複執行測試案例並分析程式碼覆蓋率的步驟。
angular-cli: run the tests in voice-selector.component.ts with code coverage
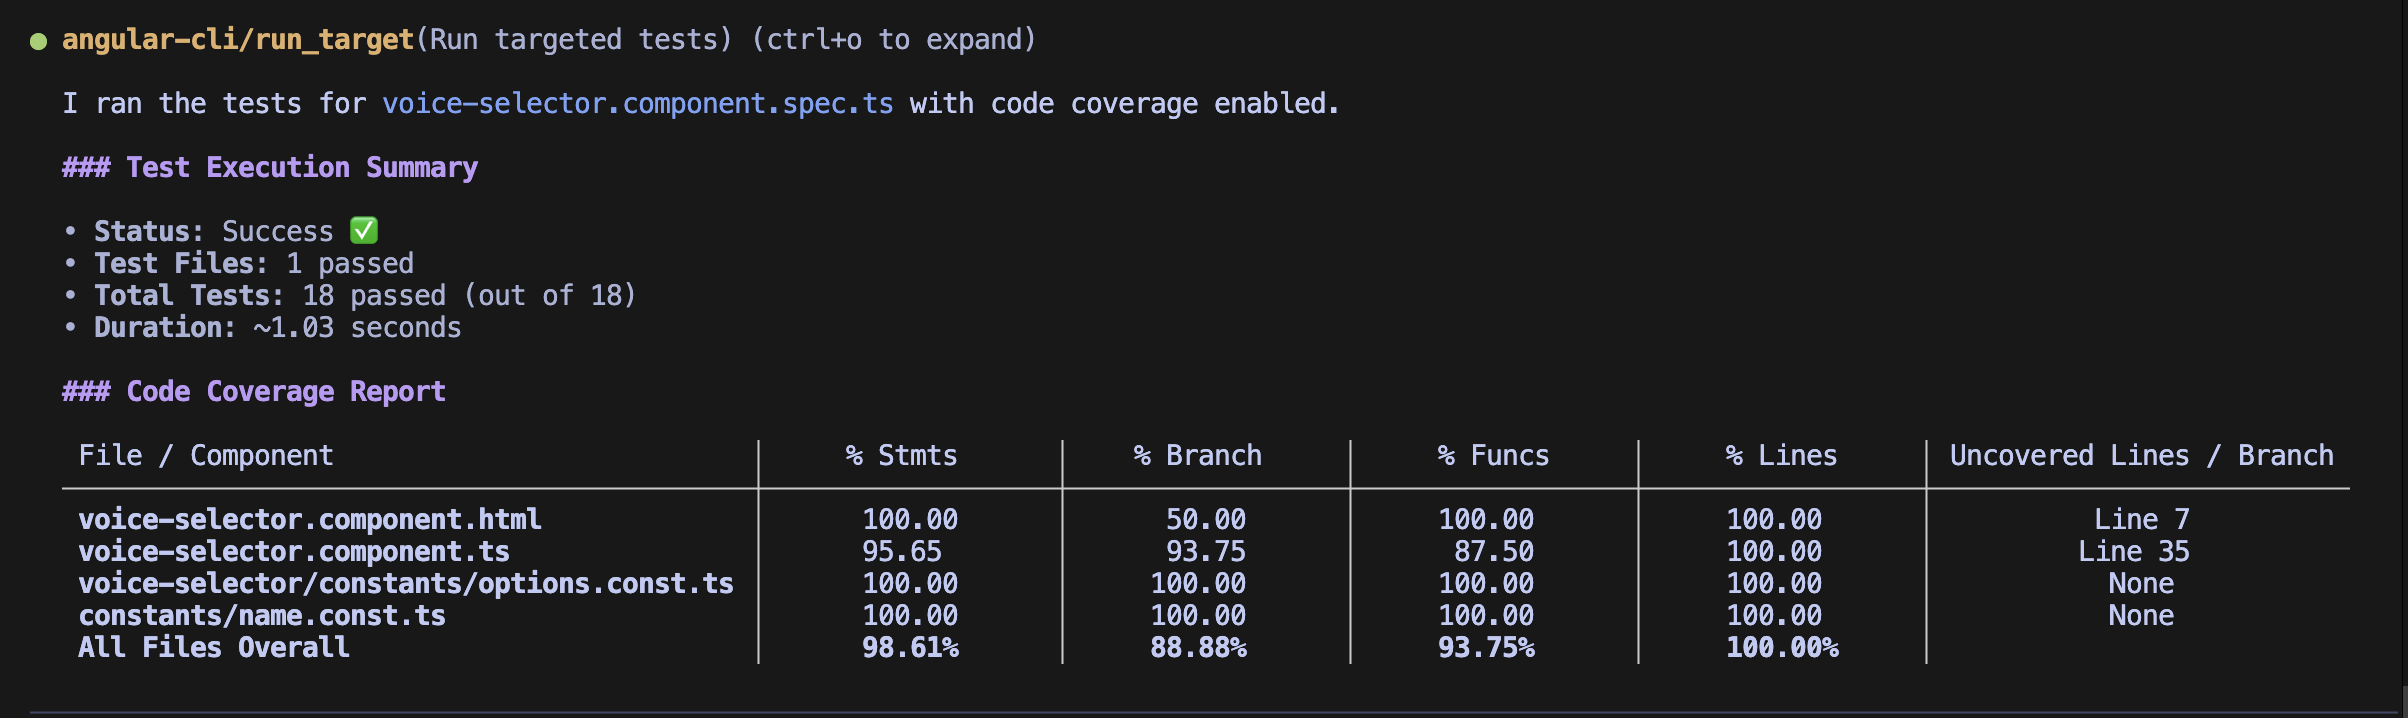
表格顯示第 35 行有無法觸及的程式碼(unreachable code),因此我使用 tdd 來找出根本原因。
tdd what happens to line 35 of voice-selector.component.ts
 )
)
移除 SORTED_VOICE_MAP.get(DEFAULT_VOICE) 後,分支百分比達到了 100%。
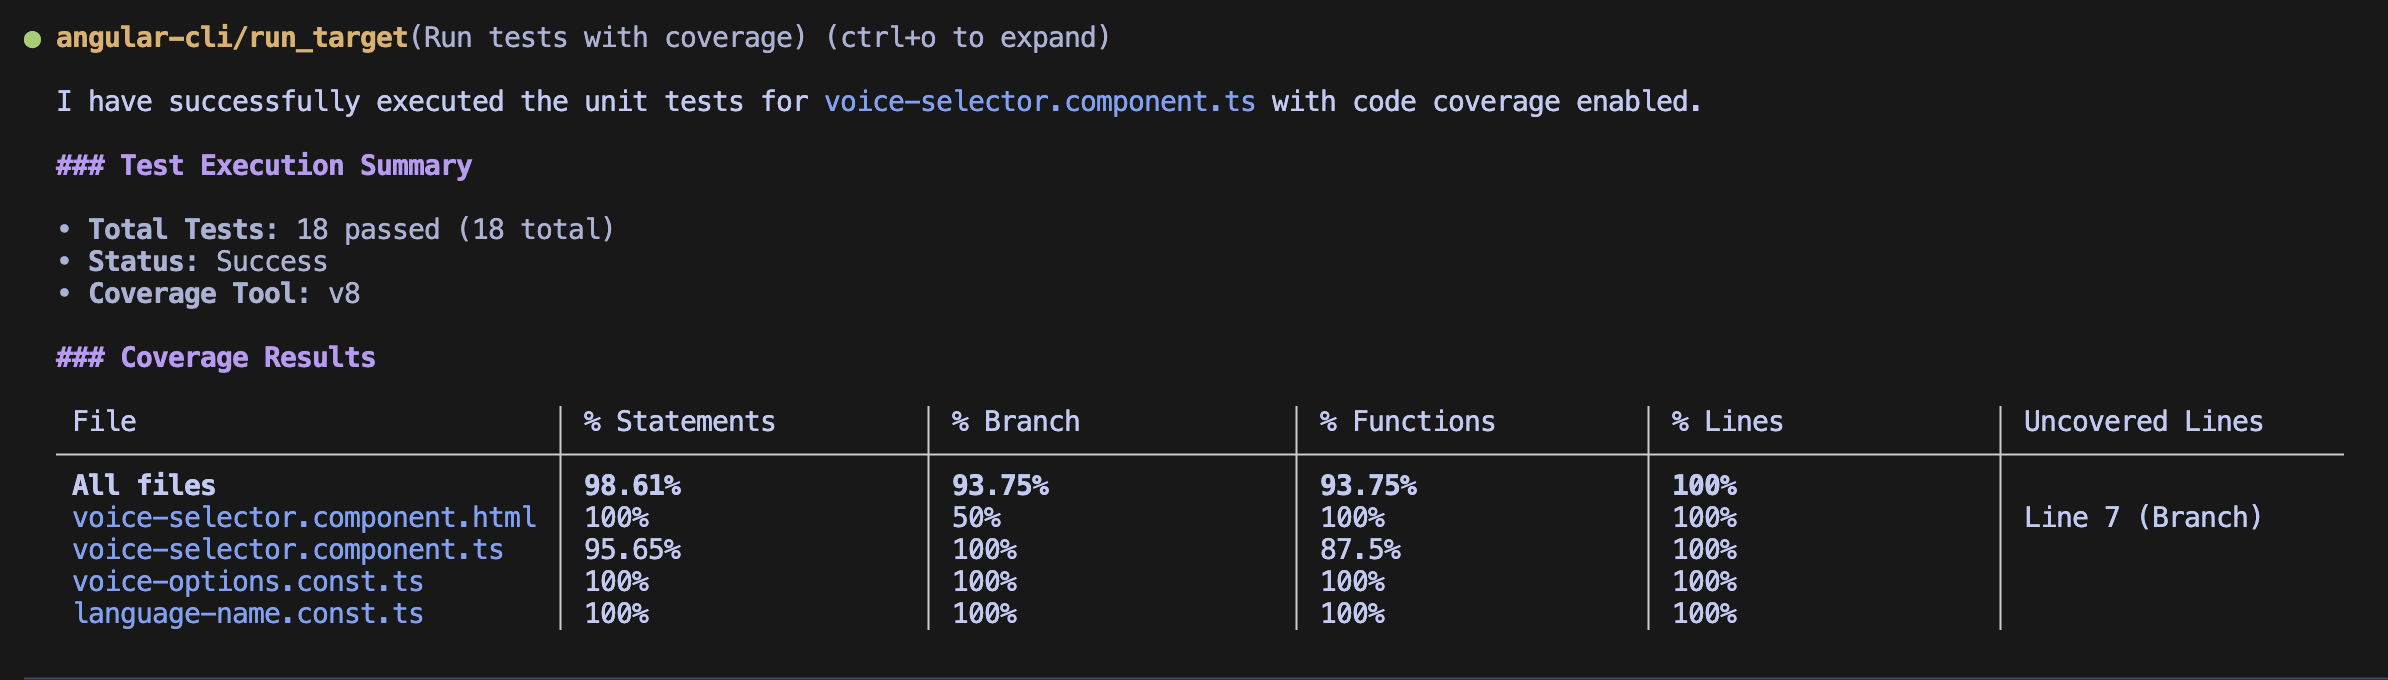
angular-cli: run the tests in audio-tags.component.ts with code coverage
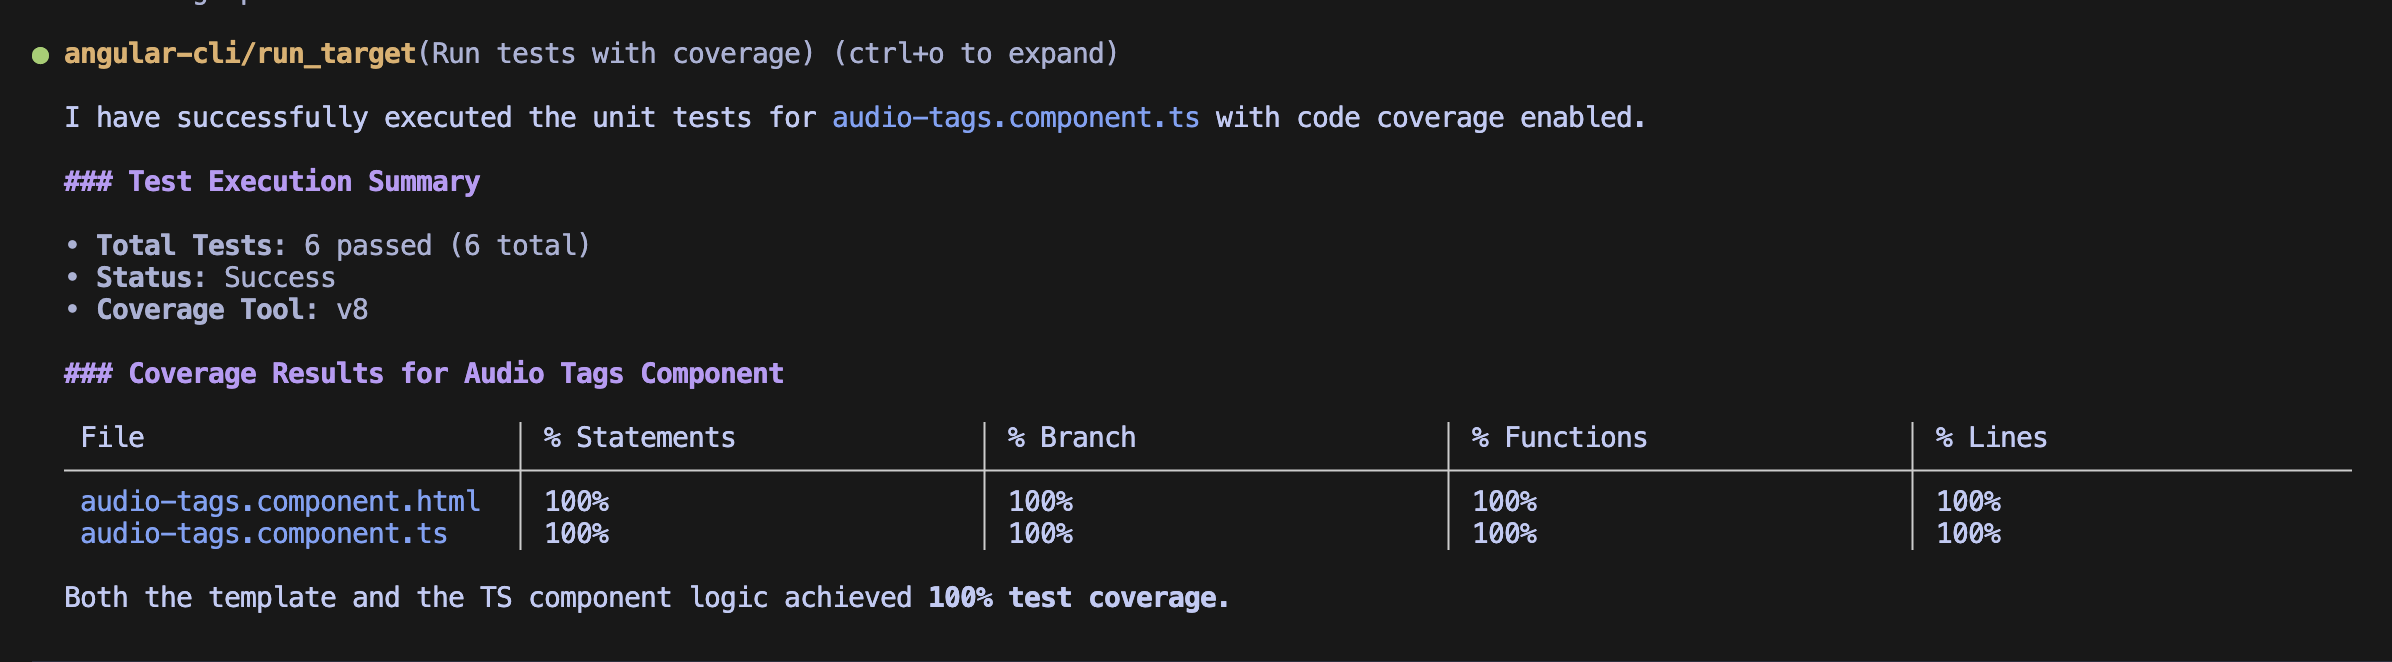
AudioTagsComponent 的覆蓋率為 100%。
/code-review main against /0006-accessible-custom-components-angular-aria.md and @.scratch/angular-aria/spec.md.

Before reporting any accessibility or syntax violation on @angular/aria, you MUST search the official Angular documentation using angular-cli MCP tools. If a pattern matches the official Angular example, it MUST NOT be flagged as a violation.

忽略誤判,VoiceSelectorComponent 有一個程式碼異味(code smell)。selectedValues 應該改為單數且型別為 model<string>,以便它能接收來自 AudioTagsComponent 的語音名稱。
function getVoiceValue(newValue: string) {
  return newValue && SORTED_VOICE_MAP.has(newValue) ? newValue : DEFAULT_VOICE;
}

@Component({
  selector: 'app-voice-selector',
  templateUrl: './voice-selector.component.html',
  styleUrl: './voice-selector.component.css',
  imports: [Combobox, ComboboxPopup, ComboboxWidget, Listbox, Option, OverlayModule],
})
export class VoiceSelectorComponent {
  selectedValue = model.required<string>();

  displayLabel = computed(() => {
    const value = getVoiceValue(this.selectedValue());
    return SORTED_VOICE_MAP.get(value);
  });

  /* Set selectedValue in the template, and remove the valueChange output */
}
<ng-template ngComboboxPopup [combobox]="comboboxRef">
    <div class="voice-popup-container">
        <div
            ... no change ...
            [value]="[selectedValue()]"
            (valueChange)="selectedValue.set($event[0])"
            ... no change ...
        >
        ... no change to the for loop
    </div>
</ng-template>
VoiceSelectorComponent 將 selectedValues 重新命名為 selectedValue,並將其從訊號(signal)轉換為必填的 model()。
範本直接指派並更新 model,因此可以省略 valueChange 輸出。
@Component({
  selector: 'app-audio-tags',
  imports: [FormField, VoiceSelectorComponent],
  templateUrl: './audio-tags.component.html',
  styleUrl: './audio-tags.component.css',
})
export class AudioTagsComponent {
  #audioPromptModel = signal<AudioPromptData>({
    scene: 'A news anchor reading the news in a busy newsroom',
    emotion: 'professional, slightly serious',
    pace: 'moderate, clear enunciation',
    voiceOption: DEFAULT_VOICE,
  });
  audioPromptForm = form(this.#audioPromptModel);

  selectedValue = computed(() => this.#audioPromptModel().voiceOption);

  onValueChange(newValues: string) {
    const voiceOption = newValues ?? DEFAULT_VOICE;
    this.#audioPromptModel.update((model) => ({
      ...model,
      voiceOption,
    }));
  }
}
<app-voice-selector [selectedValue]="selectedValue()" (selectedValueChange)="onValueChange($event)" />
AudioTagsComponent 使用雙向繫結(two-way binding)來更新表單模型的 voiceOption 屬性。
規格審查未發現任何問題,而標準審查則對 model() 的語法有些吹毛求疵。所有問題皆已解決,功能分支可以合併至 main 分支。

我們在 Angular 應用程式中取得了進展。它不僅支援 PWA,還支援 a11y。明天,我們將使用 Firebase MCP 伺服器建立一個包含網路應用程式、Firebase AI 邏輯和 Remote Config 的 Firebase 專案。然後,我們導覽至 Firebase 主控台以啟用 Agent Platform API 和 reCAPTCHA Enterprise。


 iThome鐵人賽
 看影片追技術