
今天正式寫第一個 WebMCP Tool。我們會用 document.modelContext.registerTool() 註冊一個 get_page_info,再用 getTools() 確認 Tool 存在,最後用 executeTool() 手動執行。
先把 Agent 放一邊。只要這三步都能成功,就代表「網站提供 Tool」這條路徑已經打通。
Day 05 先不要進 WordPress、Laravel,也不用先做複雜 UI。這一天只驗證一件事:瀏覽器能不能看到我們註冊的第一個 WebMCP Tool,而且可以真的執行它。
這個 Demo 不需要 Node.js、npm 或後端框架,先在 VS Code 建一個資料夾:
day05-webmcp/
├── index.html
└── app.js
index.html:
<!DOCTYPE html>
<html lang="zh-Hant">
<head>
  <meta charset="UTF-8">
  <meta name="viewport" content="width=device-width, initial-scale=1.0">
  <title>WebMCP Lab</title>
</head>
<body>
  <h1>Day 05 - Hello WebMCP</h1>
  <p>第一個 WebMCP Tool 實驗。</p>

  <script type="module" src="./app.js"></script>
</body>
</html>
這裡要注意 type="module",因為後面的 app.js 會直接使用 top-level await。
在 Chrome 網址列輸入:
chrome://flags/#enable-webmcp-testing
把 WebMCP testing flag 設成:
Enabled
然後重新啟動 Chrome。Chrome 官方目前就是用這個 flag 支援本機 WebMCP 開發;公開網站則另外走 Origin Trial。
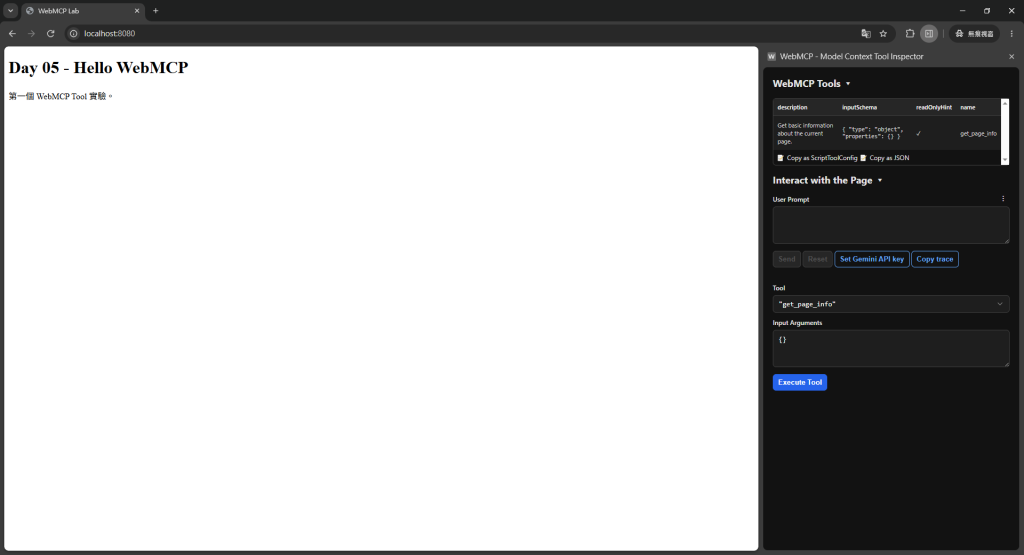
另外建議安裝 Model Context Tool Inspector。它可以查看目前頁面註冊了哪些 Tools、手動執行 Tool、檢查 Input Schema 與 Result。若要使用 Inspector 上方的 Interact with the Page 以自然語言測試 Agent 是否會選對 Tool,還需要先按 Set Gemini API Key 設定 Gemini API Key。這個 Inspector 是獨立的 WebMCP 測試工具,和 Chrome 內建的 Gemini 不是同一個功能。
最簡單可以在 VS Code 安裝 Live Server,對 index.html 選 Open with Live Server。
如果不想裝外掛,也可以直接在 VS Code Terminal 執行:
python -m http.server 8080
Windows 如果 python 指令不可用,可以試:
py -m http.server 8080
然後在 Chrome 打開:
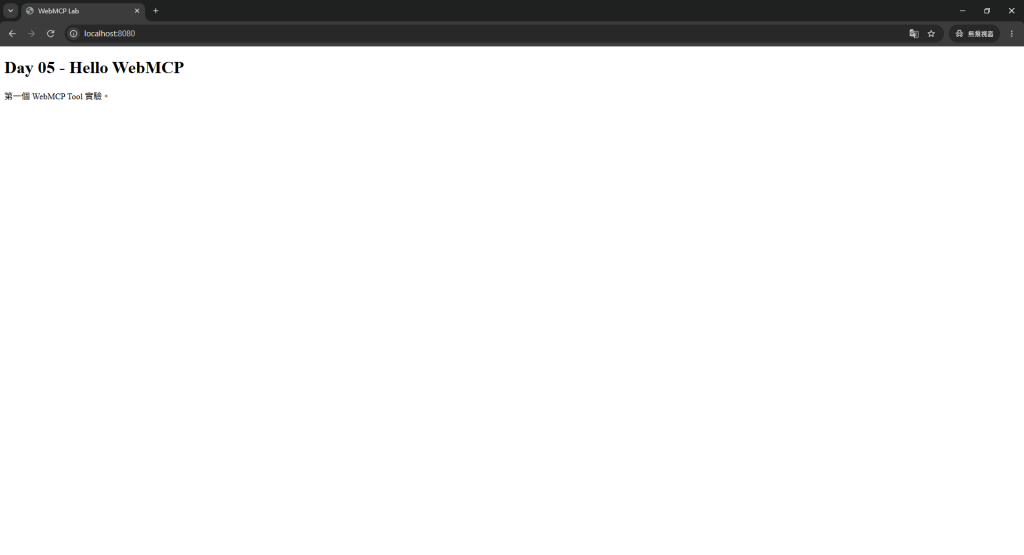
http://localhost:8080/
📸 圖片 1|VS Code 的最小 WebMCP Demo 已在 localhost 跑起來
Tool 功能刻意選最簡單的:取得目前頁面的資訊。
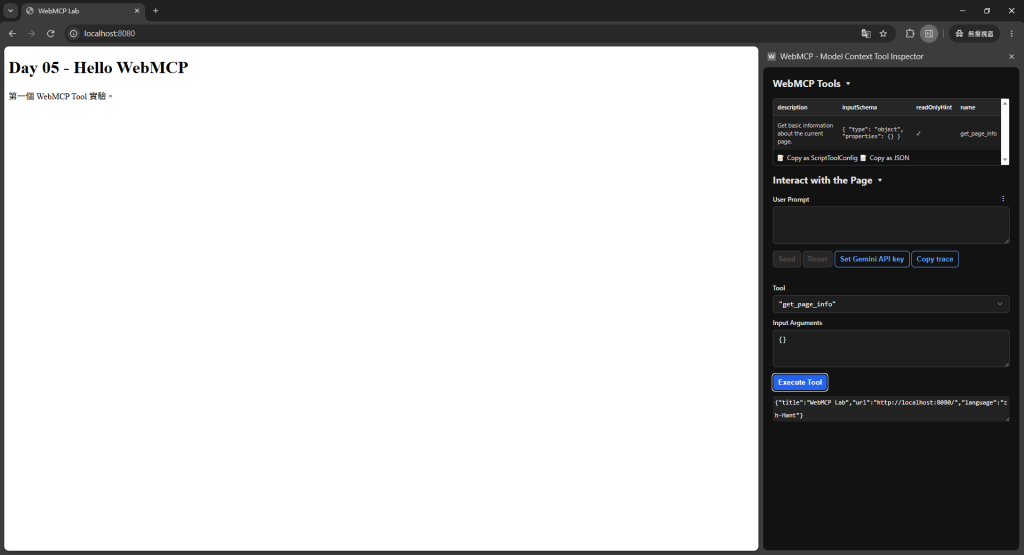
預期回傳:
{
  "title": "WebMCP Lab",
  "url": "http://localhost:8080/",
  "language": "zh-Hant"
}
這是一個:
的 Tool,很適合當第一個範例。
app.js:
if (!document.modelContext) {
  throw new Error('WebMCP is not available.');
}

await document.modelContext.registerTool({
  name: 'get_page_info',
  description: 'Get basic information about the current page.',
  inputSchema: {
    type: 'object',
    properties: {}
  },
  annotations: {
    readOnlyHint: true
  },
  execute: async () => {
    return JSON.stringify({
      title: document.title,
      url: location.href,
      language: document.documentElement.lang || null
    });
  }
});

console.log('get_page_info registered');
📸 圖片 2|Tool Inspector 已看到
get_page_info
這裡有四個最重要的欄位:
name
→ Tool 的穩定識別名稱

description
→ 告訴 Agent 這個 Tool 什麼時候有用

inputSchema
→ Tool 接受哪些結構化參數

execute
→ 真正執行網站功能
今天 Schema 是空物件,因為不需要參數。
目前 Chrome WebMCP 支援 Tool annotations,其中 readOnlyHint: true 表示這個 Tool 不會改變應用程式狀態。
annotations: {
  readOnlyHint: true
}
這不是權限防線,但它能提供 Agent/Browser 額外安全語意,協助判斷是否需要確認。
在加入購物車、刪除、付款這類操作裡,annotations 會更重要。
官方 API 提供:
const tools = await document.modelContext.getTools();
console.log(tools);
你應該會看到類似:
[
  {
    name: 'get_page_info',
    description: 'Get basic information about the current page.',
    // ...
  }
]
這一步對開發很好用,因為你不需要先接真正 Agent 才知道 Tool 有沒有存在。
也可以做一個簡單 Debug Helper:
async function debugTools() {
  const tools = await document.modelContext.getTools();

  console.table(
    tools.map(tool => ({
      name: tool.name,
      origin: tool.origin,
      readOnly: tool.annotations?.readOnlyHint ?? false
    }))
  );
}

await debugTools();
先拿到 Tool:
const tools = await document.modelContext.getTools();
const tool = tools.find(t => t.name === 'get_page_info');
再執行:
const result = await document.modelContext.executeTool(
  tool,
  {}
);

console.log(result);
目前官方 executeTool() 可以直接接受可序列化成 JSON 的 JavaScript object,所以即使沒有參數,也可以直接傳:
{}
也就是:
const result = await document.modelContext.executeTool(tool, {});
舊版文件曾使用 JSON 字串作為輸入參數;Chrome 官方英文文件在 2026-09-11 更新後已標註,JSON stringified input arguments 從 Chrome 155 起 deprecated。這篇以目前的新寫法為準。
📸 圖片 3|實際執行
get_page_info的回傳結果
if (!document.modelContext) {
  throw new Error('WebMCP is not available.');
}

await document.modelContext.registerTool({
  name: 'get_page_info',
  description: 'Get basic information about the current page.',
  inputSchema: {
    type: 'object',
    properties: {}
  },
  annotations: {
    readOnlyHint: true
  },
  execute: async () => {
    return JSON.stringify({
      title: document.title,
      url: location.href,
      language: document.documentElement.lang || null
    });
  }
});

const tools = await document.modelContext.getTools();
const tool = tools.find(t => t.name === 'get_page_info');

if (!tool) {
  throw new Error('get_page_info was not registered.');
}

const result = await document.modelContext.executeTool(
  tool,
  {}
);

console.log(JSON.parse(result));
假設網頁本來有:
async function getPageInfo() {
  return {
    title: document.title,
    url: location.href,
    language: document.documentElement.lang || null
  };
}
那 UI 和 WebMCP 都應該使用它:
button.addEventListener('click', async () => {
  render(await getPageInfo());
});

await document.modelContext.registerTool({
  // ...
  execute: async () => JSON.stringify(await getPageInfo())
});
WebMCP 是新的 Interface,不是新的 Business Logic。
這個原則在 WordPress/Laravel 這類後端框架整合時尤其重要:JavaScript Tool 負責把能力提供給 Agent,真正資料處理還是可以走既有 PHP API。
同一名稱重複註冊會失敗。Component 重複 mount 時尤其要注意,因此 Tool 生命週期必須和 Component 生命週期對齊。
❌ Click current page button
✅ Get basic information about the current page
Agent 需要的是「目的」,不是 UI 實作細節。
第一個 Tool 就回:
return document.body.innerHTML;
通常不是好主意。輸出應盡可能只包含 Agent 完成任務需要的資訊。
registerTool() 是網站提供能力的核心入口。name、description、inputSchema、execute 想清楚。getTools() 和 executeTool() 很適合本機除錯。readOnlyHint。


 iThome鐵人賽
 看影片追技術