

PwaUpdateBanner 僅在部署新版本時才會顯示。因此,我們不需要急先載入它;我們可以將它的載入延遲到根元件中的 updateAvailable signal 變為 true 為止。
@defer (when updateAvailable()) {
  <app-pwa-update-banner />
}
@Component({
  selector: 'app-root',
  imports: [PwaUpdateBanner, HeaderComponent, FooterComponent, RouterOutlet],
  templateUrl: './app.html',
  styleUrl: './app.css',
})
export class App {
  readonly #pwaService = inject(PwaUpdateService);
  readonly updateAvailable = this.#pwaService.updateAvailable;
}
我們注入 PwaUpdateService 來監聽 updateAvailable signal。一旦此 signal 變為 true,瀏覽器便會載入 PwaUpdateBanner 元件。
AnalyzerPanelComponent 由用於選取相片的 PhotoPanel,以及在圖片分析完成後顯示的 AltTextPanel 所組成。因此,我們可以將 AltTextPanel 的載入延遲到 analysis signal 包含資料、發生錯誤或載入狀態變為作用中為止。
<div class="panel-grid">
  <app-photo-panel [(analysis)]="analysis" [(error)]="error" [isLoading]="isLoading()" (emitFile)="handleGenerateClick($event)" />

  @defer (when isLoading() || error() || analysis()) {
    <!-- Right Side: Results -->
    <app-alt-text-panel [analysis]="analysis()" [error]="error()" [isLoading]="isLoading()" />
  } @placeholder {
    <div class="panel-container">
      <div class="empty-state">
        <p>Upload an image and click "Generate" to see the results.</p>
      </div>
    </div>
  }
</div>
使用 @defer (when isLoading() || error() || analysis()) 可確保 AltTextPanel 僅在這三個條件中至少滿足一個時才會載入。當運算式評估為 false 時,@placeholder 區塊會顯示靜態訊息:'Upload an image and click "Generate" to see the results.'。因此,RecommendationsDisplayComponent 與其他元件也都會被延遲載入。
由於 PhotoPanel 本身並未被延遲載入,很容易讓人就此打住,而完全忽略了範本內部等待被延遲載入的巢狀子元件。
PhotoPanel 由 PhotoPickerComponent、TagsDisplayComponent 以及 ObscureFactComponent 組成,但並非所有元件都必須急先載入。
例如,TagsDisplayComponent 只有在實際存在標籤時才需要渲染。在此之前,可以使用輕量級的佔位區塊簡單告知使用者尚未產生任何標籤。
@let tags = parsed?.tags || [];
@let hasTags = tags.length > 0;
@defer (when hasTags) {
    <app-tags-display [tags]="tags" />
} @placeholder {
    <div class="tags-wrapper">
        <h2 class="tags-title">Suggested Tags</h2>
        <p class="no-tags-message">No tags were generated for this image.</p>
    </div>
}
同樣地,ObscureFactComponent 只有在 Firebase AI Logic 回傳冷知識時才應該載入;否則,會以靜態佔位區塊提示使用者上傳圖片以探索冷知識。
@let fact = parsed?.fact;
@defer (when fact) {
    <app-obscure-fact [interestingFact]="fact" />
} @placeholder {
    <div class="obscure-fact-placeholder">
        <h3 class="obscure-fact-title">A surprising or obscure fact about the tags</h3>
        <p class="obscure-fact-empty">Upload an image to discover an obscure fact and generate speech.</p>
    </div>
}
由於該應用程式沒有獨立的宣傳著陸頁,我們在根路由('/')上急先載入 DashboardComponent。這透過消除了擷取延遲載入 dashboard 分塊所需的額外網路往返時間,大幅改善了 Lighthouse 稽核中的 First Contentful Paint (FCP) 與 Largest Contentful Paint (LCP)。
export const routes: Routes = [
  {
    path: 'dashboard',
    component: DashboardComponent,
  },
  {
    path: '',
    pathMatch: 'full',
    redirectTo: 'dashboard',
  },
  {
    path: '**',
    redirectTo: 'dashboard',
  },
];
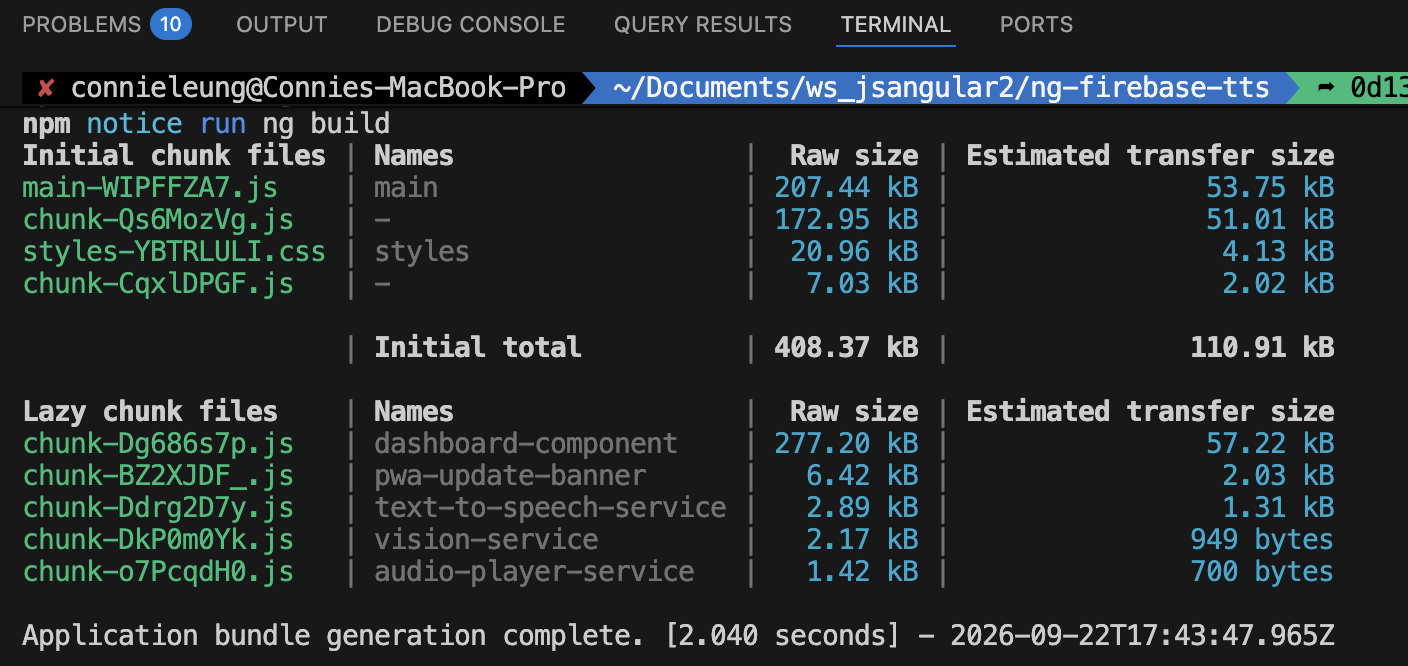
在實作可延遲檢視之前,初始的主要打包檔案大小超過 207 kB。
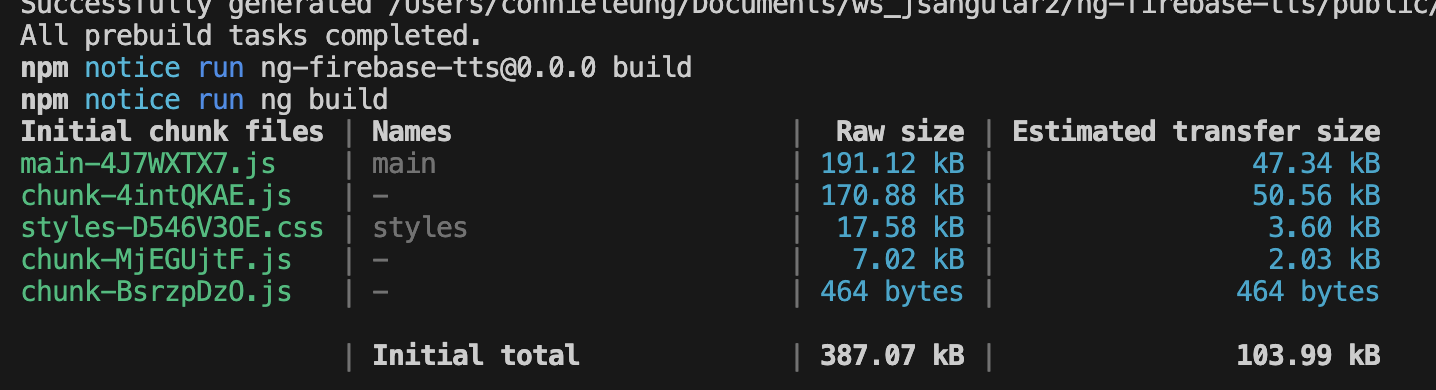
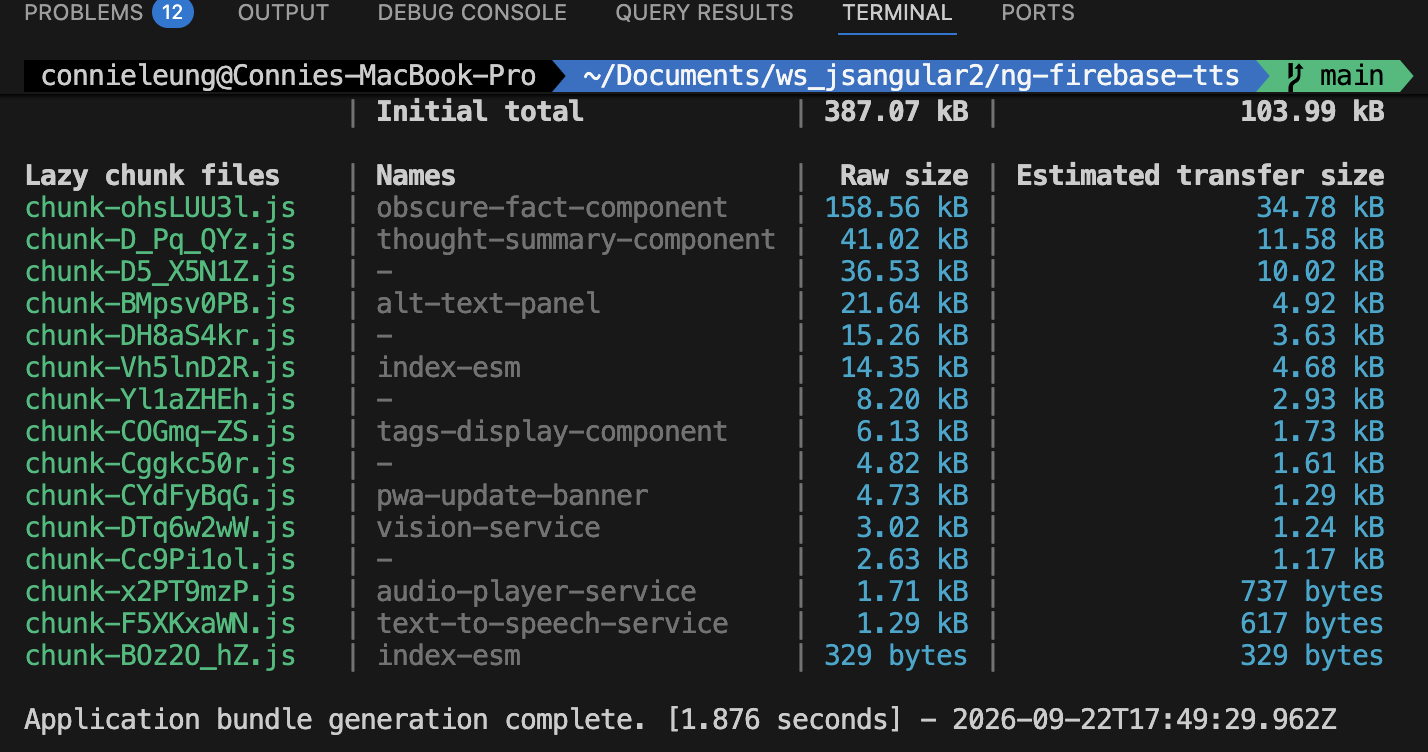
經過效能最佳化後,主要打包檔案降至 191 kB,且各個元件被清楚地拆分為獨立的延遲載入分塊。
因此,在初始頁面載入期間減少了約 50 kB 的傳輸量。這讓應用程式更具高效能。瀏覽器僅在真正需要時才請求元件分塊。此外,當某個元件更新時,只會載入該元件,而不會強迫使用者重新下載整個應用程式的打包檔案。
今天就先到這裡。明天我們將使用 Chrome DevTools MCP 與 Chrome Lighthouse 取得應用程式的效能、SEO、無障礙性以及代理人瀏覽分數。接著,我們將重構程式碼,在桌面版檢視中將分數推向 100 分。
使用 @defer 進行延遲載入
Angular 可延遲檢視教學


 iThome鐵人賽
 看影片追技術