前面介紹完每一塊拼圖的概念之後,上一篇文章開始進入實戰演練。
實戰練習的範例,是透過一個網路銀行的範例專案,挑選了登入功能這個user story,在上一篇文章中我們完成了下面幾個部分:
接下來這篇文章,則是要用最快速的方式,通過目前兩個還處於紅燈的scenario。
上一篇文章:[Day 27]TDD實戰練習-1
本系列文章專區
@目前的進度
目前feature上的scenario如下:
Scenario: 當提款卡Id為1234時,輸入密碼為91時,驗證成功,導到index
Given 在登入頁面
And 提款卡Id輸入"1234"
And 密碼輸入"91"
When 按下確認按鈕
Then 頁面url為"index.aspx"
Scenario: 當提款卡Id為1234時,輸入密碼為1234時,驗證失敗,出現密碼錯誤
Given 在登入頁面
And 提款卡Id輸入"1234"
And 密碼輸入"1234"
When 按下確認按鈕
Then 呈現訊息為"密碼輸入錯誤"
目前的測試程式如下:
using System;
using System.Text;
using Microsoft.VisualStudio.TestTools.UnitTesting;
using OpenQA.Selenium;
using OpenQA.Selenium.Firefox;
using TechTalk.SpecFlow;
namespace TestWebBank
{
[Binding]
public class 登入功能Steps
{
#region Test Setting
    private static IWebDriver driver;
    private static StringBuilder verificationErrors;
    private static string baseURL;

    [BeforeFeature("WebBank")]
    public static void BeforeFeatureWebAtm()
    {
        driver = new FirefoxDriver();
        //請自行修改為網站的domain name與port
        baseURL = "http://localhost:10542";
        verificationErrors = new StringBuilder();
    }

    [AfterFeature("WebBank")]
    public static void AfterFeatureWebAtm()
    {
        try
        {
            driver.Quit();
        }
        catch (Exception)
        {
            // Ignore errors if unable to close the browser
        }
        Assert.AreEqual("", verificationErrors.ToString());
    }

    #endregion Test Setting

    [Given(@"在登入頁面")]
    public void Given在登入頁面()
    {
        driver.Navigate().GoToUrl(baseURL + "/WebBankSite/Login.aspx");
    }

    [Given(@"提款卡Id輸入""(.*)""")]
    public void Given提款卡Id輸入(string cardId)
    {
        driver.FindElement(By.Id("txtCardId")).Clear();
        driver.FindElement(By.Id("txtCardId")).SendKeys(cardId);
    }

    [Given(@"密碼輸入""(.*)""")]
    public void Given密碼輸入(string password)
    {
        driver.FindElement(By.Id("txtPassword")).Clear();
        driver.FindElement(By.Id("txtPassword")).SendKeys(password);
    }

    [When(@"按下確認按鈕")]
    public void When按下確認按鈕()
    {
        driver.FindElement(By.Id("btnLogin")).Click();
    }

    [Then(@"頁面url為""(.*)""")]
    public void Then頁面Url為(string url)
    {
        var expected = string.Format("{0}/WebBankSite/{1}", baseURL, url);
        Assert.AreEqual(expected, driver.Url);
    }

    [Then(@"呈現訊息為""(.*)""")]
    public void Then呈現訊息為(string message)
    {
        Assert.AreEqual(message, driver.FindElement(By.Id("Message")).Text);
    }
}
}
目前的production code如下:
public partial class Login : System.Web.UI.Page
{
protected void Page_Load(object sender, EventArgs e)
{
}
protected void btnLogin_Click(object sender, EventArgs e)
{
    //密碼驗證錯誤
    //this.Message.Text = @"密碼輸入錯誤";

    //密碼驗證成功
    //Response.Redirect("index.aspx");
}
}
@TDD的原則:剛剛好的程式碼
TDD的一個原則就是,當出現紅燈的時候,接下來撰寫production code,期望只寫出「剛好滿足」測試程式的production code,一行不多、一行不少。
這個原則在一開始接觸時,開發人員可能會很不習慣,尤其是幾乎每一本或每一篇從頭介紹TDD的書籍文章,都會先建議讀者先用最快、最笨的方式來實作出通過測試的code。
這看起來似乎很不make sense,但這會有個很特別的效果,就是又往目標前進一步的效果。也能收到在TDD循環中,擁有節奏的感覺。
不過,當需求明確且開發人員已經可以知道幾步以後的重構模樣,那建議就不必每次都從最一開始的hard-code開始,因為每一份重構的工,還是得花掉一些些時間。
這篇文章,仍舊先從最一開始hard-code來解說,以方便完全沒有相關經驗的讀者可以循序漸進。
@依據scenario,迅速通過測試
首先,針對login success的scenario,我們來撰寫production code,使其迅速通過測試。
production code程式碼如下:
    protected void btnLogin_Click(object sender, EventArgs e)
    {
        //密碼驗證錯誤
        //this.Message.Text = @"密碼輸入錯誤";

        //Scenario: 當提款卡Id為1234時,輸入密碼為91時,驗證成功,導到index
        //Given 在登入頁面
        //And 提款卡Id輸入"1234"
        //And 密碼輸入"91"
        //When 按下確認按鈕
        //Then 頁面url為"index.aspx"

        //密碼驗證成功
        var id = this.txtCardId.Text.Trim();
        var password = this.txtPassword.Text;

        if (id == "1234" && password == "91")
        {
            Response.Redirect("index.aspx");
        }
    }
一個hard-code的判斷式,讓我們通過了login success的scenario。
(但login failed的scenario仍舊是測試失敗)
如下圖所示:

接下來我們用同一個方式,想辦法先通過login failed的scenario。
程式碼如下:
    protected void btnLogin_Click(object sender, EventArgs e)
    {
        var id = this.txtCardId.Text.Trim();
        var password = this.txtPassword.Text;

        if (id == "1234" && password == "91")
        {
            //密碼驗證成功
            Response.Redirect("index.aspx");
        }

        //Scenario: 當提款卡Id為1234時,輸入密碼為1234時,驗證失敗,出現密碼錯誤
        //Given 在登入頁面
        //And 提款卡Id輸入"1234"
        //And 密碼輸入"1234"
        //When 按下確認按鈕
        //Then 呈現訊息為"密碼輸入錯誤"
        if (id == "1234" && password == "1234")
        {
            //密碼驗證錯誤
            this.Message.Text = @"密碼輸入錯誤";
        }
    }
ok,按照Scenario的描述,寫完剛好通過測試的程式碼,執行一下測試,可以看到,兩個scenario都通過了。如下圖所示:

很好,我們已經進入TDD的第二個階段:綠燈!
這時候,如果scenario已經能夠100%代表整個user story的話,就代表可以deploy了。(當然啦,在這個範例中,這樣的scenario根本不可能是100%)
anyway, 綠燈之後,接下來我們就要進行重構。
@重構
有了測試的保護,我們在進行重構的過程中,仍須確保原本的綠燈不會因為重構的動作,而導致變成紅燈。這也是重構的起手式,務必先建立自動測試保護。讀者想了解細節的話,可以參考前面的文章:[Day 10]Refactoring 起手式 - 建立測試
@垃圾分類
目前的程式碼已經有相關的註解了,我們可以先來進行垃圾分類。將login success的處理與login failed的處理,用extract method的方式,擷取成function。
程式碼如下:
    protected void btnLogin_Click(object sender, EventArgs e)
    {
        var id = this.txtCardId.Text.Trim();
        var password = this.txtPassword.Text;

        if (id == "1234" && password == "91")
        {
            LoginSuccess();
        }

        if (id == "1234" && password == "1234")
        {
            LoginFailed();
        }
    }

    /// <summary>
    /// 密碼驗證錯誤
    /// </summary>
    private void LoginFailed()
    {
        this.Message.Text = @"密碼輸入錯誤";
    }

    /// <summary>
    /// 密碼驗證成功
    /// </summary>
    private void LoginSuccess()
    {
        Response.Redirect("index.aspx");
    }
執行測試,仍是綠燈,通過測試。
@職責分離
Authentication這一件事,不應該交由頁面來決定,而是該由特定的Authentication class來處理。
(註:這邊建議至少按照3-layer的方式,將相關的BLL, DAL抽離PL,因此Authentication class會放到新建的library中)
所以定義出負責Authentication的class之後,程式碼如下:
    protected void btnLogin_Click(object sender, EventArgs e)
    {
        var id = this.txtCardId.Text.Trim();
        var password = this.txtPassword.Text;

        var authentication = new Authentication();
        bool isValid = authentication.Verify(id, password);

        if (isValid)
        {
            LoginSuccess();
        }
        else
        {
            LoginFailed();
        }

        //if (id == "1234" && password == "91")
        //{
        //    LoginSuccess();
        //}

        //if (id == "1234" && password == "1234")
        //{
        //    LoginFailed();
        //}
    }

    /// <summary>
    /// 密碼驗證錯誤
    /// </summary>
    private void LoginFailed()
    {
        this.Message.Text = @"密碼輸入錯誤";
    }

    /// <summary>
    /// 密碼驗證成功
    /// </summary>
    private void LoginSuccess()
    {
        Response.Redirect("index.aspx");
    }
我們一樣透過Visual Studio的產生功能,來幫我們產生對應的class與function。
這時候執行測試,我們會得到測試失敗的結果,原因是NotImplementedException的exception。

@建立單元測試
我們有了library, Authentication的class,Verify的方法。也知道了期望的結果,接下來在寫Verify方法的內容之前,我們用一樣的方式先來建立測試案例與測試程式。
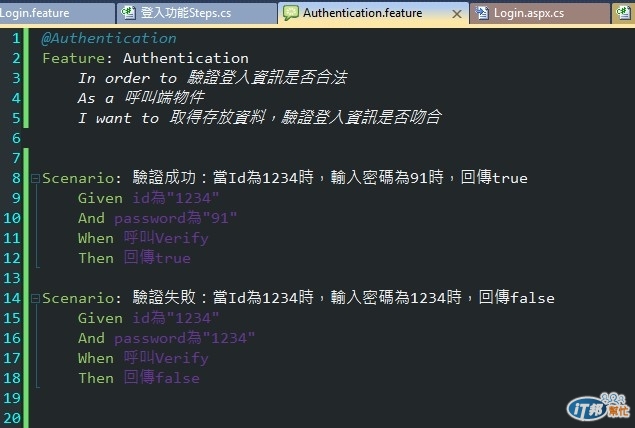
我們建立一個Authentication的feature,其Scenario如下圖所示:
有了Scenario,接下來完成我們的測試程式。
@Authentication的測試程式
測試程式就依照Scenario的template來撰寫。想了解細節的讀者,可以參考前面的文章:
程式碼如下:
    [Binding]
    public class AuthenticationSteps
    {
        private static Authentication target;

        [BeforeScenario("Authentication")]
        public static void BeforeFeatureAuthentication()
        {
            target = new Authentication();
            ScenarioContext.Current.Clear();
        }

        [AfterScenario("Authentication")]
        public static void AfterFeatureAuthentication()
        {
            ScenarioContext.Current.Clear();
        }

        [Given(@"id為""(.*)""")]
        public void GivenId為(string id)
        {
            ScenarioContext.Current.Add("id", id);
        }

        [Given(@"password為""(.*)""")]
        public void GivenPassword為(string password)
        {
            ScenarioContext.Current.Add("password", password);
        }

        [When(@"呼叫Verify")]
        public void When呼叫Verify()
        {
            var id = ScenarioContext.Current["id"].ToString();
            var password = ScenarioContext.Current["password"].ToString();

            var result = target.Verify(id, password);
            ScenarioContext.Current.Add("result", result);
        }

        [Then(@"回傳""(.*)""")]
        public void Then回傳(string result)
        {
            var isValid = Convert.ToBoolean(result);
            var actual = Convert.ToBoolean(ScenarioContext.Current["result"]);
            Assert.AreEqual(isValid, actual);
        }
    }
這時候一樣執行測試會失敗,因為production code還沒開始實作。
@撰寫Authentication,以通過相關測試案例
接下來,只要把原本放在頁面上的程式,轉移到Authentication的Verify方法中即可。
這個手法,可以參考前面文章:[Day 15]Refactoring - 食神歸位
程式碼如下:
    public class Authentication
    {
        public bool Verify(string id, string password)
        {
            if (id == "1234" && password == "91")
            {
                //LoginSuccess();
                return true;
            }

            if (id == "1234" && password == "1234")
            {
                //LoginFailed();
                return false;
            }

            return false;
        }
    }
執行一下測試,可以看到四個測試案例都通過了。如下圖所示:

@小結
ok,整個步驟到這邊,我們已經從acceptance testing (透過Selenium.WebDriver),往下drill down到integration testing了,也就是Authentication物件的測試。
整體的程式碼,演變過程如下:
0. 沒有任何實作內容。
現在我們已經有Login頁面的驗收測試案例,也有了Authentication物件的測試案例,並且擁有剛好可以通過Login Feature與Authentication Feature的production code。
下一篇文章,則要針對物件層級的integration testing與unit testing,以及運用OOD/OOP的基本原則,來讓整個設計更臻完善,都完成後,就能開始挑選下一個user story。

來不及偷學呀....

泰大~你實在謙虛過頭啦
因為我最近在搞黑莓機的C++開發,離WIN/JAVA是愈來愈遠了呀...
果然是前輩~~~~