前面的章節都在介紹繪製形狀,而我都是使用單純的線條來描繪形狀的邊框,因此這篇就來聊聊 stroke ( 邊框 ) 的設定。( oxxostudio.tw 同步發表:SVG 研究之路 (6) - stroke 邊框

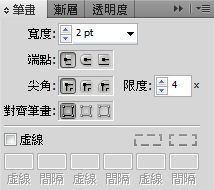
其實在 SVG 裏頭邊框的設定很簡單,如果手邊有 Illustrator 的,邊框的設定就像裏頭筆畫的線條設定一樣,只是一個由視覺化的面板控制,一個由程式碼撰寫,有興趣的話,可以直接繪製線段存成 SVG,就可以很清楚了解邊框的設定。
stroke 主要有五個設定:
**1. stroke:**邊框的顏色
**2. stroke-width:**邊框的寬度
**3. stroke-linecap:**邊框端點的屬性
3.1 butt ( 預設 )
3.2 square
3.3 round
**4. stroke-linejoin:**邊框接合尖角的屬性
4.1 miter ( 預設 )
4.2 round
4.3 bevel
**5. stroke-dasharray:**虛線

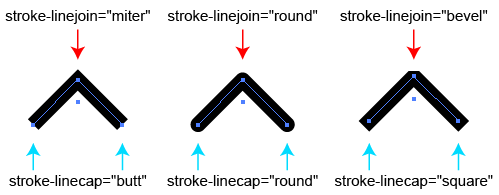
上述的這些設定,我們都可以在 Illustrator 的屬性面板中看到,至於邊框的顏色和寬度就不提了 ( 應該沒有人看不懂中文吧 ),storke 最重要的只有剩下的三個屬性,首先我們看到stroke-linecap和stroke-linejoin,分別代表了兩個端點的屬性,以及兩條線段尖角接合處的屬性 ( 如果不是尖角,則必定是使用貝茲曲線劃出的曲線 ),下圖可以非常清楚的看出各個屬性所代表的意義,裏頭只有一個要注意的,round是有半徑的圓弧形,直徑就是我們所設定的寬度。

<polyline fill="none" stroke="#000000" stroke-width="10" points="83.678,119.133 113.376,89.434 143.075,119.133 "/>
<polyline fill="none" stroke="#000000" stroke-width="10" stroke-linecap="round" stroke-linejoin="round" points="193.546,119.133
    223.245,89.434 252.943,119.133 "/>
<polyline fill="none" stroke="#000000" stroke-width="10" stroke-linecap="square" stroke-linejoin="bevel" points="
    307.677,116.758 337.376,87.059 367.076,116.758 "/>
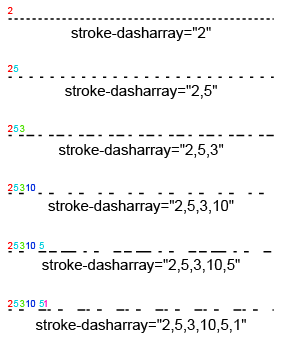
最後一個屬性是 stroke-dasharray,裏頭的值是一個陣列,代表線段長度與虛線間隔長度的交錯數字,通常是兩個數字一組 ( 長度和間隔 ),如果是奇數,則最後數字接續的間隔,長度會以第一個數字為預設值,下方的圖片可以看出不同設定所造成的差異:

<line fill="none" stroke="#000000" stroke-dasharray="2" x1="0" y1="0" x2="100" y2="0"/>
<line fill="none" stroke="#000000" stroke-dasharray="2,5" x1="0" y1="10" x2="100" y2="10"/>
<line fill="none" stroke="#000000" stroke-dasharray="2,5,3" x1="0" y1="20" x2="100" y2="20"/>
<line fill="none" stroke="#000000" stroke-dasharray="2,5,3,10" x1="0" y1="30" x2="100" y2="30"/>
<line fill="none" stroke="#000000" stroke-dasharray="2,5,3,10,5" x1="0" y1="40" x2="100" y2="40"/>
<line fill="none" stroke="#000000" stroke-dasharray="2,5,3,10,5,1" x1="0" y1="50" x2="100" y2="50"/>
以上就是 stroke 的基本介紹,其實跟 illustrator 的屬性設定幾乎一模一樣,應該很容易理解囉!
