到目前為止,已經介紹了不少 webGL 的 API 以及 GLSL 的使用與撰寫。是時候來寫寫看有趣的特效了,其實在網路上隨便搜尋關鍵字都能看到不少絢爛奪目的 webGL 特效,不過現在你也有能力看看別人的 shader 是如何撰寫,並且自己做出特效來了。
今天要示範的效果是 distortion。
有興趣的讀者們可以到 codepen 觀看效果,或是直接觀看程式碼
不知道大家有沒有看過沙漠過熱、或是溫度太高而引起的現象。光因為氣溫太高造成折射,所以我們看到的畫面會有一點扭曲的感覺。
這邊我們的想法是,將紋理座標傳入後,對座標做扭曲處理,再透過 texture2D 跟 sampler 結合,計算出 fragment 的顏色。
聽起來還蠻簡單的吧!那我們馬上開始吧
首先,為了將紋理座標順利傳入,我們需要透過 varying 來傳遞。這邊簡單撰寫頂點著色器如下:
attribute vec2 a_textureCoords;
attribute vec4 a_position;

varying vec2 v_textureCoords;

attribute float a_pointSize;

void main() {
	gl_Position = a_position;
	gl_PointSize = 10.0;

	v_textureCoords = a_textureCoords;
}
最主要的處理函式在 fragment shader 當中,我們扭曲的方式是套用 sin 函數,當然如果大家有更逼真的扭曲方式,也歡迎自己動手試試看!
同樣的效果,我們可以使用在沙漠、火焰特效、飛機引擎等等,只要對應好位置,就可以做出不錯看的效果唷!
當然,用 canvas 2D 也能做到類似的效果,不過相對地處理起來會比較麻煩一些。因為你必須要對圖片中的每個像素做運算,這不是個輕鬆的工作。
float distortion(float point,float freq, float speed) {
  return sin(point * freq + ((3.1415/2.0) * u_time * speed));
}
point 代表傳入的點位置,第二和第三個參數分別代表頻率與速度。我們這邊很簡單地回傳用 sin 處理過後的數值。因為我們要實現動畫效果,所以可以看到 u_time 這個變數,我們待會會讓 Javascript 傳值進來。
完成了!我們簡單地對頂點座標做處理,並且加入 sin 函數做扭曲,大致完成一半了,接下來只要撰寫 main function 以及 Javascript 的部分,我們的程式應該就能順利操作了。
void main() {
	vec2 distortions = distortions(v_textureCoords);
	gl_FragColor = texture2D(u_sampler, vec2(distortions.x, distortions.y));
}
很簡潔吧!我們把處理過後的紋理座標和 sampler 結合在一起,並且傳值給 gl_FragColor。
完整的 fragment shader 會長這樣:
precision mediump float;

varying vec2 v_textureCoords;

uniform float u_time;
uniform sampler2D u_sampler;
uniform vec2 u_resolution;


vec2 pixel() {
  return 1.0 / u_resolution;
}

// make position distortion by sin func.
float distortion(float point,float freq, float speed) {
  return sin(point * freq + ((3.1415/2.0) * u_time * speed));
}

vec2 distortions(vec2 pos) {
	vec2 intensity = vec2(1.0,1.0) * pixel();

  vec2 waves = vec2(
    distortion(pos.y,100.0,0.35),
    distortion(pos.x,100.0,0.4)
  );

  return pos + (waves * intensity * 1.0);
}

void main() {
	vec2 distortions = distortions(v_textureCoords);

	gl_FragColor = texture2D(u_sampler, vec2(distortions.x, distortions.y));
}
回到 Javascript 的部分,為了加速說明,我會省略連接 program 與 shader 的程式碼,詳細可以到文末的範例程式碼看看。
const time = gl.getUniformLocation(program, 'u_time');
const resolution    = gl.getUniformLocation(program, 'u_resolution');
gl.uniform2f(resolution, canvas.width, canvas.height);
const textureCoords = gl.getAttribLocation(program, 'a_textureCoords');
const position      = gl.getAttribLocation(program, 'a_position');
const pointSize     = gl.getAttribLocation(program, 'a_pointSize');

const textures = [
	  0, 0,
	  1, 0,
	  0, 1,
	  1, 1,
	];

const vertices = [
  -0.8, -0.8,
  0.8, -0.8,
  -0.8, 0.8,
  0.8, 0.8,
];
當然妳可以依據自己的需求來對應不同的紋理座標以及頂點座標,也可以將 buffer 結合在一起方便取用。最後將紋理綁定後即可。
完成圖會長這樣: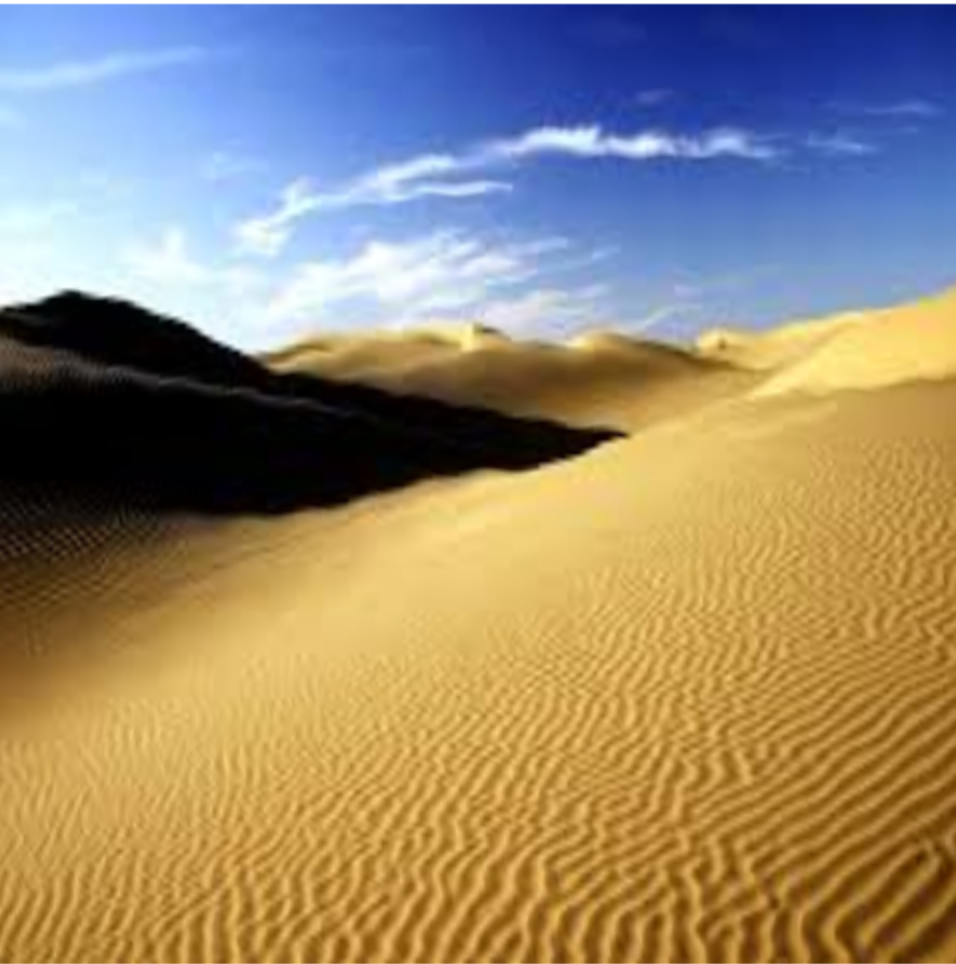
這裡示範了 webGL 的簡單特效,妳可以到 shader toy 尋找關於更多有趣的著色器,看著他學習,試著自己打造一個吧!
好了,webGL 的介紹總算告了一段落,明天開始我們就要介紹 three.js 了。不過在這之前,先讓我們來了解一下基本知識吧!
未來 3 天,我會介紹光源、投影的概念、再開始我們的 three.js 之旅。