今天要來試試看 Variational Autoencoder,因為理論上的部分還沒有辦法參透,因此直接從 Github 上找實作來試試看,並用 MNIST 的資料來練習重現.
在 encoder 一開始的地方和 Autoencoder 一樣,循序的降維.這裡定義了維度從 784 維到 500 維到 200 維再到 2 維.
n_z = 2
batch_size = 50
X = tf.placeholder(tf.float32, shape = [None, 784])

W_e_1 = weights([784, 500], "w_encoder_1")
b_e_1 = bias([500], "b_encoder_1")
h_e_1 = tf.nn.relu(tf.add(tf.matmul(X, W_e_1),b_e_1))

W_e_2 = weights([500, 200], "w_encoder_2")
W.append(W_e_2)
b_e_2 = bias([200], "b_encoder_2")
h_e_2 = tf.nn.relu(tf.add(tf.matmul(h_e_1, W_e_2),b_e_2))
接下來就是有趣的地方了,再進入 2 維前它把前面經過低維權重輸出的向量複製兩份,來建立 Gaussian,而且一份做成 mean 一份做成 stddev ...
再來把它轉成二維的 code layer
W_latent = weights([500, n_z], "w_latent")
W.append(W_latent)
b_latent = bias([n_z], "b_latent")

z_mean = tf.add(tf.matmul(h_e_1, W_latent), b_latent)
z_log_sigma = tf.add(tf.matmul(h_e_1, W_latent), b_latent)

eps = tf.random_normal((batch_size, n_z), 0, 1, dtype = tf.float32)
z = tf.add(z_mean, tf.mul(tf.sqrt(tf.exp(z_log_sigma)), eps))
最後要在 cost function 加上特殊的一項
tf.reduce_sum(1 + z_log_sigma - tf.square(z_mean) - tf.exp(z_log_sigma), 1)
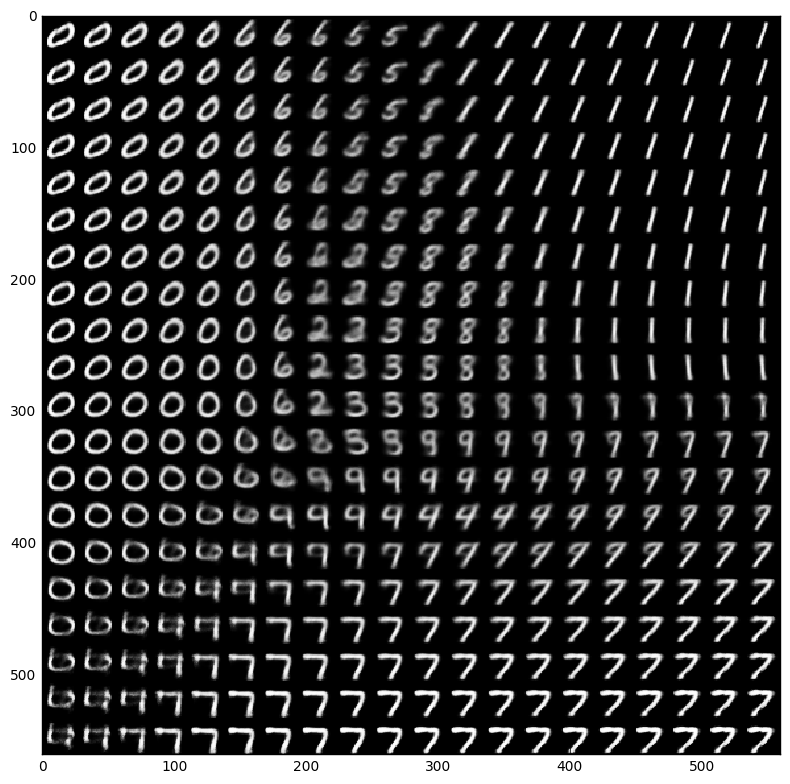
我們變動 code layer 的數值來看看對應的 decoder 輸出是什麼
有一種古老文明的感覺,現在它已經學會了數字之間的變化了!
實作了預期的結果,但是在數學部分還要再深入了解,然後最近拖了一大段的部分,這幾天要來趕快補救一下
